- How to open system monitor easily?
- Best System Monitoring Tools for Ubuntu
- 1. htop
- 2. Glances
- 3. Stacer
- 4. BashTOP
- 5. GNOME System Monitor
- 6. vtop
- 7. nmon
- 8. atop
- 9. gotop
- Conclusion
- About the author
- Swapnil Tirthakar
- How To Use Ubuntu System Monitor
- Processes
- Run System Monitor
- Understand Processes View
- Understand Resources View
- Understand Filesystem View
- Show All Processes
- Sort Active Programs
- End an Active Program
- Relationship to Other Programs
How to open system monitor easily?
You can add a custom keyboard command using the following steps:
- Go to System Settings
- Click Keyboard
- Open the Shortcuts tab
- Click the «+» symbol near the bottom of the window
- Give your command a title. E.g. System Monitor
- In the Command field, enter gnome-system-monitor
- Click Apply
- Click Disabled on your newly created shortcut
- Enter the key combination you want for your shortcut. E.g. Ctrl + Alt + M
Note: on Ubuntu 14.10, Ctrl + Alt + Del is already in use, but can be overridden.
For those looking to mimic Windows, bind System Monitor to Ctrl + Shift + Esc , which is the shortcut to open Task Manager directly.
FTR: in Gnome 40.3 instead of a + there’s a list of shortcuts groups, and one of them says something like «additional shortcuts» (depending on localization), it serves as a placeholder for user shortcuts, so you can add a custom one in it.
Why open the terminal at all? You are opening an extra application, which you may not be able to close without closing the System Monitor, to open something that can be done with some keystrokes: Alt + F2 then type gnome-system-monitor. That’s the most hassle free.
You can create a Keyboard Shortcut to easily open System Monitor.
Type Keyboard in Unity Dash, this will open Keyboard Settings. Click on Shortcuts, select Custom Shortcuts, click on add button. This will open a window.
Type any Name System Monitor and Command gnome-system-monitor , apply.
Now click on disabled and choose any Keyboard shortcut like Alt + E . This will easily open System Monitor when you press Alt + E .
Best System Monitoring Tools for Ubuntu
![]()
It does not matter if you’re a system administrator or an average user, but keeping your computer infrastructure and network running smoothly is very important. Hence, you need a reliable system monitoring tool that will help you keep track of all the system activities like CPU performance, memory usage, network monitoring, and status of all the connected devices.
There are many choices available on the internet for system monitoring tools. Still, we have crafted a list of the best system monitoring tools for you by testing each tool in different circumstances. So, sit back and enjoy the ride to find the best system monitoring tool for Ubuntu that matches your requirements.
1. htop
htop is a cross-platform system monitor, process viewer, and process manager and a reliable alternative to top, which is also a system monitoring tool for Linux and its distros. It is specially designed and developed for consoles and terminals; hence, it supports text mode.
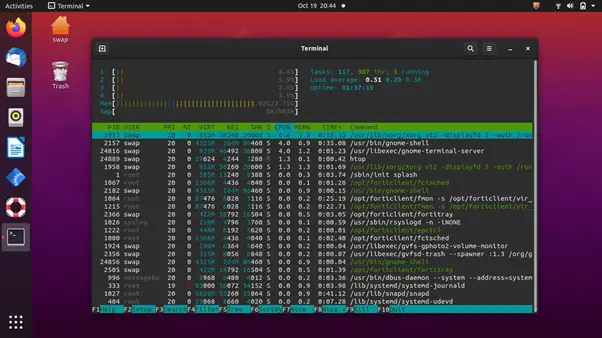
It is a feature-rich system monitoring tool that can be used on Linux, FreeBSD, OpenBSD, and macOS. Talking about the features, it offers information based on various parameters, such as tasks, load average, and uptime. You can change color preferences on its UI to match your requirements.
For Linux and its distros, it provides a delay account matrix and offers support for custom scripts and real-time signals. Since it is open-source and free, it makes it one of the best system monitoring tools for Linux systems.
2. Glances
Written in Python, Glances is another cross-platform system monitoring tool on our list. It uses a web-based interface to give you maximum system information in the minimum possible space. Depending on terminal size, it automatically adjusts itself and displays all the information in a single window.
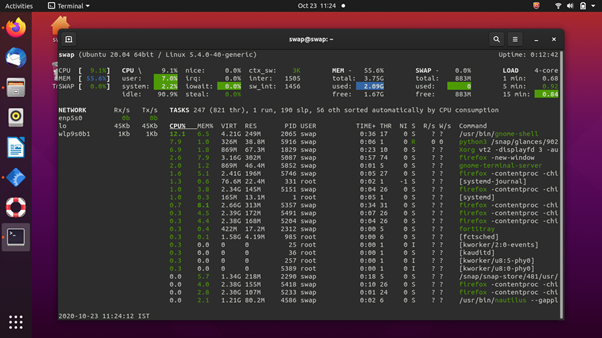
It can also be used in client/server mode, and remote system monitoring could be done through the web interface or terminal. You getting all the important information in one place is one of the positives of this tool.
The thing I like most about this system monitoring tool is that you can keep track using its web interface, which allows remote monitoring. Linux running on low-end or older computers might find it tough to run this tool smoothly as it demands higher CPU resources.
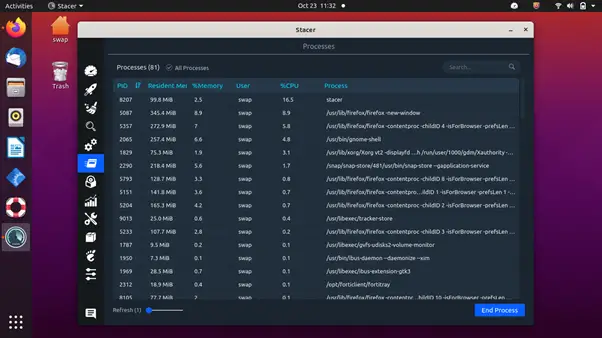
3. Stacer
Stacer is an open-source system monitor and optimization tool, which helps system administrators manage system resources and tasks under one roof. It is a modern tool with an excellent user interface that makes you feel at home even on first use.
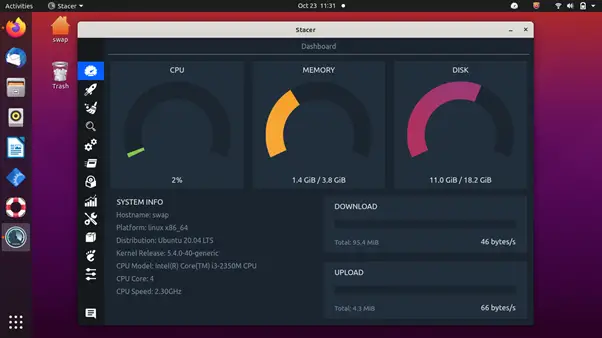
It has feature-rich tools that let you manage startup apps, clean unnecessary package caches, crash reports, application logs, application caches, and trash under the system cleaner tab, and start or stop services quickly. Sort processes based on process id (PID), CPU, and memory usage, find a particular process easily using its name in the search bar, and uninstall applications that are not required anymore.
The resource tab displays CPU, RAM, Disk, CPU load average, and network activity for the last 60 seconds. It also comes with an APT repository manager, which you can use to activate, disable or delete any repository. Ubuntu users can use this feature to edit the package repositories.
Sudo add-apt-repository ppa:oguzhaninan / stacer
sudo apt-get install stacer
4. BashTOP
BashTOP is another cool and reliable system monitoring tool for Linux and its distros, such as Ubuntu. It displays the usage stats for processors, memory, disks, network, and other resources.
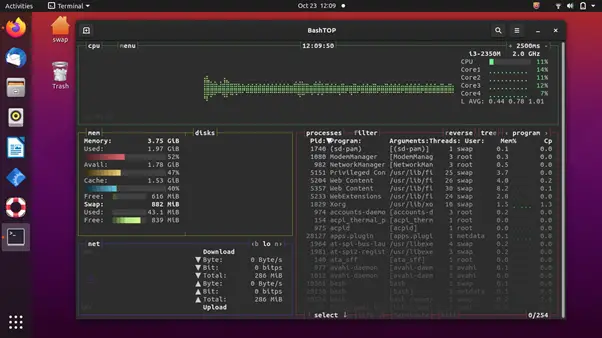
It is an excellent tool for desktop and computer users who are generally personal users. However, system administrators and server users won’t find this tool useful as their demands will be higher. Also, it is a little bit slower compared to other system monitoring tools, such as Htop.
It is an easy-to-use tool and sports a beautiful user interface with everything placed perfectly.
$ sudo add-apt-repository ppa:bashtop-monitor / bashtop
5. GNOME System Monitor
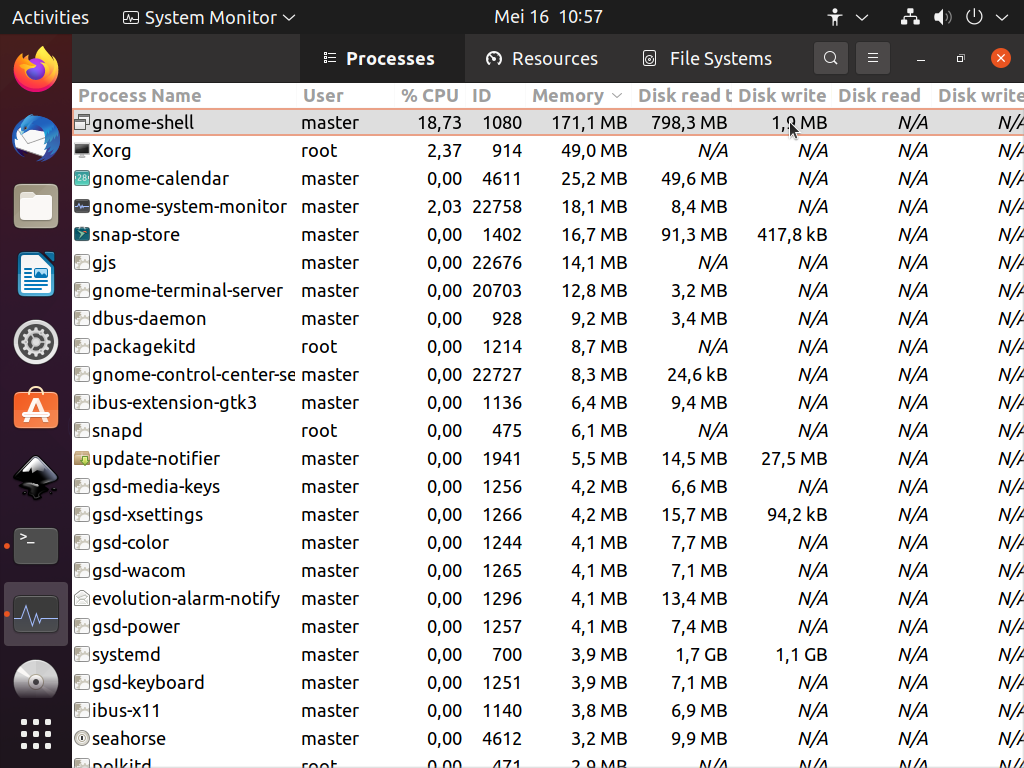
It is a simple system monitoring tool that comes pre-installed on various Linux distros running the GNOME desktop environment. This tool shows which programs are running, how much processor time, memory, and disk space are used.
As you can see in the screenshot, it has a clean and simple user interface. Every information and stats are placed perfectly in the user interface, which makes it easy to read and understand.
The CPU history tab shows how much processor capacity is used for each CPU, and the memory and history tabs show how much of your computer’s memory (RAM) is being used. Under the network tab, you see the download and upload speed of the network over the last 60 seconds.
6. vtop
vtop is a free and open-source system monitoring tool for Ubuntu and other Linux distros. Using vtop, not only can you monitor system resources, but also you can manage them.
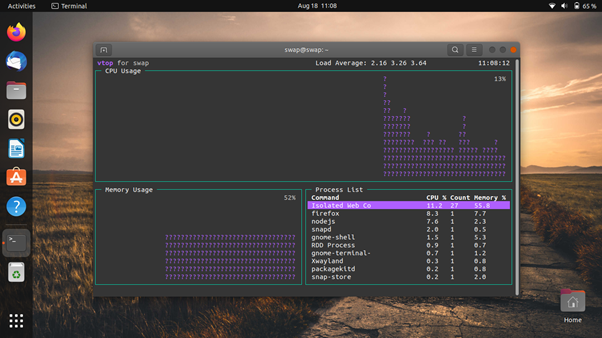
It is a command-line tool written in node.js. Hence, you must first install node.js and npm packages before installing vtop. Using this tool, you can easily monitor CPU usage and memory usage, something you can do in other command-line tools like top.
$ sudo apt-get install node.js
7. nmon
nmon is a simple-to-use system monitoring tool for Linux and its distros, such as Ubuntu. It gives you a quick overview of what’s going on with your server.
This monitoring tool displays the usage stats of CPU, memory, network, disks, file system, NFS, top processes, and resources. The best thing is you can select what the nmon displays, and what you have to do is simply press specific keys to toggle stats.
8. atop
atop is an advanced interactive system and process monitor that displays the load on the Linux system. It shows the stats of the most critical hardware resources, such as CPU, memory, disk, and network.
You can log resource utilization permanently if you want it for long-term analysis.
9. gotop
gotop is another command-line graphical system monitoring tool for Ubuntu and other Linux distros. Along with Linux, gotop is also available for macOS.
It is inspired by vtop and gtop. But unlike them, it does not use node.js. Instead, it is written in Go. You can monitor CPU usage, disk usage, CPU temperature, memory usage, network usage, and process table.
Conclusion
These are the best system monitoring tools you can use on your computers running Linux and its distros. Some other tools are available for Ubuntu, but the ones listed above are tested and presented to you.
About the author
Swapnil Tirthakar
A Software Engineer who loves football and passionate about traveling. I often spend my free time playing with gadgets and exploring new possibilities in tech world. I am Linux enthusiast and have about 6 years of experience in web development. I have good command on Python, Java, SQL and system security.
How To Use Ubuntu System Monitor
This is a simple guide to check your Ubuntu system resource use & running programs with the built-in program System Monitor. To formerly Windows users, this is your Task Manager on Ubuntu. You will learn to read information in it and do end a process with it.
Processes
A program that runs (is residing) in memory is called process. It makes use of computer resources which are CPU load and memory space. Multiple programs that run in memory are called processes. To view processes, computer user makes use of a special program called process viewer, also called Task Manager (Windows) and System Monitor (Ubuntu).
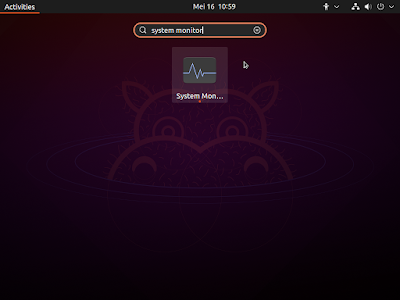
Run System Monitor
To run System Monitor, open the start menu and type system monitor and click the System Monitor you find. Alternatively, press Alt+F2 to display the runner and type gnome-system-monitor followed by Enter to run it.
Understand Processes View
The first view you will see in System Monitor is called Processes View. It is a table consisted of rows and columns of active programs in your computer.
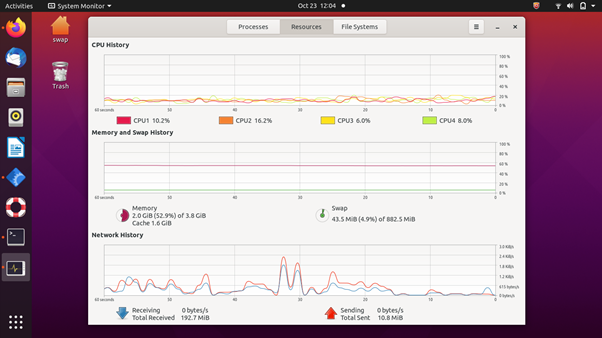
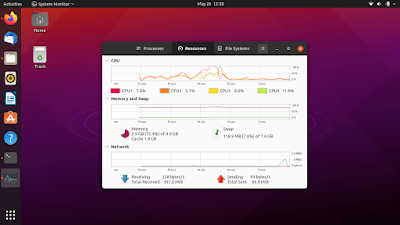
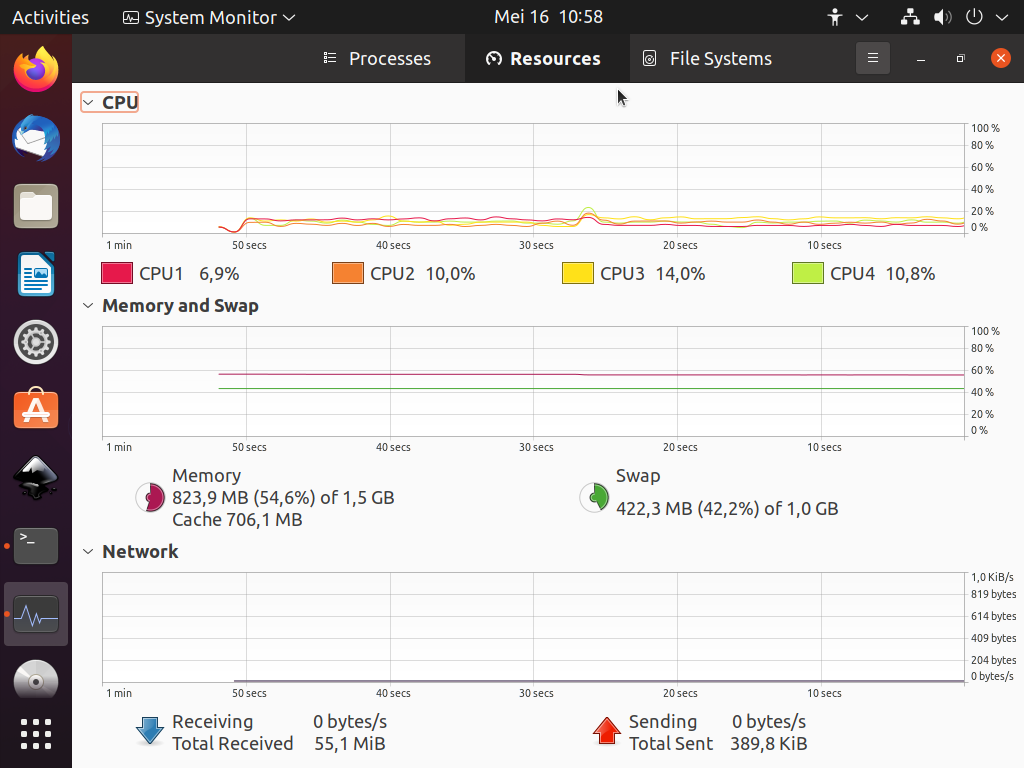
Understand Resources View
To view it, click Resources tab positioned at the middle of three buttons at the top. In this view, you see three sections of CPU — Memory — Network. CPU section displays moving graph(s) of processor loads from time to time along with the percentage(s). It will show individual cores of CPU you have as different colors. Memory section displays moving graphs and values in megabits (MiB) of memory use per capacity along with swap use per capacity. Network
Understand Filesystem View
To view it, click the File Systems tab beside Processes and Resources. This view tells hard disk drive available in the computer as well as its disk partitions, filesystem types, total capacity of each one, and how much each one is used in megabyte or gigabyte with percentage bar for each one. For example, picture below tells that in the computer there is one hard disk (sda) with two partitions (sda1 and sda3) formatted in FAT32 and EXT4 filesystems, where the Ubuntu root partition is sda3 ( / ) by capacity of 20GB with 10.6GB free.

Show All Processes
All processes are hidden by default and only your own (user’s) processes shown. To show All Processes, select All Processes under the triple lines button. Alternatively, select Active Processes instead to exclude inactive processes or select My Processes to exclude processes ran by users other than you.

Sort Active Programs
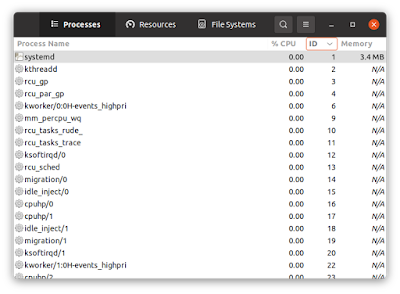
Sorting by PID (process identifier) will sort processes by how new individual programs are started against the others. To sort this way, click the «ID» column at the top of table. In Ubuntu and almost all other modern GNU/Linuxes, the number 1 process is called systemd. Newer process will have bigger number. Newest process would have biggest number.
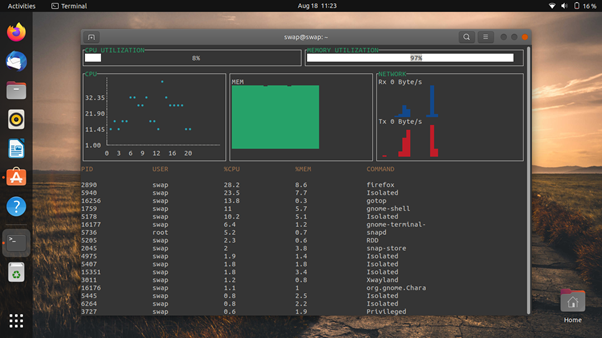
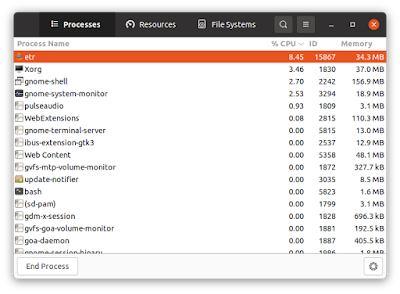
Sorting by %CPU will sort processes by how much load individual programs are having against the processor. To do so, click the «Memory» column. With this view, user can tell which programs burden the CPU the most. Picture below shows an example that three top processes by %CPU namely a game (Extreme Tux Racing, hence etr), a display controller program (Xorg), and a user interface (gnome-shell) put loads to computer CPU the most by 8.45%, 3.46%, and 2.7% respectively.
Sorting by Memory will sort processes by how much space individual programs are occupying in the memory. The space is represented in megabyte or MB unit. Picture below shows an example of three most memory occupying processes namely the web browser (firefox), the user interface (gnome-shell), and a child process of the web browser (Web Content) by 396MB, 158MB, and 130MB respectively.

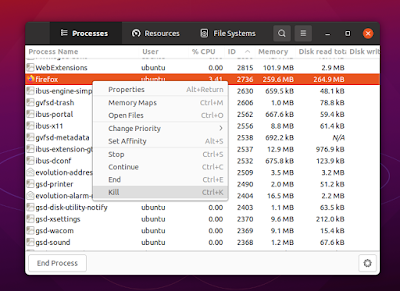
End an Active Program
The main purpose of System Monitor is, aside from the other purposes, to end a certain process. To do so:
- find the active program by reading the list or searching,
- select the program name,
- right click it,
- select Kill,
- wait until the program does not appear anymore in the list, and
- program ended.
Relationship to Other Programs
System Monitor is a utility program and is in one group with other Ubuntu utilities such as Archive Manager, Disk Usage Analyzer (Baobab), and Disks. It is part of GNOME Applications — apps created by The GNOME Project — that built most of Ubuntu Desktop. As such, System Monitor is different to amusement programs —like Rhythmbox— and productivity tools —like LibreOffice—.