- apt remove: Uninstall apt Packages in Ubuntu
- Uninstall apt packages
- Cleaning up after package removal (optional)
- Dealing with configuration files after package removal
- Summary
- Package management with APT
- Introduction
- Commands
- Installation commands
- auto-apt
- Maintenance commands
- Removal commands
- Search commands
- Typical usage example
- Setting up apt-get to use a http-proxy
- Temporary proxy session
- APT configuration file method
- BASH rc method
- How to login a proxy user
- Useful additional packages
- Additional links
- Troubleshooting
apt remove: Uninstall apt Packages in Ubuntu
How do you uninstall apt packages in Ubuntu using the terminal? It’s quite simple, actually. If you know the package name, just use it with the apt remove command like this:
sudo apt remove package_nameEven if you do not know the exact package name, tab completion is there to help you. You may also use the older apt-get remove command here.
sudo apt-get remove package_nameBoth apt and apt-get commands are pretty much alike. The new and recommended command is apt, which I would also suggest using. If you want to remove multiple packages, you can do that in a single command:
sudo apt remove package_1 package_2 package_3Uninstall apt packages
The apt command gives you all the essential tools to manage the APT packages. For uninstalling a package, it provides the remove option.
sudo apt remove package_name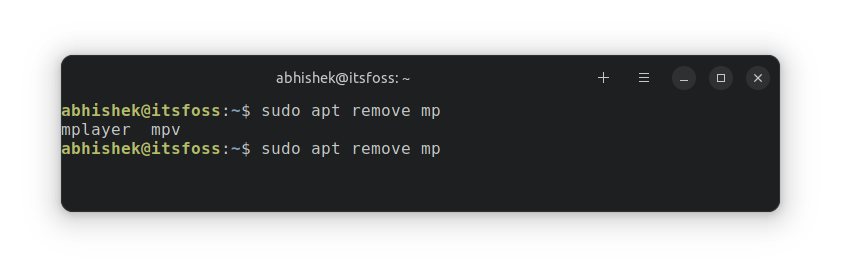
You need to use the exact package name. How do you get that? You can use the tab completion feature. Try entering the first few starting letters and press tab. It will show the possible package names you can use. For example, I typed sudo apt remove mp and press the tab. My system shows that there are two installed packages with names starting with mp. Alternatively, you can list all the installed packages with apt and look for the package name:
This will be a huge output and you may have to use the grep command to filter on the result. I decide to remove the MPlayer from my system. The package name is mplayer (with all small letters). This is important because Linux is case-sensitive.
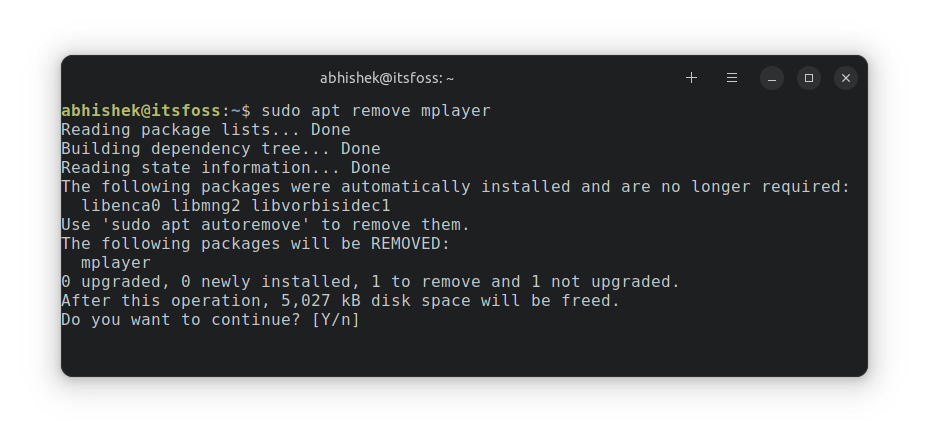
Installing and removing packages in Ubuntu requires that you have admin privileges. This is why you need to use sudo before the apt remove command. It asks to enter a password. It’s your user account’s password. When you type the command, nothing is displayed on the screen. That’s expected behavior. Type the password and press enter. As you can see in the screenshot below, it will show what packages are going to be removed. It also informs what dependency packages should be removed afterward. You have to press y or the enter key to continue with package removal.
Cleaning up after package removal (optional)
As you can see in the previous screenshot, it says, “The following packages were automatically installed and are no longer required” and then lists three packages. These are dependency packages that were installed automatically when mplayer was installed. So, what can you do? You can use the suggested command to remove these packages.
Do you really need to do that? No. You can just go ahead with your work after apt remove. The dependency packages will stay in the system. Usually, you should try running the apt autoremove commands every few weeks. It will remove all the dependency packages that are not required anymore, delete the older Linux kernel versions and thus free up disk space for you.
Dealing with configuration files after package removal
You should know that uninstalling apt package with apt remove does not remove user settings and configuration files (located under /etc directory). This way, if you install the same application again, you may reuse your custom configuration. Let’s take our example. Here are all the mplayer related directories before uninstalling it: 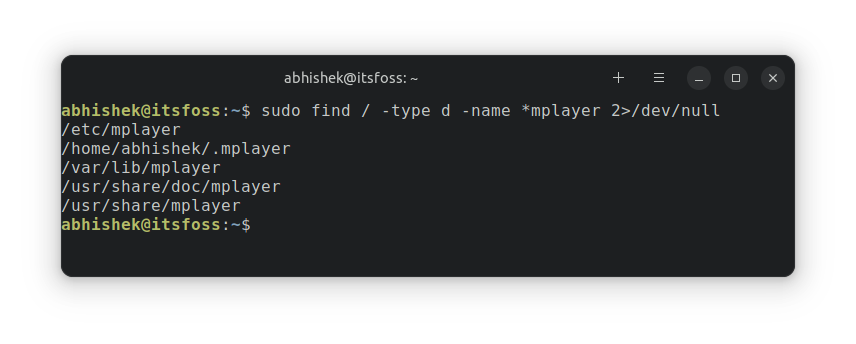 After removal, you can still see some files:
 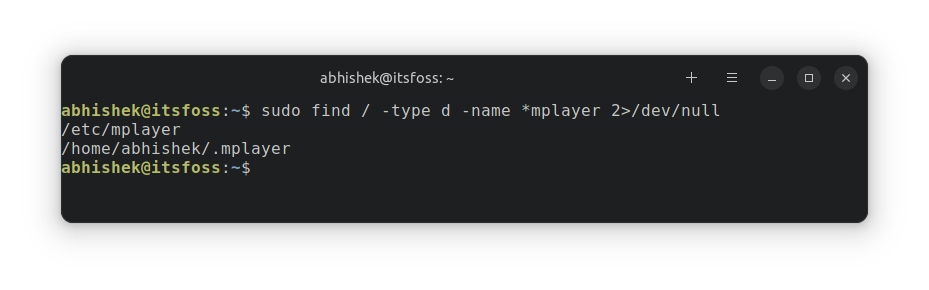 in certain cases, you might want the application to start afresh. You can use the apt purge command to uninstall apt applications and remove their configuration files located under /etc.
sudo apt purge package_nameRemember that even apt purge will not remove application-related files located under the user’s home directory. Those are really small files and do not take up a lot of space. If you are particular about these things, you can look for such files and manually remove them. There is no magic command for this.
Summary
- The apt remove command removes the specified packages.
- The remaining dependencies need to be removed separately with apt autoremove command.
- It doesn’t remove configuration and other user settings. If you install the same application again, it will likely have your user-defined settings.
I hope you find this beginner’s article about removing apt package helpful.
Please let me know if certain things are unclear in the comments and I’ll be happy to answer your questions.
Package management with APT

Package management via apt-get runs hand-in-hand with the /etc/apt/sources.list file. For information on editing or updating your sources list see SourcesList.
Introduction
This page describes how to handle the packages on your system using apt-get and related commands. For example, you can install a new package, remove an installed package, or update all installed packages to the latest versions.
Commands

- Example:
sudo apt-get install ubuntu-desktop
Installation commands
 Use the -s flag to simulate an action. For example: «apt-get -s install » will simulate installing the package, showing you what packages will be installed and configured. Use the -s flag to simulate an action. For example: «apt-get -s install » will simulate installing the package, showing you what packages will be installed and configured. |
auto-apt
This command runs
Maintenance commands
The same as the above, except add the «smart upgrade» checkbox. It tells APT to use «smart» conflict resolution system, and it will attempt to upgrade the most important packages at the expense of less important ones if necessary.
| «apt-get dist-upgrade» does not upgrade from a previous version of Ubuntu. For more information of upgrading from a previous version of Ubuntu see http://www.ubuntu.com/getubuntu/upgrading . |
du -sh /var/cache/apt/archives
Reconfigure the named package. With many packages, you’ll be prompted with some configuration questions you may not have known were there.
- For example:
dpkg-reconfigure fontconfig-config
echo " hold" | dpkg --set-selections
 This command may have the unintended side effect of preventing upgrades to packages that depend on updated versions of the pinned package. apt-get dist-upgrade will override this, but will warn you first. If you want to use this command with sudo, you need to use echo " hold" | sudo dpkg --set-selections not sudo echo " hold" | dpkg --set-selections. This command may have the unintended side effect of preventing upgrades to packages that depend on updated versions of the pinned package. apt-get dist-upgrade will override this, but will warn you first. If you want to use this command with sudo, you need to use echo " hold" | sudo dpkg --set-selections not sudo echo " hold" | dpkg --set-selections. |
echo " install" | dpkg --set-selections
Removal commands
This command completely removes a package and the associated configuration files. Configuration files residing in ~ are not usually affected by this command.
- + operator
- If you want to remove package1 and install package2 in one step:
dpkg -l | grep '^rc' | awk '' | xargs dpkg --purge
Search commands
This command determines which installed package owns
. It shows files from installed packages that match , with the name of the package they came from. Consider this to be a «reverse lookup» utility.  In order to use this command, the package dlocate must be installed on your system.
dpkg -L package | grep /usr/bin
For more information on apt-get, apt-cache and dpkg consult their manual pages by using the man command. These manuals will provide a wider scope of information in addition to all of the options that you can use with each program.
- Example:
Typical usage example
I want to feel the wind in my hair, I want the adrenaline of speed. So let’s install a racing game. But what racing games are available?
apt-cache search racing game
It gives me a lot of answers. I see a game named «torcs». Let’s get some more information on this game.
Hmmm. it seems interesting. But is this game not already installed on my computer? And what is the available version? Which repository is it from (Universe or Main)?
Ok, so now, let’s install it!
What is the command I must type in the console to launch this game? In this example, it’s straightforward («torcs»), but that’s not always the case. One way of finding the name of the binary is to look at what files the package has installed in «/usr/bin». For games, the binary will be in «/usr/games». For administrative programs, it’s in «/usr/sbin».
dpkg -L torcs | grep /usr/games/
The first part of the command display all files installed by the package «torcs» (try it). With the second part, we ask to only display lines containing «/usr/games/».
Hmmm, that game is cool. Maybe there are some extra tracks?
But I’m running out of space. I will delete the apt cache!
Oh no, my mother asked me to remove all games from this computer. But I want to keep the configuration files so I can simply re-install it later.
If I want to also remove config files :
Setting up apt-get to use a http-proxy
These are three methods of using apt-get with a http-proxy.
Temporary proxy session
This is a temporary method that you can manually use each time you want to use apt-get through a http-proxy. This method is useful if you only want to temporarily use a http-proxy.
Enter this line in the terminal prior to using apt-get (substitute your details for yourproxyaddress and proxyport).
export http_proxy=http://yourproxyaddress:proxyport
If you normally use sudo to run apt-get you will need to login as root first for this to work unless you also add some explicit environment settings to /etc/sudoers, e.g.
Defaults env_keep = "http_proxy https_proxy ftp_proxy"
APT configuration file method
This method uses the apt.conf file which is found in your /etc/apt/ directory. This method is useful if you only want apt-get (and not other applications) to use a http-proxy permanently.
gksudo gedit /etc/apt/apt.conf
Add this line to your /etc/apt/apt.conf file (substitute your details for yourproxyaddress and proxyport).
Acquire::http::Proxy "http://yourproxyaddress:proxyport";
BASH rc method
This method adds a two lines to your .bashrc file in your $HOME directory. This method is useful if you would like apt-get and other applications for instance wget, to use a http-proxy.
Add these lines to the bottom of your ~/.bashrc file (substitute your details for yourproxyaddress and proxyport)
http_proxy=http://yourproxyaddress:proxyport export http_proxy
Save the file. Close your terminal window and then open another terminal window or source the ~/.bashrc file:
Test your proxy with sudo apt-get update and whatever networking tool you desire. You can use firestarter or conky to see active connections.
If you make a mistake and go back to edit the file again, you can close the terminal and reopen it or you can source ~/.bashrc as shown above.
How to login a proxy user
If you need to login to the Proxy server this can be achieved in most cases by using the following layout in specifying the proxy address in http-proxy. (substitute your details for username, password, yourproxyaddress and proxyport)
http_proxy=http://username:password@yourproxyaddress:proxyport
Useful additional packages
Additional links
Troubleshooting