- Как удалить пакет Ubuntu
- Как удалить пакет Ubuntu
- Как удалить пакет Ubuntu в терминале
- Выводы
- Package management with APT
- Introduction
- Commands
- Installation commands
- auto-apt
- Maintenance commands
- Removal commands
- Search commands
- Typical usage example
- Setting up apt-get to use a http-proxy
- Temporary proxy session
- APT configuration file method
- BASH rc method
- How to login a proxy user
- Useful additional packages
- Additional links
- Troubleshooting
Как удалить пакет Ubuntu
Установка и удаление программ одна из самых важных вещей для пользователя компьютера. Поскольку нам нужно как нибудь получать новые, нужные программы, а также удалять лишние. Но удаление пакетов в Ubuntu имеет некоторые тонкости. После удаления могут остаться зависимости, пакеты установленные, как рекомендованные, а также конфигурационные файлы.
В этой статье мы разберем как удалить deb пакет Ubuntu, при чем удалить чисто, так, чтобы после него не осталось следов в системе. Также поговорим о полном удалении PPA, поскольку много пакетов, которых нет в официальных репозиториях мы устанавливаем из PPA.
Как удалить пакет Ubuntu
Самый простой способ удалить пакет Ubuntu, это воспользоватся одной из графических утилит, поставляемых специально для этого, например Synaptic или Центр приложений Ubuntu. По сути это делается в пару кликов. Сначала рассмотрим порядок действий в Центре приложений Ubuntu.
Запустить центр приложений вы можете из панели значков Unity:
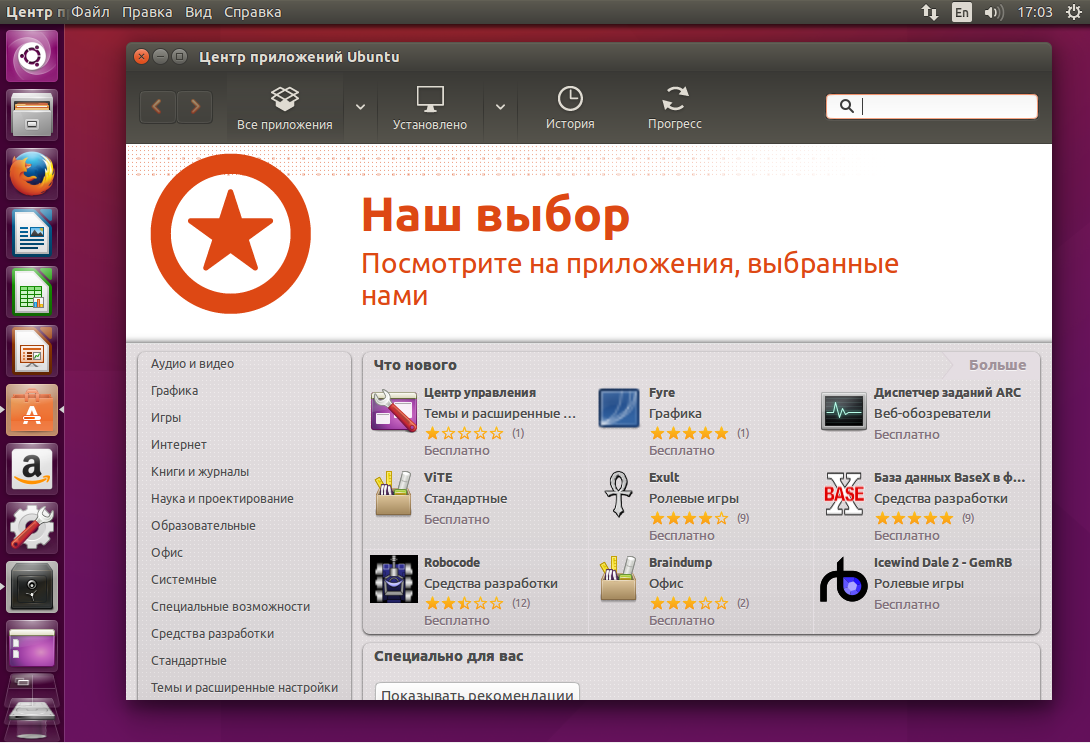
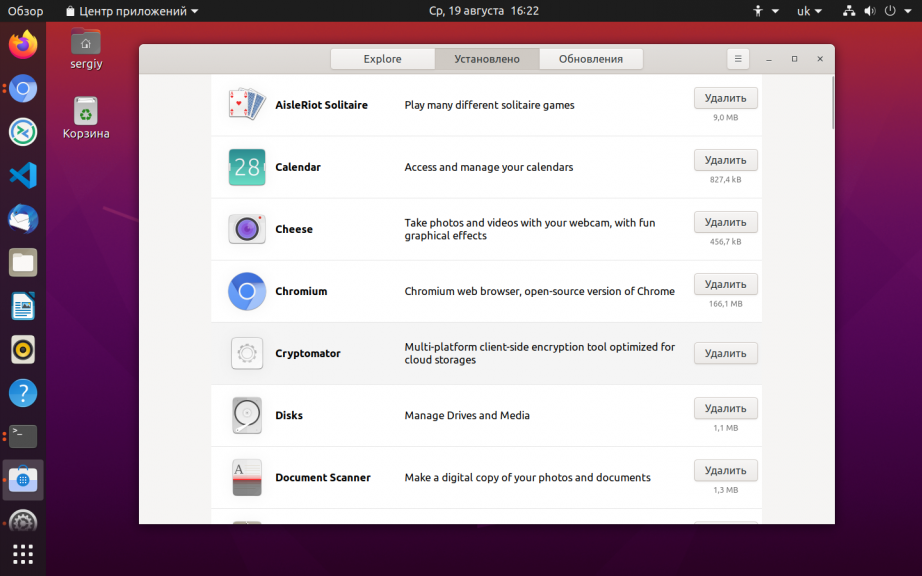
Список всех установленных пакетов находится на вкладке Установлено, здесь приложения рассортированы по категориям:
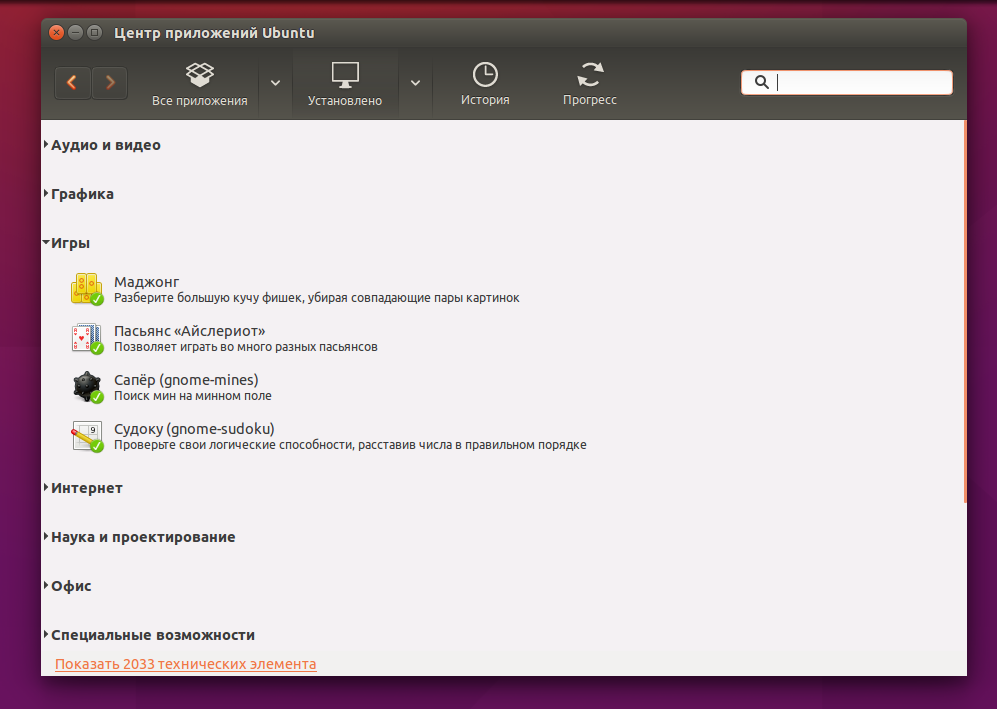
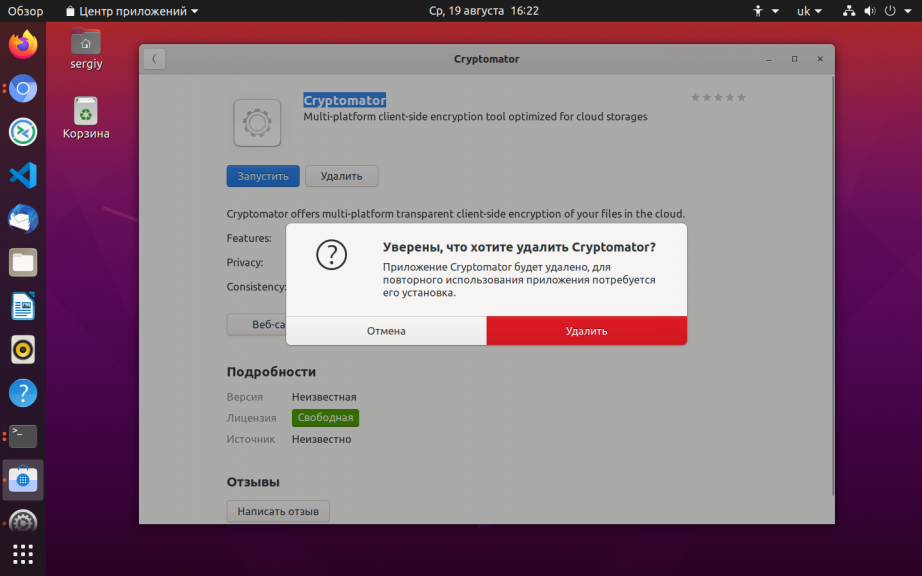
Чтобы удалить пакет Ubuntu, достаточно кликнуть по нему левой кнопкой мыши, и когда появляться доступные действия нажать кнопку Удалить:
Для завершения нужно будет подтвердить удаление и ввести пароль.
Пакет удален, но не совсем так, как нам хотелось бы. Но об этом позже.
Дальше рассмотрим пакетный менеджер Synaptic. Это как ни как стороннее программное обеспечение, но многие его используют из-за большого функционала и удобного интерфейса. Если программа еще не установлена, ее нужно установить с помощью центра приложений или выполнив в терминале:
sudo apt install synaptic
Запустить программу можно через терминал, выполнив команду:
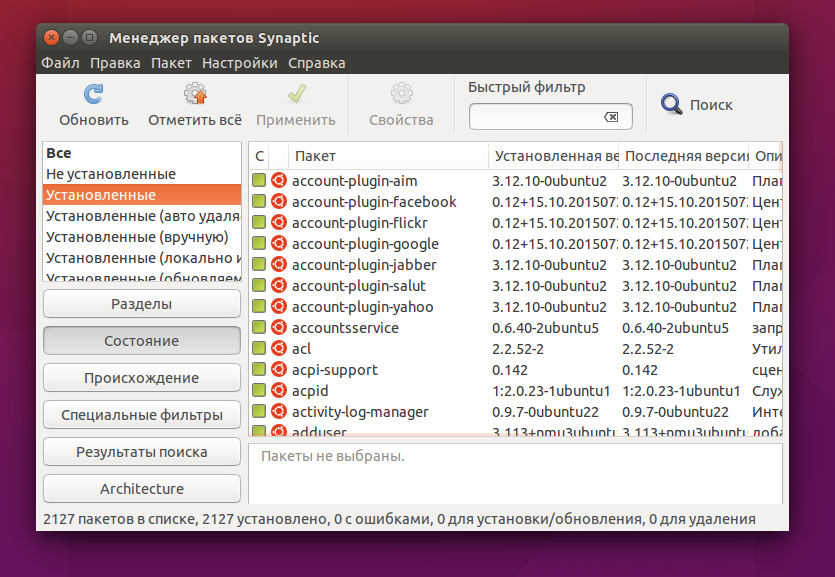
Посмотреть установленные пакеты вы можете выбрав вкладку состояние, а затем выбрав Установленные:
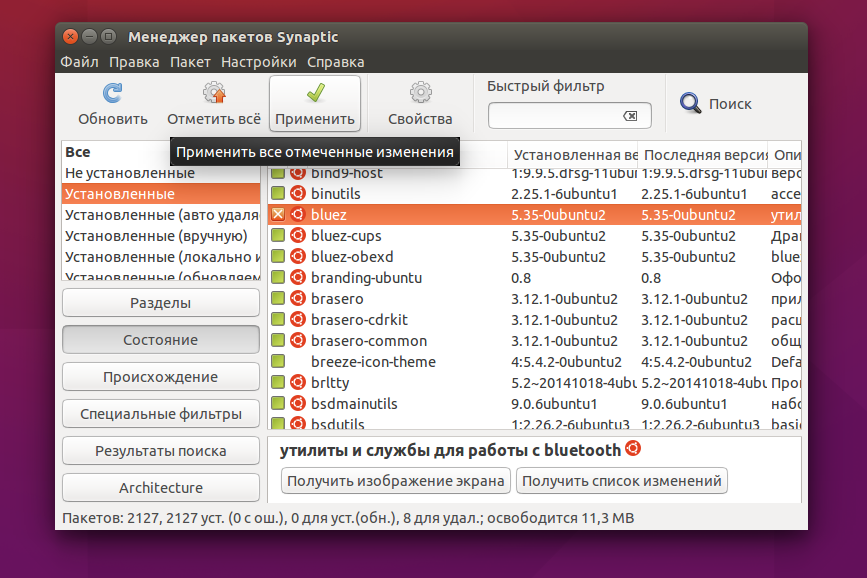
Удалить deb ubuntu вы можете просто нажав правой кнопкой мыши и в контекстном меню на нужном пакете и выбрав отметить для удаления или отметить для полного удаления:
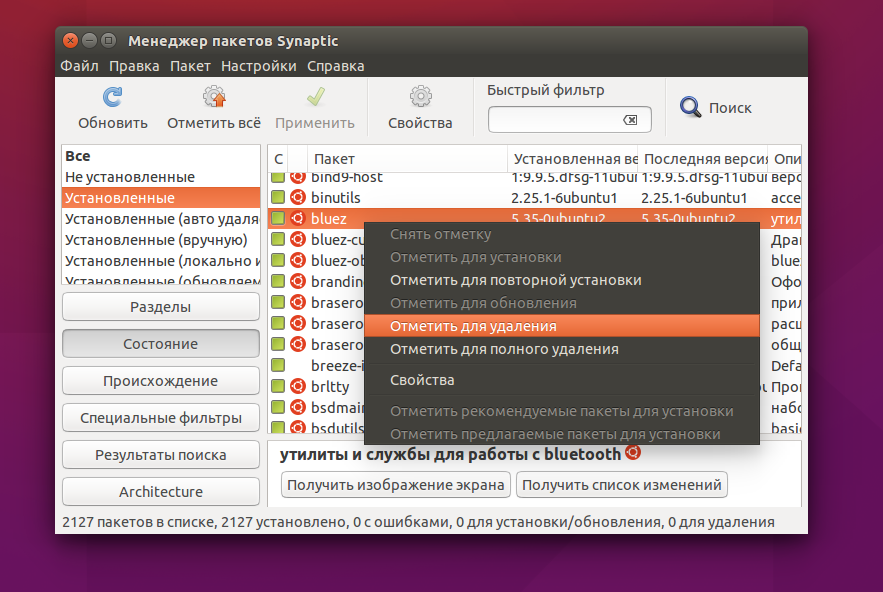
Программа покажет, какие еще пакеты будут удалены, это те пакеты, которые зависят от нашего пакета:
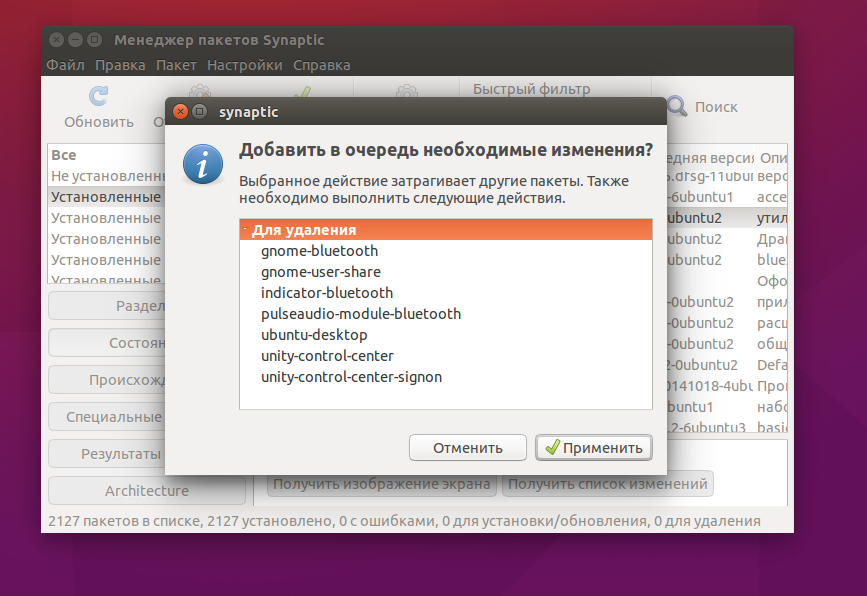
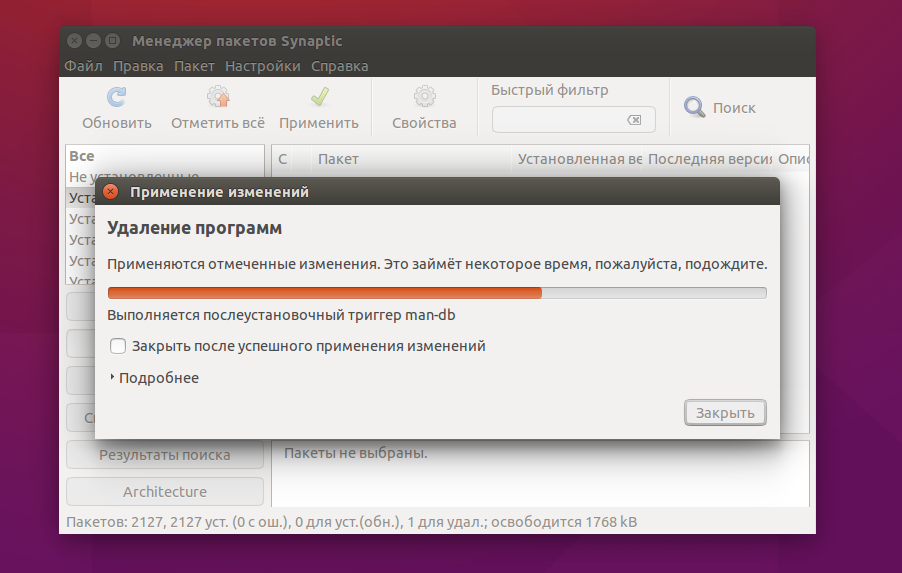
Теперь, чтобы завершить удаление, осталось нажать кнопку Применить:
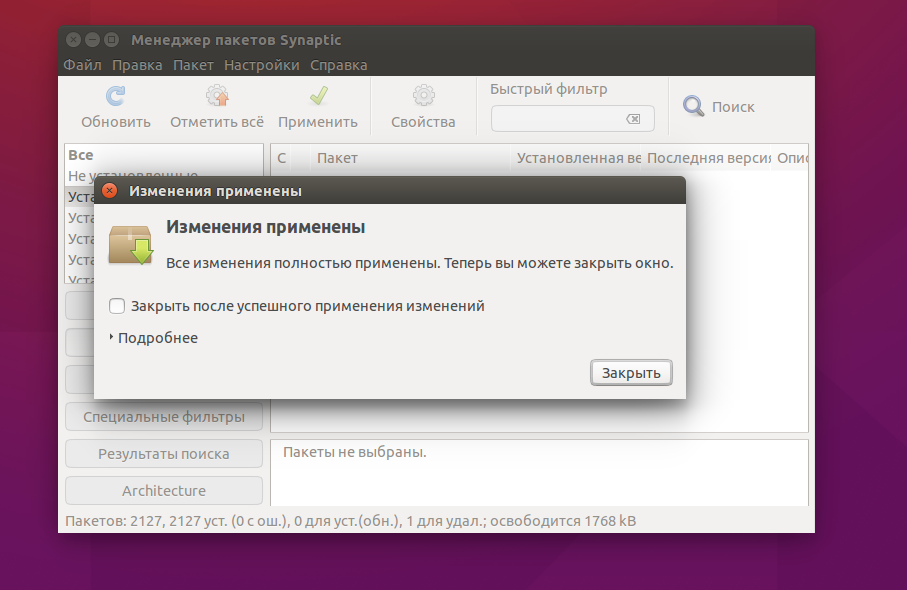
Теперь программа покажет какие пакеты будут удалены. И пойдет процесс удаления:
Просто удаление и полное удаление отличается только тем, что при полном удалении удаляются конфигурационные файлы. Но проблема этих инструментов в том, что пакеты установленные как зависимости и рекомендованные к программе не удаляются и остаются в системе. Такое поведение наблюдается как в Synaptic, так и в Центре приложений Ubuntu. Поэтому мы переходим к описанию самого гибкого способа — удаление пакетов Ubuntu в терминале.
Как удалить пакет Ubuntu в терминале
В новых версиях Ubuntu для управления пакетами, а в том числе и удаления можно использовать новый менеджер пакетов — apt. Команда удаления выглядит таким образом:
sudo apt remove имя_пакета
Будет выполнено полное удаление пакета, включая конфигурационные файлы и зависимости, только рекомендованные программы останутся. Если вы хотите использовать apt-get чтобы удалить deb ubuntu, то порядок действий немного другой. Для обычного удаления пакета выполните:
sudo apt-get remove имя_пакета
Для удаления пакета вместе с его конфигурационными файлами, выполните:
sudo apt-get purge имя_пакета
А чтобы, также удалить зависимости, установленные вместе с пакетом, нужно после одной из предыдущих команд выполнить:
Будут удаленны не только явно указанные зависимости, но и программы установленные как рекомендованные.
Ну с основами разобрались, теперь перейдем к более сложным ситуациям. Что если вы устанавливали программу из deb файла и теперь не знаете точно, как называется ее пакет, чтобы удалить?
Это очень просто узнать, например по исполняемому файлу, допустим исполняемый файл программы TimeShift находится по адресу /usr/bin/timeshift, теперь узнаем ее пакет:
sudo dpkg -S /usr/bin/timeshift
Как видите, пакет так и называется — timeshift. Теперь можно удалить программу Ubuntu, одним из выше описанных способов.
Очень часто мы устанавливаем недостающее нам программное обеспечение из PPA, но не все эти пакеты нужны нам на протяжении долгого времени, а при обновлении системы, могут даже вызвать ошибки. Так как же удалить все пакеты установленные из PPA? Для этого есть специальная утилита: ppa-purge.
Если она еще не установлена, устанавливаем командой:
sudo apt install ppa-purge
Теперь, чтобы удалить все пакеты установленные из определенного ppa используйте:
sudo ppa-purge -i ppa:владелец_ppa/имя_ppa
Обратите внимание на ppa:владелец_ppa/имя_ppa — обычно в таком формате записываются все PPA: протокол:владелец/имя.
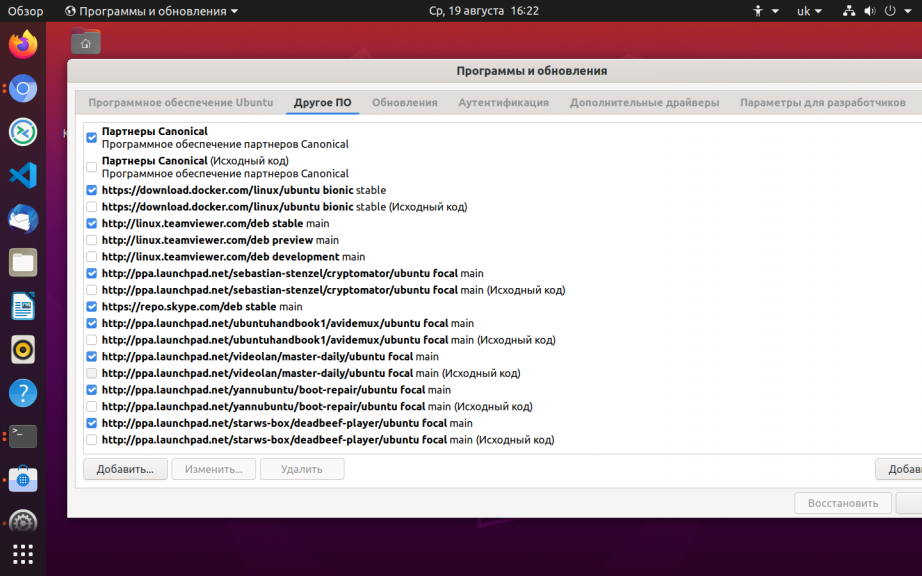
Узнать список репозиториев можно в программе источники приложений:
Такой командой можно одним махом удалить пакеты ubuntu, установленные из ppa:
find /etc/apt/sources.list.d -type f -name «*.list» -print0 | \
while read -d $’\0′ file; do awk -F/ ‘/deb / && /ppa\.launchpad\.net/ ‘ «$file»; done
Если вы устанавливали приложение из исходных кодов, то удалить его намного сложнее, потому что оно не контролируется менеджером пакетов, и соответственно система не знает какие файлы ему принадлежат.
Но все же способ есть, обычно, разработчики в файле сценариев makefile, кроме цели install реализуют цель uninstall, которая дозволяет выполнить обратное действие.
Поэтому если у вас осталась папка с исходным кодом той программы можно просто перейти в нее и выполнить make uninstall чтобы удалить приложение Ubuntu:
cd /папка/с/исходниками
$ sudo make uninstall
Выводы
В этой статье мы рассмотрели все, что поможет вам удалить приложение Ubuntu. При чем удалить полностью, а не только файлы программы. Если у вас остались вопросы, пишите в комментариях.
Обнаружили ошибку в тексте? Сообщите мне об этом. Выделите текст с ошибкой и нажмите Ctrl+Enter.
Package management with APT

Package management via apt-get runs hand-in-hand with the /etc/apt/sources.list file. For information on editing or updating your sources list see SourcesList.
Introduction
This page describes how to handle the packages on your system using apt-get and related commands. For example, you can install a new package, remove an installed package, or update all installed packages to the latest versions.
Commands

- Example:
sudo apt-get install ubuntu-desktop
Installation commands
 Use the -s flag to simulate an action. For example: «apt-get -s install » will simulate installing the package, showing you what packages will be installed and configured. Use the -s flag to simulate an action. For example: «apt-get -s install » will simulate installing the package, showing you what packages will be installed and configured. |
auto-apt
This command runs
Maintenance commands
The same as the above, except add the «smart upgrade» checkbox. It tells APT to use «smart» conflict resolution system, and it will attempt to upgrade the most important packages at the expense of less important ones if necessary.
| «apt-get dist-upgrade» does not upgrade from a previous version of Ubuntu. For more information of upgrading from a previous version of Ubuntu see http://www.ubuntu.com/getubuntu/upgrading . |
du -sh /var/cache/apt/archives
Reconfigure the named package. With many packages, you’ll be prompted with some configuration questions you may not have known were there.
- For example:
dpkg-reconfigure fontconfig-config
echo " hold" | dpkg --set-selections
 This command may have the unintended side effect of preventing upgrades to packages that depend on updated versions of the pinned package. apt-get dist-upgrade will override this, but will warn you first. If you want to use this command with sudo, you need to use echo " hold" | sudo dpkg --set-selections not sudo echo " hold" | dpkg --set-selections. This command may have the unintended side effect of preventing upgrades to packages that depend on updated versions of the pinned package. apt-get dist-upgrade will override this, but will warn you first. If you want to use this command with sudo, you need to use echo " hold" | sudo dpkg --set-selections not sudo echo " hold" | dpkg --set-selections. |
echo " install" | dpkg --set-selections
Removal commands
This command completely removes a package and the associated configuration files. Configuration files residing in ~ are not usually affected by this command.
- + operator
- If you want to remove package1 and install package2 in one step:
dpkg -l | grep '^rc' | awk '' | xargs dpkg --purge
Search commands
This command determines which installed package owns
. It shows files from installed packages that match , with the name of the package they came from. Consider this to be a «reverse lookup» utility.  In order to use this command, the package dlocate must be installed on your system.
dpkg -L package | grep /usr/bin
For more information on apt-get, apt-cache and dpkg consult their manual pages by using the man command. These manuals will provide a wider scope of information in addition to all of the options that you can use with each program.
- Example:
Typical usage example
I want to feel the wind in my hair, I want the adrenaline of speed. So let’s install a racing game. But what racing games are available?
apt-cache search racing game
It gives me a lot of answers. I see a game named «torcs». Let’s get some more information on this game.
Hmmm. it seems interesting. But is this game not already installed on my computer? And what is the available version? Which repository is it from (Universe or Main)?
Ok, so now, let’s install it!
What is the command I must type in the console to launch this game? In this example, it’s straightforward («torcs»), but that’s not always the case. One way of finding the name of the binary is to look at what files the package has installed in «/usr/bin». For games, the binary will be in «/usr/games». For administrative programs, it’s in «/usr/sbin».
dpkg -L torcs | grep /usr/games/
The first part of the command display all files installed by the package «torcs» (try it). With the second part, we ask to only display lines containing «/usr/games/».
Hmmm, that game is cool. Maybe there are some extra tracks?
But I’m running out of space. I will delete the apt cache!
Oh no, my mother asked me to remove all games from this computer. But I want to keep the configuration files so I can simply re-install it later.
If I want to also remove config files :
Setting up apt-get to use a http-proxy
These are three methods of using apt-get with a http-proxy.
Temporary proxy session
This is a temporary method that you can manually use each time you want to use apt-get through a http-proxy. This method is useful if you only want to temporarily use a http-proxy.
Enter this line in the terminal prior to using apt-get (substitute your details for yourproxyaddress and proxyport).
export http_proxy=http://yourproxyaddress:proxyport
If you normally use sudo to run apt-get you will need to login as root first for this to work unless you also add some explicit environment settings to /etc/sudoers, e.g.
Defaults env_keep = "http_proxy https_proxy ftp_proxy"
APT configuration file method
This method uses the apt.conf file which is found in your /etc/apt/ directory. This method is useful if you only want apt-get (and not other applications) to use a http-proxy permanently.
gksudo gedit /etc/apt/apt.conf
Add this line to your /etc/apt/apt.conf file (substitute your details for yourproxyaddress and proxyport).
Acquire::http::Proxy "http://yourproxyaddress:proxyport";
BASH rc method
This method adds a two lines to your .bashrc file in your $HOME directory. This method is useful if you would like apt-get and other applications for instance wget, to use a http-proxy.
Add these lines to the bottom of your ~/.bashrc file (substitute your details for yourproxyaddress and proxyport)
http_proxy=http://yourproxyaddress:proxyport export http_proxy
Save the file. Close your terminal window and then open another terminal window or source the ~/.bashrc file:
Test your proxy with sudo apt-get update and whatever networking tool you desire. You can use firestarter or conky to see active connections.
If you make a mistake and go back to edit the file again, you can close the terminal and reopen it or you can source ~/.bashrc as shown above.
How to login a proxy user
If you need to login to the Proxy server this can be achieved in most cases by using the following layout in specifying the proxy address in http-proxy. (substitute your details for username, password, yourproxyaddress and proxyport)
http_proxy=http://username:password@yourproxyaddress:proxyport
Useful additional packages
Additional links
Troubleshooting