- Linux udp traffic monitor
- Privacy Overview
- IPTraf-ng — инструмент мониторинга сети для Linux
- Установка IPTraf-ng в Linux
- Использование IPTraf-ng в Linux
- IPTraf-ng – A Console-Based Network Monitoring Tool
- Installing IPTraf-ng in Linux
- Usage of IPTraf-ng in Linux
- Check IP Traffic in Linux
- General Interface Statistics
- Detailed Interface Statistics
- Statistical Breakdowns
- LAN Station Monitor
- Configure
- IPTraf Options
- Introduction
- Requirements
- Overview of UDP tools
- Sniffing packets with tcpdump
- Understanding dropped packets
- UDP header values explained
- Checksum
- Analyse UDP over time with wireshark
Linux udp traffic monitor
We use cookies on our website to give you the most relevant experience by remembering your preferences and repeat visits. By clicking “Accept All”, you consent to the use of ALL the cookies. However, you may visit «Cookie Settings» to provide a controlled consent.
Privacy Overview
This website uses cookies to improve your experience while you navigate through the website. Out of these, the cookies that are categorized as necessary are stored on your browser as they are essential for the working of basic functionalities of the website. We also use third-party cookies that help us analyze and understand how you use this website. These cookies will be stored in your browser only with your consent. You also have the option to opt-out of these cookies. But opting out of some of these cookies may affect your browsing experience.
Necessary cookies are absolutely essential for the website to function properly. These cookies ensure basic functionalities and security features of the website, anonymously.
| Cookie | Duration | Description |
|---|---|---|
| cookielawinfo-checkbox-analytics | 11 months | This cookie is set by GDPR Cookie Consent plugin. The cookie is used to store the user consent for the cookies in the category «Analytics». |
| cookielawinfo-checkbox-functional | 11 months | The cookie is set by GDPR cookie consent to record the user consent for the cookies in the category «Functional». |
| cookielawinfo-checkbox-necessary | 11 months | This cookie is set by GDPR Cookie Consent plugin. The cookies is used to store the user consent for the cookies in the category «Necessary». |
| cookielawinfo-checkbox-others | 11 months | This cookie is set by GDPR Cookie Consent plugin. The cookie is used to store the user consent for the cookies in the category «Other. |
| cookielawinfo-checkbox-performance | 11 months | This cookie is set by GDPR Cookie Consent plugin. The cookie is used to store the user consent for the cookies in the category «Performance». |
| viewed_cookie_policy | 11 months | The cookie is set by the GDPR Cookie Consent plugin and is used to store whether or not user has consented to the use of cookies. It does not store any personal data. |
Functional cookies help to perform certain functionalities like sharing the content of the website on social media platforms, collect feedbacks, and other third-party features.
Performance cookies are used to understand and analyze the key performance indexes of the website which helps in delivering a better user experience for the visitors.
Analytical cookies are used to understand how visitors interact with the website. These cookies help provide information on metrics the number of visitors, bounce rate, traffic source, etc.
Advertisement cookies are used to provide visitors with relevant ads and marketing campaigns. These cookies track visitors across websites and collect information to provide customized ads.
Other uncategorized cookies are those that are being analyzed and have not been classified into a category as yet.
IPTraf-ng — инструмент мониторинга сети для Linux
IPTraf-ng – это консольная программа мониторинга сетевой статистики Linux, которая показывает информацию об IP-трафике, включая следующую информацию:
- Текущие соединения TCP
- UDP, ICMP, OSPF и другие типы IP-пакетов
- Счетчик пакетов и байтов в соединениях TCP
- IP, TCP, UDP, ICMP, не-IP и другие счетчики пакетов и байтов
- Подсчет TCP/UDP по портам
- Подсчет пакетов по размерам
- Подсчет пакетов и байтов по IP-адресу
- Активность интерфейса
- Статусы флагов TCP-пакетов
- Статистика станций локальной сети
Утилита IPTraf-ng может быть использована для определения типа трафика в вашей сети, а также того, какие службы наиболее активно используются в каких системах, среди
В этой статье вы узнаете, как установить и использовать утилиту сетевой статистики IPTraf-ng в системах Linux.
Установка IPTraf-ng в Linux
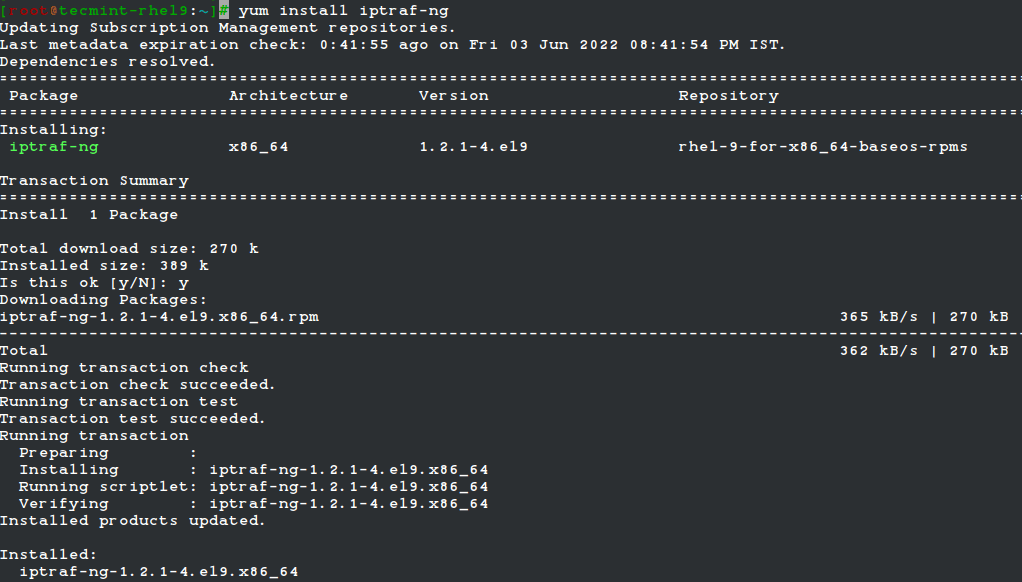
IPTraf-ng является частью дистрибутива Linux и может быть установлен командой yum из терминала.

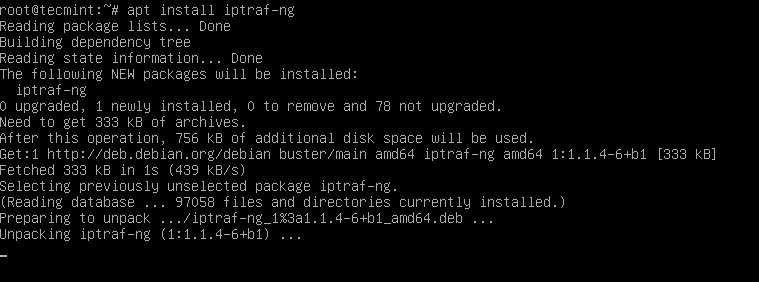
Под менеджером пакетов apt, как показано.
$ sudo apt install iptraf-ng

Использование IPTraf-ng в Linux
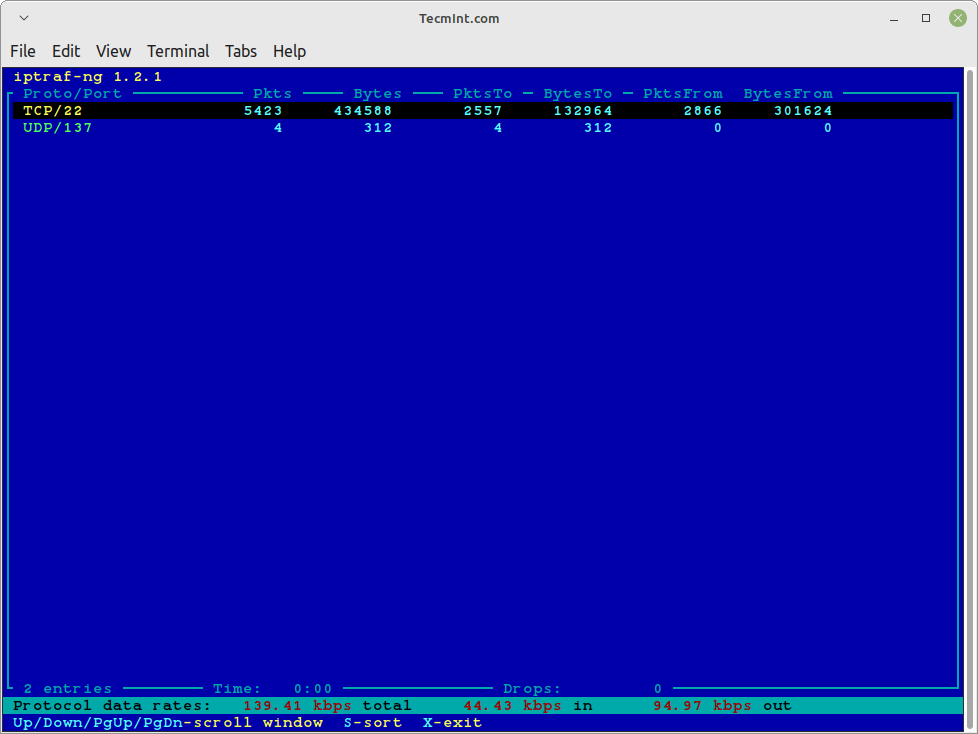
После установки iptraf-ng выполните следующую команду из терминала, чтобы запустить интерфейс меню на основе ascii, который позволит вам просматривать текущий мониторинг IP-трафика
Все права защищены. © Linux-Console.net • 2019-2023
IPTraf-ng – A Console-Based Network Monitoring Tool
IPTraf-ng is a console-based Linux network statistics monitoring program that shows information about IP traffic, which includes information such as:
- Current TCP connections
- UDP, ICMP, OSPF, and other types of IP packets
- Packet and byte counts on TCP connections
- IP, TCP, UDP, ICMP, non-IP, and other packet and byte counts
- TCP/UDP counts by ports
- Packet counts by packet sizes
- Packet and byte counts by IP address
- Interface activity
- Flag statuses on TCP packets
- LAN station statistics
The IPTraf-ng utility can be used to find out the type of traffic on your network, and what kind of service is the most heavily used on what systems, among others.
In this article, you will learn how to install and use the IPTraf-ng network statistics utility in Linux systems.
Installing IPTraf-ng in Linux
IPTraf-ng is part of the Linux distribution and can be installed on RHEL-based distributions such as CentOS Stream, Fedora, Rocky Linux, and AlmaLinux using the following yum command from the terminal.
Under Debian-based distributions, iptraf-ng can be installed using Ubuntu Software Center or apt package manager as shown.
$ sudo apt install iptraf-ng
Usage of IPTraf-ng in Linux
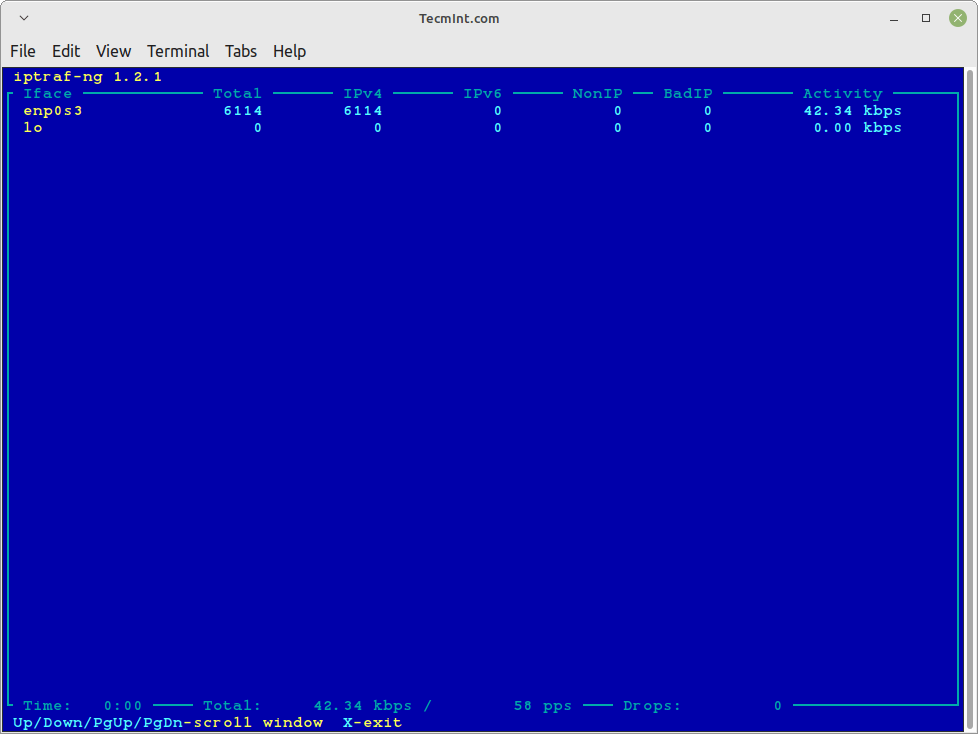
Once iptraf-ng is installed, run the following command from the terminal to launch an ascii-based menu interface that will allow you to view current IP traffic monitoring, General interface statistics, Detailed interface statistics, Statistical breakdowns, LAN station monitors, Filters, and also provide some configure options where you can configure as per your need.
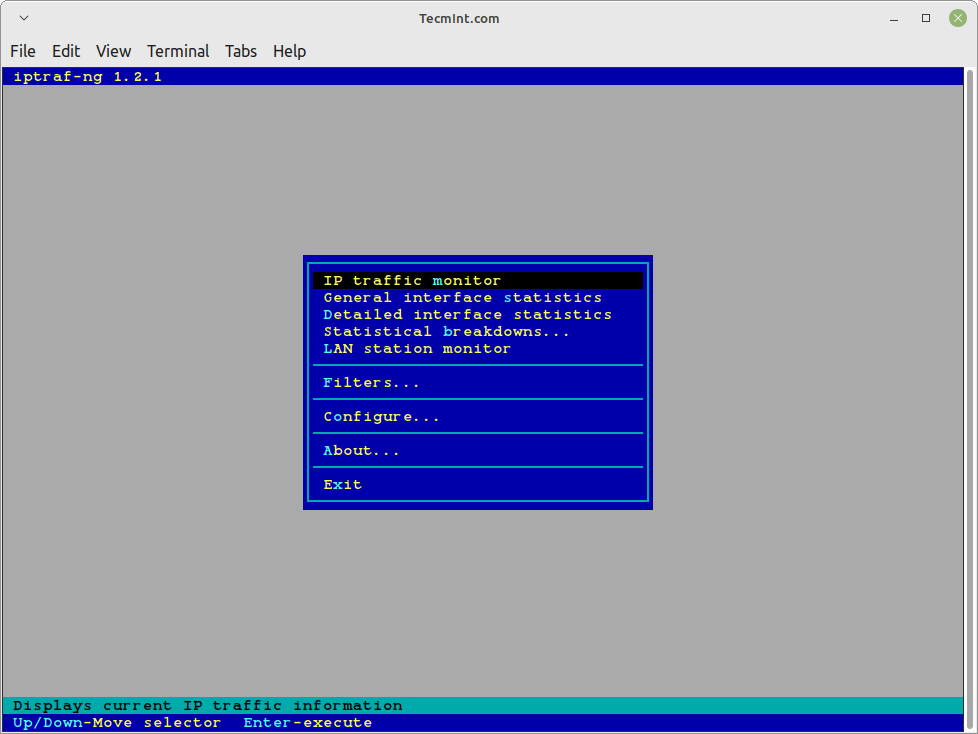
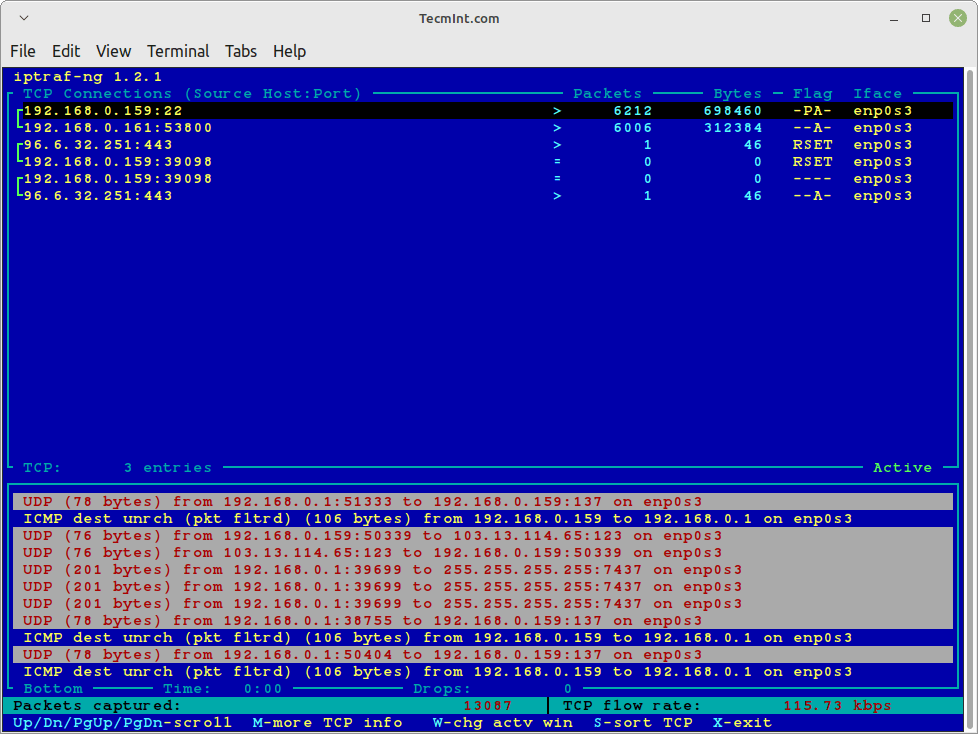
The iptraf interactive screen displays a menu system with different options to choose from. Here are some screenshots that show real-time IP traffic counts and interface statistics etc.
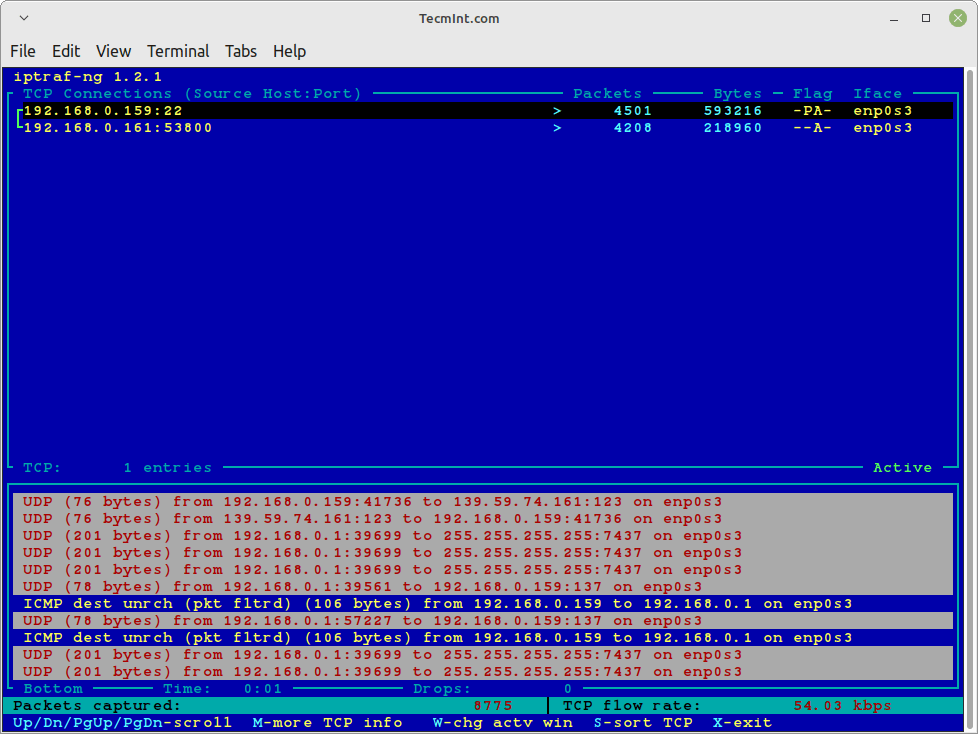
Check IP Traffic in Linux
General Interface Statistics
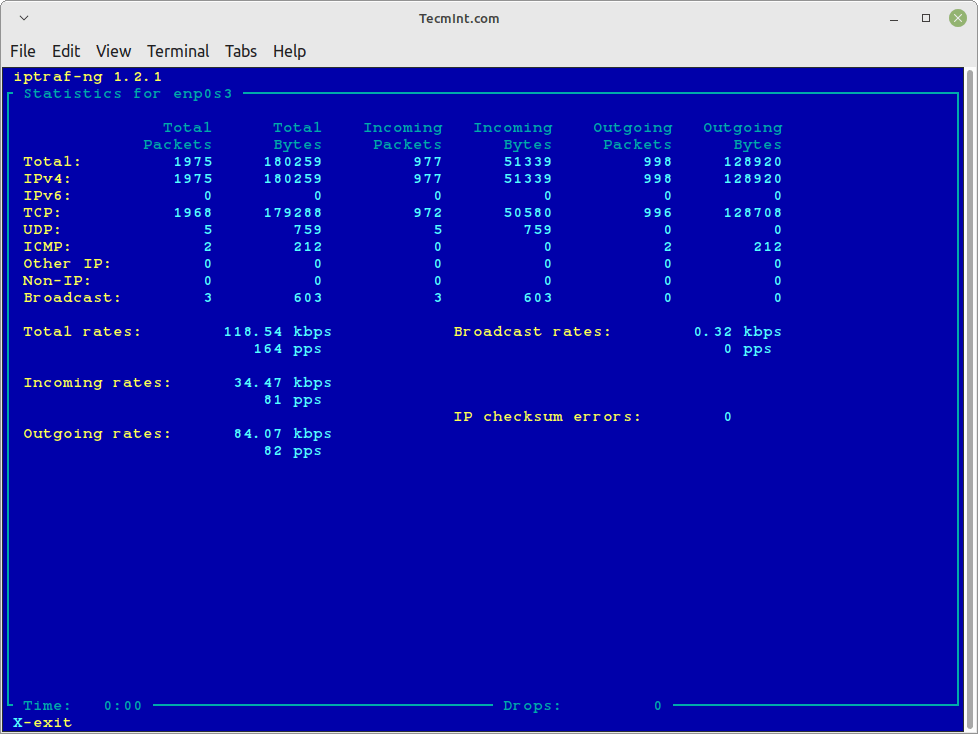
Detailed Interface Statistics
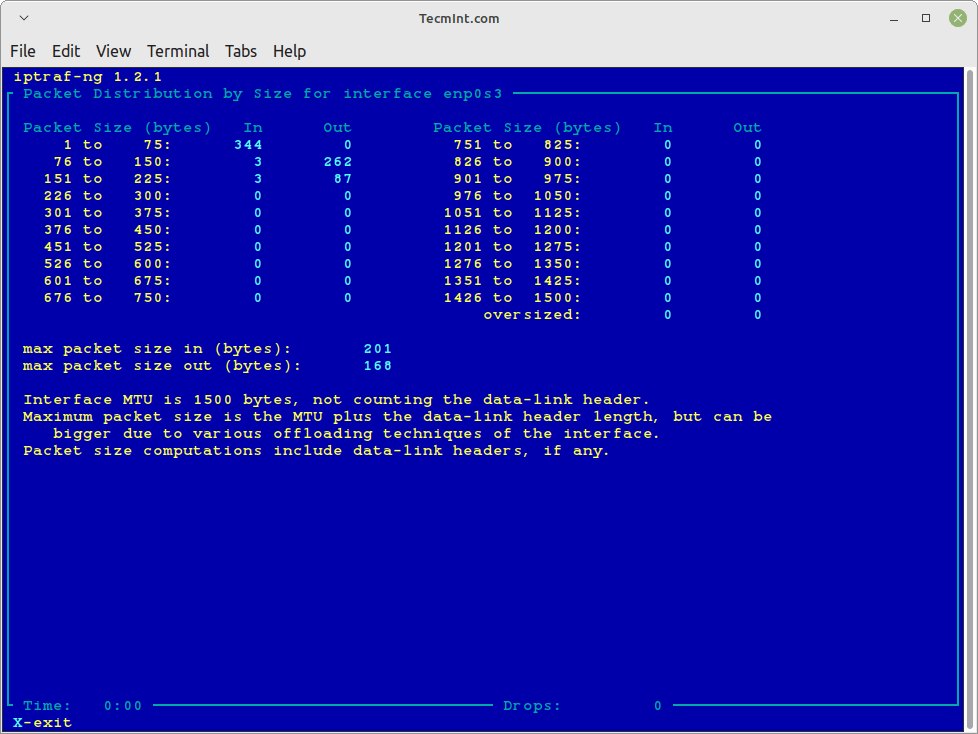
Statistical Breakdowns
LAN Station Monitor

Configure

IPTraf Options
Using “iptraf -i” will immediately start the IP traffic monitor on a particular interface. For example, the following command will start the IP traffic on interface eth0.
This is the primary interface card that is attached to your system. Else you can also monitor all your network interface traffic using the argument as “iptraf -i all“.
# iptraf-ng -i eth0 Or # iptraf-ng -i all
Similarly, you can also monitor TCP/UDP traffic on a specific interface, using the following command.
If you want to know more options and how to use them, check iptraf-ng ‘man page‘ or use the command as ‘iptraf-ng -help‘ for more parameters. For more information visit the official project page.
Introduction
If you manage a server that receives or transmits over UDP, how can this be monitored?
Using tcpdump and maybe some wireshark, let’s work it out.
UDP overview
UDP is a transport layer protocol and alternative to TCP. Like TCP it is carried in a single IP packet, but unlike TCP it does not require a handshake between sender and receiver, it is a connectionless protocol. The data is sent without requiring a response on receipt from the receiver.

So, loss tolerant services where data transmission loss is not considered critical will use UDP. Services where if not all data is received, it’s not required to resend that data again such as:
- Domain Name System ( DNS ).
- Streaming media applications such as movies.
- Online multiplayer games.
- Voice over IP ( VoIP ).
- Trivial File Transfer Protocol ( TFTP ).
- Network Management Protocol ( SNMP ).
- Routing Information Protocol ( RIP ).
- Dynamic Host Configuration Protocol ( DHCP ).
(Yes I just pasted this list in, I hope it’s still helpful though.)
Requirements
Overview of UDP tools
| Action | firewall-cmd | netcat | netstat | nmap | tcpdump | wireshark |
|---|---|---|---|---|---|---|
| Open, close ports. | ☑ | |||||
| Send UDP packets. | ☑ | |||||
| List all UDP listening ports, port connections, listening programs. | ☑ | ☑ | ||||
| Sniff packets in console by port, host, hostname/IP. | ☑ | ☑ | ||||
| Analyse packet capture file dump. | ☑ |
Sniffing packets with tcpdump
Let’s look at some UDP packets. We’re going to use tcpdump to capture all UDP traffic on a port on an interface. Verbose mode ( -v ) is switched on to see some additional fields like checksum and ttl .
[root@rhel-8-1 ~]# tcpdump -i lo -n udp port 53 -vv tcpdump: listening on lo, link-type EN10MB (Ethernet), capture size 262144 bytes 13:20:26.807498 IP (tos 0x0, ttl 64, id 35216, offset 0, flags [DF], proto UDP (17), length 32) 127.0.0.1.59720 > 127.0.0.1.distinct: [udp sum ok] UDP, length 4 ^C 1 packets captured 2 packets received by filter 0 packets dropped by kernel Let’s breakdown the output. What can we see? Let’s identify an IP and UDP packet from that output. IP encapsulates UDP, so when listening on a port for UDP you will get both the IP packet AND the UDP packet.
Here’s a breakdown of the separate packets shown in that output.
| 13:20:26.807498 IP (tos 0x0, ttl 64, id 35216, offset 0, flags [DF], proto UDP (17), length 32) |
| IPv4 header fields and values. |
| 127.0.0.1.59720 > 127.0.0.1.distinct: [udp sum ok] UDP, length 4 |
| UDP header fields and values. |
Understanding dropped packets
Before we move onto what the UDP header fields and values mean, let’s take a quick look at the line 0 packets dropped by the kernel in that tcpdump trace above.
| 0 packets dropped by kernel | Number of packets dropped due to lack of buffer space (read droppped packets section for more. |
Packets get dropped due to no having enough buffer space in the kernel to capture them — why not increase buffer size ( 4069 is KB…):
Or, pass the -c flag. This sets the number of packets captured. A low number here will now stop the buffer size from maxing out ( 20 means udp stream will stop after 20 packets have been captured…):
$ tcpdump -ni lo udp -c 20 port 53 Or, you can even save buffer space by stopping tcdump doing unneccessary DNS queries to resolve IPs by using the -n (no lookups) flag:
UDP header values explained
Here’s a diagram of the UDP header structure (see also RFC 768).
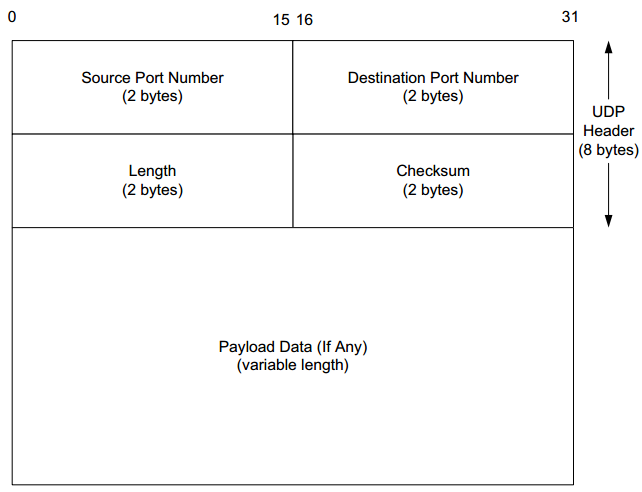
Can we see that in the tcpdump trace above? You betcha. And it is relatively straightforward.
| 127.0.0.1.59720 > 127.0.0.1.distinct | Source IP address and port to the left of > and Destination IP address and port to the right of where that packet is being sent to and from. |
| [udp sum ok] | The datagram’s checksum status. |
| length 4 | The packet length (Bytes), not including headers. |
Great. What stands out to me there is checksum let’s take a deeper look at what checksum is and UDP checksum values.
Checksum

Checksum is used to detect errors in the transmitted UDP segment. It is calculated like so:
- Treats segment contents, including header fields as a sequence of 16-bit integers.
- Adds together the segment contents (this is the checksum value).
- Puts the checksum value into the UDP checksum field.
- Computes checksum of the received segment.
- Checks if computed checksum equals checksum field value: ..if they match 1 , ..if they don’t 0 .
In tcpdump a UDP checksum match will be shown as [udp sum ok] , and a non match as [bad udp cksum 0x224d -> 0x2604!] with the differing bytes shown in the checksum field.
If a checksum error is detected in a UDP sgment the packet will be dropped (discarded) by the receiver.
Analyse UDP over time with wireshark
save output to file
Let’s save the output of tcpdump to a file… no need to redirect to stdout , there’s a flag for it:
tcpdump -c 20 -n -B port 53 -w udp_port_53_log A capture packet file has now been created:
[root@rhel-8-1 ~]# file udp_port_53_log udp_port_53_log: tcpdump capture file (little-endian) - version 2.4 (Ethernet, capture length 262144) To analyse this file, wireshark can be used (reads pcap pcapng files).

Thanks. RF C791, RFC 6864, A beginner’s guide to network troubleshooting in Linux, Verifying which ports are listening and other articles were useful to write this. This was written by Nick Otter.