- How do I resize partitions using command line without using a GUI on a server?
- 3 Answers 3
- Alternative solution : swap file
- Resizing (Growing) the Partition
- Resizing (Shrinking) the Partition
- Как изменить размер Ext4
- Как увеличить размер Ext4
- Шаг 1. Увеличение раздела
- Шаг 2. Увеличение файловой системы
- Шаг 3. Проверка на ошибки
- Шаг 4. Монтирование
- Как уменьшить размер Ext4
- Шаг 1. Проверка файловой системы
- Шаг 2. Уменьшение файловой системы
- Шаг 3. Уменьшение раздела
- Шаг 4. Монтирование
- Выводы
- Похожие записи
- Оцените статью
- Об авторе
How do I resize partitions using command line without using a GUI on a server?
I only have access to the server via a terminal and I can’t use graphical tools such as GParted!
I want to create a new partition from a part of the root (about 768mb) for swap.
# df -h Filesystem Size Used Avail Use% Mounted on /dev/vda 20G 1.3G 18G 7% / udev 10M 0 10M 0% /dev tmpfs 199M 4.9M 194M 3% /run tmpfs 100M 12K 100M 1% /run/user tmpfs 5.0M 4.0K 5.0M 1% /run/lock 3 Answers 3
You cannot shrink/edit a partition if any of the partition on the storage device is mounted. So in order to unmount and edit the root filesystem, the OS need to be shutdown. Then boot into a live system and edit the partition as described in other answers.
Alternative solution : swap file
As an alternative to creating an entire partition, a swap file offers the ability to vary its size on-the-fly, and is more easily removed altogether. Swap file can be hot plugable. i.e can be added and removed without unmounting/turning off the OS.
- Create a 512 MB file called /swapfile . This will be our swap file.
fallocate -l 512M /swapfile dd if=/dev/zero of=/swapfile bs=1M count=512 /swapfile none swap defaults 0 0 I think this is the most easiest and efficient answer =)! Are there implications in using a file instead of a partition though?
Slightly Low Performance if file is fragmented. There is no performance advantage to either a contiguous swap file or a partition, both are treated the same way.
I think this is the best solution. As you are not formatting, shrinking or otherwise changing partition(tables), there is no risk of data-loss.
First of all is important to know that you cannot resize to shrink your root partition if you are using it (This is called online shrinking). You can only grow it online. This is supported by the resize2fs command. I will assume the following:
- You don’t want to loose your information on the root partition.
- You don’t have physical access to the hard drive in order to use a LiveCD. This can apply to a virtual environment or a remote one. In the case of a virtual one you can still manage to boot from a LiveCD if you set the VM to boot from a LiveCD. This is assumming the VM supports outputting the Desktop GUI from where you would run the Gparted app to resize easily. But since this is less likely I assume you can not.
There are 2 type of partitions that you can resize, the LVM partitions or Logical Volume Manager partitions which support Online resizing (Shrinking/Growing) since the creation of the galaxy and the standard partitions most of us use. Right now the only one that has almost 100% support of complete online resizing (Shrink/Grow) is the btrfs filesystem (Which is still in development). I will explain how to do the normal partitions most of us use in the ext4 filesystem.
Resizing (Growing) the Partition
To grow your partition you can do it with the root mounted. To do this simply do:
Provided you already have the empty space ready to be merged. Afterwards I recommend rebooting for the changes to take effect correctly. The command above would resize to the maximum permitted. If you wish to resize to a particular size then simply add the size at the end:
sudo resize2fs /dev/sda1 25G Note that if you want to specify 25.4 GB, you can not use the «.». you would need to go down one unit of measure. In this case from GB to MB, so it would look like this:
sudo resize2fs /dev/sda1 25400M This way you will have a partition of 25.4G
Resizing (Shrinking) the Partition
Shrinking the partition is a two step process which involves:
- Reducing the size of the file system by the amount needed.
- Reducing the size of the underlying block device to match that of the file system.
Before reducing the capacity of a file system you need to reduce the size of the block device (Which can be a partition or a logical volume). Since this is not available for any of the ext* file systems you won’t be able to shrink it from 20 GB to 19.5 GB to create the 500 MB swap one.
Even Ext4 does not support online shrinking. If you try to do it you will get the following:

Your only bet as far as I know is to either:
- Install another Ubuntu version on the same server (On another partition) that can then be used to shrink the root partition of the original Ubuntu Server.
- Install Ubuntu server from scratch with the size you actually want
- Use the Ubuntu Server Live Image to resize the partition. For this case, you will need to get to this screen: And choose the Resize option as shown in the image above. From there you will select what the new size will be since from here you can unmount the unit and shrink it if you want.
As an additional help here is the gparted filesystem suppor http://gparted.org/features.php which gives a very detailed list of supported ones and includes if they have full online resizing. Btrfs is amongst them.
I have added a link at the bottom. The kernel also needs to support this if the filesystem is to resize online correctly.
Thank you @Mr.Hyde. There were several issues with Workstation 10 and even 11. I would recommend 12 and for Ubuntu I would also update either to the latest or the new LTS because there were also some issues. In my case I have VMware workstation 12.0.1 and Ubuntu 15.10 64 bit.
@ack_stoverflow that would be incorrect in the man pages. I have many times used resize2fs for just that. Resizing the partition. I think they really need to update that man page. There are limitations depending on the filesystem like stated in the answer but resizing is doable nonetheless.
The answer depends on whether you can unmount the partition to shrink, or not. In your case, you probably cannot unmount the partition. In Linux (UNIX/MAC OS), mounting a partition refers to using the file system and mapping it to the mount point (in your case / ). Unmounting means that you stop using the filesystem, and remove the mapping to the mount point. You cannot unmount the filesystem containing your running OS.
If the partition can be unmounted
Lets assume you want to shrink a 200GB ext4 partition on /dev/sda4 mounted to /data . It currently contains music and movies or similar, so you can temporarily unmount it. You want to create a 4GB swap.
sudo resize2fs /dev/sda4 196G to resize the ext4 filesystem to 196 GB, assuming that there is enough space. Now, you have to shrink the partition. I currently belive you need to use cfdisk to delete the existing partition, and recreate a smaller partition in its place. You can then also create a new partition for the swap.
will give you a text-based gui to inspect your partition table. I would recommend you to print the partition table to a file or screen at that point, and take note of the current configuration as backup. You can then select /dev/sda4 and delete the partition. In its place, free space will be displayed. Use new to create a new partition with 196 GB in its place, and set the type to ext4. Then, move to the trailing free space and create the 4GB swap partition with type swap . Note: I did not test these commands, as I can’t play around with my / at the moment.
If the partition cannot be unmounted
You cannot shrink a mounted ext3/4 partition (see manpage of resize2fs ). As you are running your OS from / , you cannot unmount / . That means you have to boot another OS (e.g. from USB key) to do the changes.
In your case, it is a remote server (on KVM most likely), so you might not be able to boot from USB/ a live OS image. There might be other ways to change the partitioning from your vServer provider through an admin GUI. I believe that is your best bet currently.
Как изменить размер Ext4
На данный момент Ext4 — это самая популярная файловая система для операционных систем семейства Linux, она используется как на серверах, так и на домашних компьютерах, и там и там часто возникает необходимость изменить размер раздела.
В сегодняшней статье мы рассмотрим как расширить раздел Ext4 в графическом интерфейсе или с помощью терминала.
Как увеличить размер Ext4
Шаг 1. Увеличение раздела
Если вы хотите изменить размер корневого раздела файловой системы, то вам обязательно надо будет загрузится с LiveCD иначе вы не сможете редактировать примонтированный раздел. Если это не системный раздел, то его можно отмонтировать и затем изменять. Для увеличения раздела будем использовать parted. Сначала запустите утилиту:
Здесь /dev/sda — это ваш диск, один из разделов которого вы хотите расширить. Сначала выведите текущую таблицу разделов, для этого выполните:

Как видите, здесь есть только один раздел и он занимает 16 гигабайт, а всего на диске доступно 21,7 гигабайт. Чтобы расширить Ext4 и занять всё это пространство используйте команду resizepart:
(parted) resizepart 1 21,7GB
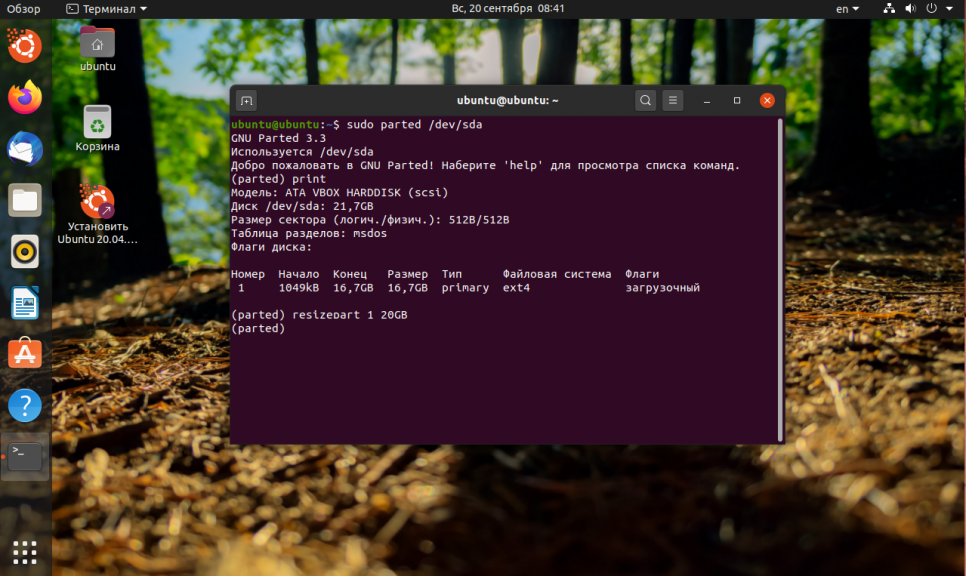
Первый параметр, это номер раздела, который вы узнали из предыдущей команды, а второй, размер раздела, доступный размер тоже выводится в предыдущей команде. Теперь утилиту можно закрыть:
Шаг 2. Увеличение файловой системы
Осталось увеличить самую файловую систему до конца раздела. Для этого воспользуемся утилитой resize2fs. Она может работать даже когда файловая система смонтирована.
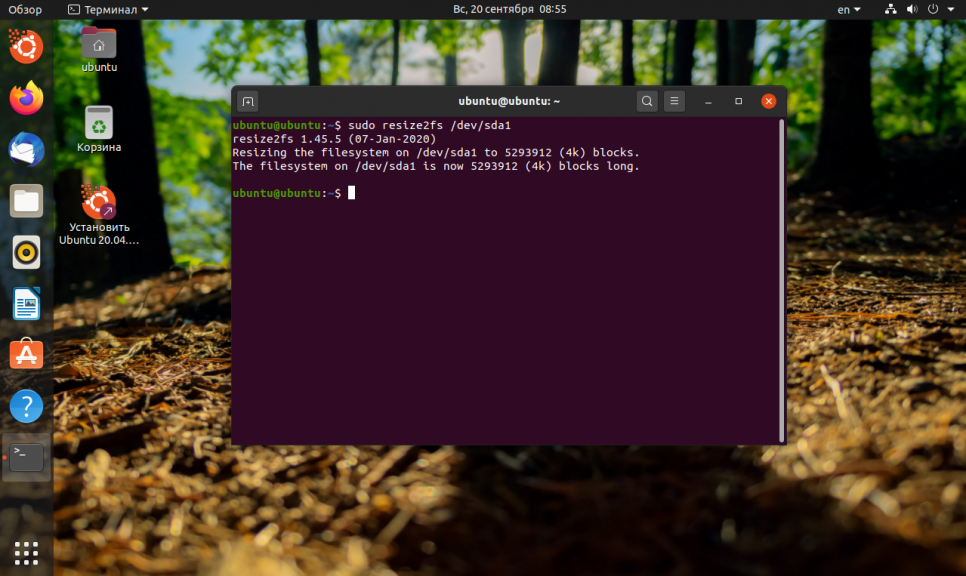
Утилита по умолчанию увеличивает файловую систему на всё доступное пространство раздела.
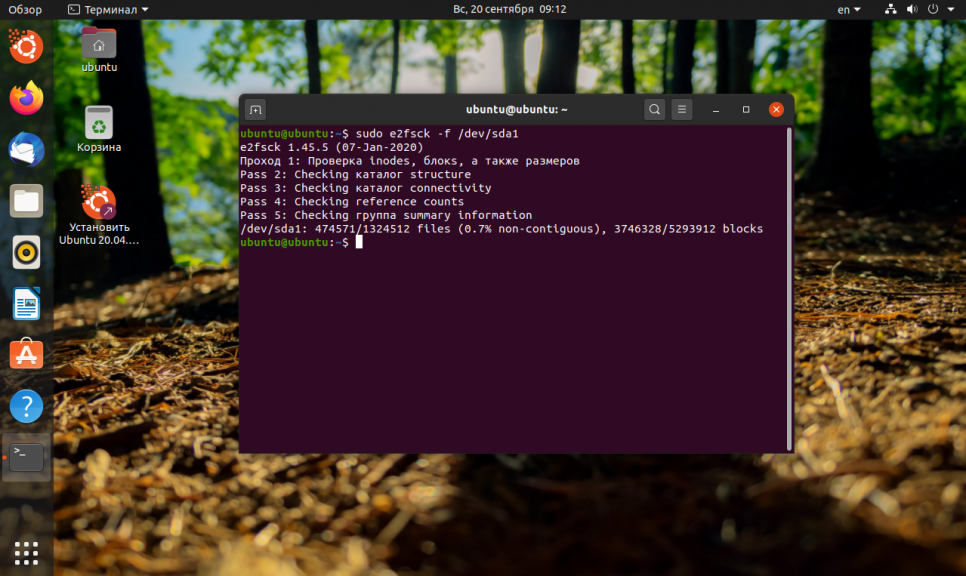
Шаг 3. Проверка на ошибки
После этого не помешает проверить всё на ошибки с помощью fsck:
Шаг 4. Монтирование
Затем можно монтировать полученную файловую систему и проверять её размер, как видите, теперь она занимает 20 гигабайт:
Как уменьшить размер Ext4
Допустим, нам надо отделить от корневого раздела четыре гигабайта и создать из них другой раздел, например, раздел подкачки. Для этого сначала надо уменьшить размер файловой системы, а затем самого раздела.
Шаг 1. Проверка файловой системы
Перед тем, как уменьшить размер Ext4 надо проверить её на ошибки. Если файловая система смонтирована, размонтируйте её:
Шаг 2. Уменьшение файловой системы
Уменьшение размера файловой системы тоже выполняется с помощью resize2fs. Но теперь утилите надо передать в параметрах новый размер файловой системы. Например, 16 гигабайт:
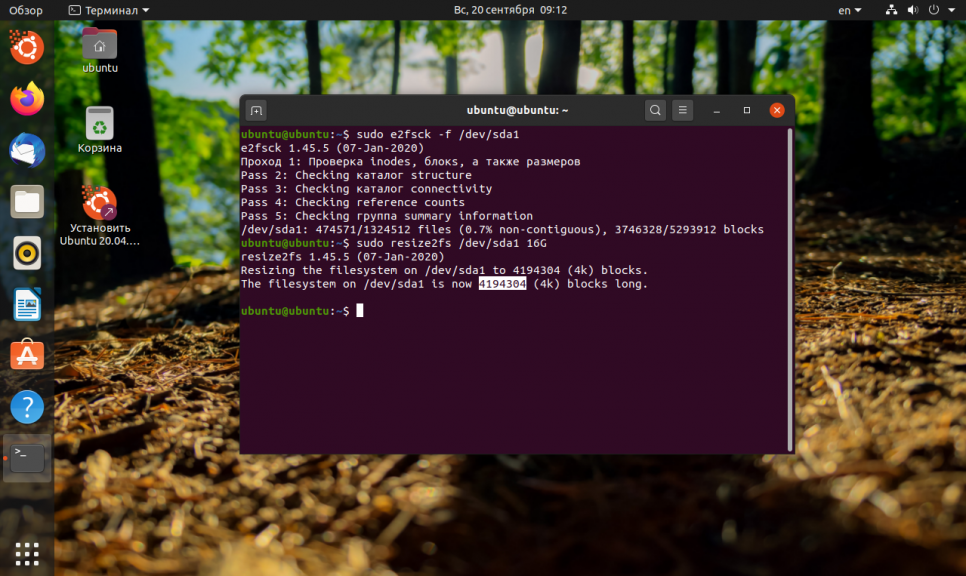
Размер можно указывать в килобайтах (K), мегабайтах (M) или гигабайтах (G). Теперь вы знаете как изменить размер Ext4. В выводе утилита вы увидите сколько теперь блоков занимает файловая система. Это число надо умножить на 4096 чтобы получить размер файловой системы в байтах. Цифра четыре взята потому что размер одного блока в Ext4 равняется четырём килобайтам. Например, в данном случае это будет 17179869184 байт или 16 гигабайт:

Теперь надо уменьшить размер раздела с помощью parted. Но значение желательно брать чуть больше, для безопасности, потому, что если вы зацепите пространство, где расположена файловая система, то работать с ней вы больше не сможете.
Шаг 3. Уменьшение раздела
Запустите parted и используйте ту же команду resizepart чтобы уменьшить размер раздела:
(parted) resizepart 1 16,1GB
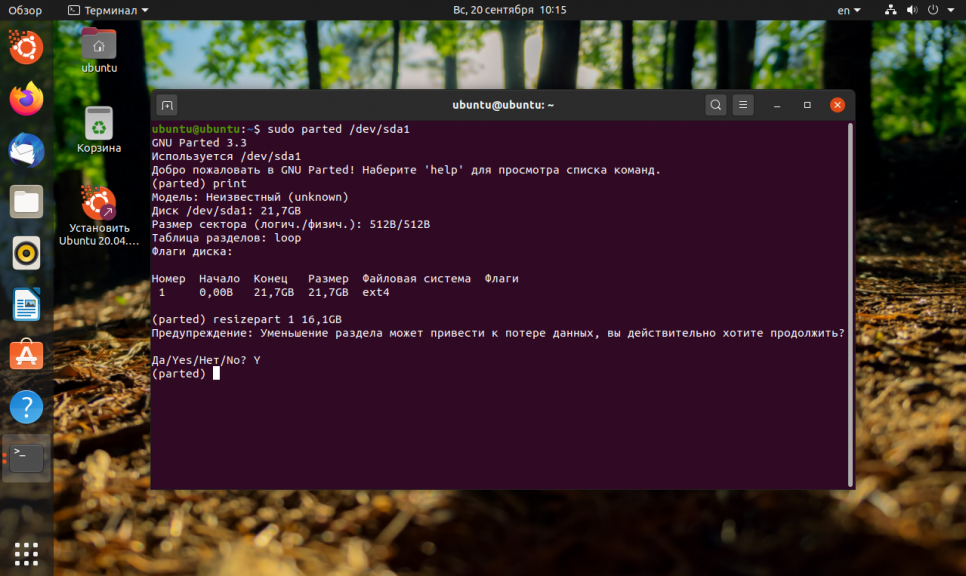
Чтобы закрыть программу выполните:
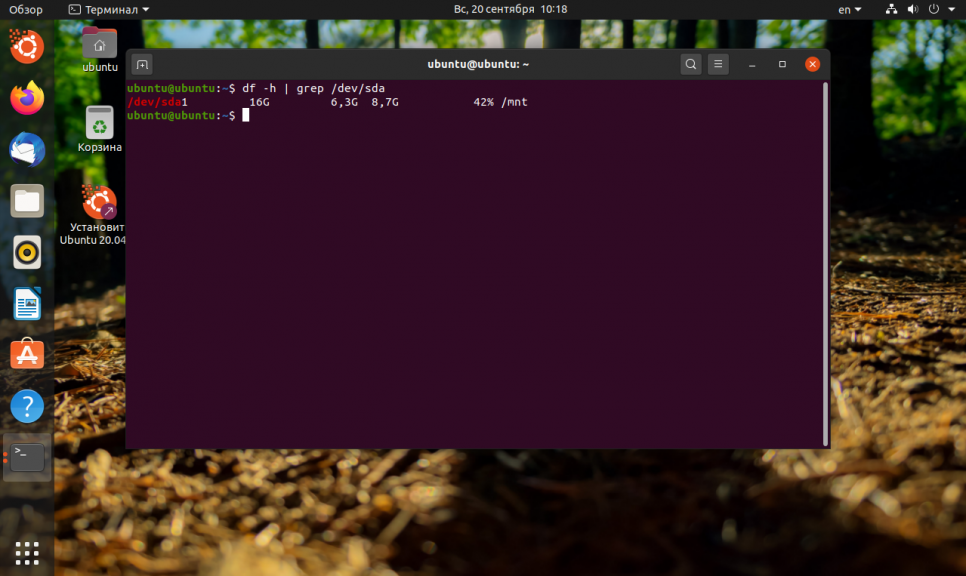
Шаг 4. Монтирование
После этого файловую систему можно монтирововать и проверять её размер:
Выводы
В этой статье мы рассмотрели как уменьшить раздел Ext4, а также как его увеличить через терминал. Если вы работаете в графическом интерфейсе, то всё выполняется гораздо проще. Для этого можно воспользоваться утилитой Gparted. Она автоматически меняет как размер раздела, так и файловой системы. К тому же программа может не только менять положение конца раздела, но и начала, иногда это может быть полезно. А как вы меняете размер файловой системы? Напишите в комментариях!
Обнаружили ошибку в тексте? Сообщите мне об этом. Выделите текст с ошибкой и нажмите Ctrl+Enter.
Похожие записи
Оцените статью
Статья распространяется под лицензией Creative Commons ShareAlike 4.0 при копировании материала ссылка на источник обязательна .
Об авторе
Основатель и администратор сайта losst.ru, увлекаюсь открытым программным обеспечением и операционной системой Linux. В качестве основной ОС сейчас использую Ubuntu. Кроме Linux, интересуюсь всем, что связано с информационными технологиями и современной наукой.