- Introduction
- Prerequisites
- Dummy headlines
- How to Create a Bootable Linux USB Flash Drive?
- Create a Bootable Linux USB with Etcher (Linux, Windows, macOS)
- Create a Bootable Linux USB with dd (Linux, macOS)
- dd for windows
- Create a Bootable Linux USB with Rufus (Windows)
- Create a Bootable Linux USB with EtchDroid (Android)
- About the author
- David Morelo
- Best Linux Apps for Creating Bootable Live USB Drive
- Startup Disk Creator
- Etcher
- UNetbootin
- DD Command
- Conclusion
- About the author
- Nitesh Kumar
Introduction
Ubuntu can be installed from a USB flash drive. This may be necessary for most new portable computers without DVD drives and is handy for others because a USB flash drive is so convenient. Also, you can configure Ubuntu on the USB flash drive to save changes you make, unlike a read-only CD/DVD disk.
Booting from a USB flash drive created with usb-creator alias Startup Disk Creator and mkusb will behave just as if you had booted from the install CD. It will show the language selection and then the install menu, from which you can install Ubuntu onto the computer’s hard drive or launch the LiveCD environment. Other utilities, e.g. UNetbootin, may create slightly different boot drives or if on UEFI might not work at all with Debian iso files due to a bug
Note: This article uses the term «USB flash drive» alongside USB stick, USB drive, USB device, USB pendrive and thumb drive.
Prerequisites
- a 4 GB USB flash device/drive/stick. If the iso file is smaller than 2 GB, it is possible to use a 2 GB USB device, at least with some of the methods. Files on this USB device will be erased, so backup the files you want to keep before making the device bootable. Some of the tools require that this USB device is properly formatted and mounted while other tools will overwrite whatever is on the target device. Please follow the instructions for each tool.
- an Ubuntu flavour ISO file downloaded from an official web page, ubuntu.com/download or http://releases.ubuntu.com, stored in your running computer (for example in the directory Downloads in the internal drive, not in the USB flash drive that you want to make into a USB boot drive).
- Check with md5sum (or another checksum tool) that the download was good. In Linux there is the tool ‘md5sum’. In Windows you can do it with Rufus: click on the circle with a tick mark (more about Rufus here.)
Dummy headlines
After a major remake of this help page the following headlines are kept here because they may be linked to from other web sites. Several other headlines further down in the page are also kept for this reason.
How to Create a Bootable Linux USB Flash Drive?
![]()
One great thing about Linux is that you can try it out without installing it on your hard drive. Most Linux distributions provide disk images (ISO files) that contain everything you need to boot into a live environment and, optionally, begin installation.
But how do you transfer a downloaded disk image to a USB flash drive? In this article, we provide three solutions to help you create a bootable Linux USB flash drive on Linux, Windows, macOS, and even Android.
Create a Bootable Linux USB with Etcher (Linux, Windows, macOS)
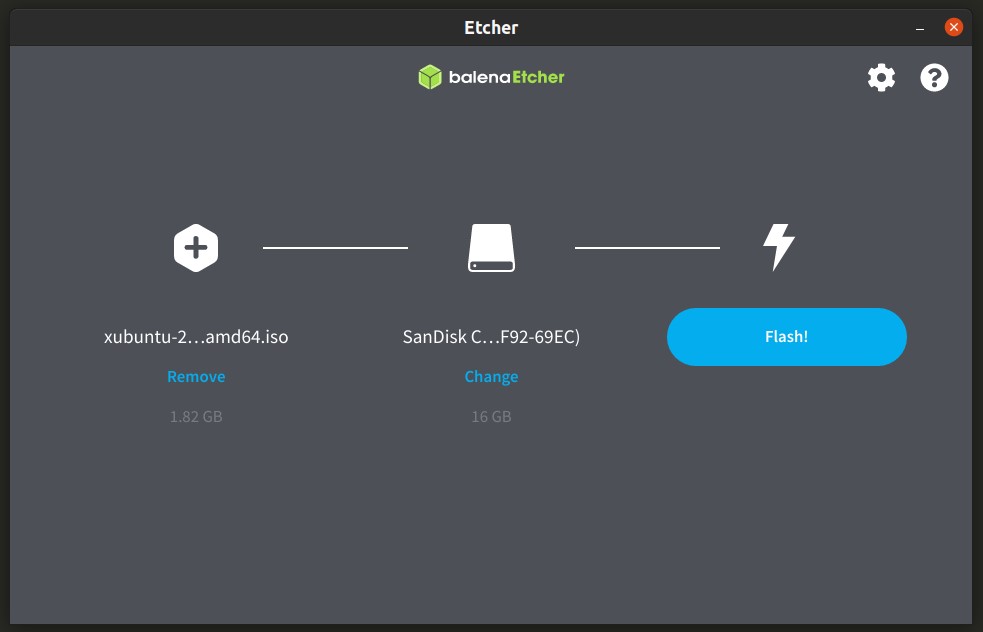
Written in Electron, Etcher is a cross-platform open source utility for flashing disk images to USB drives and memory cards. It runs on Windows, macOS, and Linux and provides an approachable graphical user interface that reduces the process of creating a bootable Linux USB to just three simple steps.
Unlike other similar software tools, Etcher prevents users from accidentally wiping their entire hard drives, which is something you’ll definitely appreciate if you’ve never created a bootable USB before and understandably feel anxious about the process.
To create a bootable Linux USB with Etcher:
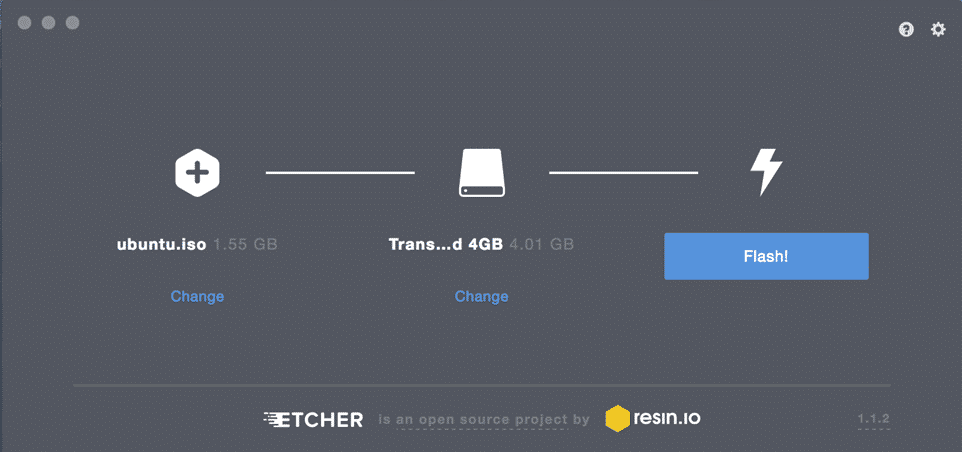
1. Download Etcher from its official website.
3. Select the ISO file you want to flash to your USB drive.
4. Specify the target USB drive if the correct drive is not selected already.
5. Click the Flash! button and wait for the process to finish.
Create a Bootable Linux USB with dd (Linux, macOS)
dd is a command-line utility for Unix-like operating systems whose primary purpose is to read/write data from/to device files, such as USB flash drives. Because dd is bundled in GNU coreutils, you can find it on virtually all Linux distributions, as well as on macOS.
To create a bootable Linux USB with dd:
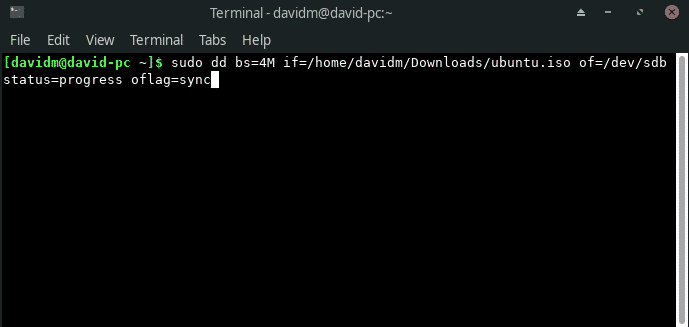
- Open your favorite terminal emulator.
- Issue the following command (replace /dev/sdx with your drive and path/to/ubuntu.iso with the actual path to the ISO file you want to flash):
The version of dd included in GNU coreutils doesn’t provide any progress indication. If you’d like some reassurance that the transfer is progressing as it should, you can use the following command (replace dd-pid with the process-id of dd, which you can find using htop):
dd for windows
There’s actually a version of dd for Windows that provides all the functionality you need to transfer an ISO file to a USB flash drive. To install it:
- Download the latest version from its official website.
- Extract the downloaded archive to a new folder on your hard drive.
- Open Command Prompt and navigate to the folder with dd for Windows.
- Use dd for Windows just like you would the version included in GNU coreutils.
Unfortunately, dd for Windows was last updated in 2010, and many users have reported issues when using the utility in Windows 10. Considering that dd for Windows doesn’t even support data conversion, such as byte order swapping and conversion to and from the ASCII and EBCDIC text encodings, you’re probably better off using either Etcher or Rufus, which we describe in the next chapter.
Create a Bootable Linux USB with Rufus (Windows)
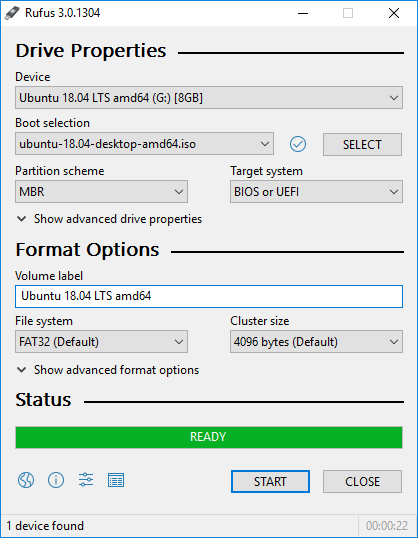
Before the release of Etcher in 2016, Rufus was the best way to create a bootable Linux USB in Windows. This bootable USB flash drive creator is much faster than all of its Windows competitors, and it can create live USB drives for systems with both BIOS and UEFI. Rufus has been translated into several dozen languages, and it’s compatible with Windows 7 and newer, both 32- and 64-bit.
To create a bootable Linux USB with Rufus:
- Download Rufus from its official website.
- You can choose between an installer and a portable version.
- Install it if you’ve downloaded the installer. Otherwise, you can just launch it.
- Select the target USB device.
- Click the SELECT button next to the boot selection dropdown menu and specify the ISO file you want to flash.
- Choose the correct partition scheme for your system.
- Click the START button.
- Wait for Rufus to finish.
In addition to creating live Linux USB flash drives, Rufus can also flash Windows disk images.
Create a Bootable Linux USB with EtchDroid (Android)
The last utility we want to describe is called EtchDroid, and its purpose is to write OS images to USB drives on Android smartphones and tablets.
Why would you want to use your Android device to create a bootable Linux USB? Well, imagine you find yourself in the middle of nowhere, and your laptop stops working after a botched system update. Without another computer to use, your only option on how to create a bootable Linux USB to fix the issue is your Android device, and that’s where EtchDroid comes in.
To create a bootable Linux USB with EtchDroid:

- Download EtchDroid from Google Play or F-Droid.
- Connect a USB flash drive to your Android device using a USB OTG adapter.
- Launch EtchDroid and select the Write raw image or ISO option.
- Select your ISO image.
- Select the USB flash drive.
- Tap Write to write the image to the USB flash drive.
EtchDroid has been tested with Ubuntu and its derivatives, Debian, Fedora, Arch Linux, and Raspberry PI SD card images. It doesn’t work with Windows, macOS, and old GNU/Linux distros. Support for Windows installation ISO files is on the developer’s to-do list.
About the author
David Morelo
David Morelo is a professional content writer in the technology niche, covering everything from consumer products to emerging technologies and their cross-industry application
Best Linux Apps for Creating Bootable Live USB Drive
![]()
This article will list some useful Linux applications that will allow you to create bootable live USB drives by extracting or transferring ISO image files of various Linux distributions. Live mode allows users to run and experience a full Linux desktop along with all of its applications without actually installing the OS. You can also create persistent live bootable USB drives that will allow you to permanently store changes made in a live session. Creating persistent storage for live mode won’t be covered in this article as it is a complex and lengthy topic that needs to be covered in a separate article.
Startup Disk Creator
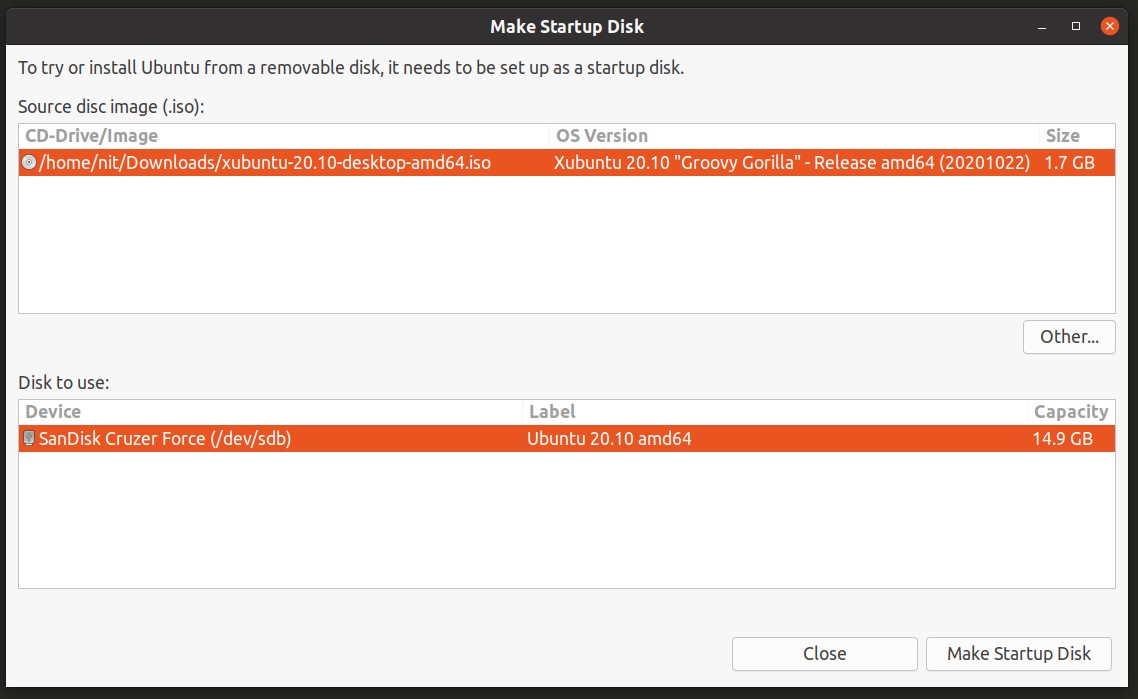
Startup Disk Creator, as the name suggests, is an application for creating “startup disks” or “bootable disks” that can be run in live mode. This application ships by default in Ubuntu and some of its variants. The process for creating a new bootable drive using Startup Disk Creator is pretty straight forward: you have to launch the application, select the ISO image, select the USB drive and then have to click on the “Make Startup Disk” button. The process may take some to finish, depending on the read / write speeds of the external drive and size of the ISO image. Note that all data on the external drive will be wiped out during creation of the bootable drive.
In case Startup Disk Creator is not installed by default on your Ubuntu system, you can install it by running the command mentioned below:
If you are using Kubuntu or other Ubuntu derivatives using KDE as the default desktop environment, you can use the KDE variant instead:
Etcher
Etcher or balenaEtcher is a cross platform and open source application that can be used to flash ISO images of various Linux distributions. Created using technologies like Electron and TypeScript, Etcher can verify contents of external drives after flashing to ensure that these drives work properly on the next boot. Etcher features a minimalistic interface without much clutter.
You can download the Etcher “AppImage” executable file that can be used on all major Linux distributions from here. Other installable packages are also available on the same page.
UNetbootin
UNetbootin is an open source software that allows you to create bootable external drives from ISO images of various Linux distributions. It can also download ISO images directly from the application itself. UNetbootin uses a different approach than other applications mentioned in this article. It extracts the contents of the ISO image to external drives along with some other files needed to make these USB drives bootable. This method is especially useful if you want to copy some files to a USB drive once it has been made bootable. Other apps mentioned in the article may make “read-only” drives from ISO images of certain Linux distributions (Ubuntu for example).

You can download the UNetbootin executable binary that can be used on all Linux distributions from here.
Run the following commands to launch UNetbootin:
Note that UNetbootin shows an option to reserve space for persistent storage, but it didn’t work in my testing.
DD Command
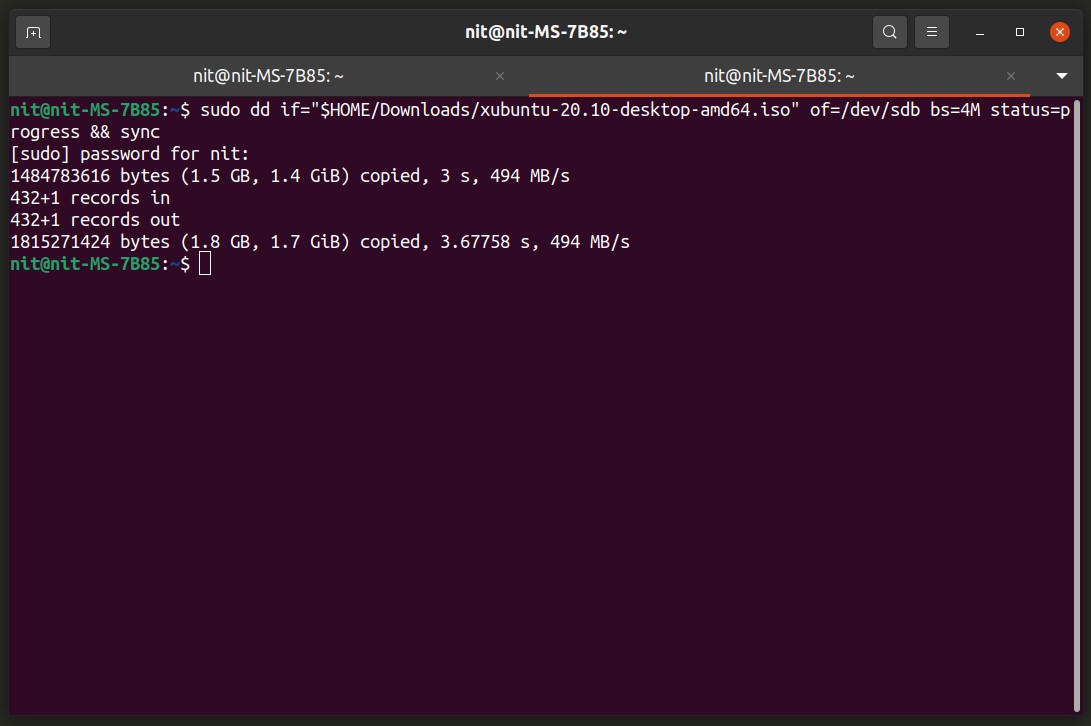
DD command can copy and convert files on Linux systems. You can use it to transfer files on any connected storage drive, internal or external. DD command is commonly used to copy ISO image files and create bootable USB disks. DD command is available by default on all major Linux distributions.
To create a bootable live USB disk by using DD command, first you have to find out the identifier for your external drive. You can do so by running the command below:
Once you have the identifier for your external drive, run the command below by replacing “/dev/sdX” with the identifier you found in the step above (also change the path to ISO image file). Be extra careful when supplying the identifier, you don’t want to wipe out a wrong storage drive.
Wait for the process to finish, then safely remove the drive from the file manager.
Conclusion
These are some of the tried and tested methods to reliably create bootable live USB drives. These methods do not create persistent drives where all changes made in a live session are stored and saved just like on a full installation. Creating persistent drive is a bit complex process and a separate topic altogether.
About the author
Nitesh Kumar
I am a freelancer software developer and content writer who loves Linux, open source software and the free software community.