- USB Redirector for Linux — Share USB over Network in Linux
- USB Redirector for Linux helps to:
- How to Start
- Redirect a USB Device in 5 Steps
- Cross-platform Features and Remote Desktop Support
- More Information on How to Use USB Redirector for Linux
- System Requirements
- Подключение USB устройств в WSL (Windows для Linux) и Hyper-V
USB Redirector for Linux — Share USB over Network in Linux
This Free product allows to share and access USB devices remotely on Linux platform. This solution is compatible with all of our other USB redirection products. It allows redirecting USB devices between Linux based computers or between Linux and Windows. And with help of the special patch, it is possible to add USB redirection support to the well-known open source remote desktop clients, rdesktop and FreeRDP, so that you can redirect USB devices into remote session on Windows computer where USB Redirector RDP Edition or USB Redirector TS Edition are installed.
USB Redirector for Linux helps to:
- Redirect USB devices to virtual machine.
- Organize USB server for users in your local or corporate network.
- Use USB devices plugged into your Linux thin-client in a Windows Remote Desktop session.
- Use USB devices plugged into remote Windows-based computer.
- Limit physical access to USB devices, but make them available for users in your network.
Not sure if this version suits your needs?
Compare USB Redirector editions
How to Start
USB Redirector for Linux can be installed in three modes:
- USB server mode. When installed in this mode, USB Redirector allows to share your USB devices for access on remote computers with Linux or Windows operating systems.
- USB client mode. When installed in this mode, USB Redirecror allows you to connect remote USB devices that were shared on remote computers with Linux or Windows operating systems.
- Combined USB server and USB client mode. You can either share your USB devices for remote access or connect USB devices from remote computers with Linux or Windows operating systems.
USB Redirector installation instructions can be found here.
Redirect a USB Device in 5 Steps
- Step 1. Download and install USB Redirector for Linux in USB server mode on a computer where USB device is physically attached, this computer will be the USB server:
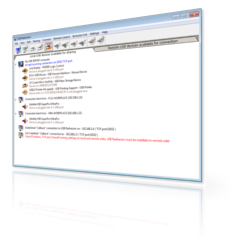
user@cyber:~$ usbsrv -list-devices =================== LIST OF LOCAL USB DEVICES =================== 8: Portable Super Multi Drive HLDS Inc — USB Mass Storage Device Vid: 152e Pid: 2571 Port: 1-4 Status: plugged ===================== ======================= =================== user@cyber:~$
root@localhost:~$ usbclnt -list-devices ================== LIST OF REMOTE USB DEVICES =================== 1: USB server at 192.168.1.105:32032 Mode: manual-connect Status: connected | `- 8: Portable Super Multi Drive HLDS Inc Vid: 152e Pid: 2571 Port: 1-4 Mode: manual-connect Status: available for connection ===================== ======================= =================== root@localhost:~$
Cross-platform Features and Remote Desktop Support
USB Redirector for Linux is compatible with USB Redirector, USB Redirector RDP Edition and USB Redirector TS Edition. It means you can freely share USB devices between Linux and Windows systems without any limitations.
It is possible to redirect USB devices over RDP connection from Linux thin-client to Windows Terminal Server (RD Sesssion Host). For this, you need to use one of the compatible RDP clients. We support the most popular open source Linux Remote Desktop clients, rdesktop and FreeRDP. We provide patches for these RDP clients which add USB over RDP redirection support.
After installing USB Redirector for Linux, you need to apply the special patch, that is shipped inside USB Redirector installation package in the rdp/rdesktop directory:
- Copy usbrdr.c and usbrdr.patch into rdesktop source code directory
- Run patch -p3 -i usbrdr.patch
- Re-compile and re-install patched rdesktop
- Start rdesktop with ‘-r usbrdr’ option:
More Information on How to Use USB Redirector for Linux
System Requirements
USB Redirector for Linux works on the following Linux distributions:
- Debian 6 and newer
- Fedora 10 and newer
- Gentoo 10.1 and newer
- openSUSE 11.1 and newer
- RedHat 6 and newer
- Ubuntu 8.10 and newer
- Other systems, which meet the following requirements:
- kernel version 2.6.27 to 5.5
- glibc 2.9 or newer, uclibc or musl libs
- udev subsystem
- r/w file system (not read-only)
- kernel source code or kernel headers are required for installation
IncentivesPro is a division of SimplyCore LLC.
Copyright © 2007-2020 SimplyCore LLC. All rights reserved.
Подключение USB устройств в WSL (Windows для Linux) и Hyper-V

13.09.2022

itpro

Linux, Windows 10, Windows 11

Комментариев пока нет
Для получения прямого доступа к физическим USB устройствам компьютера из подсистемы Windows для Linux (WSL2) или виртуальной машины Hyper-V вы можете open-source проект usbipd-win. Это проект позволяет настроить сквозную передачу внешнего USB устройства, подключенного к хостовой Windows, в любой дистрибутив Linux, запущенный в виде WSL или в виртуальные машины. Это позволяет выполнять любые действия с USB устройствами из Linux (прошивка Android устройств/ADB/Fastboot, доступ к смарт-картам, работа с оборудованием Arduino и т.д.).
В usbipd-win используется протокол USB/IP для перенаправления USB трафика через виртуальный сетевой интерфейс между WSL и хостовой Windows. Сначала мы настроим клиент USB/IP в Linux (WSL), и затем установим и установим и запустим серверную часть usbipd-win на Windows и прокинем USB устройство в Linux.
Usbipd-win поддерживает версии, начиная с Windows 8.1 x64 и Windows Server 2012 R2, и позволяет предоставить общий доступ к локальным USB устройствам Windows другим виртуальным машинам (включая WSL2 и гостевые ОС Linux на Hyper-V). С помощью встроенных средств Hyper-V ранее можно было пробрасывать только USB накопители или другие виды USB устройства через довольно ограниченный режим Enhanced Session Mode.
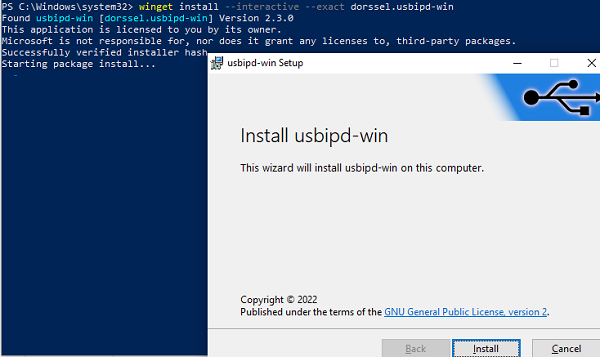
Проект usbipd-win доступен на GitHub (https://github.com/dorssel/usbipd-win). Вы можете скачать и установить его вручную (доступен установочный MSI файл), но гораздо быстрее установить приложение с помощью встроенного менеджера пакетов winget.
winget install —interactive —exact dorssel.usbipd-win
Программа создаст в Windows отдельную службу usbipd (USBIP Device Host): «C:\Program Files\usbipd-win\usbipd.exe» server, которая слушает на порту TCP 3240
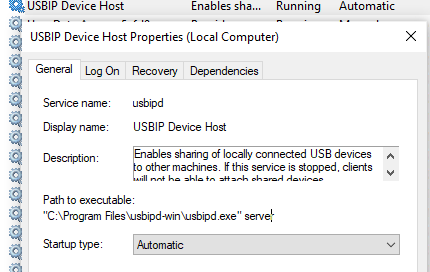
Для программы usbipd.exe в Windows Defender Firewall создано правило ( usbipd ), разрешающее доступ на порт TCP 3240 с компьютеров в локальной сети.
Теперь настроим поддержку USBIP в среде Windows Subsystem for Linux. Проверьте, что версия ядра в вашем образе не ниже 5.10.60.1 (в нашем примере для демонстрации используется WSL 2 с образом Ubuntu 22.04 LTS):
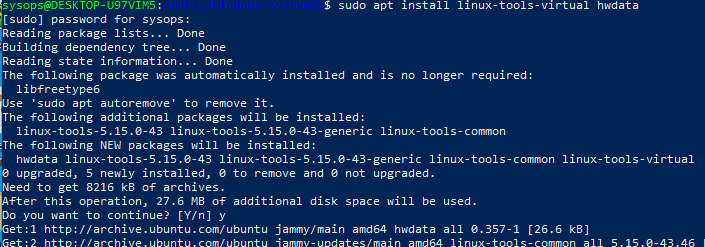
Теперь нужно установить инструменты для работы с USB/IP и базу с идентификаторами USB устройств.
$ sudo apt install linux-tools-virtual hwdata
$ sudo update-alternatives —install /usr/local/bin/usbip usbip `ls /usr/lib/linux-tools/*/usbip | tail -n1` 20
$ sudo apt-get install usbip hwdata usbutils
Установка USB/IP утилит в WSL образа на базе rpm (CentOS/Oracle Linux):
$ sudo rpm —import https://www.elrepo.org/RPM-GPG-KEY-elrepo.org
$ sudo rpm -ivh http://www.elrepo.org/elrepo-release-7.0-3.el7.elrepo.noarch.rpm
$ sudo yum install kmod-usbip
$ sudo yum install usbip-utils
$ sudo yum install hwdata
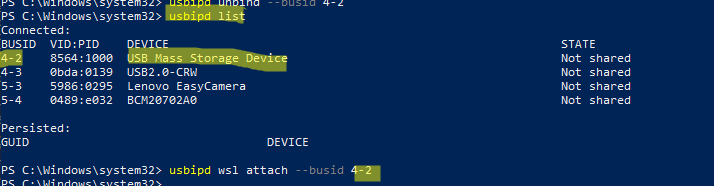
Теперь откройте командную строку с правами администратора на хостовом Windows компьютере и выведите список USB устройств:
Как вы видите, ни одно из USB устройств не опубликовано (Not shared). Вы можете предоставить общий доступ к USB устройству по его BUSID. В моем примере я хочу прокинуть в WSL флешку (USB Mass Storage Device) с BUISID 4-2.
usbipd wsl attach —busid 4-2
- Если вы используете WSL 1 (не поддерживается в usbip), появится ошибка: sbipd: error: The specified WSL distribution is using WSL 1, but WSL 2 is required. Learn how to upgrade at https://docs.microsoft.com/windows/wsl/basic-commands#set-wsl-version-to-1-or-2.
- Если появится ошибка: usbipd: error: WSL kernel is not USBIP capable, обновите WSL систему командой:
wsl —update
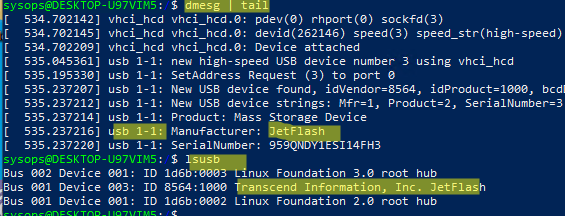
Проверьте, что ваша флешка была подключена к WSL:
Если вы хотите прокинуть ваше USB устройство на другой компьютер с Linux ОС по сети (это может быть виртуальная машина с гостевой Linux на Hyper-V, или любом другом гипервизоре), сначала получить список опубликованных USB устройств:
$ usbip list —remote=192.168.31.20
Теперь можно подключить нужное USB по его ID:
$ sudo usbip attach -remote=192.168.31.20 —busid=4-2
В этом примере указан IP адрес хоста Windows, где запущен сервер usbipd-win.
Теперь ваши Linux утилиты должны увидеть подключенное USB устройство.
Чтобы отключить общий доступ к USB устройству в Windows:
usbipd wsl detach —busid 4-2
Обратите внимание, что подключенные таким образом USB накопители не определяются как блочные устройства в WSL. Проверьте это командой lsblk. Дело в том, что в ядре WSL отсутствует драйвера для USB накопителей (чтобы добавить их придется пересобрать ядро).
В обычных дистрибутивах Linux вы сможете смонтировать файловую систему прокинутых USB накопителей стандартным образом.
Поэтому, если вам нужно смонтировать внешнюю USB флешку, диск, SD карту в WSL, нужно использовать такие команды:
$ sudo mkdir /mnt/f
$ sudo mount -t drvfs f: /mnt/f

Таким образом usbipd-win можно использовать для сквозной передачи физических USB устройств из Windows в WSL, в виртуальные машину или физические компьютер с Linux по сети с помощью USBOverIP
![]() Предыдущая статья Следующая статья
Предыдущая статья Следующая статья ![]()

Mailcow: готовый почтовый сервер на postfix+dovecot+SOGo на Docker контейнерах
Установка KMS сервера vlmcsd на Linux для активации Windows и Office
Установка и настройка прокси сервера Squid в Linux
Настройка аутентификации в Nginx через Active Directory (LDAP)