- Linux host PC
- Connecting to Linux console through UART-USB converter
- Connecting to Linux console via SSH client
- Connecting as root — not recommended
- Connecting as regular user
- Windows host PC
- Prerequisites
- Connecting to Linux console through UART-USB converter
- Connecting to Linux console via SSH client
- Connecting as root — not recommended
- Connecting as regular user
- Enabling a USB Serial Console on Linux
- Configuring ttyUSB0
- Accessing the USB Serial Console with CoolTerm
Linux host PC
Connecting to Linux console through UART-USB converter
VisionCB-STD has built-in UART-USB converter, it lets you connect to the console via virtual COM port. First of all you need to determine what is the VisionCB-STD virtual COM number on your Linux system. To do that connect VisionCB-STD board to your PC with micro-USB cable and list your terminal devices:
If there is only one device then it is the terminal you are looking for (/dev/ttyUSB0 in the example above), if there are more /dev/ttyUSB* terminal then disconnect and reconnect your board to find proper one.
sudo minicom -b 115200 -D /dev/ttyUSB0 -s
Enter Serial port setup, press F to disable hardware flow control, press Enter, choose Exit, now you can log in as root (password root) or som (password som). It is strongly recommended to change the default passwords of existing users. To do that enter passwd command, you will be prompted to enter password twice:
root@somlabs:~# passwd root Enter new UNIX password: Retype new UNIX password: passwd: password updated successfully root@somlabs:~#
To exit minicom press Ctrl+A, Z, X, then confirm by pressing Enter.
Connecting to Linux console via SSH client
Connecting as root — not recommended
Login to the UART-USB console as described in the previous section and change the root password. Once you have changed it (still via UART-USB connection) you need to modify /etc/ssh/sshd_config file:
Now you can log in as root via SSH, you only need IP address of VisionSOM-6ULL. Enter ip a for list of all network interfaces and their IP addresses:
root@somlabs:~# ip a 1: lo: mtu 65536 qdisc noqueue state UNKNOWN group default link/loopback 00:00:00:00:00:00 brd 00:00:00:00:00:00 inet 127.0.0.1/8 scope host lo valid_lft forever preferred_lft forever inet6 ::1/128 scope host valid_lft forever preferred_lft forever 2: eth0: mtu 1500 qdisc pfifo_fast state UP group default qlen 1000 link/ether a6:e3:1c:a0:3d:b0 brd ff:ff:ff:ff:ff:ff inet 192.168.0.25/24 brd 192.168.0.255 scope global eth0 valid_lft forever preferred_lft forever inet6 2a02:a310:813c:d700:a4e3:1cff:fea0:3db0/64 scope global mngtmpaddr dynamic valid_lft 974055sec preferred_lft 369255sec inet6 fe80::a4e3:1cff:fea0:3db0/64 scope link valid_lft forever preferred_lft forever 3: sit0@NONE: mtu 1480 qdisc noop state DOWN group default link/sit 0.0.0.0 brd 0.0.0.0
In this case the IP address of the Ethernet (eth0) interface is 192.168.0.25. Now you can connect to VisionSOM-6ULL with SSH client from your Linux host PC:
Connecting as regular user
To connect as a regular user you need to create new account or use existing one. In the first case login as root through USB-UART converter or SSH, and add a new account and set password:
root@somlabs:~# useradd tom root@somlabs:~# passwd tom Enter new UNIX password: Retype new UNIX password: passwd: password updated successfully root@somlabs:~#
By default new user has no home directory and his shell is /bin/sh. To create home directory enter:
root@somlabs:~# mkdir /home/tom
To change shell to bash enter:
root@somlabs:~# chsh -s /bin/bash tom
Now you can log in as tom with SSH client.
Windows host PC
Prerequisites
- PC with Windows operating system and USB port (for USB-UART converter connection) or local network connection (for SSH connection)
- VisionCB-STD board with VisionSOM-6ULL and Linux image installed
- Micro-USB cable
- PuTTY terminal
Connecting to Linux console through UART-USB converter
VisionCB-STD has built-in UART-USB converter, it lets you connect to Linux console via virtual COM port. First of all you need to determine what is the VisionCB-STD virtual COM number on your Windows system, to do that open Control Panel, connect VisionCB-STD to your computer, find Ports (COM & LPT) and expand it. You should see USB Serial Port (COM), if there is only one item with this name then it is your port, if there are more ports then disconnect and reconnect VisionCB-STD to check which port shows up. Now we can connect with PuTTY to your VisionSOM-6ULL, connect VisionCB-STD to your PC, run PuTTY and:
- Select Serial in Connection type section
- Enter VisionCB-STD port number in Serial line field
- Enter 115200 in Speed field
- Click Open
Now you can log in using one of existing user names. It is strongly recommended to change the default passwords of existing users. To do that enter passwd command, you will be prompted to enter password twice:
root@somlabs:~# passwd root Enter new UNIX password: Retype new UNIX password: passwd: password updated successfully root@somlabs:~#
Connecting to Linux console via SSH client
Connecting as root — not recommended
Login to the UART-USB console as described in the previous section and change the root password. Once you have changed it (still via UART-USB connection) you need to modify /etc/ssh/sshd_config file:
Now you can log in as root via SSH, you only need IP address of VisionSOM-6ULL. Enter ip a for list of all network interfaces and their IP addresses:
root@somlabs:~# ip a 1: lo: mtu 65536 qdisc noqueue state UNKNOWN group default link/loopback 00:00:00:00:00:00 brd 00:00:00:00:00:00 inet 127.0.0.1/8 scope host lo valid_lft forever preferred_lft forever inet6 ::1/128 scope host valid_lft forever preferred_lft forever 2: eth0: mtu 1500 qdisc pfifo_fast state UP group default qlen 1000 link/ether a6:e3:1c:a0:3d:b0 brd ff:ff:ff:ff:ff:ff inet 192.168.0.25/24 brd 192.168.0.255 scope global eth0 valid_lft forever preferred_lft forever inet6 2a02:a310:813c:d700:a4e3:1cff:fea0:3db0/64 scope global mngtmpaddr dynamic valid_lft 974055sec preferred_lft 369255sec inet6 fe80::a4e3:1cff:fea0:3db0/64 scope link valid_lft forever preferred_lft forever 3: sit0@NONE: mtu 1480 qdisc noop state DOWN group default link/sit 0.0.0.0 brd 0.0.0.0
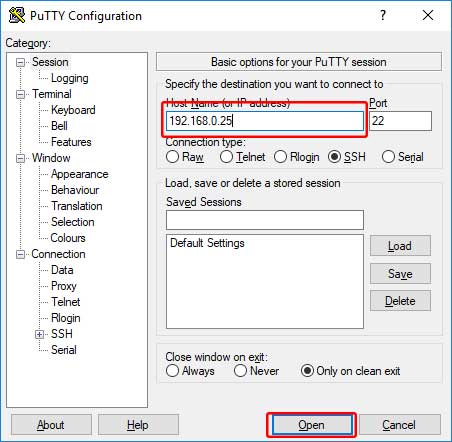
In this case the IP address of the Ethernet (eth0) interface is 192.168.0.25. Now you can connect to VisionSOM-6ULL with SSH client from your Windows host PC:
- Start PuTTY
- Enter VisionSOM-6ULL IP address in Host Name field
- Click Open button
Connecting as regular user
To connect as a regular user you need to create new account or use existing one. In the first case login as root through USB-UART converter or SSH, and add a new account and set password:
root@somlabs:~# useradd tom root@somlabs:~# passwd tom Enter new UNIX password: Retype new UNIX password: passwd: password updated successfully root@somlabs:~#
By default new user has no home directory and his shell is /bin/sh. To create home directory enter:
root@somlabs:~# mkdir /home/tom
To change shell to bash enter:
root@somlabs:~# chsh -s /bin/bash tom
Now you can log in as tom with SSH client.
Enabling a USB Serial Console on Linux
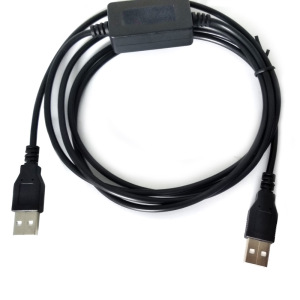
Serial consoles have been used to communicate with headless networking and datacenter gear for decades. It works without requiring a screen, keyboard or networking which makes it helpful for debugging embedded devices and clusters of broken laptops and headless Arm boxes (which is my home lab). Most devices stopped shipping with serial ports years ago and USB to RS-232 serial adapters became common, but I picked up a USB to USB crossover serial adapter eliminating the need for separate cables. I purchased mine from Alibaba.com, which was cheaper than the name-brand alternatives (about $25 with shipping to Australia).
Configuring ttyUSB0
On Linux the serial console is usually available as ttyS0 , and if it’s enabled you can connect to it with tools like screen or minicom . Physical and virtual consoles are connected to serial ports and the terminal with the application getty (“get tty”), presenting the user with a login prompt. A USB serial console would be available as ttyUSB0 , so you need to connect the Linux service getty to ttyUSB0 . For most recent Linux versions, this is managed by systemd so enabling and starting the service is as simple as:
systemctl enable getty@ttyUSB0.service systemctl start getty@ttyUSB0.service This creates a symlink from /etc/systemd/system/getty.target.wants/getty@ttyUSB0.service to /lib/systemd/system/getty@.service and starts listening on the USB serial console. I ran this on Raspbian 10, Armbian 11, and Debian 11 x86 and Arm systems and it worked across the board. I added it to my Chef recipe to ensure it stayed enabled across my current and any future machines.
Accessing the USB Serial Console with CoolTerm
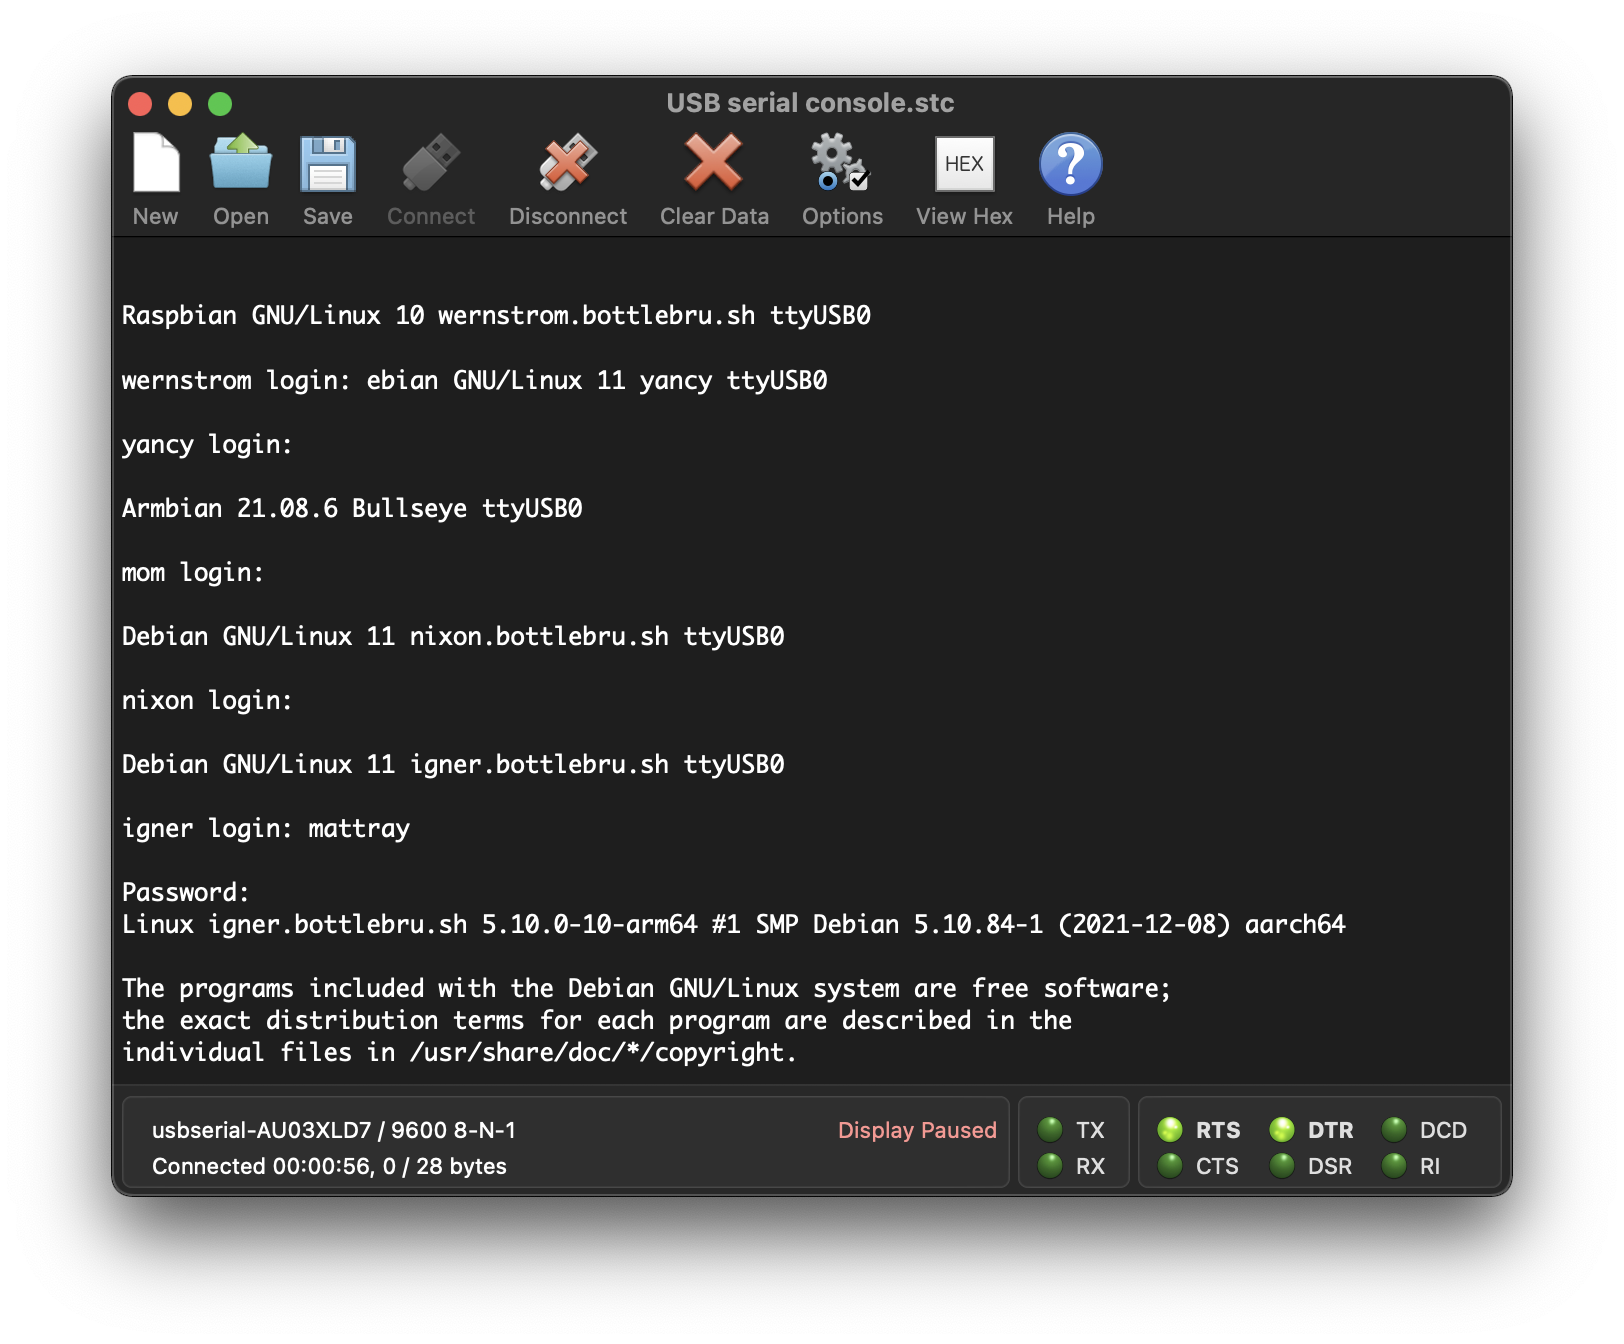
I’m currently using macOS, so I initially tried out Serial which was very impressive but seemed like overkill for my limited needs. Roger Meier’s CoolTerm serial port terminal application was simple and worked like a charm.
To connect with CoolTerm follow these steps:
- Start the CoolTerm application
- Connect the USB serial crossover cable. I’m using a USB-C to USB-A adapter with my M1 Macbook Air, it works just fine.
- Go to Options and select the Port similar to usbserial-AU03XLD7 . If it is not listed, unplug the USB cable, replug it and click Re-Scan Serial Ports without the cable plugged into the remote machine yet.
- The Baudrate should probably be 9600 , this appears to be the default.
- Data Bits should be 8 , Parity None and Stop Bits 1 , these are all defaults.
- Under Terminal you may want to set Filter ASCII Escape Sequences if you use any special characters in your PS1 or see odd characters in your terminal.
- I didn’t change any of the other defaults, it worked without having to mess with these.
- Exit the Options and select Connect. At this point you should see a blank terminal and a timer with the number of bytes transmitted.
- Plug the other end of the USB cable into your ttyUSB0 enabled device and a terminal should come right up. It works exactly like a virtual console or SSH session.
Unplugging it and plugging it into another machine behaves exactly like detaching a monitor. A USB console left open will stay open and switching to other machines will bring up their prompt accordingly. Have fun!
- You’ve somehow ended up reading Matt Ray’s ramblings.
- Email me
- @mattray on GitHub
- @mattray on Twitter
- subscribe via RSS