- Install a different version of a package
- 3 Answers 3
- Short answer:
- Long answer copied from https://askubuntu.com/a/103338/42024:
- How to Use update-alternatives Command on Ubuntu
- Prerequisites:
- Installing New Alternatives:
- Auto Mode and Alternative Priority:
- Changing Alternatives Command Manually:
- Settings Alternatives Mode to Auto:
- Removing Alternative from Alternatives:
- Removing All Commands from Alternatives:
- About the author
- Shahriar Shovon
- How to manage different versions of same software in Linux?
- 1 Answer 1
- How to use 2 different versions of GCC on Linux Ubuntu and force MAKE to use one of them
- 1 Answer 1
Install a different version of a package
I’m running lucid server and have installed tomcat. The version it installed is 6.0.24-2ubuntu1.6. Is this the version I’m tied to? Is it possible to install a more recent version? The one available from maverick is 6.0.28. Maybe I can add a source to provide my lucid install with this version? In the package manager user interface I can «force version». Is it possible to force version from command line alternative as well?
3 Answers 3
Short answer:
Using pinning, you can select which packages come from maverick, and automatically get their dependencies, and keep them up-to-date through your package manager. https://help.ubuntu.com/community/PinningHowto
Long answer copied from https://askubuntu.com/a/103338/42024:
You would be much better off exploring apt pinning, see man apt_preferences .
So lets assume you’re on Oneiric and you want to get those packages from Precise.
If you read the man you’ll see that I copy/pasted the relevant sections and just modified the release name
/etc/apt/preferences
Package: libccid Pin: release n=precise Pin-Priority: 990 Package: libpcsclite* Pin: release n=precise Pin-Priority: 990 Package: libusb* Pin: release n=precise Pin-Priority: 990 Package: opensc Pin: release n=precise Pin-Priority: 990 Package: pcscd Pin: release n=precise Pin-Priority: 990 Explanation: Uninstall or do not install any Ubuntu-originated Explanation: package versions other than those in the oneiric release Package: * Pin: release n=oneiric Pin-Priority: 900 Package: * Pin: release o=Ubuntu Pin-Priority: -10 Then, I copied my /etc/apt/sources.list to /etc/apt/sources.list.d/precise.list and replaced all occurrences of oneiric with precise. Then ran apt-get update and finally apt-get upgrade .
# apt-get upgrade Reading package lists. Done Building dependency tree Reading state information. Done The following packages will be upgraded: libpcsclite1 libusb-0.1-4 libusb-1.0-0 libusbmuxd1 4 upgraded, 0 newly installed, 0 to remove and 0 not upgraded. Need to get 86.0 kB of archives. After this operation, 88.1 kB disk space will be freed. Do you want to continue [Y/n]? y Do you want to continue [Y/n]? y Get:1 http://us.archive.ubuntu.com/ubuntu/ precise/main libusb-0.1-4 amd64 2:0.1.12-20 [17.6 kB] Get:2 http://us.archive.ubuntu.com/ubuntu/ precise/main libusb-1.0-0 amd64 2:1.0.9~rc3-2 [30.9 kB] Get:3 http://us.archive.ubuntu.com/ubuntu/ precise/main libpcsclite1 amd64 1.7.4-2ubuntu1 [23.5 kB] Get:4 http://us.archive.ubuntu.com/ubuntu/ precise/main libusbmuxd1 amd64 1.0.7-2 [14.1 kB] Fetched 86.0 kB in 0s (124 kB/s) For some reason, pcscd and opensc didn’t get installed, probably because it wasn’t installed to begin with so there was nothing to upgrade, no big deal, I can install exactly that version using precise as the reference like this.
$ apt-get install opensc pcscd -t precise How to Use update-alternatives Command on Ubuntu
![]()
If you have 2 or more versions of the same command, you can use update-alternatives to set which one to use by default and also switch between them very easily. For example, let’s say, you have Python 2 and Python 3 installed on your computer. Now, you have to run a Python 2 script as follows:
Here, is the path of the Python 2 script i.e. ~/scripts/hello.py
The same way, you have to run a Python 3 script as follows:
Here, is the path of the Python 3 script i.e. ~/scripts/hello2.py
So, what if you want to access both Python 2 and Python 3 using the same command python?
Well, using update-alternatives command, you can make a new executable python (/usr/local/bin/python) and add all the available Python versions to the alternatives database. Then, you can easily set which version of Python to use by default. You can also switch between the Python versions very easily. I am going to show you how to do this practically in this article. That way, you will gain practical knowledge of how update-alternative works.
Prerequisites:
You must have Python 2 and Python 3 installed on your Ubuntu machine if you want to follow along and try out the examples in this article.
You can install Python 2 and Python 3 with the following command on Ubuntu:

Python 2 and Python 3 should be installed if not installed already. In my case, they are already installed.

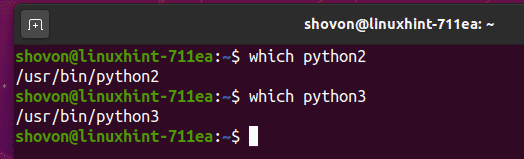
Now, find the Python 2 and Python 3 interpreter path with the following commands:
As you can see, the Python 2 interpreter path is /usr/bin/python2 and Python 3 interpreter path is /usr/bin/python3. Memorize them. We will need this later.
Installing New Alternatives:
Now, you can create a new alternatives python and install Python 2 interpreter /usr/bin/python2 as an alternative with the priority 20 as follows:
NOTE: Here, /usr/local/bin/python is the binary path of the python alternatives. You can change it to some other path such as /usr/bin/python if you want. But I would suggest you place it somewhere in the /usr/local/bin/ directory as this is the directory where user-space programs should be according to the directory structure of Linux.

A new alternatives python should be created and Python 2 interpreter should be added there as an alternative.

The same way, install Python 3 interpreter /usr/bin/python3 as an alternative of the python alternatives and set it a priority of 40 with the following command:

Python 3 interpreter alternative should be added to the python alternatives.

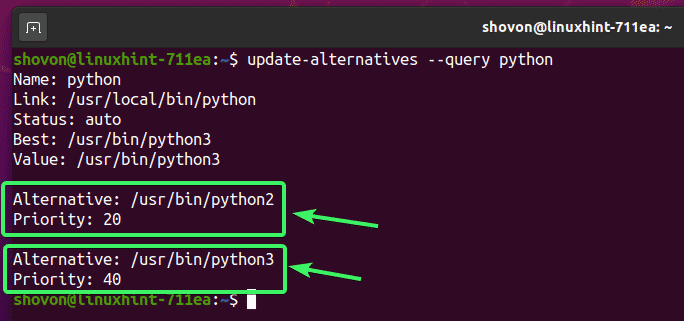
Now, you can see more information about the python alternatives you’ve just created as follows:

As you can see, the python alternatives has 2 alternative commands /usr/bin/python2 (priority 20) and /usr/bin/python3 (priority 40).
Auto Mode and Alternative Priority:
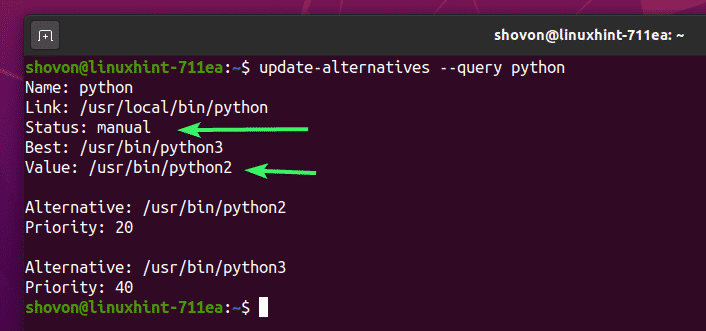
Every alternatives in the update-alternatives database has 2 modes: auto and manual.
In auto mode, the alternatives selects the command/executable/alternative with the highest available priority by default.
In manual mode, you select the default command/executable/alternative for the alternatives manually.
The default mode for any alternatives is auto.
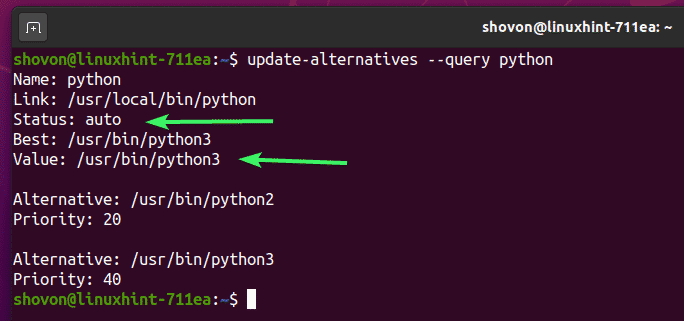
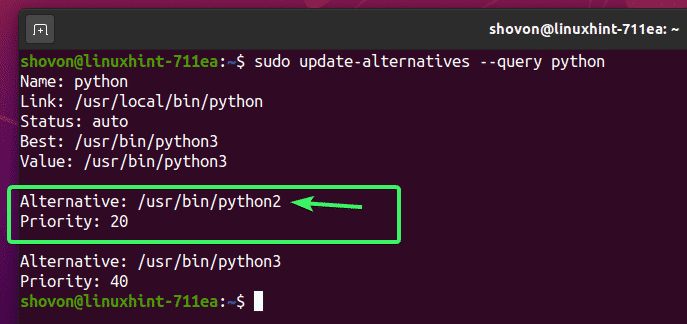
In the earlier section, you’ve seen I’ve set the priority for Python 2 interpreter (/usr/bin/python2) alternative 20 and for Python 3 interpreter (/usr/bin/python3) alternative 40. This was because I wanted to set Python 3 interpreter as the default alternative for the python alternatives. As the default mode is auto, the python alternatives selected the Python 3 interpreter alternative automatically as it has higher priority than Python 2 interpreter alternative.
As you can see, the mode (Status) is auto. The Python 3 interpreter (/usr/bin/python3) is the Best one as it has the highest priority. Also, the currently selected one is also the Python 3 interpreter (/usr/bin/python3) as it has the highest priority and the mode is auto.
As you can see, python command executes the Python 3 interpreter.

In the next section of this article, I will show you how to change the alternatives mode to manual and select a lower priority command/executable for the alternatives as well.
Changing Alternatives Command Manually:
As I have said, Python 2 won’t be automatically selected as I have set it to a lower priority. So, if you want to select a lower priority alternative, you have to do that manually.
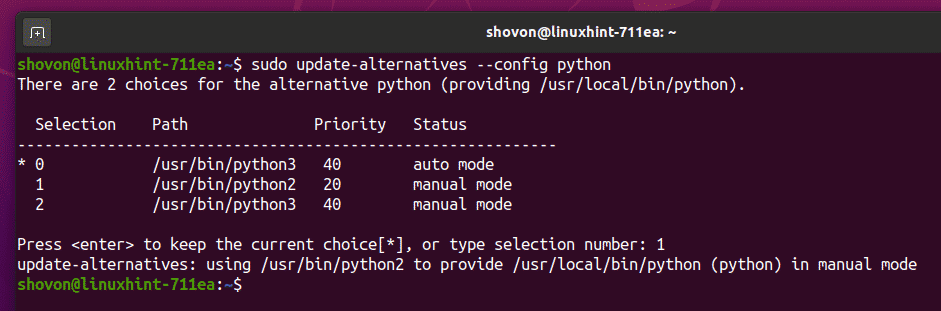
To select Python 2 alternative manually for the python alternatives, run the following command:

Now, update-alternatives will list all the commands/alternatives you have installed for the python alternatives. In my case, it’s Python 2 and Python 3 alternatives.
You also have a Selection number for each version/alternative which you can use to select a version/alternative from the list. Selection number 0 is auto. Selection number other than 0 is manual.
Here, Selection number 1 is for Python 2 alternative and Selection number 2 is for Python 3 alternative.
So, to select Python 2 alternative, press 1 and then press .

Python 2 should be set as the default alternative for the python alternatives.
As you can see, the current mode is manual. Even though the Best alternative is /usr/bin/python3 (Python 3), it’s using /usr/bin/python2 (Python 2).
As you can see, python command executes the Python 2 interpreter now.

Settings Alternatives Mode to Auto:
If you want to switch to auto mode for the python alternatives again, run the following command:

Based on the priority, an alternative should be set for the python alternatives. In this case, the Python 3 alternative.

As you can see, python command executes the Python 3 interpreter.

Removing Alternative from Alternatives:
You can remove an alternative from the python alternatives.
First, list all the available alternative for the python alternatives as follows:

Now, select and copy the path of the alternative you want to remove. I am going to remove the /usr/bin/python2, the Python 2 interpreter here.
To remove the /usr/bin/python2 (Python 2 interpreter) alternative from the python alternatives, run the following command:

As you can see, the /usr/bin/python2 (Python 2 interpreter) alternative is removed from the python alternatives.

Removing All Commands from Alternatives:
You can also remove all the available alternatives from the python alternatives with the following command:

As you can see, there are no alternatives for python any more.

So, that’s how you use update-alternatives command on Ubuntu to switch between different versions of the same program or command very easily. Thanks for reading this article.
About the author
Shahriar Shovon
Freelancer & Linux System Administrator. Also loves Web API development with Node.js and JavaScript. I was born in Bangladesh. I am currently studying Electronics and Communication Engineering at Khulna University of Engineering & Technology (KUET), one of the demanding public engineering universities of Bangladesh.
How to manage different versions of same software in Linux?
(To be specific: The software «Arduino 1.06» is offered via Ubuntu repositories. There is a new version 1.6 available, but not in the Ubuntu repositories yet. What happens to my old version when I install 1.6?)
1 Answer 1
Yes, if you install a new version of a package using Ubuntu’s installation tools (Ubuntu Software Center, or a low-level tool like dpkg ), it will replace the old version.
There is no no simple, supported way to install two versions of a single package in parallel. However, if there is a problem with the new version, you can go back to the old version by re-installing it.
There are some options of installing multiple versions of a program in parallel:
- Some software is packaged specially to allow this. Different versions use different package names, so they appear as different packages to the installation system, and can be installed in parallel. However, note that this only works if this is taken into account when creating the packages — you cannot just rename the packages before installation. This is most often done with libraries that have incompatible changes (for example, GTK+ V3 is packaged as libgtk-3-0, V2 as libgtk2.0-0 ).
- Get a version of the software that is not a Debian package (Ubuntu’s package format), but can be installed by just unpacking it in a folder. Then you can install as many versions as you want. For example, Firefox is distributed like this.
- Finally, you can manually unpack a Debian package, install it into a folder and modify the software to find its files in the new location. This, however, can be quite complicated, so is usually only an option for software developers.
How to use 2 different versions of GCC on Linux Ubuntu and force MAKE to use one of them
I’m using the last version of Ubuntu which come with the gcc 4.4.5 version. I need to recompile a program that was not written by me and that can be only compiled with an older version of gcc like the 4.0. I managed to configure this older version and used a prefix during the install process so that my old gcc version is in the /opt/gcc-4.0.1/bin. I have tried to create a symlink using ln -s /opt/gcc-4.0.1/bin/gcc gcc . But when I invoke gcc -v I still get the result gcc version 4.4.5 . To compile my program which come already with a makefile, if I do make , it’s still using the new version of gcc. How could I tell make to use the old version?
1 Answer 1
Make uses some standard variables in order to determine which tools to use, the C-compiler variable is called «CC». You can set the CC variable, either directly in your Makefile
which is fine if you’re working alone on it, or everyone has the same setup. Or you can pass it on the command line like so:
the third option is set /opt/gcc-4.0.1/bin before everything else in your path (which is why it doesn’t work for you, the current directory isn’t in the path, so the symlink you put there will not be considered when searching)
export PATH=/opt/gcc-4.0.1/bin:$PATH For completeness, in your symlink solution, you’d have to invoke ./gcc to get the right gcc instance, but IMHO this is probably not the best solution.