- What is the Significance of the “wheel” Group in Ubuntu?
- Significance of the “wheel” Group in Ubuntu
- How to Add a User to the “wheel” group in Ubuntu?
- Optional: Create “wheel” Group
- How to Remove a User from the “wheel” Group?
- Conclusion
- Users and Groups
- Finding the owner of file
- /etc/passwd file
- Details about groups
- wheel group
- Becoming superuser
- Adding a new user
- Changing user passwords
- Modifying existing user details
- Deleting a user
- Adding a new group
- Adding new group to an user
- Table of Contents
- Related Topics
What is the Significance of the “wheel” Group in Ubuntu?
In Ubuntu, the “wheel” group is a special group that has significant security implications. It restricts access to the root user account and provides limited root privileges to certain trusted users. When a user is added to the “wheel” group, they are granted the ability to use the “su” (switch user) command to switch to the root user account. It allows the user to execute administrative tasks that need root authority, such as installing software, changing system files, and managing system services.
This guide will illustrate the significance of the “wheel” group along with practical implementation in Ubuntu.
Significance of the “wheel” Group in Ubuntu
The “su” command is only available to members of the wheel group. This means that even if a user knows the root password, they cannot switch to the root user account unless they are a member of the wheel group.
- Extra Layer of Security: It provides an extra layer of security for the root user account.
- Restrict Access: It restricts access to the root user account, which reduces the risk of accidental or malicious changes to the system.
- Delegate Certain Administrative Tasks: It also allows system administrators to delegate certain administrative tasks to trusted users without giving them full root access.
- Maintain the Stability of the System: It provides limited root privileges to trusted users.
How to Add a User to the “wheel” group in Ubuntu?
By default, the first user created during installation is added to the “sudo” group. It permits the performance of administrative operations. To add a user to the “wheel” group in Ubuntu, you can follow these steps:
Step 1: Check the “wheel” Group with Existing Users
To check if the “wheel” group is already present on the system, run the “grep” command by specifying the directory such as “/etc/group”:

The output shows that the “wheel” group exists and has one user assigned to it named as “roger“
Optional: Create “wheel” Group
If the “wheel” group does not exist, create it using the “groupadd” command by specifying the “wheel” group as below:

The output shows that the “wheel” group has been created.
Step 2: Add the User to the “wheel” Group
Once the “wheel” group is created, add the user to it by using the “usermod” command with the “aG” option. In our case, specify the username as “peter” to add to the “wheel” group:
$ sudo usermod -aG wheel peter

The output shows that “peter” has been added to the “wheel” group.
Step 3: Verify Added User to the “wheel” Group
To verify the added user “peter” is part of the “wheel” group, run the following command:

The output confirms that the user “peter” is now a member of the “wheel” group.
How to Remove a User from the “wheel” Group?
To remove an existing user from the wheel group, use the “deluser” command by specifying the group and user names. In our case, remove the “peter” from the “wheel” group:

The output shows that “peter” has been removed from the “wheel” group. To explore more methods to delete a user from a group, follow our link.
Conclusion
In Ubuntu, the “wheel” is a user group that provides administrative access to certain users on a system. Members of the “wheel” group can perform tasks, such as installing packages, updating/modifying system settings, and managing groups and users. This article has explained the significance of the “wheel” group along with adding a user to the “wheel” group in Ubuntu.
Users and Groups
In this chapter we’ll learn about user and group management on your system, and also about basic access control.
In Linux everything is associated to an user and a group. Based on these values, the system figures out, who can access what part of the system. That includes files, directories, network ports etc.
Finding the owner of file
We use the ls -l command to find the owner, and group of a file or directory.
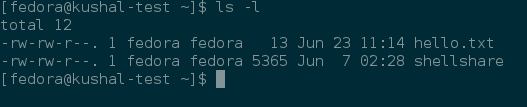
In the above example, fedora is the name of the owner and group both. The first value talks about who can access this file (we will learn about this in a while.)
/etc/passwd file
/etc/passwd contains all the users available in the system. This is a plain text file (this means you can view the information by using cat command.)
$ cat /etc/passwd root:x:0:0:root:/root:/bin/bash bin:x:1:1:bin:/bin:/sbin/nologin daemon:x:2:2:daemon:/sbin:/sbin/nologin adm:x:3:4:adm:/var/adm:/sbin/nologin lp:x:4:7:lp:/var/spool/lpd:/sbin/nologin sync:x:5:0:sync:/sbin:/bin/sync shutdown:x:6:0:shutdown:/sbin:/sbin/shutdown halt:x:7:0:halt:/sbin:/sbin/halt mail:x:8:12:mail:/var/spool/mail:/sbin/nologin operator:x:11:0:operator:/root:/sbin/nologin games:x:12:100:games:/usr/games:/sbin/nologin ftp:x:14:50:FTP User:/var/ftp:/sbin/nologin nobody:x:99:99:Nobody:/:/sbin/nologin systemd-timesync:x:999:998:systemd Time Synchronization:/:/sbin/nologin systemd-network:x:192:192:systemd Network Management:/:/sbin/nologin systemd-resolve:x:193:193:systemd Resolver:/:/sbin/nologin dbus:x:81:81:System message bus:/:/sbin/nologin sshd:x:74:74:Privilege-separated SSH:/var/empty/sshd:/sbin/nologin chrony:x:998:995::/var/lib/chrony:/sbin/nologin systemd-coredump:x:994:994:systemd Core Dumper:/:/sbin/nologin fedora:x:1000:1000:Fedora:/home/fedora:/bin/bash polkitd:x:993:993:User for polkitd:/:/sbin/nologin tss:x:59:59:Account used by the trousers package to sandbox the tcsd daemon:/dev/null:/sbin/nologin
Each line has seven entries separated by :.
username:password:uid:gid:gecos:/home/dirname:shell
| FIELD | MEANING | |
|---|---|---|
| username | the username | |
| password | the password of the user | |
| uid | Numeric user id | |
| gid | Numeric group id of user | |
| gecos | arbitary field | |
| /home/dirname | Home directory of the user | |
| shell | Which shell to use for the user | ||
You’ll see accounts with /sbin/nologin as their shell. These are generally accounts for various services, which are not supposed to be used by a normal human user; (which is why, no shell is needed.)
The actual user passwords are stored in an encrypted form in /etc/shadow file, with only the root user having access to this file.
$ ls -l /etc/shadow ----------. 1 root root 2213 Jun 22 15:20 /etc/shadow
If you want to know more about the current user, use the id command.
$ id uid=1000(vagrant) gid=1000(vagrant) groups=1000(vagrant) context=unconfined_u:unconfined_r:unconfined_t:s0-s0:c0.c1023
Details about groups
Group details are stored inside the /etc/group file. Each user has one primary group, and zero or more supplementary groups.
wheel group
If your user is part of the wheel group, then it has sudo access. If you remember the Fedora Installer, it actually gives you the option to mark a new user to be part of the wheel group during installation.
Becoming superuser
Have you noticed the silent command sudo in front of many commands in the lab before? We use that sudo command to become root user temporarily. The root user is also known as the superuser of the system, it has all the access power to change anything on the system. It is the administrator account of any Linux system.
Try the following command.
Now, you will find the id* command worked as root instead of your regular user.
If you want to become root user for more than one command, then use the following command, and provide the root password to the input.
To be able to use sudo command, you must have your user mentioned in the /etc/sudoers file. The best way to edit the file is to use visudo command as root user.
Read the man pages of su and sudo command.
Adding a new user
The useradd command adds a new user to the system. As you can well guess, this command has to execute as root, otherwise anyone can add random user accounts in the system. The following command adds a new user babai to the system.
In Fedora, the initial user you create gets the uid 1000.
Changing user passwords
The passwd command helps to change any user password.
$ sudo passwd babai Changing password for user babai. New password: Retype new password: passwd: all authentication tokens updated successfully.
Modifying existing user details
The usermod command can help to modify an existing user. You can use the same command to lock user account in the system.
$ sudo usermod -L babai $ su - babai Password: su: Authentication failure $ sudo usermod -U babai
The last command in the above example unlocks the user account.
Deleting a user
We use the userdel command to delete a user from the system.
Adding a new group
The groupadd command adds a new group. You can also pass the group id as an option. In the following example we are adding a new group called firejumpers.
$ sudo groupadd -g 4001 firejumpers
Adding new group to an user
We can use usermod command to add any extra group to any of our system user. In the following example, we are adding firejumpers group to our vagrant user.
$ sudo usermod -aG firejumpers vagrant
It is important to use -a flag to the usermod command. Without the -a flag usermod command will delete all the existing groups of the user. With usermod -a we append the user to the supplemental groups. And -G flag specifies the new list of supplementary GROUPS. Therefore with usermond -aG we append the new list of supplementary groups to the user’s existing group/groups.

Linux command line for you and me is a book for newcomers to command line environment.
Table of Contents
- Users and Groups
- Finding the owner of file
- /etc/passwd file
- Details about groups
- wheel group
- Becoming superuser
- Adding a new user
- Changing user passwords
- Modifying existing user details
- Deleting a user
- Adding a new group
- Adding new group to an user
Related Topics