- How do I grant sudo privileges to an existing user? [duplicate]
- How To Add User To Sudoers & Add User To Sudo Group on Ubuntu
- Steps to Add Sudo User on Ubuntu
- Step 1: Create New User
- Step 2: Add User to Sudo Group
- Step 3: Verify User Belongs to Sudo Group
- Step 4: Verify Sudo Access
- How to give a Linux user sudo access? [closed]
- 3 Answers 3
- Права суперпользователя Debian (sudo, visudo)
- Установка и настройка
- Тонкая настройка
- Полезные команды
- Вам также может быть интересно
How do I grant sudo privileges to an existing user? [duplicate]
You need to add the user hduser to the sudo group (which is the «administrators» group in Ubuntu).
If you have already created the user, you can add the user to the sudo group by running the following command in a Terminal:
sudo usermod -a -G sudo hduser Usage: usermod [options] LOGIN Options: -c, —comment COMMENT new value of the GECOS field -d, —home HOME_DIR new home directory for the user account -e, —expiredate EXPIRE_DATE set account expiration date to EXPIRE_DATE -f, —inactive INACTIVE set password inactive after expiration to INACTIVE -g, —gid GROUP force use GROUP as new primary group -G, —groups GROUPS new list of supplementary GROUPS -a, —append append the user to the supplemental GROUPS
Yes , @JacobFoshee is right — «user must log off, then back on again for this change to take effect.»
In Ubuntu you need to add the user only to the group sudo .
1) Become root. You can do this using sudo -i or becoming root the old fashioned way su —
3) I changed this portion of the sudoers file to have my chosen users become sudo users, and you can add users similarly (blank lines introduce to format cleanly):
## User Aliases ## These aren't often necessary, as you can use regular groups ## (ie, from files, LDAP, NIS, etc) in this file - just use %groupname ## rather than USERALIAS # User_Alias ADMINS = jsmith, mikem dbadmin ALL=(ALL) ALL ics ALL=(ALL) ALL csm ALL=(ALL) ALL coa ALL=(ALL) ALL 4) Press : and x to write the changes to sudoers and exit vi.
How To Add User To Sudoers & Add User To Sudo Group on Ubuntu
The sudo command is the preferred means to handle elevated permissions. In supported versions of Ubuntu, using the sudo command will grant elevated permissions for 15 minutes.
Standard user accounts are restricted from performing sensitive tasks, such as viewing the contents of the /root directory. This prevents the accidental use of commands with massive consequences. It also makes it more difficult for intruders to compromise a system. However, sometimes you need to run an administrative command. Sudo – or Super User Do – grants you privileges to run sensitive tasks.
This simple tutorial will show you how to add a new user on Ubuntu and provide sudo access.

- A system running a supported version of Ubuntu
- Access to a root user account or another account with sudo privileges
- Access to a terminal window/command line (Ctrl–Alt–T)
Note: Linux Sudo Command tutorials also available for CentOS and Debian.
Steps to Add Sudo User on Ubuntu
Step 1: Create New User
1. Log into the system with a root user or an account with sudo privileges.
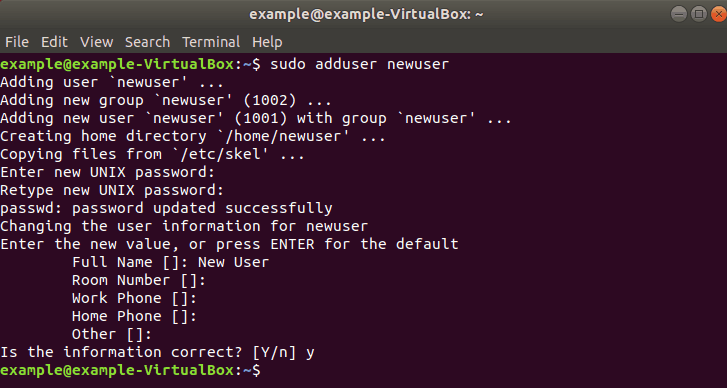
2. Open a terminal window and add a new user with the command:
The adduser command creates a new user, plus a group and home directory for that user.
You may get an error message that you have insufficient privileges. (This typically only happens for non-root users.) Get around it by entering:
3. You can replace newuser with any username you wish. The system will add the new user; then prompt you to enter a password. Enter a great secure password, then retype it to confirm.
4. The system will prompt you to enter additional information about the user. This includes a name, phone numbers, etc. – these fields are optional, and can be skipped by pressing Enter.
Step 2: Add User to Sudo Group
Most Linux systems, including Ubuntu, have a user group for sudo users. To grant the new user elevated privileges, add them to the sudo group.
In a terminal, enter the command:
Replace newuser with the username that you entered in Step 1.
Again, if you get an error, run the command with sudo as follows:
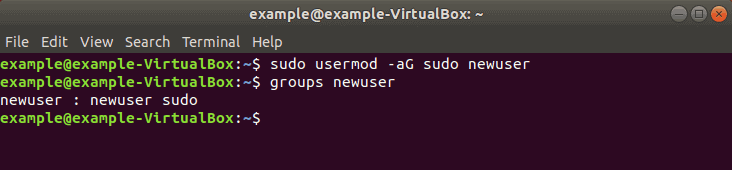
sudo usermod -aG sudo newuserThe -aG option tells the system to append the user to the specified group. (The -a option is only used with G .)
Note: Usermod command is a useful tool for user management. To learn more about its options, refer to our guide How To Use The Usermod Command In Linux.
Step 3: Verify User Belongs to Sudo Group
Enter the following to view the groups a user belongs to:
The system will respond by listing the username and all groups it belongs to, for example: newuser : newuser sudo
Step 4: Verify Sudo Access
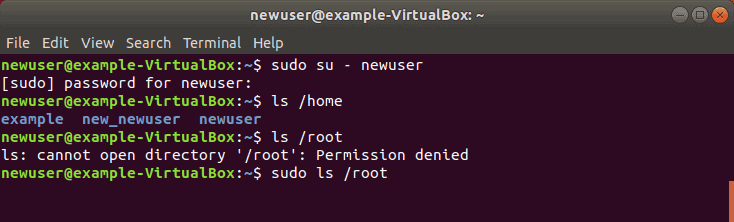
Replace newuser with the username you entered in Step 1. Enter your password when prompted. You can run commands as normal, just by typing them.
However, some commands or locations require elevated privileges. If you try to list the contents of the /root directory, you’ll get an access denied error: ls /root
The command can be executed with:
The system will prompt for your password. Use the same password you set in Step 1. You should now see the contents of the /root directory.
Now you know how to add and create a user with sudo privileges on Ubuntu.
Before sudo, users would log in to their systems with full permissions over the entire system with the su command. This was risky as users could be exploited by tricking them into entering malicious commands. These vulnerabilities were solved by limiting account privileges. However, administrators still had to log out of their account and into an admin account to perform routine tasks.
The sudo command in Ubuntu strikes a balance – protecting user accounts from malicious or inadvertent damage while allowing a privileged user to run administrative tasks. To learn more about the difference between these commands, check out Sudo vs. Su.
How to give a Linux user sudo access? [closed]
If you like to reopen the question you should provide additional details that qualify it as a valid according the rules in the help center.
3 Answers 3
You need run visudo and in the editor that it opens write:
That line grants all permissions to user igor .
If you want permit to run only some commands, you need to list them in the line:
igor ALL=(ALL) /bin/kill, /bin/ps What would be the reason if one carried out the above, but the user (in this case igor ) still did not have full sudo access (ie. can issue sudo ls but not sudo mount -a )?
@puk it depends on the commands that you listed in /etc/sudoers; when you wrote ALL , user can run all commands
This answer will do what you need, although usually you don’t add specific usernames to sudoers . Instead, you have a group of sudoers and just add your user to that group when needed. This way you don’t need to use visudo more than once when giving sudo permission to users.
If you’re on Ubuntu, the group is most probably already set up and called admin :
$ sudo cat /etc/sudoers # # This file MUST be edited with the 'visudo' command as root. # # Members of the admin group may gain root privileges %admin ALL=(ALL) ALL # Allow members of group sudo to execute any command %sudo ALL=(ALL:ALL) ALL # See sudoers(5) for more information on "#include" directives: #includedir /etc/sudoers.d On other distributions, like Arch and some others, it’s usually called wheel and you may need to set it up: Arch Wiki
To give users in the wheel group full root privileges when they precede a command with «sudo», uncomment the following line: %wheel ALL=(ALL) ALL
Also note that on most systems visudo will read the EDITOR environment variable or default to using vi . So you can try to do EDITOR=vim visudo to use vim as the editor.
To add a user to the group you should run (as root):
# usermod -a -G groupname username where groupname is your group (say, admin or wheel ) and username is the username (say, john ).
Права суперпользователя Debian (sudo, visudo)
В операционных системах семейства Linux реализован принцип разграничения пользовательских привилегий, то есть у разных учетных записей разный объем прав доступа к каталогам, файлам и программам. Максимальными правами наделена встроенная учетная запись root. Вновь создаваемые пользовательские аккаунты обычно существенно ограничены в доступе к системным конфигурационным файлам, управлении сервисами, установке и удалении программных пакетов. При этом работа в операционной системе под учетной записью root настоятельно не рекомендуется, прежде всего в целях безопасности. В этом случае на помощь приходит утилита командной строки sudo.
Команда sudo позволяет запускать отдельные команды с повышением привилегий (по умолчанию с правами root) пользуясь непривилегированной учетной записью. Давайте разберемся, что же требуется для работы этой утилиты.
Установка и настройка
В ОС Ubuntu sudo включена по умолчанию, а в Debian, если в процессе установки не был выбран соответствующий пакет, скорее всего будет следующая картина:
Значит, требуется установить недостающий пакет. Обновляем информацию о репозиториях и устанавливаем sudo:
Дожидаемся окончания процесса:

После успешной установки потребуется сконфигурировать sudo, определив, какие пользователи или группы смогут использовать повышение привилегий и в каком объеме. Все эти настройки хранятся в конфигурационном файле /etc/sudoers, однако вносить в него изменения напрямую настоятельно не рекомендуется. Для этих целей используется специальная команда:
которая запускает текстовый редактор с конфигурационным файлом:

За предоставление прав здесь отвечают две строки:
Первая строка назначает права для учетной записи root, вторая устанавливает права для членов группы sudo, которая была создана при установке пакета (знак % перед названием означает, что имя относится к группе пользователей). Соответственно, у нас есть два основных способа предоставить пользовательской учетной записи право использовать sudo:
Добавить учетную запись пользователя (например, user) в группу sudo на сервере:
После изменения членства в группе, потребуется заново авторизоваться в этой учетной записи для применения новой конфигурации. Данный метод рекомендуется в тех случаях, когда пользователю необходимо предоставить полные права.
Создать в файле новую запись, например, для учетной записи user. Мы добавляем строку по аналогии с root:
Добавлять новую запись рекомендуется в тех случаях, когда список привилегий будет корректироваться (об этом чуть позднее). Если мы внесли изменения в файл, нужно их сохранить нажатием сочетания клавиш Ctrl-O и выйти из редактора — Ctrl-X.
Теперь можно проверить корректность работы:
Команда sudo запрашивает пароль текущего пользователя (в данном случае это user) — вводим его, и, если все сделано правильно, мы увидим содержание системного конфигурационного файла.
Тонкая настройка
Таким образом, обычный пользователь может запускать команды с правами учетной записи root не зная ее пароль. Это очень удобно, но может быть небезопасно — есть ли возможность ограничить круг команд, которые можно исполнять посредством sudo? Да, и поможет нам в этом тот же самый конфигурационный файл. Снова запускаем visudo и разбираемся дальше. Нас интересуют параметры, указанные после имени пользователя:

- ALL=(ALL:ALL) ALL — первый параметр определяет к какому хосту применяется конфигурация. При использовании выделенного сервера параметр можно оставить без изменений;
- ALL=(ALL:ALL) ALL — параметры в скобках определяют с полномочиями какого пользователя (первый параметр) и/или группы (второй параметр) будет выполняться команда. По умолчанию sudo выполняет команду от имени root, однако при запуске с ключом –u можно указать другую учетную запись, а с ключом –g другую группу, чьи полномочия будут использованы при запуске;
- ALL=(ALL:ALL) ALL — третий параметр определяет к каким файлам и командам относятся данные настройки.
Исходя из вышесказанного, при необходимости определить перечень разрешенных команд заменяем последний параметр ALL тем, что нам требуется, перечисляя команды через запятую. Например, строка:
дает право пользователю user с помощью sudo осуществлять перезагрузку сервера командой sudo /sbin/shutdown –r и просматривать файлы с помощью sudo /bin/cat. Другие команды через sudo выполняться не будут. Например, при попытке выключить сервер командой sudo /sbin/shutdown –h, получим ответ:
Полезные команды
Увидеть список привилегий можно, запустив sudo –l (будет отображен список для текущего пользователя), либо sudo –l –U user (будет отображен список привилегий пользователя user):

В состав sudo входит команда sudoedit, которая запускает текстовый редактор с указанным файлом сразу с повышенными привилегиями, то есть вместо команды:
Если требуется длительная работа в режиме повышенных привилегий и вводить sudo для каждой команды неудобно, можно запустить через sudo экземпляр командного интерпретатора:
и продолжить работу в нем — все команды будут запускаться с повышенными правами. По завершении работы выходим из интерпретатора командой exit.