- 15 useradd command examples in Linux [Cheat Sheet]
- Different examples to use useradd command
- 1. Create a new user using useradd command
- 2. useradd command to add a new user and user’s directory in home directory
- 3. useradd command to create a new user without directory
- 4. useradd command to create a new user with custom home directory
- 5. Create a new user with specific user ID with useradd command
- 6. Create a new user with specific group name with useradd command
- 7. Create a new user and assign multiple groups using useradd command
- 8. useradd command to add a new user with an expiry date
- 9. Create a new user with comment using useradd command
- 10. useradd command to create “system user”
- 11. Create a new user with custom login shell using useradd command
- 12. Declare default values for useradd command
- 13. useradd command to create a new user with an unencrypted password
- 14. useradd command to create a new user with duplicate user ID
- 15. Disable account once password expires after n number of inactive days
- Conclusion
- What’s Next
- Further Reading
- Создание пользователя в Linux. Команды adduser и useradd
- В чем отличия adduser и useradd?
- Команда adduser
- Создание пользователя командой adduser
- Команда useradd
- Синтаксис команды useradd
- Создание нового пользователя
- Создание нового пользователя с домашней директорией в /home
- Создание нового пользователя с произвольной домашней директорией
- Создание нового пользователя с произвольными UID, GID
- Создание пользователя с указанием оболочки (shell)
- Создать пользователя и добавить его в группы
- Заключение
15 useradd command examples in Linux [Cheat Sheet]
We all know that we can have multiple users in the Linux systems. But, do you know how to add a new user in the Linux system?
useradd is a simple command-line tool in Linux for adding a new user to the system. useradd is a symbolic link to adduser command. Both the commands have similar functions. System administrators can use this command to manage users in the system.
Different examples to use useradd command
Only root users or users having sudo permissions can execute the useradd command. When the useradd command is successfully executed, it does the following things:
- Adds details of a new user to files such as /etc/passwd, /etc/shadow, /etc/group and /etc/gshadow.
- Creates a new directory for a new user in the /home.
In this tutorial, you will find the different examples to create a new user in the Linux system by using useradd command.
1. Create a new user using useradd command
This is the most basic command to create a new user in the Linux system. It only requires the name of a user. The name of a new user must be unique from other users in the system.
Sample Output:

You can check the details of a new user added in /etc/passwd file using grep command. In the above output, you can see the details of a new user elliot. The details include the following things:
- Username: The username should be between 1-32 characters. It is also the login name for the user.
- Password: The user password is stored in encrypted format (x) in /etc/shadow file.
- User ID: Every user has a unique User Identification Number. 1243 is user ID of elliot.
- Group ID: It shows the primary group ID of a user. The group IDs are stored in /etc/group file. In our case, 1245 is the primary group ID of elliot.
- User detail: In between two colons, the comment or detail added for a new user will be displayed if any.
- Directory path: The path for the new user’s directory is displayed. The default location is the home directory.
2. useradd command to add a new user and user’s directory in home directory
In most Linux systems, the user’s directory is not created in the home directory. You can use -m option to force the useradd command to create the user’s directory in /home.
Sample Output:

As you can see in the above output, the directory for user rohan is created but the previously added user elliot has no directory.
3. useradd command to create a new user without directory
In some Linux distributions, useradd command creates a new user and its directory in the home directory. If you do not need the user’s directory, use -M option so the useradd command only creates a new user.
Sample Output:

4. useradd command to create a new user with custom home directory
You can use -d option to create user’s directory in another location instead of the home directory. That directory must be present in the system.
$ sudo useradd -d /directory_name/user_name user_name Sample Output:

5. Create a new user with specific user ID with useradd command
In the Linux systems, every user has unique user name and user ID. By default, useradd command assigns the next available user ID to a new user. -u or —uid option allows you to create a new user with specific user ID.
$ sudo useradd -u user_ID user_name Sample Output:

6. Create a new user with specific group name with useradd command
This command allows you to assign the different group name to a new user. Usually, useradd command provides the same group name as username and the same group ID as the user ID. -g option allows you to assign different group name to a new user. The group name must be already present in the system.
You can check group name of user using id -gn user_name command.
$ sudo useradd -g group_name user_name Sample Output:

The above output shows the user eliza has group linux but the previously added user harry has group harry.
You can also create a new user by using specific group ID instead of group name with useradd command.
$ sudo useradd -g group_ID user_name Sample Output:

7. Create a new user and assign multiple groups using useradd command
In Linux systems, there are two types of group: Primary group and Secondary group. Every user can associate to only one primary group. But they can associate to none or multiple secondary groups.
-G option specifies the secondary groups to a new user.
$ sudo useradd -G secondary_group1,secondary_group2 Sample Output:

In the above output, sam is the primary group, and student and computer are the secondary groups.
8. useradd command to add a new user with an expiry date
By default, useradd command does not set the expiry date of a user. -e option allows you to specify the expiry date for a new user. System administrators can use this command to create temporary accounts in the system. The user expiry date can be viewed by using chage -l command.
The date must be provided in YYYY-MM-DD format.
$ sudo useradd -e YYYY-MM-DD user_name Sample Output:

9. Create a new user with comment using useradd command
This command allows you to create a new user with a brief comment. You can add any comment using -c option. This is a useful command to store a short information about the user.
$ sudo useradd -c "comment" user_name Sample Output:

10. useradd command to create “system user”
Generally, system users are created during the installation of OS and new packages. You can create a new system user using -r option with useradd . The ID of system users and groups ranges from 100-999.
Sample Output:

11. Create a new user with custom login shell using useradd command
The default login shell is /bin/sh or bin/bash in most of the Linux distributions. -s option allows you to set the specific login shell for a new user.
Sample Output:

12. Declare default values for useradd command
You can view the default useradd values using -D option. It also allows you to edit the values. These values are stored in /etc/default/useradd. To edit the default login shell, you can use:
$ sudo useradd -D -s new_shell Sample Output:

The default login shell of useradd is changed.

13. useradd command to create a new user with an unencrypted password
-p option allows you to specify an unencrypted password for a new user. You can check the password stored in /etc/shadow file. You will need root permission to access the file.
$ sudo useradd -p password user_name Sample Output:

14. useradd command to create a new user with duplicate user ID
Generally, every user has a different user ID but -o option allows you to create a new user with duplicate user ID.
$ sudo useradd -o -u user_ID user_name Sample Output:

In the above output, both users elliot and lucy have same user ID.
15. Disable account once password expires after n number of inactive days
You can create a new user by defining a time period after which the user account will be disabled if there is no activity from that user assuming the password of the user has expired. Use —inactive or -f to define the period after which account will be disabled. A value of 0 disables the account as soon as the password has expired, and a value of -1 disables the feature.
$ sudo useradd --inactive NUM user_name Conclusion
This article presents the most used useradd command in Linux. Now, you can easily add a new user to the Linux system. You can use these commands in Ubuntu, RHEL, CentOS, Fedora, Debian and any other Linux distributions. useradd command is easy to use and helpful for creating new users in the system.
What’s Next
Further Reading
Didn’t find what you were looking for? Perform a quick search across GoLinuxCloud
If my articles on GoLinuxCloud has helped you, kindly consider buying me a coffee as a token of appreciation.

For any other feedbacks or questions you can either use the comments section or contact me form.
Thank You for your support!!
Создание пользователя в Linux. Команды adduser и useradd

Для создания пользователей в Linux можно использовать графические утилиты, предоставляемые дистрибутивом, или воспользоваться командной строкой.
Для создания пользователей из командной строки обычно используют утилиты adduser или useradd. Рассмотрим, использование данных утилит.
В чем отличия adduser и useradd?
useradd — это низкоуровневая утилита для создания пользователей в Linux.
adduser — представляет собой более простое решение для создания пользователей и по факту является надстройкой над useradd, groupadd и usermod.
Утилита adduser доступна не во всех дистрибутивах Linux. Реализация adduser также может отличаться. Если в дистрибутиве присутствует утилита adduser, то для создания пользователей рекомендуется использовать именно ее.
Команда adduser
Создание пользователя командой adduser
Рассмотрим, как создать обычного пользователя командой adduser
Чтобы создать нового пользователя, выполняем команду adduser и указываем имя пользователя (вместо pupkin укажите имя пользователя, которого вы создаете):
После запуска данной команды, вы должны ввести пароль для нового пользователя. Затем будет предложено ввести дополнительную информацию о пользователе: имя, номер комнаты (кабинета), телефоны и комментарий. Вводить эту информацию необязательно. Просто нажимайте Enter , чтобы пропустить ввод данных.
$ sudo adduser pupkin [sudo] пароль для pingvinus: Добавляется пользователь «pupkin» . Добавляется новая группа «pupkin» (1001) . Добавляется новый пользователь «pupkin» (1001) в группу «pupkin» . Создаётся домашний каталог «/home/pupkin» . Копирование файлов из «/etc/skel» . Новый пароль : Повторите ввод нового пароля : passwd: пароль успешно обновлён Изменение информации о пользователе pupkin Введите новое значение или нажмите ENTER для выбора значения по умолчанию Полное имя []: Vasiliy Pupkin Номер комнаты []: 123 Рабочий телефон []: Домашний телефон []: Другое []: Janitor Данная информация корректна? [Y/n] y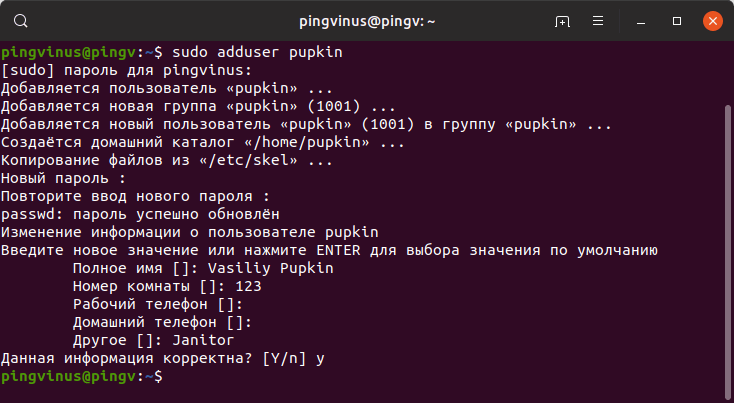
В результате выполнения команды adduser будут выполнены следующие действия:
- Создается новый пользователь с именем, которое вы указали при выполнении команды.
- Создается группа с тем же именем.
- Создается домашний каталог пользователя в директории /home/имяпользователя
- В домашний каталог копируются файлы из директории /etc/skel
Команда useradd
Синтаксис команды useradd
Команда useradd принимает в качестве аргумента имя пользователя, а также различные опции.
Синтаксис команды следующий:
Создание нового пользователя
Чтобы просто создать пользователя используется команда useradd без каких-либо опций. Указывается только имя пользователя.
Данная команда создает нового пользователя с системными параметрами по умолчанию, которые прописаны в файле /etc/default/useradd
Чтобы пользователь мог войти в систему, необходимо задать для него пароль. Для этого используем команду:
Создание нового пользователя с домашней директорией в /home
Создадим пользователя и его домашнюю директорию.
Домашняя директория создается по умолчанию в каталоге /home . Имя директории совпадает с именем пользователя.
Создание нового пользователя с произвольной домашней директорией
Чтобы создать пользователя с домашней директорией, расположенной в произвольном месте, используется опция -d , после которой указывается путь до директории. Директорию необходимо создать заранее.
Создаем домашнюю директорию для будущего пользователя:
Копируем файлы и директории, которые по умолчанию создаются в домашней директории пользователя в данной системе. Данные файлы находятся в директории /etc/skel
sudo cp -rT /etc/skel /users/pupkinСоздаем пользователя и указываем домашнюю директорию:
sudo useradd -d /users/pupkin pupkinМеняем права доступа у домашней директории:
sudo chown -R pupkin:pupkin /users/pupkinЗадаем пароль для пользователя:
Можно просмотреть информацию о пользователе, которая сохранена в файле /etc/passwd
cat /etc/passwd | grep pupkin pupkin:x:1001:1001::/users/pupkin:/bin/sh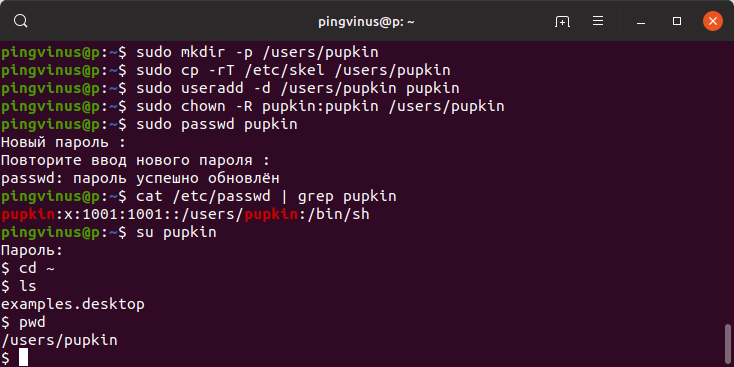
Создание нового пользователя с произвольными UID, GID
Каждый пользователь в Linux имеет свой числовой идентификатор — UID, а также идентификатор основной группы пользователя — GID.
При создании пользователя можно задать произвольные номера UID и/или GID. При указании номера группы, группа с этим номером должна быть создана заранее.
useradd -u 1234 -g 1222 pupkinСоздание пользователя с указанием оболочки (shell)
По умолчанию новые пользователи создаются с оболочкой /bin/sh Чтобы задать другую оболочку, используется опция -s /путь/до/оболочки
sudo useradd -m -s /bin/bash pupkinСоздать пользователя и добавить его в группы
Обычно пользователи в Linux принадлежат нескольким группам. Чтобы при создании нового пользователя задать группы, к которым он будет принадлежать, используется опция -G список,групп
sudo useradd -m -G adm,cdrom,wheel -s /bin/bash pupkinЗаключение
Мы рассмотрели примеры создания нового пользователя в Linux с использованием команд adduser и useradd . Команда adduser более простая и в большинстве случаев рекомендуется использовать именно ее.