- last command in Linux with Examples – View history of user logins
- last command examples
- lastb command examples
- lastlog command with examples
- Conclusion
- Просмотр истории входа в Linux. Кто и когда входил в систему
- Где хранятся логи входа в систему
- Просмотр истории входа в систему
- Просмотр истории входа для определенного пользователя
- Ограничить количество строк
- Просмотр неудачных попыток входа в систему
- Заключение
- How to Check Linux Login History
- Viewing Linux login history
- 1. View history of all logged users
- 2. View login history of a certain user
- 3. Display IP addresses in login history instead of hostname
- 4. Display only last N logins
- 5. View all the bad login attempts on your Linux server
last command in Linux with Examples – View history of user logins
This last command guide is a follow-up of my previous 90 Linux Commands frequently used by Linux Sysadmins article. Every week, or as time allows, I will publish articles on around 90 commands geared toward Linux sysadmins and Linux power users. Let’s continue this series with the last command.
You may be working with other system administrators and developers who all have to log in to the same system. At some point, you will want to view a list of the last users who logged in, from where, and what time. Meet the last command for Linux and Unix-like systems.
last command examples
The last command usually reads from the log file /var/log/wtmp and prints the history of successful user login attempts as well as any currently logged-in users. The last logged-in users appear at the top of the list. We will also look at similar commands, namely: lastb and lastlog .
To view last logins, their duration, and other details, use:
To show only the last 10 logins, use:
To print the full date and time of entries with their IPs, use:
To view all logins by a specific user and show the IP address instead of the hostname, use:
To view all recorded reboots, use:
To view all recorded shutdowns, use:
To check when was the file /var/log/wtmp was written last, use:
You can also filter by users or ttys, in which case last will show only entries matching those arguments. Ttys can be abbreviated. For example, last 7 is the same as last tty7 .
lastb command examples
lastb is the same as last , except that it shows the log of the last failed login attempts.
To show a list of all failed login attempts, use:
To show a list of failed login attempts since a given time, use:
sudo lastb --since YYYY-MM-DD
To show a list of failed login attempts until a given time, use:
sudo lastb --until YYYY-MM-DD
To show a list of all failed login attempts at a specific time, use:
These options apply to both last and lastb :
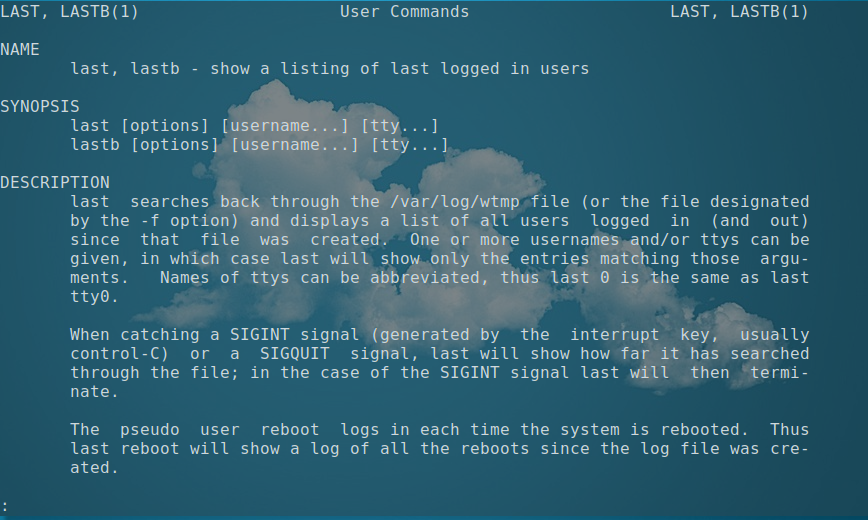
Screenshot and below excerpt are from: man last .
-a, –hostlast – Display the hostname in the last column. Useful in combination with the –dns option.
-d, –dns – For non-local logins, Linux stores not only the hostname of the remote host but its IP number as well. This option translates the IP number back into a hostname.
-f, –file – Tell last to use a specific file instead of /var/log/wtmp. The –file option can be given multiple times, and all of the specified files will be processed.
-F, –fulltimes – Print full login and logout times and dates.
-i, –ip – Like –dns , but displays the host’s IP number instead of the name.
-n, –limit number – Tell last how many lines to show.
-p, –present time – Display the users who were present at the specified time. This is like using the
options –since and –until together with the same time.
-R, –nohostname – Suppresses the display of the hostname field.
-s, –since time – Display the state of logins since the specified time. This is useful, e.g., to easily determine who was logged in at a particular time. The option is often combined with –until.
-t, –until time – Display the state of logins until the specified time.
–time-format format – Define the output timestamp format to be one of notime, short, full, or iso. The notime variant will not print any timestamps at all, short is the default, and full is the same as the –fulltimes option. The iso variant will display the timestamp in ISO-8601 format. The ISO format contains timezone information, making it preferable when printouts are investigated outside of the system.
-w, –fullnames – Display full user names and domain names in the output.
-x, –system – Display the system shutdown entries and run level changes.
lastlog command with examples
Also useful is the lastlog command. The lastlog command shows the most recent login for all users or a specific user.
To show the most recent login of all users, use:
To show a record of the specific user, use:
To show logins older than 1 day, use:
To show records more recent than 7 days, use:
Sorting the output:
For all of these commands (last, lastb, and lastlog), you can reverse the output using tac . For example:
Related commands:
- who – print who is currently logged in.
- w – a quick summary of every user logged into a computer.
- lastcomm – List Last Executed Commands of User.
Conclusion
If you are accessing Linux servers along with other system administrators and developers, last , lastb , and lastlog provide a fast way to view a list of last and currently logged-in users.
Просмотр истории входа в Linux. Кто и когда входил в систему

Данная информация обычно нужна системным администраторам для просмотра истории входа в систему на многопользовательском сервере.
Помимо этого, бывает полезно узнать о неудачных попытках входа. Это могут быть боты, но могут быть и попытки взлома вашего сервера.
Где хранятся логи входа в систему
Информация о том, кто входил (залогинивался) или пытался войти в систему, хранится в лог файлах. Для этого используется три лог-файла:
/var/log/btmp — неудачные попытки входа.
/var/run/utmp — кто в данный момент залогинен (текущие сессии).
/var/log/wtmp — список всех сессий входа в систему.
Эти файлы, в отличии от большинства других лог-файлов Linux, имеют бинарный формат. Если вы попробуете просмотреть их командой cat , то на экран будет выведена «каша». Для их просмотра используется команда last .
Просмотр истории входа в систему
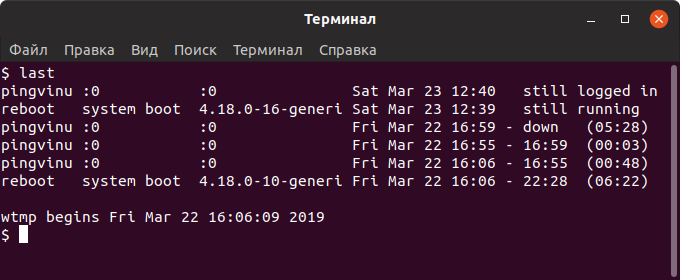
Для просмотра логов входа в систему используется команда last . По умолчанию команда last выводит информацию из файла /var/log/wtmp , в котором хранятся записи обо всех сессиях входа.
yuriy pts/0 181.23.456.189 Sat Mar 23 12:27 still logged in nifnif pts/11 181.45.678.912 Wed Mar 20 05:30 - 05:49 (00:19) nafnaf pts/22 181.45.678.312 Fri Mar 15 00:01 - 02:27 (02:26) nufnuf pts/33 181.45.678.411 Wed Mar 13 11:02 - 11:28 (00:26) . Как вы можете видеть, выводится таблица с информацией. В ней содержатся имена пользователей, IP-адрес, с которого осуществлялся вход, дата и время входа и продолжительность сессии. Запись вида pts/0 означает, что для входа использовалось SSH соединение (или другое удаленное соединение, например, telnet).
Также выводится информация о включении/выключении системы.
Последняя строка в файле /var/log/wtmp показывает, когда был создан файл.
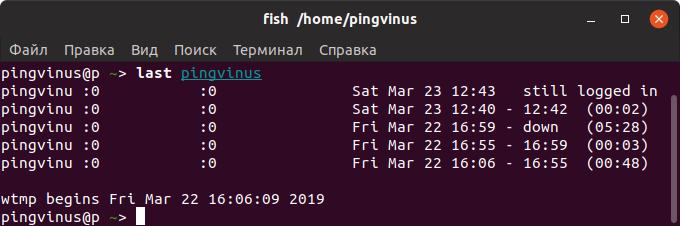
Просмотр истории входа для определенного пользователя
Чтобы показать информацию о сессиях определенного пользователя, то для команды last необходимо указать имя этого пользователя:
Ограничить количество строк
Иногда лог, который выводит команда last , может быть очень большой. Чтобы ограничить количество выводимых строк, используется опция -n ЧислоСтрок или просто -ЧислоСтрок .
Выведем только десять свежих записей:
Просмотр неудачных попыток входа в систему
Как было сказано выше, записи о неудачных попытках входа в систему хранятся в лог-файле /var/log/btmp .
Команда last по умолчанию выводит информацию из файла /var/log/wtmp . Чтобы вывести информацию из другого файла, используется опция -f ИмяФайла
Выведем записи о неудачных попытках входа (из файла /var/log/btmp ):
Или же можно воспользоваться командой lastb . Команда lastb работает точно также, как и команда last , но выводит информацию из файла /var/log/btmp
Заключение
Мы рассмотрели использование команды last для просмотра информации об истории входа в систему.
Дополнительную информацию по использованию команды last можно получить, выполнив в терминале:
How to Check Linux Login History
You may want to know who logged on your system and from where. You should also see bad login attempts on your system. Learn how to see login history in Linux.
If you have a Linux server, there is a possibility that you have several users accessing the system. You may want to know who is logged on your system, when a particular user logged to the Linux system. You may also want to know from which IP address your system was accessed.
Even if you don’t have multiple users, someone probably have tried to access your Linux server. Trust me, this may sound weird but it’s a common thing these days for bots to try and access your Linux servers. Don’t believe me? Just check the bad login attempts on your server to see if someone tried to login to your system.
Let me show you how to view the Linux login history so that you are aware of who is accessing your system and from where.
Viewing Linux login history
Linux is very good at keeping logs of everything that goes on your system. Quite naturally, it also stores logs about login and login attempts. The login information is stored in three places:
- /var/log/wtmp – Logs of last login sessions
- /var/run/utmp – Logs of the current login sessions
- /var/log/btmp – Logs of the bad login attempts
Let’s see these things in a bit detail.
1. View history of all logged users
To view the history of all the successful login on your system, simply use the command last.
The output should look like this. As you can see, it lists the user, the IP address from where the user accessed the system, date and time frame of the login. pts/0 means the server was accessed via SSH.
abhi pts/0 202.91.87.115 Wed Mar 13 13:31 still logged in root pts/0 202.91.87.115 Wed Mar 13 13:30 - 13:31 (00:00) servesha pts/0 125.20.97.117 Tue Mar 12 12:07 - 14:25 (02:17) servesha pts/0 209.20.189.152 Tue Mar 5 12:32 - 12:38 (00:06) root pts/0 202.91.87.114 Mon Mar 4 13:35 - 13:47 (00:11) wtmp begins Mon Mar 4 13:35:54 2019The last line of the output tells you the when was the wtmp log file was created. This is important because if the wtmp file was deleted recently, last command won’t be able to show history of the logins prior to that date.
You may have a huge history of login sessions so it’s better to pipe the output through less command.
2. View login history of a certain user
If you just want to see the login history of a particular user, you can specify the user name with last command.
You’ll see the login information of only the selected user:
last servesha servesha pts/0 125.20.97.117 Tue Mar 12 12:07 - 14:25 (02:17) servesha pts/0 209.20.189.152 Tue Mar 5 12:32 - 12:38 (00:06) wtmp begins Mon Mar 4 13:35:54 20193. Display IP addresses in login history instead of hostname
You couldn’t see it in the previous output but by default, last command shows the hostname instead of the IP address of the user. If you are on a sub-network, you’ll probably see only the hostnames.
You can force to display the IP addresses of the previously logged users with the -i option.
4. Display only last N logins
If your system has a good uptime, perhaps your login history would be huge. As I mentioned earlier, you can use the less command or other file viewing commands like head or tail.
Last command gives you the option to display only certain number of login history.
Just replace N with the number you want. You can also combine it with the username.
5. View all the bad login attempts on your Linux server
Now comes the important part: checking the bad login attempts on your server.
You can do that in two ways. You can either use the last command with the btmp log file:
or you can use the lastb command:
Both of these commands will yield the same result. The lastb is actually a link to the last command with the specified file.
root ssh:notty 218.92.0.158 Wed Mar 13 14:34 - 14:34 (00:00) sindesi ssh:notty 59.164.69.10 Wed Mar 13 14:34 - 14:34 (00:00) root ssh:notty 218.92.0.158 Wed Mar 13 14:34 - 14:34 (00:00) sindesi ssh:notty 59.164.69.10 Wed Mar 13 14:34 - 14:34 (00:00) root ssh:notty 218.92.0.158 Wed Mar 13 14:34 - 14:34 (00:00)Bad logins could be an incorrect password entered by a legitimate user. It could also be a bot trying to brute force your password.
You have to analyze here and see if you recognize the IPs in the log. If there has been too many login attempts from a certain IP with user root, probably someone is trying to attack your system by bruteforcing.
You should deploy Fail2Ban to protect your server in such cases. Fail2Ban will ban such IPs from your server and thus giving your server an extra layer of protection.
I hope this tutorial teach you to view login history in Linux and now you can use this knowledge to better manage and protect your Linux system.
If you liked this article, please share it on social media and subscribe to our newsletter for more Linux related tutorials.