- NetworkConfigurationCommandLine
- Find Network Interface Card
- Configuring Static IP Address For Your Network Card
- Setting up Second IP Address or Virtual IP Address
- Setting Your Hostname
- Setting up DNS
- Configuring DHCP Address for Your Network Card
- Howto Set MTU for a DHCP Connection
- How to Change IP Address in Linux
- Using the ip Command to Set an IP Address
- Making an IP Address Permanent
- Using Netplan for Network configuration (for Ubuntu)
- Using Graphical Interface to Change the System IP Address (for Desktop Users)
- Wrapping Up
- Как назначить IP адрес в Linux
- В дистрибутивах на базе Debian
- В дистрибутивах c менеджером пакетов RPM
- Дополнительные статьи
- Об этой статье
NetworkConfigurationCommandLine
You can configure a network interface from the command line. You configure your network client hosts with the command line by using commands to change your current settings or by editing a number of system files.
Find Network Interface Card
When setting up your network you will need to know the network interface cards on your computer. The interface name of cards for different vendors may be different, which is why this step is needed.
This will list the interface names for all NICs on your computer. It will probably include eth0 (hardwired NIC), lo (loopback interface for the localhost), and something for your wireless card (like wifi0, or wlan0).
Configuring Static IP Address For Your Network Card
Configure a Static IP address by editing /etc/network/interfaces. Replace eth0 with your network interface card (see Find Network Interface Card).
sudo nano /etc/network/interfaces
# The primary network interface auto eth0 iface eth0 inet static address 192.168.2.33 gateway 192.168.2.1 netmask 255.255.255.0 network 192.168.2.0 broadcast 192.168.2.255
For these settings to take effect you need to restart your networking services.
sudo /etc/init.d/networking restart
Setting up Second IP Address or Virtual IP Address
If you need to set up a second ip address you need to edit the /etc/network/interfaces.
sudo nano /etc/network/interfaces
auto eth0:1 iface eth0:1 inet static address 192.168.2.33 netmask 255.255.255.0 network x.x.x.x broadcast x.x.x.x gateway x.x.x.x
You need to enter all the details like address,netmask,network,broadcast and gateways values.
For these new settings to take effect you need to restart networking services using the following command
sudo /etc/init.d/networking restart
Setting Your Hostname
The hostname command allows you to directly query, or set, the hostname from the command line.
You can see your current hostname with
To set the hostname directly you can become root and run
When your system boots it will automatically read the hostname from the file /etc/hostname
Setting up DNS
You can add hostname and IP addresses to the file /etc/hosts for static lookups.
To cause your machine to consult with a particular server for name lookups you simply add their addresses to /etc/resolv.conf.
For example a machine which should perform lookups from the DNS server at IP address 192.168.3.2 would have a resolv.conf file looking like this
enter the following details
search myaddress.com nameserver 192.168.3.2
Configuring DHCP Address for Your Network Card
The DHCP address can be configured by editing the following file /etc/network/interfaces. Replace eth0 with your interface card (see Find Network Interface Card).
sudo nano /etc/network/interfaces
# The primary network interface – use DHCP to find our address auto eth0 iface eth0 inet dhcp
Howto Set MTU for a DHCP Connection
Although this is not documented in the manual for interfaces, MTU for a DHCP connected device can be set in the /etc/network/interfaces file. To do so you need to append the ‘pre-up’ command to the ‘iface’ section of the relevent interface.
iface eth0 inet dhcp pre-up /sbin/ip link set $IFACE mtu 1492
The above example sets the MTU for device eth0 to 1492, the usual MTU for a PPPoE ISP connection. This however is only needed if connections seem to hang otherwise (with the default of 1500).
NetworkConfigurationCommandLine (последним исправлял пользователь ip72-213-131-215 2009-08-14 04:14:29)
The material on this wiki is available under a free license, see Copyright / License for details
You can contribute to this wiki, see Wiki Guide for details
How to Change IP Address in Linux
Learn different ways of changing the IP address in Linux. Also learn how to make the changes [ermanent.
As a sysadmin, you’ll often deal with IP address configuration. Changing the IP address is one of the common IP configuration tasks.
While the IP addresses on most systems are configured automatically, you may need to change them manually in some cases.
In this article, you’ll see various ways to change the IP address in Linux. I’ll also focus on Ubuntu network configuration separately.
Before you proceed any further, you should run this command to check your current IP address:
This will also show the interface name which you’ll need while changing the IP address.
Using the ip Command to Set an IP Address
The ip command is available on most Linux distributions.
For setting an IP address, use it like this:
ip addr add [ip_address] dev [interface]For example, add an IP address to the eth1 interface as:
sudo ip addr add 192.168.56.21/24 dev eth1You now have two IP addresses: one from the old configuration and one from the new command:

As you can see in the above screenshot, after deleting the old one, you are left with only one.
Making an IP Address Permanent
Surprisingly, the IP addresses set by the above method are not going to persist in system reboots.
sudo nano /etc/network/interfacesIf your file read like the below, your IP address will be set by a DHCP client:
auto eth0 iface eth0 inet dhcpTo change the IP address as per our choice, we can modify this file to manually set the IP address. To set the IP address statically, for e.g. as 192.168.56.20, change the above entry to look as:
auto enp0s3 iface enp0s3 inet static address 192.168.56.20 netmask 255.255.255.0 gateway 192.168.40.31The entries above are self-explanatory for moderate Linux users. To apply the changes, you need to run the command:
$ sudo systemctl restart networking.serviceTip: On RedHat-based systems, the file ‘/etc/sysconfig/networking-scripts/ifcfg-*’ serves the purpose of configuring network interfaces.
Using Netplan for Network configuration (for Ubuntu)
Ubuntu provides a Netplan utility for network configuration.
Let us take an example of configuring an IP address on Ubuntu 20.04. I am using ‘NetworkManager’ as the renderer for the network configuration.
The current IP address can be checked from the Netplan configuration file. This file is in YAML format and can be created if not present:
sudo nano /etc/netplan/config.yamlIf the IP address is dynamic, you will see the ‘dhcp4’ parameter set to true.
In case, you have a pre-configured static IP, the configuration will look much like this:
--- network: version: 2 renderer: networkd ethernets: eth1: addresses: - 192.168.56.66/24 nameservers: addresses: - 8.8.8.8 routes: - to: default via: 10.0.2.2To change the IP address, replace the old IP address with a new one. Additionally, you can keep this IP and add one more to the above interface (en01).
Once you have configured the network, pre-test it before applying:
After confirming the changes, the new configuration can be applied as:
Check if the new settings have been applied:
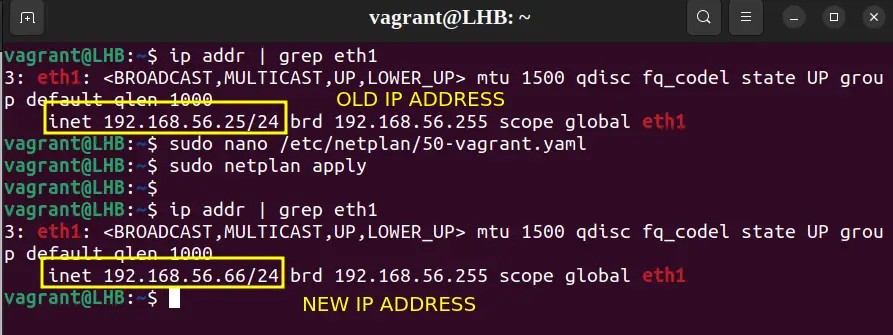
One of the advantages of using Netplan is that the network configuration will persist between reboots. Your IP address change is permanent.
Using Graphical Interface to Change the System IP Address (for Desktop Users)
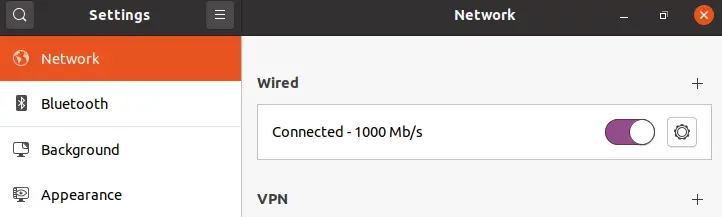
Managing IP addresses with a graphical interface is the easiest one and preferable for new Linux users. On a Ubuntu system, the Network settings contain all the required configurations.
Open ‘Settings’ from the GNOME dashboard and look for the ‘Network’ option:
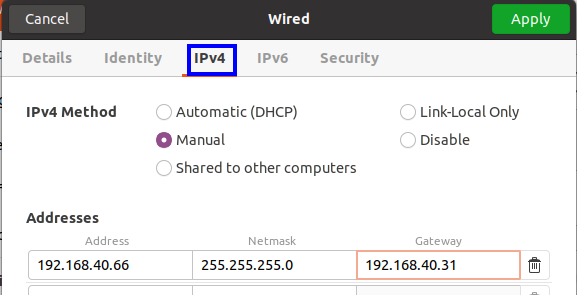
Choose the setting icon from the active network on your system:
On the new window, select the IPv4 tab and then under the IPv4 method, choose the Manual option. Enter the details for the new IP address:
Now restart your connection and check the IP address:
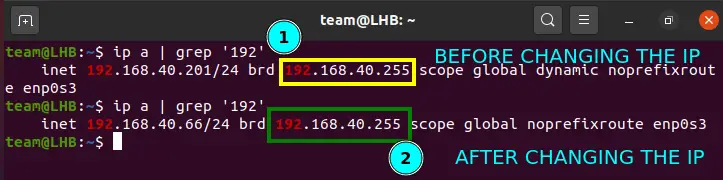
As you can see from the above screenshot, the IP address has now changed.
Wrapping Up
The ip command is suitable for all Linux systems. Netplan is a new way of managing a network and is a very straightforward approach for Ubuntu systems.
I also added steps for the desktop users to help them change the IP address graphically.
Let me know if you have any questions or suggestions.
Как назначить IP адрес в Linux
В создании этой статьи участвовала наша опытная команда редакторов и исследователей, которые проверили ее на точность и полноту.
Команда контент-менеджеров wikiHow тщательно следит за работой редакторов, чтобы гарантировать соответствие каждой статьи нашим высоким стандартам качества.
Количество просмотров этой статьи: 94 491.
Из данной статьи вы узнаете, как назначить компьютеру с Linux новый IP-адрес. Это поможет решить проблемы с подключением к интернету.
В дистрибутивах на базе Debian

Обновите свою версию Linux. Популярными дистрибутивами Linux на базе Debian являются Ubuntu, Mint и Raspbian.

- Нажмите Ctrl + Alt + T или Ctrl + Alt + F1 (в Mac OS X вместо Ctrl зажмите ⌘ Command ).
- Если возможно, щелкните по текстовому полю в верхней или нижней части экрана.
- Откройте окно «Меню» и щелкните по «Терминал».

- Учетная запись суперпользователя в Linux является аналогом учетной записи администратора в Windows или Mac OS X.

- Возглавляет список активный сетевой интерфейс (Wi-Fi или Ethernet). Он помечен как «eth0» (Ethernet) или «wifi0» (Wi-Fi).


- Например, чтобы назначить IP-адрес «192.168.2.100» Ethernet-соединению («eth0»), введите sudo ifconfig eth0 192.168.0.100 netmask 255.255.255.0 .

Назначьте адрес основного шлюза. Введите route add default gw 192.168.1.1 и нажмите ↵ Enter . [1] X Источник информации


Проверьте, изменился ли IP-адрес выбранного сетевого интерфейса. Введите ifconfig , найдите сетевой интерфейс и посмотрите на адрес справа от имени интерфейса. Скорее всего, вы увидите IP-адрес, который вы только что назначили.
В дистрибутивах c менеджером пакетов RPM

Обновите свою версию Linux. Популярными дистрибутивами Linux с менеджером пакетов RPM являются CentOS, Red Hat и Fedora.

- Нажмите Ctrl + Alt + T или Ctrl + Alt + F1 (в Mac OS X вместо Ctrl зажмите ⌘ Command ).
- Если возможно, щелкните по текстовому полю в верхней или нижней части экрана.
- Откройте окно «Меню» и щелкните по «Терминал».

- Учетная запись суперпользователя в Linux является аналогом учетной записи администратора в Windows или Mac OS X.

Найдите сетевой интерфейс, которому нужно назначить новый IP-адрес. Обычно это Ethernet-соединение или Wi-Fi-соединение, текущий IP-адрес которого можно найти в правой части окна.


Выведите на экран параметры сети. Введите ls и нажмите ↵ Enter . Имя текущего соединения отобразится в верхнем левом углу параметров сети.


- BOOTPROTO: измените dhcp на none .
- Any IPV6 entry: удалите все записи с IPV6; для этого поставьте курсор возле I (слева) и нажмите Del .
- ONBOOT: измените no на yes .

- Введите PREFIX=24 и нажмите ↵ Enter . Также можно ввести NETMASK=255.255.255.0 .
- Введите GATEWAY=192.168.2.1 и нажмите ↵ Enter . Если нужно, замените адрес шлюза на свой.

Сохраните внесенные изменения и закройте файл. Для этого воспользуйтесь меню «Файл» или введите :wq и нажмите ↵ Enter .
- В некоторых специфических дистрибутивах Linux необходимо выполнить другие действия, чтобы назначить новый IP-адрес. Подробную информацию ищите в интернете.
Дополнительные статьи


Об этой статье
В создании этой статьи участвовала наша опытная команда редакторов и исследователей, которые проверили ее на точность и полноту.
Команда контент-менеджеров wikiHow тщательно следит за работой редакторов, чтобы гарантировать соответствие каждой статьи нашим высоким стандартам качества. Количество просмотров этой статьи: 94 491.