- Reset Lost Password Of Ubuntu Virtual Machine
- Click on “Advanced options for Ubuntu”
- Choose recovery mode for any one of the available kernels
- Under Recovery Menu, choose root
- Установка root-пароля в VM используя контекстуализацию
- Шаг 1. Создаем скрипт
- Шаг 2. Регистрируем скрипт в Sunstone
- Шаг 3. Обновляем шаблон
- Шаг 4. Создание пароля
- Добавим значение ROOT_PASSWORD в шаблон.
- Сброс пароля в ВМ на KVM | Proxmox
- Меняем пароль пользователя в виртуальной машине с ОС Windows.
- Меняем пароль пользователя в виртуальной машине с ОС Linux.
- Для API на PHP
- Ошибка при смене пароля.
- Исправляем для Linux систем.
- Исправляем для Windows систем.
- RSS
- What are the credentials for virtual-machine image?
- Support This Project
- Recent Posts
- Follow us
- Links
- Acknowledgements
- Privacy Overview
Reset Lost Password Of Ubuntu Virtual Machine
I have this tendency of playing around with software in virtual machine first before exposing it to my production environment. There are lots of reasons for doing so, checking compatibility, worthiness, dependency requirements, and what not. Its always a safe bet to install and run a package in test machine (in this case a Virtual Machine) before pushing in to your actual machine.
This also means that there are times when I don’t power on the virtual machine for weeks at all and hence suffer the possibility of losing track of its credentials, including password for its user account. Although, I do make a point of storing the password in some form at some place but there’s always a chance of things going wrong.
Something similar happened last week, when I booted into a Ubuntu 16.04 virtual machine to play around with CrossOver linux and Play On Linux, just to see if Microsoft Office 2010 or 2013 do, in-fact, work. That’s when I realized I forgot password for the machine! Changing the forgotten or rather lost password was quite simple.
All I had to do was to shutdown the machine. Boot it back and just after pressing the “Start up this guest operating system”, start pressing the Shift key continuously. The reason for frantically hitting the Shift key is that in VMware Workstation, the boot screen appears for a very very short duration, giving your almost no time to get into it. So, don’t be surprised if the Shift key isn’t registered the first time.
Once you get into the boot manager, follow the below mentioned steps,
Click on “Advanced options for Ubuntu”

Choose recovery mode for any one of the available kernels

Under Recovery Menu, choose root

You’ll then be asked to press Enter key for entering maintenance. Press the Enter key (duh!).

Thereafter, you will have the terminal at your disposal with root privileges. Go bonkers! No, wait. Not yet. First, mount the root (/) file system as read-write by typing in (no need for sudo),
Once this is done, issue following command to reset password for the user (replace user_name with your username),
That’s about it. The system will ask for new password and once done, exit the terminal by typing,
and continue with boot process, you’ll have reset your lost password successfully!
Note – Mileage may wary for Virtualbox as compared to VMware Workstation.
Установка root-пароля в VM используя контекстуализацию
Установка root пароля для виртуальной машины используя сценарий инициализации.
По умолчанию OpenNebula не устанавливает root пароль, в целях безопасности, и использует авторизацию по RSA ключам, что безопаснее. Далее представлен способ для установки root пароля через контекстуализацию шаблонов.
Шаг 1. Создаем скрипт
#!/bin/bash
[ -n «$ROOT_PASSWORD« ] && usermod -p «$ROOT_PASSWORD« root
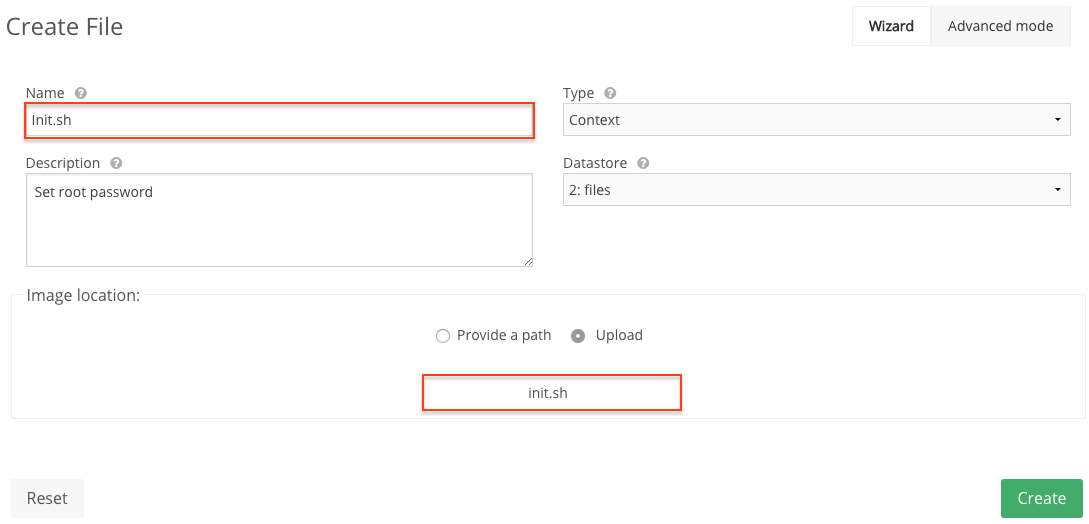
Шаг 2. Регистрируем скрипт в Sunstone
Переходим в Sunstone во вкладку Virtual Resources -> Files & Kernels , создаем новый файл и загружаем скрипт. Тип указываем CONTEXT и название, например init.sh .
Шаг 3. Обновляем шаблон
Обновим шаблон, указав ему использовать загруженный скрипт при инициализации виртуальной машины.
Virtual Resources -> Templates -> Update -> Context -> Files -> Click ‘init.sh’ -> Click ‘Update’
Шаг 4. Создание пароля
Создаем пароль в зашифрованном виде, например так:
echo -n ‘mycryptpassword’|openssl passwd -1 -stdin
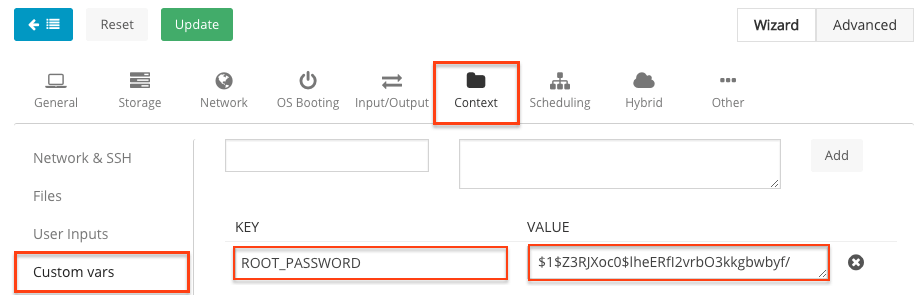
Получаем криптостойкий пароль: $1$Z3RJXoc0$lheERfI2vrbO3kkgbwbyf/
Добавим значение ROOT_PASSWORD в шаблон.
Virtual Resources -> Templates -> Update -> Context -> Custom Variables
Установка пароля завершена.
При инициализации виртуальной машины будет установлен пароль для root пользователя.
Имеется и другой способ установки root-пароля, например генерацией через PHP скрипт и подгрузкой через API.
(Будет в скором времени добавлено на Github)
Сброс пароля в ВМ на KVM | Proxmox

Сегодня научимся сбрасывать пароль пользователя в виртуальной машине на KVM расположенной в панели управления Proxmox VE.
Меняем пароль пользователя в виртуальной машине с ОС Windows.
Для смены пароль пользователя в ОС Windows воспользуемся командной строкой Proxmox. Я подключаюсь через ssh. В терминале Proxmox набираем следующую команду:
Вот как это выглядит с ВМ под номером 105 и пользователем myuser :
qm guest passwd 105 myuser Enter new password: ***** Retype new password: *****- На запрос Enter new password вводим новый пароль.
- на запрос Retype new password подтверждаем пароль еще раз.
Теперь переходим в ВМ c Windows и логинимся с новым паролем.
Меняем пароль пользователя в виртуальной машине с ОС Linux.
Для смены пароль пользователя в ВМ с Linux воспользуемся всё тем же ssh. В терминале Proxmox набираем следующую команду:
qm guest passwd 114 root Enter new password: ****** Retype new password: ******Для API на PHP
Для смены пароля через API на PHP необходимо передать следующий параметр.
$data = [ «username»=>’MyUser’, «password»=>’1234567890′, «crypted»=>false ];Ошибка при смене пароля.
Также данные команды могут выдать следующую ошибку:
No QEMU guest agent configuredДля исправления необходимо установить quemu-guest-agent в вашу виртуальную машину. Конечно же это нужно делать до того, как вы забыли пароль от вашего пользователя.
Исправляем для Linux систем.
Перейдите в гостевую систему и в терминале наберите следующую команду:
В системах на Debian/Ubuntu выполняем следующие команды:
sudo apt install qemu-guest-agentНа системах на базе Redhat:
yum install qemu-guest-agentИсправляем для Windows систем.
Сначала вы должны скачать драйвер virtio-win iso (см. Windows VirtIO Drivers).
Затем установите драйвер virtio-serial:
- Прикрепите ISO к виртуальной машине Windows (virtio-*.iso)
- Перейдите в Диспетчер устройств Windows
- Найдите «PCI Simple Communications Controller«
- Щелкните правой кнопкой мыши ->Обновить драйвер и выберите на смонтированном iso DRIVE:\vioserial\\ where is your Windows Version — ваша версия Windows (например, W7 для Windows 7)
После этого необходимо установить qemu-guest-agent:
- Перейти к смонтированному ISO в проводнике
- Установщик гостевого агента находится в каталоге гостевой агент
- Запустите установщик двойным щелчком (либо qemu-ga-x86_64.msi (64-разрядная версия), либо qemu-ga-i386.msi (32-разрядная версия)
Если есть вопросы, то пишем в комментариях.
Также можете вступить в Телеграм канал, ВКонтакте или подписаться на Twitter. Ссылки в шапке страницы.
Заранее всем спасибо.
RSS
Если вы нашли ошибку, пожалуйста, выделите фрагмент текста и нажмите Ctrl+Enter.
Сегодня давайте обсудим, как можно удалить виртуальную машину в Proxmox. Вы хотите удалить виртуальную машину в Proxmox? Мы можем помочь Читать
Если Вы здесь, значит у Вас возник вопрос: «Где лежат образы виртуальных машин в Proxmox». Привожу пример скриншота Proxmox 6.2: Читать
Сегодня расскажу как подключить на виртуальную машину (ВМ) в Proxmox утилиту qemu-guest-agent для просмотра IP-адреса через WEB-интерфейс и правильной завершении Читать
В этой статье представлены команды для сброса пароля root в контейнерах LXC на Proxmox.
What are the credentials for virtual-machine image?
All images for VirtualBox and VMware have the same username and password. After logging into virtual machine that you’ve downloaded from here you can change ‘username’ & ‘password’ or create you new user.
Username – osboxes
Password – osboxes.org
For Root user account
Password – osboxes.org
Support This Project
Credentials for images:
username: osboxes
password: osboxes.org
Root account password: osboxes.org
Recent Posts
Ubuntu 22.10 and Ubuntu Server 22.10 Images for VirtualBox and VMware
Kali Linux 2022.3 VM Images Available for VirtualBox and VMware
Ubuntu 22.04 Jammy Jellyfish and Ubuntu Server 22.04 Images for VirtualBox and VMware
MX Linux 21.1 Virtual Machine Images Available for VirtualBox and VMware
Q4OS 4.8 Gemini VM Images Available for VirtualBox and VMware
Deepin 20.5 Virtual Machine Images Released for VirtualBox and VMware
Follow us
Links
Acknowledgements
The terms & logos we’ve used VirtualBox™, VMware™ and others are registered trademarks for their respective corporations, and used on this site for reference proposes only. Infringing behavior isn’t intended.
Our site is using cookies, by visiting our site you are agree to use of cookies. Read our privacy policy.
We use cookies on our website to give you the most relevant experience by remembering your preferences and repeat visits. By clicking “Accept All”, you consent to the use of ALL the cookies. However, you may visit «Cookie Settings» to provide a controlled consent.
Privacy Overview
This website uses cookies to improve your experience while you navigate through the website. Out of these, the cookies that are categorized as necessary are stored on your browser as they are essential for the working of basic functionalities of the website. We also use third-party cookies that help us analyze and understand how you use this website. These cookies will be stored in your browser only with your consent. You also have the option to opt-out of these cookies. But opting out of some of these cookies may affect your browsing experience.
Necessary cookies are absolutely essential for the website to function properly. This category only includes cookies that ensures basic functionalities and security features of the website. These cookies do not store any personal information.
Any cookies that may not be particularly necessary for the website to function and is used specifically to collect user personal data via analytics, ads, other embedded contents are termed as non-necessary cookies. It is mandatory to procure user consent prior to running these cookies on your website.