- How to install Ubuntu 22.04 Server on VirtualBox
- Steps to install Ubuntu 22.04 Server on VirtualBox
- 1. Download Ubuntu 22.04 Server LTS ISO
- 2. Do you have VirtualBox?
- 3. Create Virtual Machine
- Create New VM
- Name Virtual Machine
- Set RAM for VM
- Create a Virtual Hard disk
- 4. Start Ubuntu 22.04 server Virtual Machine
- 5. Add Ubuntu 22.04 server ISO to VirtualBox
- 6. Grub Menu to select and boot the OS
- 7. Install Ubuntu 22.04 on VirtualBox
- 8. Ubuntu Server standard or minimized
- 9. Network Connections VirtualBox
- 10. Erase disk and Install Ubuntu 22.04 server
- 11. Set Username and password
- 12. Select the Ubuntu Server package to install (optional)
- 13. Install VirtualBox Guest Additions
- 14. Switch to root user and set a password
- FAQ
- How To Setup LVS (Linux Virtual Server) Load Balancer on CentOS 8 / RHEL 8
- Step 1: Installing Linux Virtual Server on CentOS 8 / RHEL 8
- Step 2: Enabling IP forwarding and enable service
- Step 3: Configure LVS as Load Balancer
- Step 4: Adding a Virtual Service
How to install Ubuntu 22.04 Server on VirtualBox
Ubuntu 22.04 LTS Linux server is the latest long-term supported server OS from Canonical developers. Although, yet most of the server users are resorting currently on Ubuntu 20.04 LTS, however, for those who want to try out the Jammy Jellyfish on a Virtual machine before moving to it, this article will help them.
Most of the users would already be familiar with VirtualBox, if not, then it is an open-source project from Oracle to run virtual machines on all popular operating systems such as Windows, Linux, macOS, and FreeBSD.
Steps to install Ubuntu 22.04 Server on VirtualBox
Estimated reading time: 11 minutes
1. Download Ubuntu 22.04 Server LTS ISO
First, we must have a bootable ISO file of Ubuntu 22.04 Server jammy jellyfish Linux. For that, we can visit the official Image download page of Ubuntu. On the page, click on the button given for Downloading the ISO file.
2. Do you have VirtualBox?
Of course, to install Ubuntu 22.04 server Virtual machine on VBox, we also need to have VirtualBox installed on our existing host operating system. For Windows users, the installation of VirtualBox is just like any other software once you have the setup from its official website. Whereas Debian, Ubuntu, and its based Linux users can see our article on – VirtualBox installation on the Linux system.
3. Create Virtual Machine
Once you have installed the VirtualBox or if you already have then simply run it.
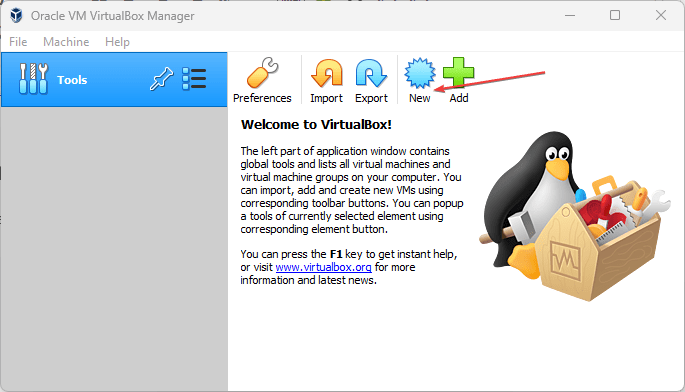
Create New VM
After that click on the “New” button to create a fresh Virtual machine.
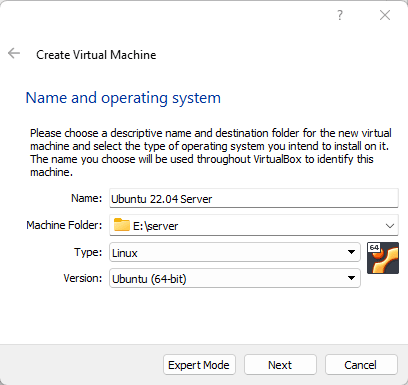
Name Virtual Machine
Give some name to your virtual machine such as “Ubuntu 22.04” where select Type- Linux and version to Ubuntu.
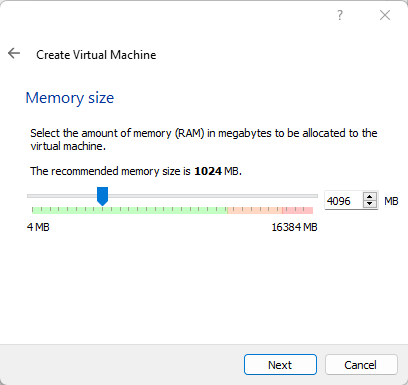
Set RAM for VM
If you are planning to install Ubuntu 22.04 Server with Desktop interface then for good performance and if your host system allows, then set the RAM to 4GB or less as per your system configuration.
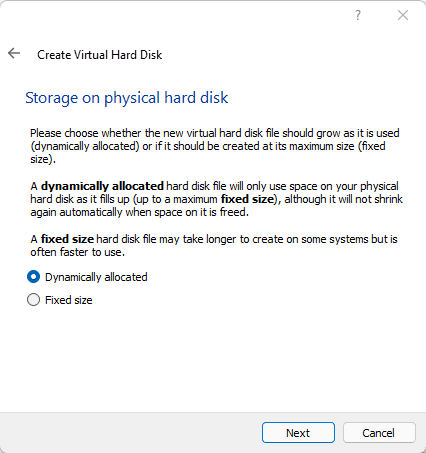
Create a Virtual Hard disk
Let the “Create a virtual hard disk now” option be selected and move to the next step.
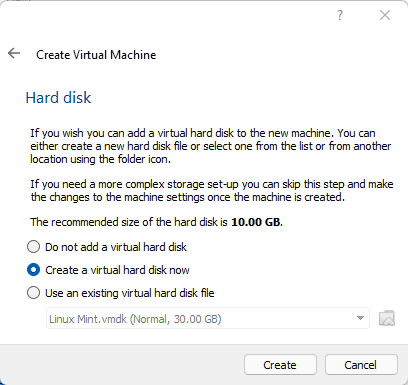
If you have any plan to use the Virtual hard disk later in VMware then go for VMDK otherwise let the default option VDI be selected.
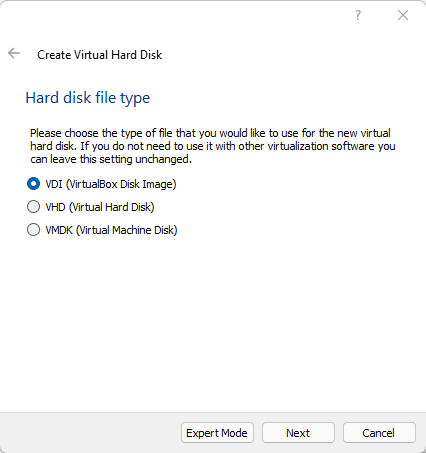
Also, let the default “Dynamic Allocated” option be selected as it is. Allocate around 30GB of virtual space.
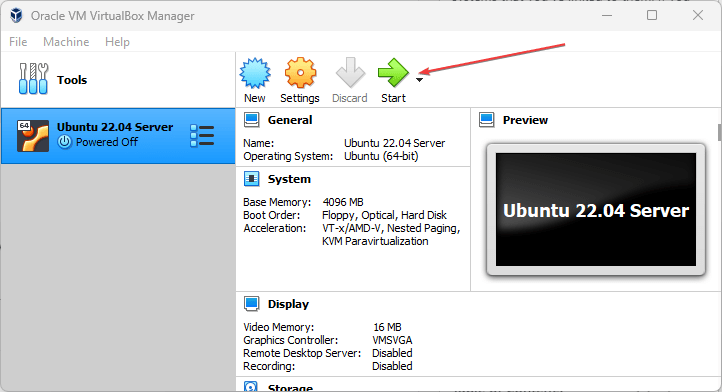
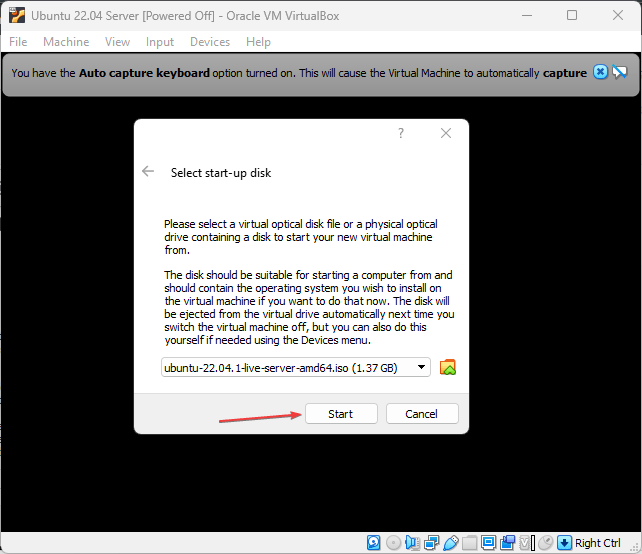
4. Start Ubuntu 22.04 server Virtual Machine
Finally, once all the above steps are done, you will see a newly created virtual machine on your VirtualBox. Select that from the left side panel and hit the Start button.
5. Add Ubuntu 22.04 server ISO to VirtualBox
Now, we need to select the downloaded Ubuntu 22.04 ISO file as a Start-up disk to boot our Virtual machine with that. For that click on the “Folder” icon.
After clicking on the Folder icon, a pop-up window will open to add the ISO image file. Click on the “Add” button and then select your downloaded ISO file.
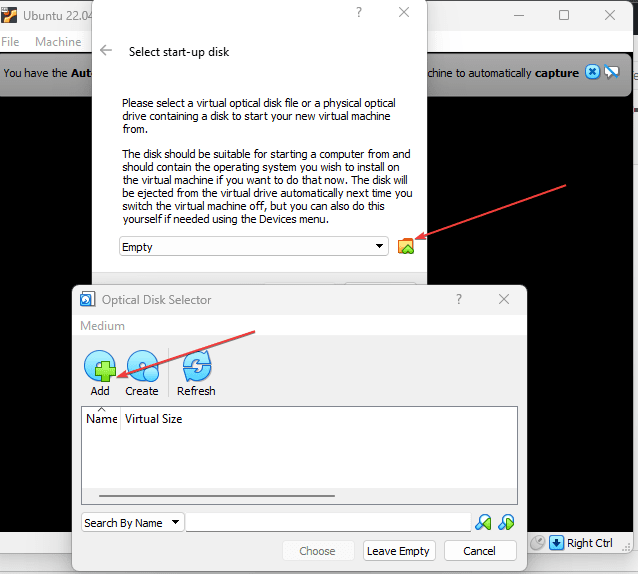
As you have done this, the same ISO image will show in the “ISO Image selection ” area. Scroll to your added Ubuntu 22.04 LTS image and hit the Choose button.
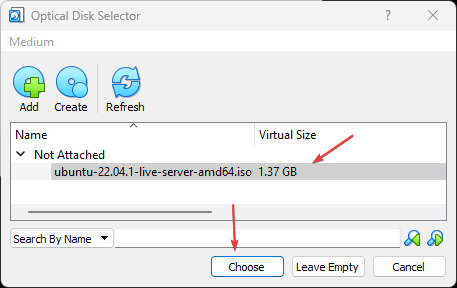
Finally, click on the Start button.
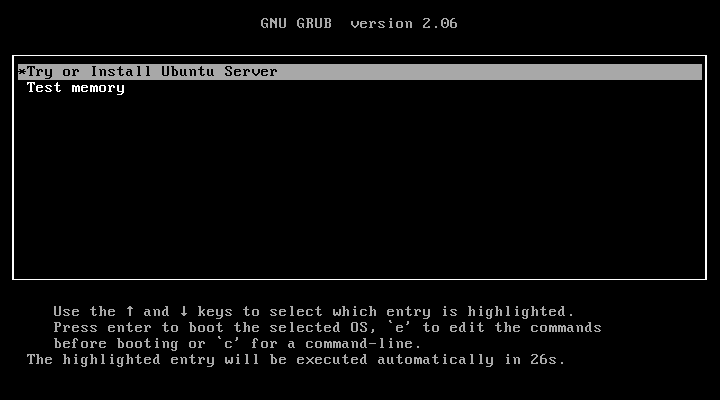
6. Grub Menu to select and boot the OS
Once the virtual machine is started, you will see the Grub menu as the first screen to select “Try or Install Ubuntu Server” to boot with it.
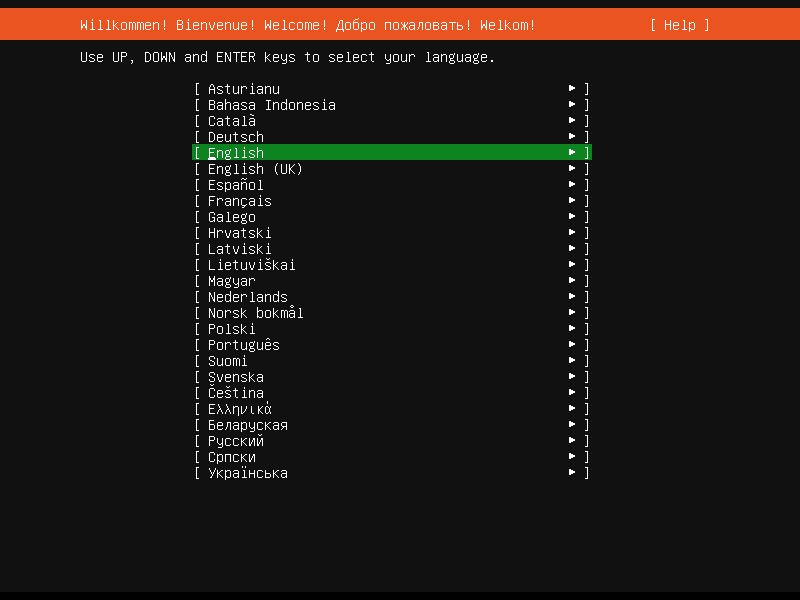
7. Install Ubuntu 22.04 on VirtualBox
Finally, from the installation wizard, select the language, by default it will be English. In the next step, let the default keyboard layout be selected, and just press the Enter key to move further.
8. Ubuntu Server standard or minimized
In the next step, the installation wizard will ask you what type of server installation do you want? It is recommended to let the default option be selected and simply hit the Enter key.

9. Network Connections VirtualBox
Ubuntu server will automatically identify the connected network and select the same to use. If you want to customize that then use the arrow key and manually select the Adapter you want to use.
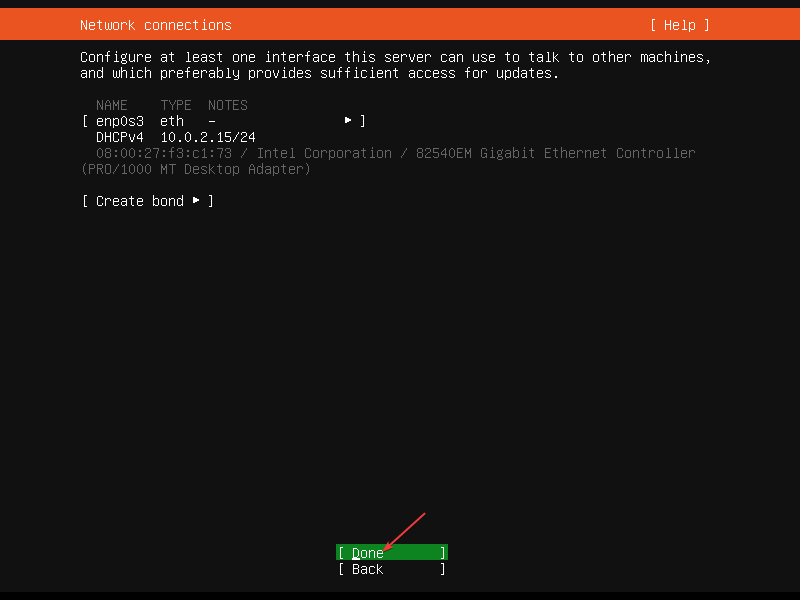
Skip the Proxy in the next step and hit the Enter key again.
After that again press the Enter key to let the system select the default Ubuntu Mirror to fetch packages.
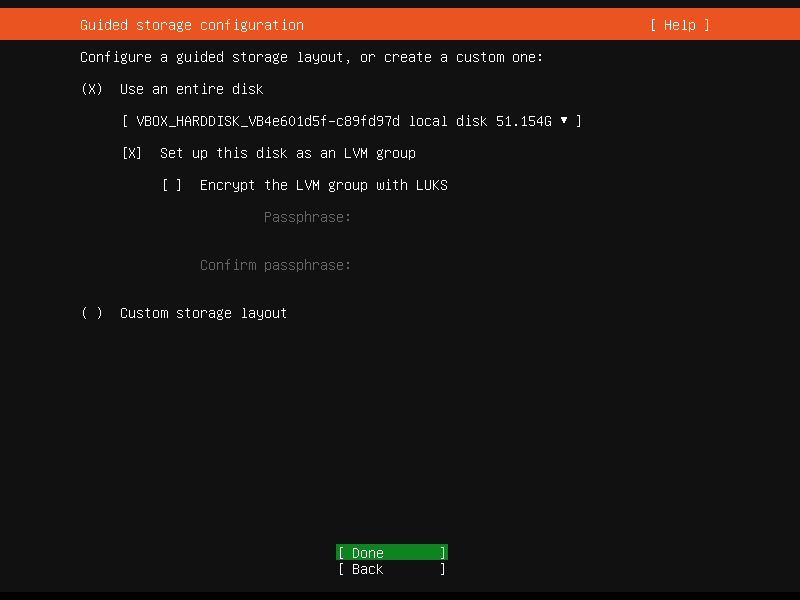
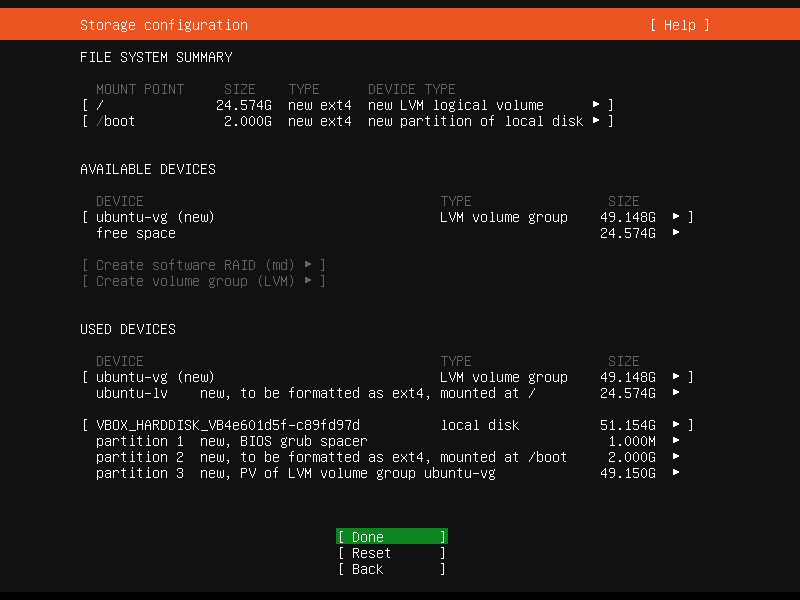
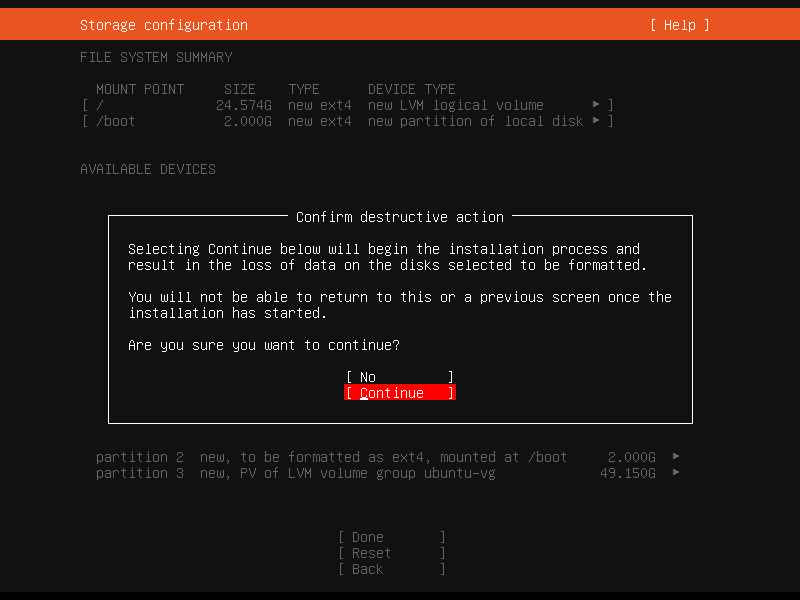
10. Erase disk and Install Ubuntu 22.04 server
Now, the system will show the entire attached virtual hard disk where it is planning to install the Ubuntu server. Use the TAB key to select the DONE option and hit the Enter key.
11. Set Username and password
Soon, you will have the Profile Setup area from where we can create a user for our Server.
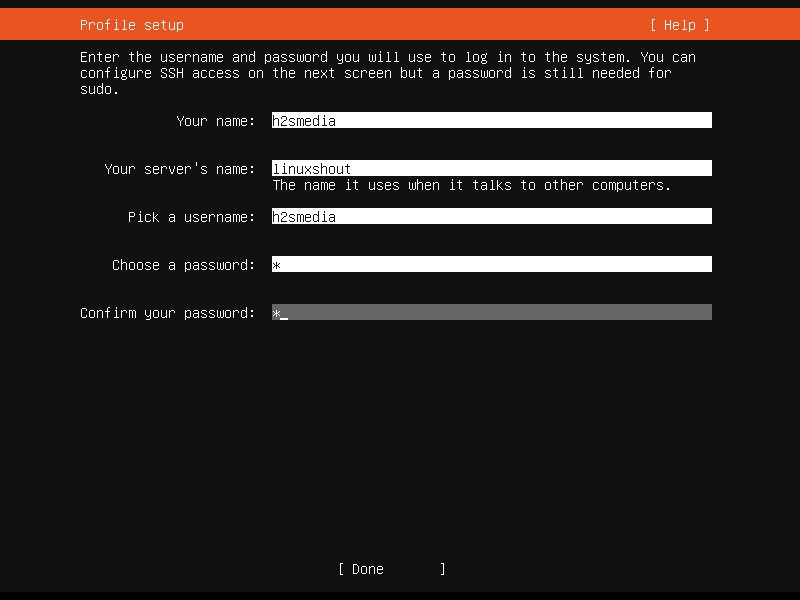
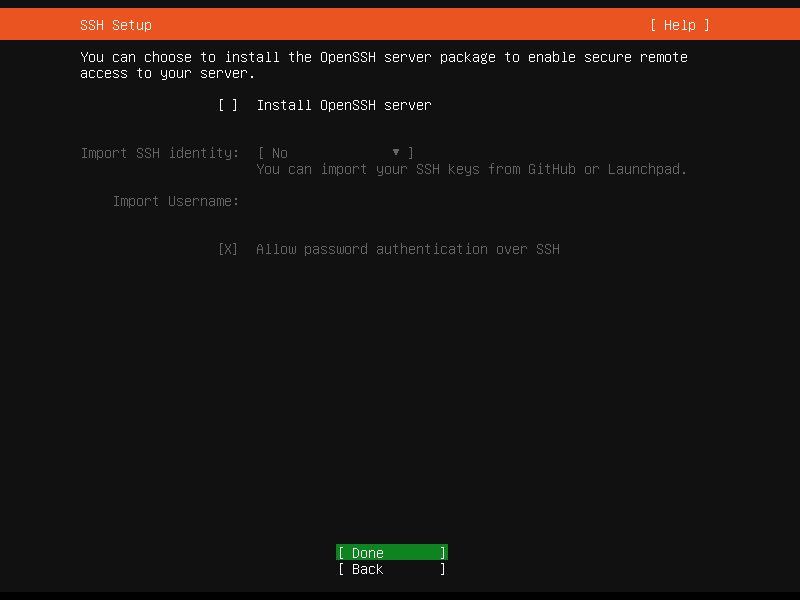
After that, if you want to access the server remotely using the SSH then you can select the “Install OpenSSH Server” using arrow keys and spacebar otherwise simply select the “DONE” and move forward because we can install it later.
12. Select the Ubuntu Server package to install (optional)
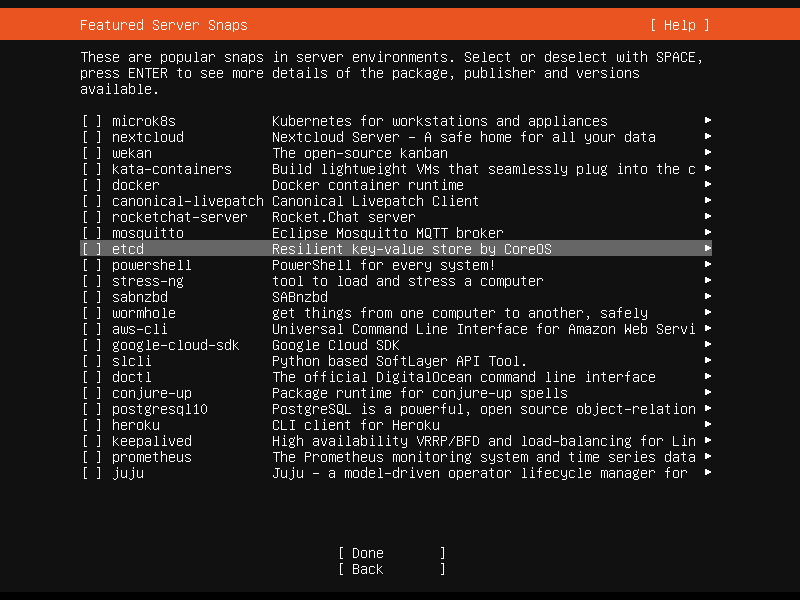
Do you want to install some popular and common server software packages such as Docker? Then you can select them here otherwise, leave them unselected and select the Done option.
Move next and the system will start the installation process of the Ubuntu 22.04 server on VirtualBox as a Virtual Machine.
13. Install VirtualBox Guest Additions
Access your Ubuntu server terminal and with an active internet connection on your virtual machine to run the given commands:
sudo apt install virtualbox-guest-additions-iso virtualbox-guest-utils virtualbox-dkmsfor Extension pack:
sudo apt install virtualbox-ext-packRestart the system…
14. Switch to root user and set a password
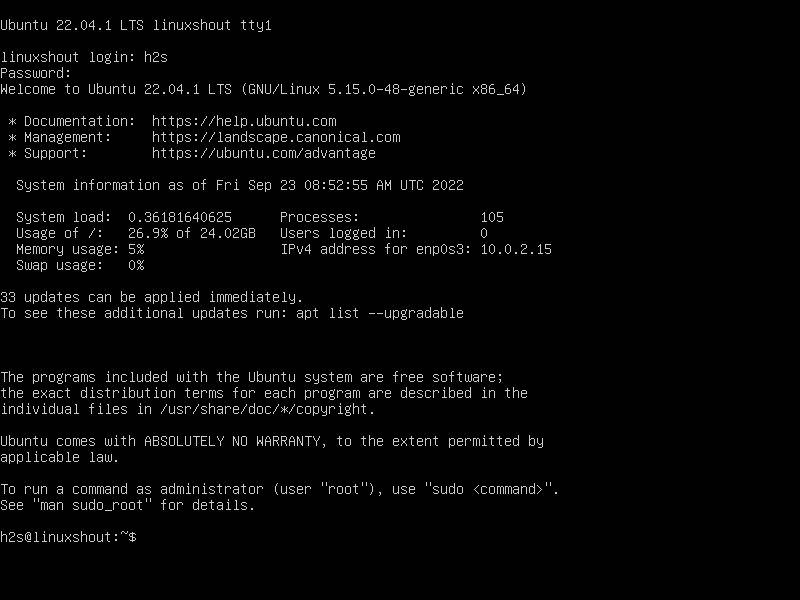
As you reboot the Ubuntu server virtual machine, a login interface will appear. Enter the details of the user you have created while installing it.
Set Ubuntu root user password
Enter the new password for your root user.
FAQ
Yes, we can run Virtual machines on an Ubuntu server with the help of a virtualization module called KVM (Kernel-based Virtual Machine). Whereas those who have a GUI Desktop server can use VirtualBox or VMware Player workstation.
To create a VirtualBox server in Linux, we need to install some Server OS distros on it such as Ubuntu server, RedHat, Fedora, OpenSUSE, and more… In this article, you can see how we have installed the Ubuntu 22.04 Server on VirtualBox.
Yes, Linux servers are not only free and open source but consume less Memory and offer an easy-to-use command line package manager to install thousands of packages. That is the reason most of the hosting and cloud servers are running on Linux.
Multipass can launch and run virtual machines and configure them with cloud-init like a public cloud. uses Hyper-V on Windows, QEMU and HyperKit on macOS and LXD on Linux for minimal overhead and the fastest possible start time. It uses images tuned for cloud usage
Yes, Ubuntu Server is free to use for both Commercial and Personal projects. However, if an Enterpise want can buy extended security, certified compliance and 24×7 support for their Ubuntu server running infrastructure from Ubuntu.
Yes, of course; we can install Ubuntu server on Laptops, Desktops or even on virtual machines like any other Linux distro.
No, Multipass is not a hypervisor instead a tool to quickly create Ubuntu VM environment and manage it with cloud-init. In simple, it is a platfrom that uses hypervisor such as KVM, HyperKit and Hyper-v to create virtual machines instantly.
Other Articles:
How To Setup LVS (Linux Virtual Server) Load Balancer on CentOS 8 / RHEL 8

Linux Virtual Server is a highly salable and highly available server built on a cluster of real servers with the load balance running on the Linux Operating System.
First of all we will install the Linux Virtual Server package on Our CentOS 8 / RHEL 8 machine. After Installing LVS on our Operating System we will configure it as a load balancer to the back end servers. This setup assumes you have installed a CentOS / RHEL 8 server or workstation edition.
Step 1: Installing Linux Virtual Server on CentOS 8 / RHEL 8
Run the following command on your server to Install Linux Virtual Server and Choose yes to proceed further.
[[email protected] ~]$ sudo yum install ipvsadm
[sudo] password for sabi:
Last metadata expiration check: 3:38:25 ago on Sun 22 Dec 2019 12:37:06 AM EST.
Dependencies resolved.
Package Arch Version Repository Size
Installing:
ipvsadm x86_64 1.29-8.el8 AppStream 57 k
Transaction Summary
Install 1 Package
Total download size: 57 k
Installed size: 83 k
Is this ok [y/N]: y
Step 2: Enabling IP forwarding and enable service
When you have finished installing package, enable the service and IP forwarding in your machine.
echo 'net.ipv4.ip_forward = 1' | sudo tee -a /etc/sysctl.conf
sudo sysctl -p
Confirm it is turned to 1
[[email protected] ~]$ echo 'net.ipv4.ip forward = 1' | sudo tee -a /etc/sysctl.conf
[sudo] password for sabi:
net.ipv4.ip forward = 1
Start and enable ipvsadm services by running
sudo touch /etc/sysconfig/ipvsadm
sudo systemctl enable –now ipvsadm
Check out the service status, it will be look like as:
[[email protected] ~]$ systemctl status ipvsadm
● ipvsadm.service - Initialise the Linux Virtual Server
Loaded: loaded (/usr/lib/systemd/system/ipvsadm.service; enabled; vendor preset: di>
Active: active (exited) since Sun 2019-12-22 04:25:30 EST; 20s ago
Process: 5880 ExecStart=/bin/bash -c exec /sbin/ipvsadm-restore < /etc/sysconfig/ipv>
Main PID: 5880 (code=exited, status=0/SUCCESS)
Dec 22 04:25:29 localhost.localdomain systemd[1]: Starting Initialise the Linux Virtua>
Dec 22 04:25:30 localhost.localdomain systemd[1]: Started Initialise the Linux Virtual>
lines 1-8/8 (END)
Step 3: Configure LVS as Load Balancer
After setting up all, move forward to configure LVS as a load balancer to actual back-end applications.
Clean the IP tables rules by running
Step 4: Adding a Virtual Service
Add a virtual service by using the syntax
ipvsadm -A -t (ServiceIP:Port) -s (Distribution method)
Following Distribution methods supported:
- rr (Round Robin) = Equal load distribution among back-end servers
- wrr (Weighted Round Robin) = The Round Robin based on real Servers weight
- lc (Least Connection) = Servers having few active processes are selected for new load assignment on priority basis.
- wlc ( Weighted Least Connection) = Assigns tasks to servers with fewer jobs and relative to the real server’s weight (Ci/Wi) . By default, this method is used.
We will do configuration based on below diagram.

In this case, I’m setting LVS server to listen on 192.168.233.129 with port 80.
sudo ipvsadm -A -t 192.168.233.129:80 -s wlc
Now, add the back-end servers by typing
sudo ipvsadm -a -t (ServiceIP:Port) -r (BackendServerIP:Port) -m
The configuration will look like
sudo ipvsadm -a -t 192.168.233.129:80 -r 192.168.233.209:80 -m
sudo ipvsadm -a -t 192.168.233.129:80 -r 192.168.233.4:80 -m
Type the following command to list current rules:
[[email protected] ~]$ sudo ipvsadm -l
IP Virtual Server version 1.2.1 (size=4096)
Prot LocalAddress:Port Scheduler Flags
-> RemoteAddress:Port Forward Weight ActiveConn InActConn
TCP cent01:http wlc
-> cent03:http Masq 1 0 0
-> cent02:http Masq 1 0 0
Allow Firewall
sudo firewall-cmd --add-service=http --permanent
sudo firewall-cmd --reload
Now, when you load the LVS server IP / domain name from the browser, you will see the page on one of the back-end server.
Hi this is the LVS server page on back-end server 1
Upon reloading, the back-end server 2 page should show
Hi this is the LVS server page on back-end server 2
This is how you can set up your LVS server on CentOS 8 / RHEL 8.