- Saved searches
- Use saved searches to filter your results more quickly
- License
- anszom/vtty
- Name already in use
- Sign In Required
- Launching GitHub Desktop
- Launching GitHub Desktop
- Launching Xcode
- Launching Visual Studio Code
- Latest commit
- Git stats
- Files
- README.md
- About
- Настраиваем виртуальный компорт в Ubuntu
- Create a virtual serial port connection over TCP
- 3 Answers 3
Saved searches
Use saved searches to filter your results more quickly
You signed in with another tab or window. Reload to refresh your session. You signed out in another tab or window. Reload to refresh your session. You switched accounts on another tab or window. Reload to refresh your session.
Virtual serial port driver for Linux
License
anszom/vtty
This commit does not belong to any branch on this repository, and may belong to a fork outside of the repository.
Name already in use
A tag already exists with the provided branch name. Many Git commands accept both tag and branch names, so creating this branch may cause unexpected behavior. Are you sure you want to create this branch?
Sign In Required
Please sign in to use Codespaces.
Launching GitHub Desktop
If nothing happens, download GitHub Desktop and try again.
Launching GitHub Desktop
If nothing happens, download GitHub Desktop and try again.
Launching Xcode
If nothing happens, download Xcode and try again.
Launching Visual Studio Code
Your codespace will open once ready.
There was a problem preparing your codespace, please try again.
Latest commit
Git stats
Files
Failed to load latest commit information.
README.md
Virtual Serial Port driver for Linux
This kernel module allows userspace programs to create virtual serial ports under /dev/ttyV#.
This is somewhat similar to the regular pseudo-tty interface, but vtty also emulates characteristics such as baud rate & modem line state. This allows users to create a fully-functional serial port driver completely in userspace.
- forward a serial port over the network. There are several Linux implementations of a RFC2217 server. VTTY allows you to write a RFC2217 client exposing a native-looking serial port to other software.
- quickly prototype a driver for an USB-to-serial converter using VTTY & libusb
- split one physical serial port in two, allowing two apps to access it without conflict (for example gdb & minicom, or esptool & minicom)
The module creates a /dev/vtmx «master» device, which is used to create the virtual serial ports in a manner similar to the pseudo-tty master device /dev/ptmx. Opening the /dev/vtmx device causes a /dev/ttyV# device to be allocated. The index of the virtual port can be obtained by issuing a VTMX_GET_VTTY_NUM (equal to TIOCGPTN) ioctl on the vtmx file descriptor.
Any writes on the vtmx file descriptor will appear as incoming data on the virtual TTY, subject to the regular in-kernel processing (line disciplines, echoing, and so on). Reading from vtmx will return data in a «packetized» format, inspired by the obscure pseudo-tty «packet» mode. On each successful read() call, the first byte returned will indicate the type of packet returned.
Currently supported packet formats:
- TAG_UART_RX (0), followed by the «serial port» data coming in from the virtual TTY (processed by the kernel as usual)
- TAG_SET_TERMIOS (1), followed by a ‘struct termios2’ structure representing the serial port configuration requested on the virtual TTY (TCSETS/TCSETS2)
- TAG_SET_MODEM (2), followed by a 32-bit integer representing the modem line state requested on the virtual TTY (TIOCMSET/TIOCMBIC/TIOCMBIS)
- TAG_BREAK_CTL (3), followed by a 32-bit integer representing the requested «break» state. A «break» state is a special condition on the serial port, during which the «low» signal state is sent for a period longer than the byte duration. A positive number indicates the duration of the requested break state (in milliseconds). Negative numbers indicate a request to set the break state indefinitely. Zero terminates the break state.
The master side can also use the VTMX_SET_MODEM_LINES ioctl (equal to TIOCMSET) to manipulate the modem line state of the virtual serial port. Only the «input» lines (such as CTS) can be changed this way. If the master process needs to change the «output» lines (such as RTS), it needs to open the ttyV# device and issue the regular tty ioctls there.
The test/ directory contains testing/example apps demonstrating the use of the interface.
Most of the functionality of VTTY is inspired by and follows the PTY interfaces. Most notable differences include:
- The «master» side of the pseudo-tty is a tty. I’m not really sure why and what would be the reason to (for example) configure the line discipline on the master side. After all, it’s only used to read & write some bytes. In VTTY, the master side is a simple character device.
- PTY does not inform the master of the «termios» settings on the slave
- PTY does not support setting modem lines on the slave
- VTTY reads on the master side return the data prefixed with a «tag» byte. This is similar to the (rarely used) «packet» mode of the pseudo-ttys.
- PTY supports locking/unlocking access to the pseudo-tty using TIOCSPTLCK. This is not supported in VTTY
Any kinds of flow control were not tested. I assume that XON/XOFF will not work.
The module is mostly stable, but I wouldn’t recommend running it on any «important» systems. I wouldn’t be surprised if there were some subtle locking bugs remaining (the linux tty layer is. complex).
Also see FIXME/TODO markers in the source code.
Some tty ioctls are not supported (notably TIOCMIWAIT & TIOCGICOUNT).
tty0tty emulates pairs of serial ports, connected in a null-modem fashion. The modem status lines are properly emulated, but the «termios» settings are not.
About
Virtual serial port driver for Linux
Настраиваем виртуальный компорт в Ubuntu
Удобно работать с виртуальной машиной XPSP3 в VirtualBox’е: когда надо включаешь её, когда не надо – выключаешь, всё очень быстро, и вирусы прочно экранируются. Но вот понадобилось внести изменения в отлаживаемую «виндовую» программу, работающую со старыми добрыми компортами. И тут обнаруживается: не работает компорт виртуальной машины. В ЛОРе нет хорошего ответа. Всё сводится к рекомендации создания новой машины, а это время. Западные пользователи на форумах тоже дают немало пустых советов. А на самом деле всё не так уж и сложно.
Сначала надо установить утилиту настройки аппаратного компорта хост-машины. Называется она setserial, в дистрибутивах Ubuntu её нет, но зато она есть в репозиториях, поэтому воспользуемся командой терминала:
sudo apt-get install setserial
И, конечно, запустим эту утилиту, чтобы посмотреть, присутствует ли на материнской плате, что собой представляет и как настроен аппаратный порт хозяйки (далее в примере исследуем COM1):
sudo setserial -g /dev/ttyS0
Учтите, что ttyS0 соответствует COM1, ttyS1 соответствует COM2 и т.д. согласно терминологии Линукса. Подставьте нужное. После ввода пароля суперпользователя в норме должен быть получен ответ:
/dev/ttyS0, UART: 16550A, Port: 0x03f8, IRQ: 4
Иначе компорт отсутствует или отключен на уровне BIOS’а хост-машины. Выключенный порт включаем. В случае отсутствия на материнской плате аппаратного компорта придётся поставить «костыль» из дополнительной PCI-платы расширения и добавить модуль его драйвера из прилагаемого к ней диска. Проверено: для Линукса драйверы раюотоспособны, но уточните номер появившегося компорта командой терминала
При необходимости параметры настройки коммуникационного порта можно откорректировать ( как именно – см. терминальной командой man setserial).
Настраиваем проключение виртуального COMn в аппаратный COMn, то бишь в файл ttySn+1. Для этого запускаем VirtualBox, НЕ ЗАПУСКАЯ ВИРТУАЛЬНУЮ МАШИНУ, и настраиваем параметры её компорта, как показано на этом скриншоте:
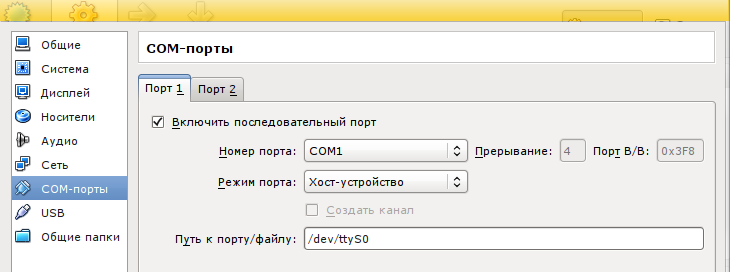
Здесь важно, чтобы номер порта, номер прерывания и адрес ввода-вывода совпадали бы с теми, которые проиндицировала утилита setserial. Если не совпадают, то утилита setserial поможет перенастроить параметры аппаратного компорта.
Но если вы сейчас попытаетесь запустить виртуальную машину, то с очень большой вероятностью получите ошибку. А всего-то надо сделать ещё две вещи.
Во-первых, вы, хотя и являетесь «главным администратором», не обязательно автоматически являетесь членом группы пользователей виртуальной машины. Удивительно? Но бывает нередко. Впрочем, эта нелепость устраняется легко. Чтобы не заморачиваться с CLI, установите с помощью эмулятора терминала великолепную утилиту gnome-system-tools (она есть в репозиториях) командой
sudo apt-get install gnome-system-tools
Данную утилиту рекомендую для многократного употребления, поэтому скопируйте из папки /usr/share/applications значок «Пользователи и группы» на рабочий стол и запустите эту утилиту из рабочего стола. Откроется окно «Параметры пользователей». Жмите кнопку «Управление группами», в открывшемся окне «Параметры групп» скроллингом отыщите группу vboxusers, выберите её и дважды щёлкните по ней. Откроется окно «Свойства группы vboxusers». Внутри панели «Члены группы» пометьте чекбокс напротив своего имени, отражающего вас, как пользователя системы.
Во вторых, реальному порту следует присвоить права «666», что означает разрешение дуплексного обмена через компорт на уровнях владельца, членов его группы и остальных пользователей. Делается это командой
sudo chmod 666 /dev/ttyS0
Вместо ttyS0 подставьте обозначение нужного аппаратного компорта хост-машины. Вcё, теперь можно смело запускать виртуальную машину, включать привычный «виндовый» гипертерминал и с помощью виртуальной Windows настраивать модемы, управлять программаторами и т.д. Словом, делать всё то, как будто бы вы работали с реальной Windows XP или «семёркой». Успехов!
Create a virtual serial port connection over TCP
I am developing an application that should be able to write to a virtual serial port and receive data through the same port from remote clients over network. The application runs on a linux server. I am new in using serial ports and I have some questions on this topic. Clients The client can establish a TCP connection to a server. When we setup a client, we have to provide the IP address of the server, a tcp port (usually 8080) and a virtual com port. The client then will automatically try to connect to the server. Server The server has a virtual com port, the same we set in the client config (e.g. COM1). When an application on the server writes data to this port, the data should be send to all clients connected via tcp. The response from the clients is send over TCP back to the server which can read it over the virtual serial port. Question On windows I used a virtual serial port connector http://www.eterlogic.com/Products.VSPE.html which did most of the work. However I want to solve this problem on linux machines. My question is, how can I create a TCP server that has a virtual serial port attached and can send/receive data through this port over TCP to listening clients?
3 Answers 3
socat pty,link=/dev/virtualcom0,raw tcp:192.168.254.254:8080& socat creates TCP connection to 192.168.254.254:8080, so that everything, that will be written to /dev/virtualcom0 will be forwarded to 192.168.254.254:8080 and vice versa.
Another approach would be to use RFC2217 via ser2net on Linux sever side and RFC2217 driver on Windows side (for example http://www.hw-group.com/products/hw_vsp/index_en.html single port version). You can also try to get http://pyserial.sourceforge.net/ to work with ser2net.
Thanks, does this create the virtual com port? I think this just links an existing one to the tcp server. However, I already did what you say here superuser.com/questions/733552/… my problem is that I cannot write to the com port.
socat would create /dev/virtualcom0 , so this is a virtual port. I’m using socat with a VScom NET-CAN 110 device and it is working like a charm. The instructions are here.
and can you say what virtualcom0 would be on windows? If I want to connect from windows client to linux that has virtualcom0 port, what should I select on windwos, COM1, COM2.
you have socat and ser2net and other programs but my experience is very bad. not working properly. I’ve done this small python program, can be useful. Update port, baudrate. then use any tcp client. Remove first line if don’t want to use is as auto executable script
#!/usr/bin/python import socket import sys import serial #open serial port ser = serial.Serial('/dev/ttyAMA0', 115200, timeout=0) #create socket sock = socket.socket(socket.AF_INET, socket.SOCK_STREAM) sock.setsockopt(socket.SOL_SOCKET, socket.SO_REUSEADDR, 1) sock.setsockopt(socket.SOL_SOCKET, socket.SO_KEEPALIVE, 1) #bond to the port. Don't use localhost to accept external connections server_address = ('', 2105) print('starting up on <> port <>'.format(*server_address)) sock.bind(server_address) #listen sock.listen(1) #loop while True: #waits for a new connection print('waiting for a connection') connection, client_address = sock.accept() try: print('connection from', client_address) #continously send from serial port to tcp and viceversa connection.settimeout(0.1) while True: try: data = connection.recv(16) if data == '': break ser.write(data) except KeyboardInterrupt: connection.close() sys.exit() except Exception as e: pass received_data = ser.read(ser.inWaiting()) connection.sendall(received_data) except Exception as e: print e finally: #clean up connection connection.close()