- Configure Linux as a Router (IP Forwarding)
- Use Cases for a Cloud-based Router
- Configure a Linux System as a Router
- Deploy Compute Instances
- Enable IP Forwarding
- Как включить/выключить IP Forwarding в Linux
- Проверяем включен или нет IP Forwarding в данный момент
- Временно включаем/отключаем IP Forwarding
- Постоянно включаем/отключаем IP Forwarding в системе
- IP Forwarding With net.ipv4.ip_forward
- Checking IP Forwarding Status
- How to Temporary Enable IP Forwarding
- How to Permanently Enable IP Forwarding
- Wrap Up
- About the author
- Denis Kariuki
Configure Linux as a Router (IP Forwarding)
Estamos traduciendo nuestros guías y tutoriales al Español. Es posible que usted esté viendo una traducción generada automáticamente. Estamos trabajando con traductores profesionales para verificar las traducciones de nuestro sitio web. Este proyecto es un trabajo en curso.
A computer network is a collection of computer systems that can communicate with each other. To communicate with a computer that’s on a different network, a system needs a way to connect to that other network. A router is a system that acts as a intermediary between multiple different networks. It receives traffic from one network that is ultimately destined for another. It’s able to identify where a particular packet should be delivered and then forward that packet over the appropriate network interface.
There are lots of options for off-the-shelf router solutions for both home and enterprise. In most cases, these solutions are preferred as they are relatively easy to configure, have lots of features, tend to have a user-friendly management interface, and may come with support options. Under the hood, these routers are stripped down computers running common operating systems, like Linux.
Instead of using one of these pre-built solutions, you can create your own using any Linux server, like a Linode Compute Instance. Using routing software like iptables, you have total control over configuring a router and firewall to suit your individual needs. This guide covers how to configure a Linux system as a basic router, including enabling IP forwarding and configuring iptables.
Use Cases for a Cloud-based Router
Many workloads benefit from custom routing or port forwarding solutions, including those workloads hosted on cloud platforms like Linode. For example, it’s common practice for security-minded applications to connect most of their systems together through a private network, like a VLAN. These systems might need access to an outside network, like other VLANs or the public internet. Instead of giving each one their own interface to the other network, one system on the private network can act as a router. The router is configured with multiple network interfaces (one to the private VLAN and one to the other network) and forwards packets from one interface to another. This can make monitoring, controlling, and securing traffic much easier, as it can all be done from a single system. Linode Compute Instances can be configured with up to 3 interfaces, each connecting to either the public internet or a private VLAN.
- Connect systems on private VLAN to the public internet.
- Connect systems on two separate private VLANs.
- Forward IPv6 addresses from a /56 routed range.
Configure a Linux System as a Router
- Deploy at least 2 Compute Instances (or other virtual machines) to the same data center. All systems should be connected to the same private network, like a VLAN. One system should be designated as the router and should also be connected to the public internet or a different private network. See Deploy Compute Instances.
- Enable IP forwarding on the Compute Instance designated as the router. See Enable IP Forwarding.
- Configure the routing software on that same instance (the router). This guide covers using iptables, but you can also use other software. See Configure iptables.
- Define a gateway on each system other than the router. This gateway should point to the router’s IP address on that network. See Define the Gateway.
Deploy Compute Instances
To get started, you can use the Linode platform to deploy multiple Compute Instances. These can mimic a basic application that is operating on a private VLAN with a single router. If you already have an application deployed and just wish to know how to configure ip forwarding or iptables, you can skip this section.
- Deploy 2 or more Compute Instances and designate one as the router. Each of these should be deployed to the same region. On the deployment page, you can skip the VLAN section for now. See Creating a Compute Instance to learn how to deploy Linode Compute Instances.
- On each Compute Instance other than the router, edit the instance’s configuration profile. See Managing Configuration Profiles for information on viewing and editing configuration profiles.
- On the Compute Instance designated as the router, leave eth0 as the public internet and set eth1 to be configured as a VLAN. Enter a name for the VLAN and assign it an IP address from whichever subnet range you wish to use. For instance, if you wish to use the 10.0.2.0/24 subnet range, assign the IP address 10.0.2.1/24 . By convention, the router should be assigned the value of 1 in the last segment.
- On each Compute Instance other than the router, remove all existing network interfaces. Set eth0 as a VLAN, select the VLAN you just created, and enter another IP address within your desired subnet (such as 10.0.2.2/24 and 10.0.2.3/24 ).
- Confirm that Network Helper is enabled and reboot each Compute Instance for the changes to take effect.
- Test the connectivity on each Compute Instance to ensure proper configuration. Log in to each instance and confirm the following is true:
- Ping the VLAN IPv4 address of another system within the same VLAN. Each Compute Instance should be able to ping the IP addresses of all other instances within that VLAN.
Enable IP Forwarding
IP forwarding plays a fundamental role on a router. This is the functionality that allows a router to forward traffic from one network interface to another network interface. In this way, it allows computers on one network to reach a computer on a different network (when configured along with routing software). Forwarding for both IPv4 and IPv6 addresses are controlled within the Linux kernel. The following kernel parameters are used to enable or disable IPv4 and IPv6 forwarding, respectively.
- IPv4: net.ipv4.ip_forward or net.ipv4.conf.all.forwarding
- IPv6: net.ipv6.conf.all.forwarding
By default, forwarding is disabled on most Linux systems. To configure Linux as a router, this needs to be enabled. To enable forwarding, the corresponding parameter should be set to 1 . A value of 0 indicates that forwarding is disabled. To update these kernel parameters, edit the /etc/sysctl.conf file as shown in the steps below.
- Log in to the Linux system you intend to use as a router. You can use SSH or Lish (if you’re using a Linode Compute Instance).
- Determine if IPv4 forwarding is currently enabled or disabled. The command below outputs the value of the given parameter. A value of 1 indicates that the setting is enabled, while 0 indicates it is disabled. If you intend to configure IPv6 forwarding, check that kernel parameter as well.
sudo sysctl net.ipv4.ip_forward Как включить/выключить IP Forwarding в Linux

Почти во всех распространенных дистрибутивах IP Forwarding выключен по-умолчанию и это имеет смысл, так как далеко не каждый его использует. Но в том случае, если вы планируете поднять собственный маршрутизатор на ОС Linux, настроить VPN сервер и так далее, вам необходимо включить форвардинг пакетов (маршрутизацию транзитных IP-пакетов, т.е. тех пакетов, которые не предназначены именно для вашего компьютера) в вашей ОС. В данной мини-инструкции я расскажу как это можно сделать:
Проверяем включен или нет IP Forwarding в данный момент
Для проверки в каком состоянии в данный момент находится форвардинг пакетов (включен или выключен), мы должны сделать запрос к ядру через команду sysctl. Делается это так:
Временно включаем/отключаем IP Forwarding
Чтобы включить форвардинг пакетов «на лету» и не перезагружать систему, нам достаточно выполнить следующую команду:
sudo sysctl -w net.ipv4.ip_forward=1Чтобы выключить форвардинг пакетов «на лету» и не перезагружать систему, нам достаточно выполнить следующую команду:
sudo sysctl -w net.ipv4.ip_forward=0Постоянно включаем/отключаем IP Forwarding в системе
В том случае, если нам необходимо перманентно включить или отключить форвардинг пакетов в системе, нам необходимо внести правки в конфигурационный файл /etc/sysctl.conf Для перманентного включения IP Forwarding, в конец данного файла добавляем следующую строчку:
Для перманентного отключения IP Forwarding, в конец данного файла добавляем следующую строчку:
Если в конфигурационном файле /etc/sysctl.conf уже есть настройка net.ipv4.ip_forward и она не закомментирована, то можно в ней выставить нужное значение и добавлять в конец файла эту настройку еще раз — нет необходимости
Далее, чтобы применить новую настройку, которую мы добавили, нам необходимо выполнить следующую команду:
Все, теперь в зависимости от значения в /etc/sysctl.conf, после перезагрузки ОС, форвардинг пакетов будет либо включен (net.ipv4.ip_forward = 1), либо выключен (net.ipv4.ip_forward = 0).
IP Forwarding With net.ipv4.ip_forward
![]()
“IP forwarding in Linux refers to setting your Linux to accept incoming network packets and forwarding them to another network. Any modern Linux system does not allow IP forwarding as it wastes bandwidth as a regular user doesn’t need IP forwarding. However, if you need to set your Linux system to act as a gateway or router, you must enable IP forwarding and, in this case, IPv4 IP forwarding. If this sounds new to you, worry less, as this article covers all you need to know about IPv4 IP forwarding.”
Checking IP Forwarding Status
By default, your Linux system has IP forwarding disabled. You can confirm its status by checking the sysctl kernel or /proc. The values get displayed in binary, with 0 implying false and 1 implying true.
To check the status using the /proc value, use the command below.
Alternatively, you can query the sysctl kernel using the command below.

From both outputs, we note the status is 0, meaning net.ipv4.ip_forward is not enabled.
How to Temporary Enable IP Forwarding
Various scenarios may require you to enable IP forwarding. For instance, if you wish to use your Linux server as a NAT device or a router, you must configure your Linux to receive network packets from one interface while forwarding them to another. Configuring the IP forwarding as a permanent solution is not preferred. Instead, you should temporarily enable it, which resets on the next reboot.
To enable IP forwarding, also known as routing, use the echo command to change the default values from 0 to 1 or use the sysctl command.
To use the echo command to enable IP forwarding, run the command below.

Similarly, run the command below to enable IP forwarding using sysctl.

Once you set the new binary value for the IP forward, you can check its status using the earlier commands. It should output 1 to imply IP forwarding is enabled.

You should know that the settings configured above won’t persist after the next reboot. Alternatively, if you wish to regain the initial state of the disabled IP forwarding before the reboot, all you need is to change the values to 0 instead of 1.
Therefore, any of the commands below will disable the IP forwarding.
$ echo 0 > / proc / sys / net / ipv4 / ip_forward
$ sysctl -w net.ipv4.ip_forward= 0

We see that the status is disabled and set to 0.

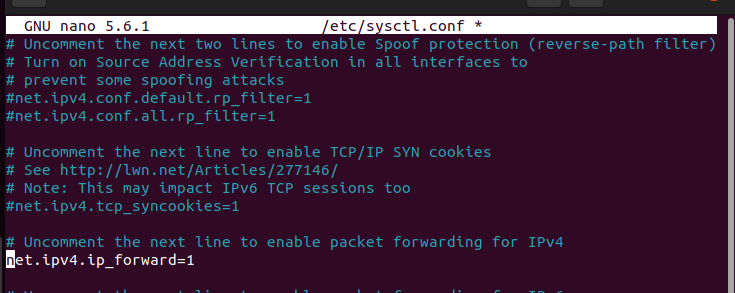
How to Permanently Enable IP Forwarding
Permanently enabling IP forwarding is not recommended, but if you must, you can edit the sysctl.conf file, and the changes will survive a reboot until you again change the settings in the configuration file to disable it.
The changes are similar to those of a temporary configuration. You need to add the state 1 to enable and 0 to disable.
Using an editor of choice, open the /etc/sysctl.conf file. In our case, we are using nano editor, and you should have root privileges to modify the file.
Once opened, you can enable IP forwarding by adding the below line of code. You can also locate the line below in the file and uncomment it by deleting the #.
If the IP forwarding was enabled and you wish to disable it permanently, replace the above line of code with the one below.
Once you’ve edited the file, run the command below for the changes to take effect.

That’s it! You’ve successfully enabled IP forwarding permanently.
Wrap Up
This guide shows how to enable and disable IP forwarding either temporarily or permanently. Using the commands presented, you should easily configure your Linux distro depending on your tasks. Hopefully, you now understand net.ipv4.ip_forwarding.
About the author
Denis Kariuki
Denis is a Computer Scientist with a passion for Networking and Cyber Security. I love the terminal, and using Linux is a hobby. I am passionate about sharing tips and ideas about Linux and computing.