- How to Check/Repair Linux File System on Boot
- The FSCK Linux Command
- FSCK Command Usage
- Repairing A Corrupted Linux File System
- Repairing Linux File System on Boot-Time
- Linux File System Repair on Boot
- Live CD/USB File System Repair
- fsck
- Boot time checking
- Mechanism
- Forcing the check
- Automatically answer yes to all repair questions
- Tips and tricks
- Attempt to repair damaged blocks
- Repair damaged blocks interactively
- Changing the check frequency
- fstab options
- Troubleshooting
- Can’t run fsck on a separate /usr partition
- ext2fs: no external journal
- Fsck Command in Linux (Repair File System)
- How to Use fsck #
- Repair Corrupted File System #
How to Check/Repair Linux File System on Boot
An operating system user that is still a learner in the OS world can never escape the challenges the current elite users have overcome. The user impact of such challenges depends on the operating system flavor or distribution you are under.
For Linux users, you might think you are facing an impossible challenge only to realize that there are multiple valid solutions for every single OS problem faced.
The Linux file system is a maze that most users hesitate to enter. It is because this file system is responsible for the performance consistency of your Linux operating system and any slight modification to its hierarchy or file system structure can be a nightmare for any user.
The FSCK Linux Command
The Linux operating system handles file system issues through the fsck command-line utility. It is a prepackaged file system check toolkit that interactively checks and repairs corrupted files that might affect the performance of your operating system.
Most of the time, it is these corrupt files that are responsible for failed system boots and partition mounts.
FSCK Command Usage
The standard syntax for fsck command-line utility is as follows:
You need to be a sudoer user or have sudo privileges to effectively use the FSCK tool.
FSCK adheres to some predefined rules.
- It references the /etc/fstab file when a user does not provide [FILESYSTEM] as a command argument.
The column for the (/) and (ext4) is set to 1 because its file system checks and repair are prioritized.
It is not recommended to use the fsck command with mounted partitions as there is a high likelihood of permanent file system damage.
Repairing A Corrupted Linux File System
The first step is to identify the device partition that holds the Linux file system you would like to check and repair.

The second step is to unmount the device whose file system you want to check and repair. e.g.
The third step is to check and possibly repair the device’s file system using FSCK.
The -p command option is for automatic repair without any user intervention.
The final step is to re-mount your device once the fsck file system check and repair is complete.
Repairing Linux File System on Boot-Time
On a running machine, it is not possible to simultaneously check and repair your Linux file system while using the OS. In this case, we have the options of using a live CD/bootable usb drive or checking and repairing the Linux file system on boot (For installed Linux systems).
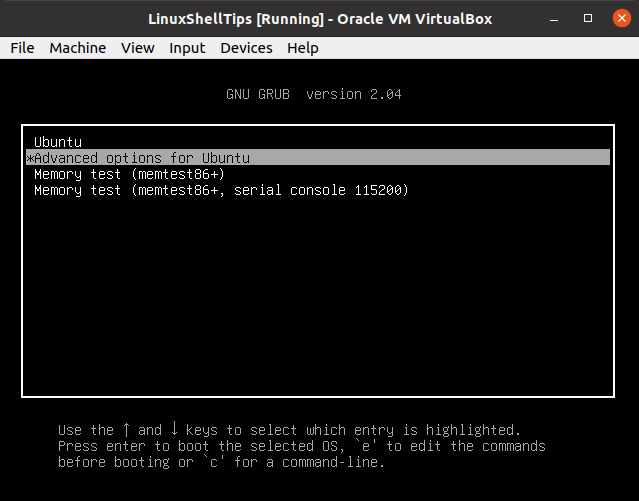
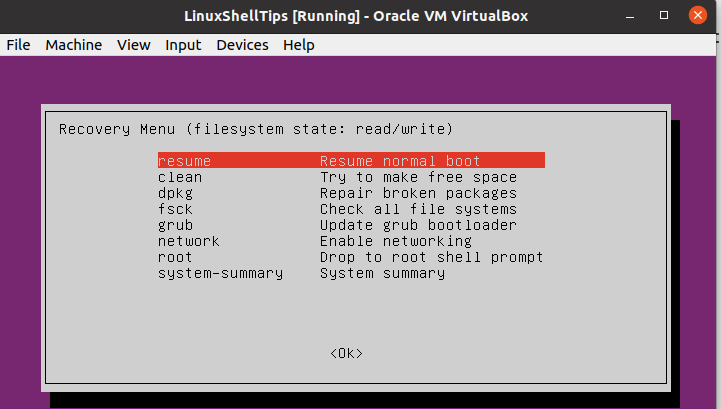
Linux File System Repair on Boot
1. Restart your machine, press [Esc] or [Shift] and select Advanced Options on the resulting boot menu.
2. Select Recovery Mode and choose the fsck option from the resulting list of menu options.
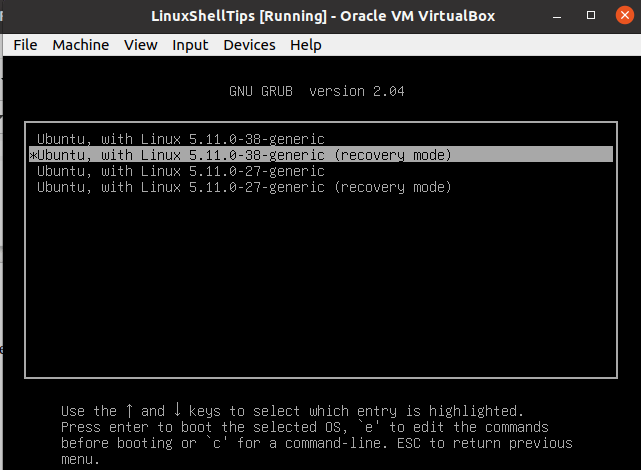
3. Hit [Enter] and choose the fsck menu option.
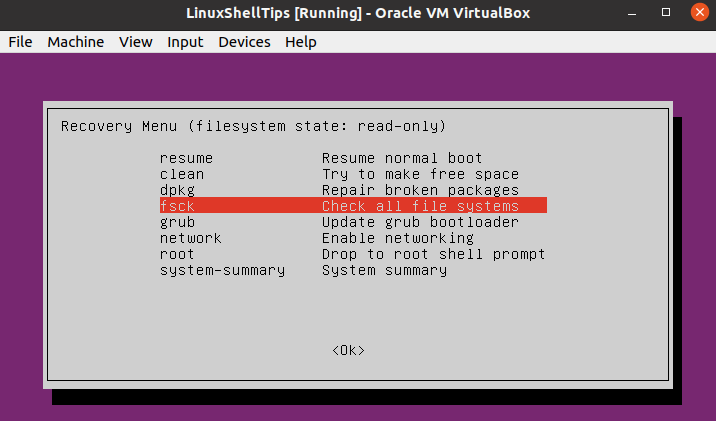
4. Choose Yes when asked whether to remount your OS root file system.

5. Once the file system check and repair is complete, direct your system to resume normal boot.
Live CD/USB File System Repair
- Boot into your machine from the live distribution (CD or USB).
- Open the Linux terminal and use sudo fdisk -l command to find the targeted Linux root partition name.
- If the root partition is identified by a name like /dev/sda1, running the following command will check and possibly repair its associated file system.
FSCK is a very effective tool to get you started on understanding the nature and performance of your Linux system. The man fsck command has more options on using the FSCK utility to check and optionally repair broken or corrupt Linux file systems.
fsck
fsck stands for «file system check» and it is used to check and optionally repair one or more Linux file systems. Normally, the fsck program will try to handle file systems on different physical disk drives in parallel to reduce the total amount of time needed to check all of the file systems (see fsck(8) ).
The Arch Linux boot process conveniently takes care of the fsck procedure for you and will check all relevant partitions on your drive(s) automatically on every boot. Hence, there is usually no need to resort to the command-line.
Boot time checking
Mechanism
There are two players involved:
- mkinitcpio offers you the option to fsck your root file system before mounting it via the fsck hook. If you do this, you should mount root read-write via the appropriate rw kernel parameter.[1]
- systemd will fsck all file systems having a fsck pass number greater than 0 (either with #fstab options or a user-supplied unit file). For the root file system, it also has to be mounted read-only initially with the kernel parameter ro and only then remounted read-write from fstab (note that the defaults mount option implies rw ).
The first option is the recommended default, and what you will end up with if you follow the Installation guide. If you want to go with option 2 instead, you should remove the fsck hook from mkinitcpio.conf and use ro on the kernel command-line. The kernel parameter fsck.mode=skip can be used to make sure fsck is disabled entirely for both options.
Forcing the check
If you use the base mkinitcpio hook, you can force fsck at boot time by passing fsck.mode=force as a kernel parameter. This will check every file system you have on the machine.
Alternatively, systemd provides systemd-fsck@.service(8) , which checks all configured file systems, which were not checked in the initramfs. However, checking the root file system this way causes a delay in the boot process, because the file system has to be remounted.
This article or section needs expansion.
Note: For those accustomed to use other GNU/Linux distributions, the old tricks consisting in writing a file with the name forcefsck to the root of each file system or using the command shutdown with the -F flag were only working for the old SysVinit and early versions of Upstart and are not working with systemd. The aforementioned solution is thus the only one working for Arch Linux.
Automatically answer yes to all repair questions
The boot time fsck checks might end up saying «UNEXPECTED INCONSISTENCY; RUN fsck MANUALLY.»
This happens when you need to apply some changes to fix the file system which are not considered completely safe, and thus require fsck to be run manually.
You can set fsck to automatically apply all suggested change (i.e. answer yes to all questions) by setting the fsck.repair kernel command line option to yes . (Other possible values are no and preen .) Check the documentation systemd-fsck@.service(8) for the meaning of these options.
Tips and tricks
Attempt to repair damaged blocks
To automatically repair damaged portions of an ext2/ext3/ext4 or FAT file system, run:
Warning: This will not ask if you want to repair it, as the answer is Yes when you run it.
Repair damaged blocks interactively
This is useful for when files on the boot partition have changed, and the journal failed to properly update. In this case, unmount the boot partition, and run the following code to repair damaged portions:
Changing the check frequency
Note: The following commands tune2fs and dumpe2fs work only with ext2/ext3/ext4 file systems.
By default, fsck checks a file system every 30 boots (counted individually for each partition). To change the frequency of checking, run:
In this example, 20 is the number of boots between two checks.
Note that 1 would make it scan at every boot, while 0 would stop scanning altogether.
If you wish to see the frequency number and the current mount count for a specific partition, use:
# dumpe2fs -h /dev/sda1 | grep -i 'mount count'
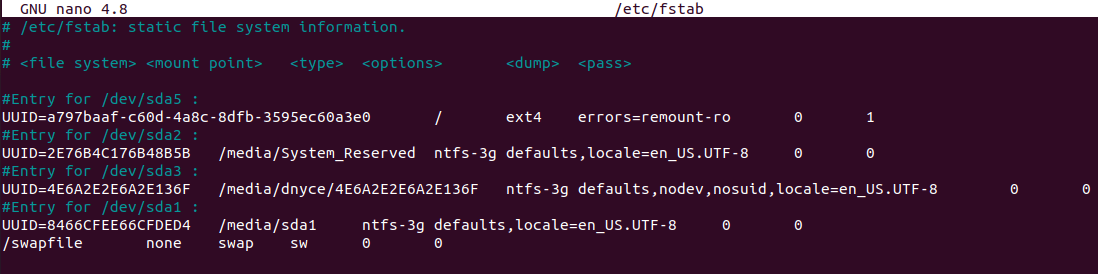
fstab options
fstab is a system configuration file and is used to tell the Linux kernel which partitions (file systems) to mount and where on the file system tree.
A typical /etc/fstab entry may look like this:
/dev/sda1 / ext4 defaults 0 1 /dev/sda2 /other ext4 defaults 0 2 /dev/sda3 /win ntfs-3g defaults 0 0
The 6th column (in bold) is the fsck option.
- 0 — do not check.
- 1 — first file system (partition) to check; / (root partition) should be set to 1 .
- 2 — all other file systems to be checked.
Troubleshooting
Can’t run fsck on a separate /usr partition
- Make sure you have the required hooks in /etc/mkinitcpio.conf and that you remembered to re-generate your initramfs image after editing this file.
- Check your fstab! Only the root partition needs 1 at the end, everything else should have either 2 or 0 . Carefully inspect it for other typos, as well.
ext2fs: no external journal
There are times (due to power failure) in which an ext(3/4) file system can corrupt beyond normal repair. Normally, there will be a prompt from fsck indicating that it cannot find an external journal. In this case, run the following commands:
Unmount the partition based on its directory
Write a new journal to the partition
# tune2fs -j /dev/partition
Run an fsck to repair the partition
Fsck Command in Linux (Repair File System)
fsck (file system check) is a command-line utility that allows you to perform consistency checks and interactive repairs on one or more Linux file systems. It uses programs specific to the type of the file system it checks.
You can use the fsck command to repair corrupted file systems in situations where the system fails to boot, or a partition cannot be mounted.
In this article, we will talk about the fsck command.
How to Use fsck #
The fsck command takes the following general form:
Only root or users with sudo privileges can clear the buffer.
When no FILESYSTEM is provided as an argument, fsck checks the devices listed in the fstab file.
Never run fsck on mounted partitions as it may damage the file system. Before attempting to check or repair file systems always unmount it first.
The fsck command is a wrapper for the various Linux filesystem checkers ( fsck.* ) and accepts different options depending on the file system’s type.
Check the manual pages for more information about a specific checker. For example, to view the options available for fsck.ext4 , type:
Repair Corrupted File System #
The simplest use case of the fsck command is to repair a non-root corrupted ext3 or ext4 file system.
- If you don’t know the device name, use fdisk , df , or any other tool to find it.
- Unmount the device: