- How to create a site-to-site IPsec VPN tunnel using Openswan in Linux
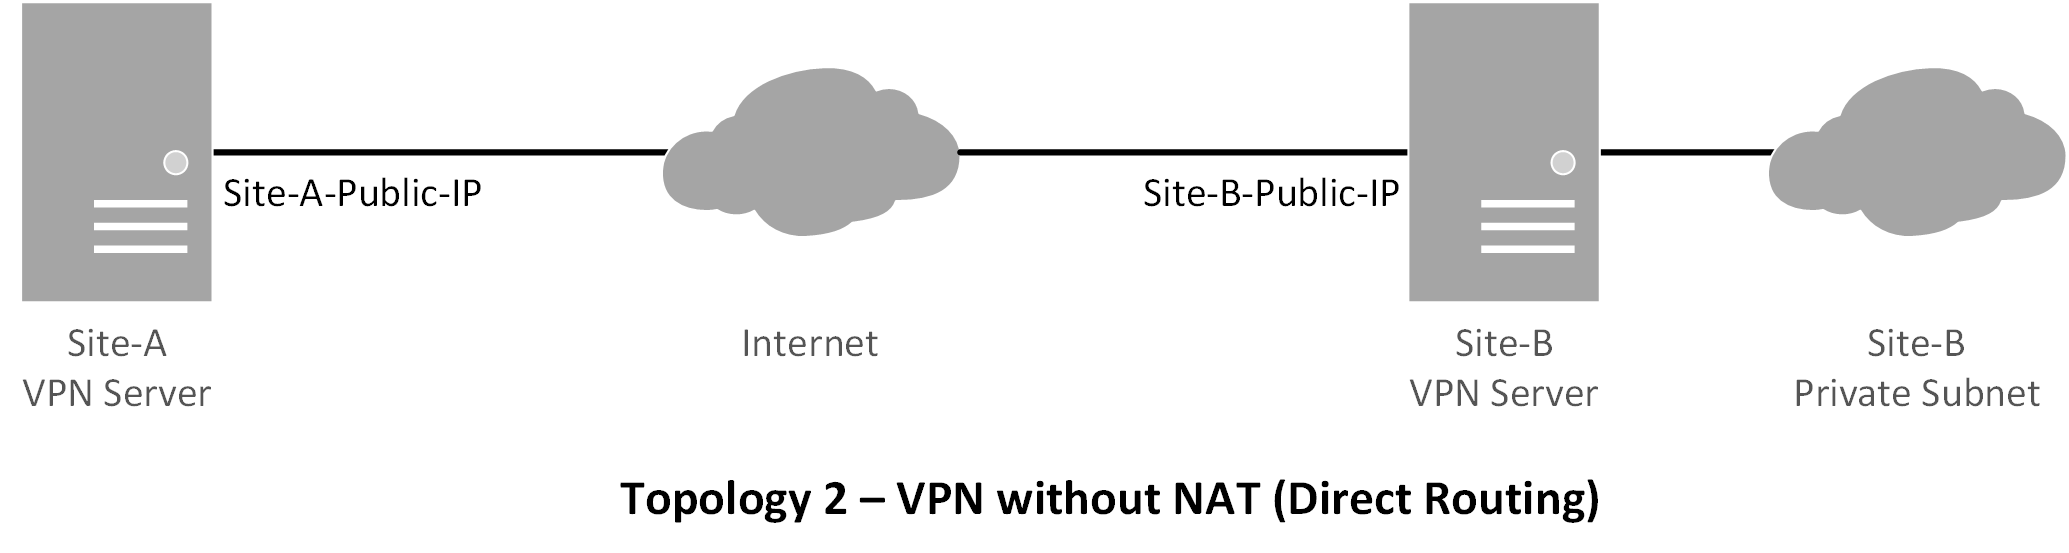
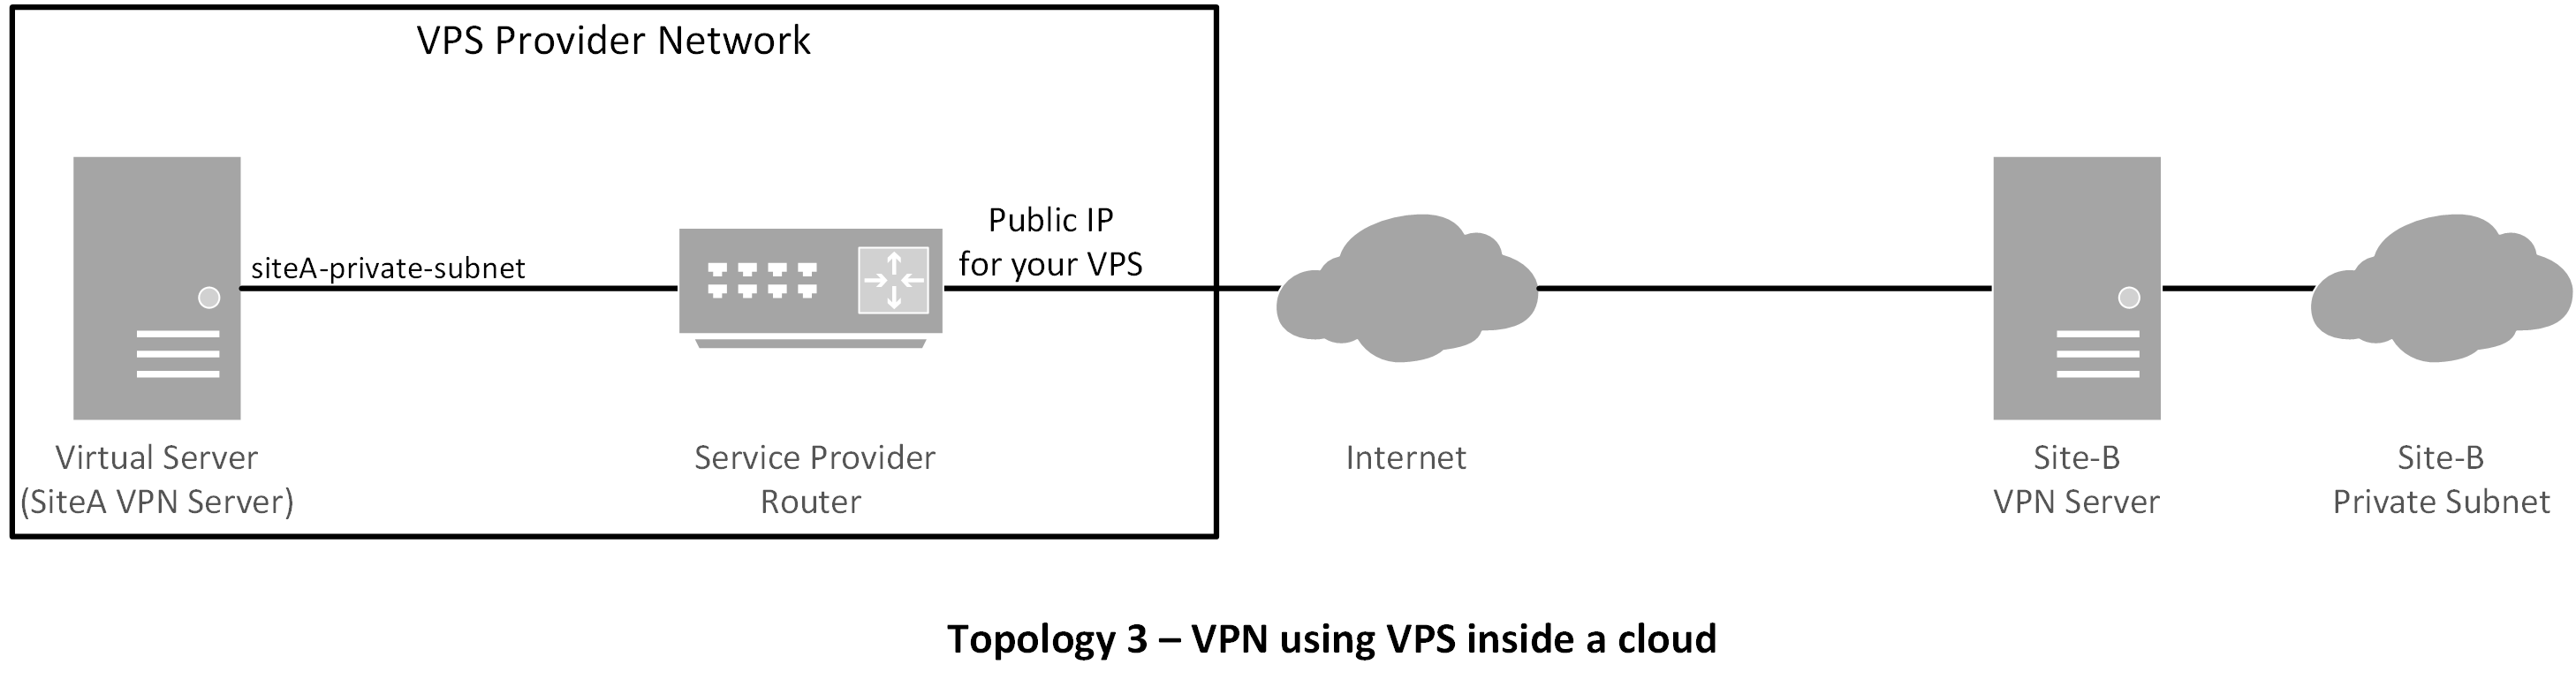
- Test Topologies
- Installing Packages and Preparing VPN Servers
- On Red Hat based Systems (CentOS, Fedora or RHEL):
- On Debian based Systems (Debian, Ubuntu or Linux Mint):
- Note:
- Preparing Configuration Files
- Starting the Service and Troubleshooting
- Support Xmodulo
How to create a site-to-site IPsec VPN tunnel using Openswan in Linux
A virtual private network (VPN) tunnel is used to securely interconnect two physically separate networks through a tunnel over the Internet. Tunneling is needed when the separate networks are private LAN subnets with globally non-routable private IP addresses, which are not reachable to each other via traditional routing over the Internet. For example, VPN tunnels are often deployed to connect different NATed branch office networks belonging to the same institution.
Sometimes VPN tunneling may be used simply for its security benefit as well. Service providers or private companies may design their networks in such a way that vital servers (e.g., database, VoIP, banking servers) are placed in a subnet that is accessible to trusted personnel through a VPN tunnel only. When a secure VPN tunnel is required, IPsec is often a preferred choice because an IPsec VPN tunnel is secured with multiple layers of security.
This tutorial will show how we can easily create a site-to-site VPN tunnel using Openswan in Linux.
Test Topologies
This tutorial will focus on the following topologies for creating an IPsec tunnel.

Installing Packages and Preparing VPN Servers
Usually, you will be managing site-A only, but based on the requirements, you could be managing both site-A and site-B . We start the process by installing Openswan.
On Red Hat based Systems (CentOS, Fedora or RHEL):
# yum install openswan lsof
On Debian based Systems (Debian, Ubuntu or Linux Mint):
Now we disable VPN redirects, if any, in the server using these commands:
# for vpn in /proc/sys/net/ipv4/conf/*; # do echo 0 > $vpn/accept_redirects; # echo 0 > $vpn/send_redirects; # done
Next, we modify the kernel parameters to allow IP forwarding and disable redirects permanently.
net.ipv4.ip_forward = 1 net.ipv4.conf.all.accept_redirects = 0 net.ipv4.conf.all.send_redirects = 0
We allow necessary ports in the firewall. Please make sure that the rules are not conflicting with existing firewall rules.
# iptables -A INPUT -p udp --dport 500 -j ACCEPT # iptables -A INPUT -p tcp --dport 4500 -j ACCEPT # iptables -A INPUT -p udp --dport 4500 -j ACCEPT
Finally, we create firewall rules for NAT.
# iptables -t nat -A POSTROUTING -s site-A-private-subnet -d site-B-private-subnet -j SNAT --to site-A-Public-IP
Please make sure that the firewall rules are persistent.
Note:
- You could use MASQUERADE instead of SNAT . Logically it should work, but it caused me to have issues with virtual private servers (VPS) in the past. So I would use SNAT if I were you.
- If you are managing site-B as well, create similar rules in site-B server.
- Direct routing does not need SNAT .
Preparing Configuration Files
The first configuration file that we will work with is ipsec.conf . Regardless of which server you are configuring, always consider your site as left and remote site as right. The following configuration is done in siteA ‘s VPN server.
## general configuration parameters ## config setup plutodebug=all plutostderrlog=/var/log/pluto.log protostack=netkey nat_traversal=yes virtual_private=%v4:10.0.0.0/8,%v4:192.168.0.0/16,%v4:172.16.0.0/12 ## disable opportunistic encryption in Red Hat ## oe=off ## disable opportunistic encryption in Debian ## ## Note: this is a separate declaration statement ## include /etc/ipsec.d/examples/no_oe.conf ## connection definition in Red Hat ## conn demo-connection-redhat authby=secret auto=start ike=3des-md5 ## phase 1 ## keyexchange=ike ## phase 2 ## phase2=esp phase2alg=3des-md5 compress=no pfs=yes type=tunnel left= leftsourceip= leftsubnet=/netmask ## for direct routing ## leftsubnet=/32 leftnexthop=%defaultroute right= rightsubnet=/netmask ## connection definition in Debian ## conn demo-connection-debian authby=secret auto=start ## phase 1 ## keyexchange=ike ## phase 2 ## esp=3des-md5 pfs=yes type=tunnel left= leftsourceip= leftsubnet=/netmask ## for direct routing ## leftsubnet=/32 leftnexthop=%defaultroute right= rightsubnet=/netmask
Authentication can be done in several different ways. This tutorial will cover the use of pre-shared key, which is added to the file /etc/ipsec.secrets .
siteA-public-IP siteB-public-IP: PSK "pre-shared-key" ## in case of multiple sites ## siteA-public-IP siteC-public-IP: PSK "corresponding-pre-shared-key"
Starting the Service and Troubleshooting
The server should now be ready to create a site-to-site VPN tunnel. If you are managing site-B as well, please make sure that you have configured the site-B ‘s server with necessary parameters. For Red Hat based systems, please make sure that you add the service into startup using chkconfig command.
If there are no errors in both end servers, the tunnel should be up now. Taking the following into consideration, you can test the tunnel with ping command.
- The site-B ‘s private subnet should not be reachable from site-A . I.e., ping should not work if the tunnel is not up.
- After the tunnel is up, try ping to site-B ‘s private subnet from site-A . This should work.
Also, the routes to the destination’s private subnet should appear in the server’s routing table.
[site-B's private-subnet] via [siteA-gateway] dev eth0 src [siteA-public-IP] default via [site-A's gateway] dev eth0
Additionally, we can check the status of the tunnel using the following useful commands.
IPsec running - pluto pid: 20754 pluto pid 20754 1 tunnels up some eroutes exist
## output truncated ## 000 "demo-connection-debian": myip=; hisip=unset; 000 "demo-connection-debian": ike_life: 3600s; ipsec_life: 28800s; rekey_margin: 540s; rekey_fuzz: 100%; keyingtries: 0; nat_keepalive: yes 000 "demo-connection-debian": policy: PSK+ENCRYPT+TUNNEL+PFS+UP+IKEv2ALLOW+SAREFTRACK+lKOD+rKOD; prio: 32,28; interface: eth0; ## output truncated ## 000 #184: "demo-connection-debian":500 STATE_QUICK_R2 (IPsec SA established); EVENT_SA_REPLACE in 1653s; newest IPSEC; eroute owner; isakmp#183; idle; import:not set ## output truncated ## 000 #183: "demo-connection-debian":500 STATE_MAIN_I4 (ISAKMP SA established); EVENT_SA_REPLACE in 1093s; newest ISAKMP; lastdpd=-1s(seq in:0 out:0); idle; import:not set
The log file /var/log/pluto.log should also contain useful information regarding authentication, key exchanges and information on different phases of the tunnel. If your tunnel doesn’t come up, you could check there as well.
If you are sure that all the configuration is correct, and if your tunnel is still not coming up, you should check the following things.
- Many ISPs filter IPsec ports. Make sure that UDP/500 , TCP/UDP/4500 ports are allowed by your ISP. You could try connecting to your server IPsec ports from a remote location by telnet .
- Make sure that necessary ports are allowed in the firewall of the servers.
- Make sure that the pre-shared keys are identical in both end servers.
- The left and right parameters should be properly configured on both end servers.
- If you are facing problems with NAT, try using SNAT instead of MASQUERADING .
To sum up, this tutorial focused on the procedure of creating a site-to-site IPSec VPN tunnel in Linux using Openswan. VPN tunnels are very useful in enhancing security as they allow admins to make critical resources available only through the tunnels. Also VPN tunnels ensure that the data in transit is secured from eavesdropping or interception.
Hope this helps. Let me know what you think.
Support Xmodulo
This website is made possible by minimal ads and your gracious donation via PayPal or credit card
Please note that this article is published by Xmodulo.com under a Creative Commons Attribution-ShareAlike 3.0 Unported License. If you would like to use the whole or any part of this article, you need to cite this web page at Xmodulo.com as the original source.