- How to Host a Website on NGINX Web Server
- Install NGINX Web Server in Linux
- Host a Simple HTML Website on NGINX
- My website is live on NGINX!
- Manage NGINX Web Server in Linux
- How to Install and Setup Apache Web Server in Linux
- 2. What is apache web server (Apache HTTPD) ?
- 3. Apache Web Server packages in RHEL and CentOS Linux
- 4. Install Apache Web Server Linux
- 5. Configure Apache http Server In Linux
- 5.1. Overview of apache httpd conf file :
- 5.2 Configure Apache httpd.conf configuration file
- 5.3 Configure Apache Virtual Hosts
- 6. Configure Firewalld to allow access to Apache http Server In Linux
- Dimitri Nek
How to Host a Website on NGINX Web Server
NGINX (pronounced as Engine-X) is a free and open-source web server software, load balancer, and reverse proxy optimized for very high performance and stability. NGINX offers low memory usage and high concurrency — which is why it is the preferred web server for powering high-traffic websites.
In this tutorial, you will learn how to install an NGINX webserver to host a simple HTML website running on a Linux platform.
Install NGINX Web Server in Linux
On Ubuntu and Debian-based distributions, run the command below to install NGINX.
On Red Hat Linux and related distributions, you might need to first add the EPEL repository with the command below.
$ sudo yum install epel-release
Next, update the repository with:
Now, you may run the following command to install NGINX on Red Hat and related distributions.
Once installed, you can start and check the status of NGINX as follows.
$ sudo systemctl start nginx $ sudo systemctl status nginx
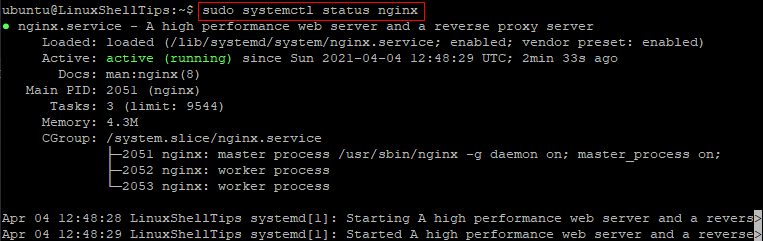
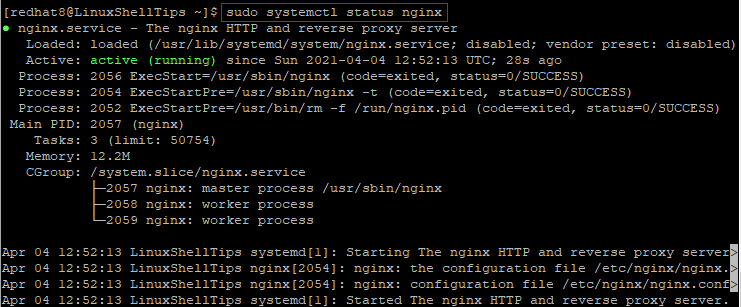
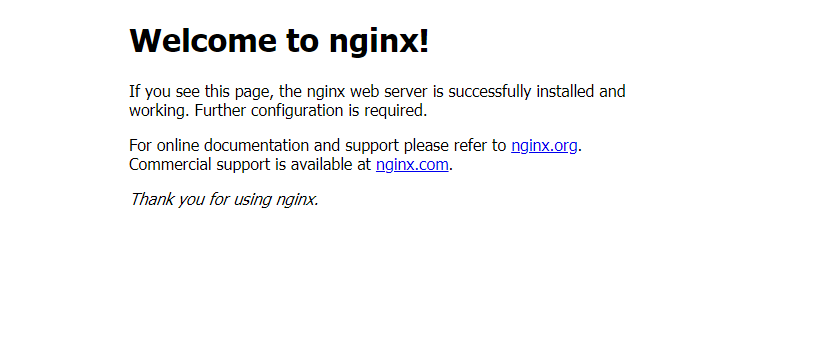
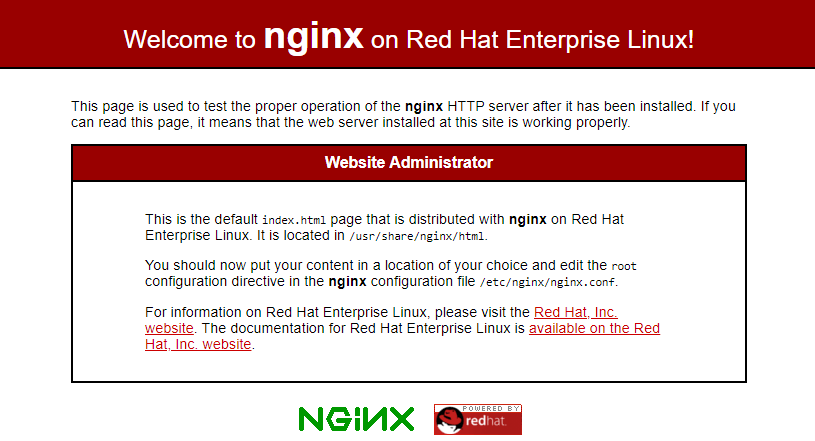
After you have successfully installed NGINX and confirmed that it is running, open a web browser and enter the IP address of your Linux server.
http://IP-Addresss OR http://localhost
You should see the test page for NGINX as shown in the images below.
Host a Simple HTML Website on NGINX
On Ubuntu and Debian-related distributions, the default website root is /var/www/html and this is where you should put your website content.
Change into the default website root with:
As for Red Hat, as indicated on the NGINX test page, the default website root is /usr/share/nginx/html and this is where you should put your website content.
Go into the default website root with:
Once you are in the default website root, run the command below to rename any existing index.html file.
$ sudo mv index.html index.html.bk
Note: On Ubuntu, you may get a message saying that the file does not exist. It’s okay to move on to the next step.
Now, run the following command to create your own index.html file.
Copy and paste the sample HTML code below into the text editor.
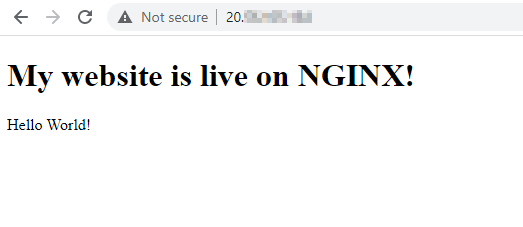
My website is live on NGINX!
Hello World!
Save and close the index.html file.
Finally, refresh your web browser to see your new website.
Manage NGINX Web Server in Linux
Here are some additional commands for the basic management of your NGINX web server.
To configure NGINX to automatically start when the Linux server is rebooted, run:
$ sudo systemctl enable nginx
To disable automatic starting of NGINX when the Linux server is rebooted, run:
$ sudo systemctl disable nginx
To restart NGINX, run:
$ sudo systemctl restart nginx
To reload NGINX configuration settings without restarting the service, run:
$ sudo systemctl reload nginx
To stop NGINX, run:
$ sudo systemctl stop nginx
Conclusion
In this guide, you have learned how to install NGINX on Ubuntu/Debian as well as Red Hat Linux distributions. We also showed you how to add your own website content.
How to Install and Setup Apache Web Server in Linux
A web server generally hosts the web content, and responds to requests for this content from web browsers such as Internet explorer, Google chrome and Firefox. The example of web server are apache web server, IIS web server, Nginx webserver and litespeed web server.
Technically, a web server is a daemon that speaks the https(s) protocol, a text-based protocol for sending and receiving object over a network connection. The http protocol is sent over the wire in clear text, using port 80/TCP by default (though other ports can be used).
There is also a TLS/SSL encrypted version of the protocol called https that uses port 443/TCP by default.
This article will discuss more on the most popular web server, Apache httpd server.
2. What is apache web server (Apache HTTPD) ?
Apache web server or Apache http server is one of the most widely used on the Internet. It is developed and maintained by Apache Software Foundation, Apache is an open source software available for free.
Beside Apache, IIS and Nginx also among the most common web servers in use today.
Based on survey by [news.netcraft.com] in June 2016, Apache Web server regained the lead from Microsoft IIS with a large increase.
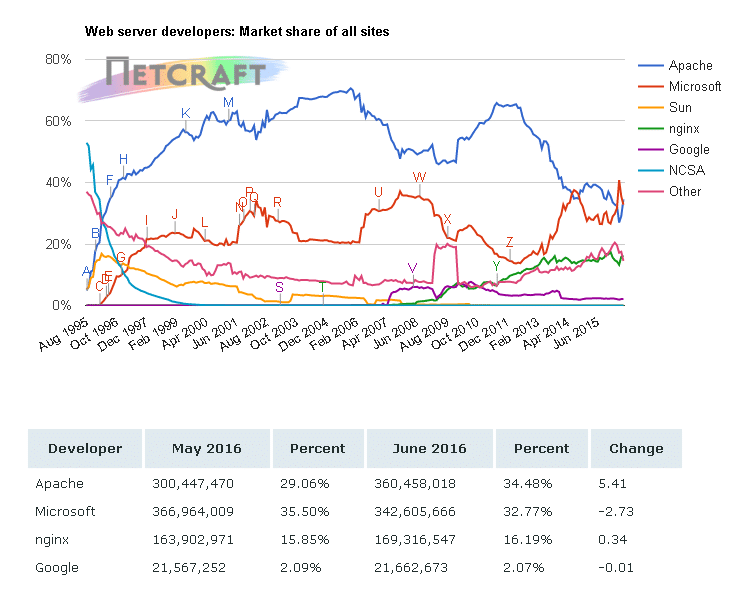
Meanwhile, the portal [trends.builtwith.com/web-server] reported (July 18, 2016) the web server statistics shows that from the entire internet web, there are 46% web server running in Apache, 29% in Microsoft IIS and 19% in Nginx.

3. Apache Web Server packages in RHEL and CentOS Linux
In Red Hat Enterprise Linux 7 and CentOS 7, there is a group of package called “Web Server”. It includes the following software :
httpd httpd-tools httpd-manual crypto-utils mod_fcgid mod_ssl perl-Newt
A default dependency of the httpd package is the httpd-tools package. This package includes tools to manipulate password maps and databases, tools to resolve IP address in log files to hostnames, and apache benchmark tool (ab). ab tool is very useful to perform a stress-test to the apache web server.
If you use Apache for your development server or Linux administrator who manages the corporate website in the apache web server, know how to setup and configure Apache will be important.
4. Install Apache Web Server Linux
This article explains the steps to install and configure Apache web server in RHEL 7 / CentOS 7 linux.
Please login to your CentOS 7 server to run below command :
a. How to install Apache web server only :
b. Apache web server installation from apache group packages :
# yum groupinstall "Web Server" -y
c. How to start, stop and restart Apache Linux web server :
The following steps shows how to start, stop and restart the apache is for RHEL 7 and CentOS 7 operating system. The command will differ slightly in other linux distributions.
d. To start Apache service:
f. To restart Apache service :
g. How to enable Apache web server at boot :
# systemctl enable httpd Created symlink from /etc/systemd/system/multi-user.target.wants/httpd.service to /usr/lib/systemd/system/httpd.service.
5. Configure Apache http Server In Linux
5.1. Overview of apache httpd conf file :
The httpd.conf is the primary configuration file in Apache Web Server in RHEL and CentOS. It is located at /etc/httpd/conf folder. It is a text file and consist of directives, containers and comments.
Example of directives in httpd.conf :
ServerRoot Listen Include AllowOverride
Example of containers :
Containers enclose one or more directives.
AllowOverride none Require all denied
Example of comments :
# Listen: Allows you to bind Apache to specific IP addresses and/or # ports, instead of the default. See also the # directive.
5.2 Configure Apache httpd.conf configuration file
There are a few apache configuration need to alter before you can start running the apache web server. All the main configuration file is in httpd.conf file :
Modify below directives and matches the value to your web server environment :
ServerAdmin email address
This is where your problem with the server should be e-mailed. This address appears on some server-generated pages, such as error documents.
ServerAdmin admin@your-domain.com
DocumentRoot directory-path
The top level directory for Apache server content. The apache user requires read access to any files and read and execute access to the directory and any of its sub-directories. Do not place a slash at the end of the directory path.
ServerName FQDN[:port]
Specifies the fully qualified domain name or IP address of the httpd server and an optional port on which the server listens. The FQDN must be resolvable to an IP address.
If you do not specify a FQDN, the server performs a reverse-name lookup on the IP address. If you do not specify a port, the server uses the port corresponding to the incoming request.
ServerName www.ehowstuff.local:80
AllowOverride Directive
In Apache 2.4, AllowOverride is set to None by default. When AllowOverride is set to None , then .htaccess files are completely ignored. In this case, the server will not even attempt to read .htaccess files in the filesystem.
When AllowOverride directive is set to All, then any directive which has the .htaccess Context is allowed in .htaccess files.
htaccess is short for Hypertext Access, is a configuration file for use on web servers running the Apache Web Server software. Most of the developers today use htaccess to configure the details of the blog or website without needed to alter the server config files.
If you run a single web site, above configuration is sufficient for your apache web server.
To apply the new configuration, restart or reload the Apache web service :
Access the web server ip address :

If you run multiple websites, you can configure Apache virtual Host as mentioned on 5.3 below :
5.3 Configure Apache Virtual Hosts
Apache virtual hosts allow a single httpd web server to serve content for multiple domains or websites. Virtual host is defined in a Virtual Host container. The multiple virtual containers for multiple domains is specify in the VirtualHost directive.
Where to specify VirtualHost directive ?
Virtual hosts are configured using the block inside the main configuration.
For ease of administration, i would recommend this virtual host blocks are not defined inside /etc/httpd/conf/httpd.conf. Instead, please create new separate configuration files in /etc/httpd/conf.d/.
Create separate configuration file to specify block:
# vi /etc/httpd/conf.d/multiple-sites.conf
DocumentRoot /var/www/html/website1 ServerName website1.ehowstuff.local ServerAdmin admin@ehowstuff.local ErrorLog "logs/website1.ehowstuff.local_error_log" CustomLog "logs/website1.ehowstuff.local_access_log" combined DocumentRoot /var/www/html/website2 ServerName website2.ehowstuff.local ServerAdmin admin@ehowstuff.local ErrorLog "logs/website2.ehowstuff.local_error_log" CustomLog "logs/website2.ehowstuff.local_access_log" combined
The document root specifies in each containers or virtualhost blocks is applicable to this virtual host and overrides any DocumentRoot directive elsewhere in the configuration.
Upload sample index.html or index.php into both document root (/var/www/html/website1 and /var/www/html/website2).
To apply the new configuration, restart or reload the Apache web service :
6. Configure Firewalld to allow access to Apache http Server In Linux
By default, port 80 is blocked. Allow HTTP service in firewalld (host-based firewall for centOS 7). HTTP uses 80/TCP and HTTPS uses 443/TCP.
# firewall-cmd --add-service=http --permanent # firewall-cmd --add-service=https --permanent # firewall-cmd --reload

Finally, you can access both virtual URL will return you different contain :

Dimitri Nek
Dimitri is a Linux-wielding geek from Newport Beach and a server optimization guru with over 20 years of experience taming web hosting beasts. Equipped with an arsenal of programming languages and an insatiable thirst for knowledge, Dimitri conquers website challenges and scales hosting mountains with unmatched expertise. His vast knowledge of industry-leading hosting providers allows him to make well-informed recommendations tailored to each client’s unique needs.