- Switch between multiple java versions
- 6 Answers 6
- Configuring Java
- Setting the JAVA_HOME Environment Variable
- Change default Java version in Ubuntu 20.04 LTS
- Install different versions of OpenJDK Development Kit and Java Runtime Environment
- Change default Java version in Ubuntu 20.04 LTS
- How to Change Java Version Linux
- Changing the Java Version in Linux
- Conclusion
- About the author
- Denis Kariuki
- How To Change The Java Version In Linux?
- Surendra Anne
- Latest posts by Surendra Anne (see all)
Switch between multiple java versions
While installing Android Studio on Ubuntu 14.04 I get the message that my Java version ( javac 1.7.0_79 ) is causing problems. I found a solution of how to install a newer Oracle version of Java:
sudo apt-add-repository ppa:webupd8team/java sudo apt-get update sudo apt-get install oracle-java8-installer However I’m afraid that this might overwrite my existing open-jdk version of Java. Since I don’t know which of my programs depend on Java, I fear that this could crash these other programs. Is there a way to make sure apt-get doesn’t overwrite my previous Java? I would basically like to have installed both and be able to switch between them manually, depending on what version I need.
6 Answers 6
Apt-get won’t overwrite the existing java versions.
To switch between installed java versions, use the update-java-alternatives command.
update-java-alternatives --list Set java version as default (needs root permissions):
sudo update-java-alternatives --set /path/to/java/version . where /path/to/java/version is one of those listed by the previous command (e.g. /usr/lib/jvm/java-7-openjdk-amd64 ).
update-java-alternatives is a convenience tool that uses Debian’s alternatives system ( update-alternatives ) to set a bunch of links to the specified java version (e.g. java , javac , . ).
tq this solve my problem too. @Nenotlep what I did is edit the environment variable manually either in .bashrc or /etc/environment
@Nenotlep in order to change JAVA_HOME you have to run the following command: source /etc/environment
@janb I honestly don’t understand why this would have any effect unless you manually specified JAVA_HOME in /etc/environment . I just switched back and forth between java 8 and 11, and there is still no JAVA_HOME in /etc/environment . In fact, it is set nowhere in my environment. I therefor rejected the suggested edit. If there are circumstances in which the suggested command is needed, please suggest a new edit and explain when and why it would be necessary.
My $JAVA_HOME is unaffected by any of the proposed commands, too. My ~/.bashrc has a line export JAVA_HOME=$(readlink -f /usr/bin/javac | sed «s:bin/javac::») though and that does the trick for me: source ~/.bashrc . If your ~/.bashrc doesn’t have that line, run directly export JAVA_HOME=$(readlink -f /usr/bin/javac | sed «s:bin/javac::») .
sudo update-alternatives --config java which lists all installed versions with current active one marked and provides dialog to switch:
There are 3 choices for the alternative java (providing /usr/bin/java). Selection Path. ------------------------------------------------------------ 0 /usr/lib/jvm/java-9-oracle/bin/java. * 1 /usr/lib/jvm/java-7-oracle/jre/bin/java. 2 /usr/lib/jvm/java-8-oracle/jre/bin/java. 3 /usr/lib/jvm/java-9-oracle/bin/java. Press to keep. [*], or type selection number: export JAVA_HOME="$(jrunscript -e 'java.lang.System.out.println(java.lang.System.getProperty("java.home"));')" to set $JAVA_HOME from current active version
As noted by @danzel at the accepted answer, this affects only the java executable, not the other parts of the configuration. Use update-java-alternatives if available.
Configuring Java
You can configure which version is the default for use in the command line by using update-alternatives , which manages which symbolic links are used for different commands.
sudo update-alternatives --config java The output will look something like the following.
There are 5 choices for the alternative java (providing /usr/bin/java). Selection Path Priority Status ------------------------------------------------------------ * 0 /usr/lib/jvm/java-8-openjdk-amd64/jre/bin/java 1081 auto mode 1 /usr/lib/jvm/java-6-oracle/jre/bin/java 1 manual mode 2 /usr/lib/jvm/java-7-oracle/jre/bin/java 2 manual mode 3 /usr/lib/jvm/java-8-openjdk-amd64/jre/bin/java 1081 manual mode 4 /usr/lib/jvm/java-8-oracle/jre/bin/java 3 manual mode 5 /usr/lib/jvm/java-9-oracle/bin/java 4 manual mode Press to keep the current choice[*], or type selection number: You can now choose the number to use as a default. This can also be done for other Java commands, such as the compiler ( javac ), the documentation generator ( javadoc ), the JAR signing tool ( jarsigner ), and more. You can use the following command, filling in the command you want to customize.
sudo update-alternatives --config commandSetting the JAVA_HOME Environment Variable
Many programs, such as Java servers, use the JAVA_HOME environment variable to determine the Java installation location.
Copy the path from your preferred installation and then open /etc/environment using Sublime Text or your favourite text editor.
At the end of this file, add the following line, making sure to replace the highlighted path with your own copied path.
JAVA_HOME="/usr/lib/jvm/java-8-oracle" Save and exit the file, and reload it: source /etc/environment .
You can now test whether the environment variable has been set by executing the following command: echo $JAVA_HOME . This will return the path you just set.
Change default Java version in Ubuntu 20.04 LTS
We consider this article to be an extension to the previous article – Install OpenJDK JRE / JDK in Ubuntu 20.04 LTS . As you would notice, we have already installed version 11 of OpenJDK JRE / JDK in Ubuntu 20.04 LTS release. Now, consider a scenario wherein we have also installed version 8 of OpenJDK JRE. In that case, the default version would still be the one which we have installed earlier i.e. version 11.0.7. So, in this article we would discuss how to change the default Java version in Ubuntu 20.04 LTS.
Just for clarity, we would first install OpenJDK Development Kit v11.0.7 and OpenJDK Java Runtime Environment v1.0.8_252. Thereafter, we would issue the specific command to change the default version of Java.
Note: Following operations would require you to have superuser privileges. In case you don’t have one, then contact your System Administrator for assistance.
Install different versions of OpenJDK Development Kit and Java Runtime Environment
Since the packages are already available in standard Ubuntu repository. Therefore, first update the Ubuntu repository to make the latest version of the package available. Hence, issue the following in terminal –
Now, to install OpenJDK Development Kit v11.0.7 –
sudo apt install openjdk-11-jdk
Next, to install OpenJDK Java Runtime Environment v1.8.0_252 –
sudo apt install openjdk-8-jre
Change default Java version in Ubuntu 20.04 LTS
First, verify for the Java version installed –
It would return the output –
openjdk version "11.0.7" 2020-04-14 OpenJDK Runtime Environment (build 11.0.7+10-post-Ubuntu-3ubuntu1) OpenJDK 64-Bit Server VM (build 11.0.7+10-post-Ubuntu-3ubuntu1, mixed mode, sharing)
Although we already installed version 1.8.0_252, But, when we pass the java -version command then it doesn’t mention the said version. Because, as of now v11.0.7 is the default version. To change that, we need to issue command –
sudo update-alternatives --config java
It would show us all the Java versions installed. Enter the selection number for OpenJDK JRE v1.8.0_252. Again –
This time it would return with –
openjdk version "1.8.0_252" OpenJDK Runtime Environment (build 1.8.0_252-8u252-b09-1ubuntu1-b09) OpenJDK 64-Bit Server VM (build 25.252-b09, mixed mode)
In conclusion, we have discussed how to change the default version of Java in Ubuntu 20.04 LTS release.
How to Change Java Version Linux
![]()
Working with different versions of Java is a common thing for developers. You may have different Java versions installed on your system and must switch between them when you want to work on a given project. Luckily, there is a quick way to change your system’s current Java version. We will cover all the details about changing your Java version in Linux.
Changing the Java Version in Linux
For this guide, we are working with Java 19. However, we install a lower version and check the steps to follow when you want to switch the version.
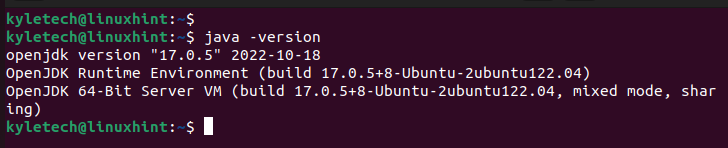
Let’s first check the current Java version in our system. For that, use the following command:
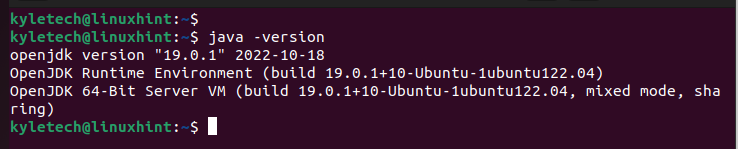
We verified that our current Java version is 19.0.1.
When you want to view your system’s installed Java JDKs and JREs, use the following command:
The command displays all the available Java versions. You can select which one to install from the listed options.
In our case, we only have one installed Java version. Notice that the following output doesn’t give any alternative Java versions.

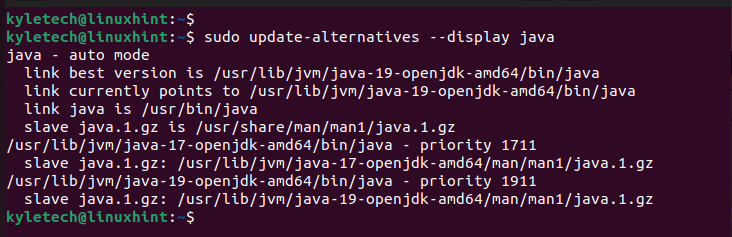
Similarly, you can check the available Java versions using the update-alternatives command:
The output also displays the link to the currently set Java version. In our case, the link points to Java 19.

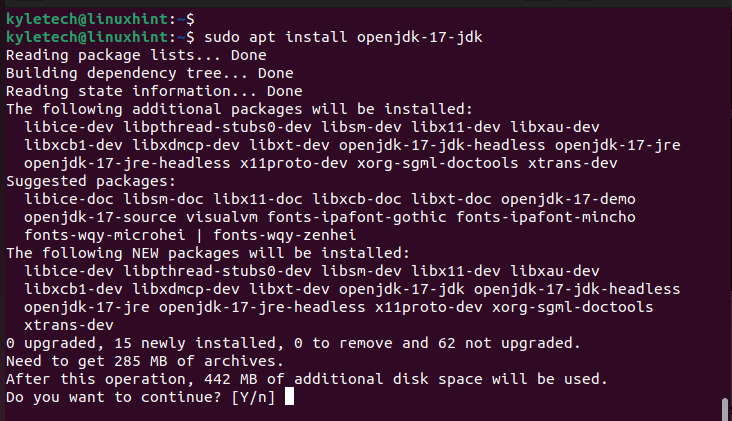
To demonstrate how we switch between the Java versions, let’s quickly install Java 19.
If we check the available Java versions, we now have Java 19 which is the currently set version, and an alternative version which is Java 17.
To change the Java version in Linux, use the –config java option with the update-alternatives command:
A list of all the available JDKs and JREs are displayed. Note the selection number of the Java version that you want to switch to. Next, enter its number in the confirmation prompt on the terminal and press the enter key.
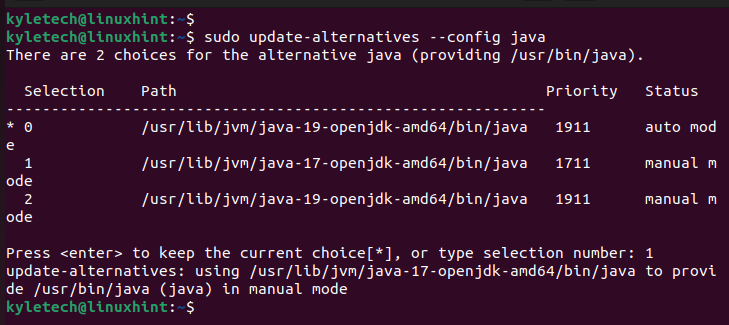
In the example, we entered our selection as 1 to switch to Java 17. Once you enter the selection, you get a message which confirms that the selection is updated.
If we check the current Java version in our system, we should get the Java 17 as we managed to switch to it.
In the output, note that the current Java version is Java 17. If we run a program that requires Java 17, we wouldn’t get any errors.
That’s how you switch between Java versions in Linux. Feel free to try it out.
Conclusion
It’s common to have different Java versions installed on your system. Different programs may require different Java versions to support them. In such a case, you may have various Java versions on your system and you need to switch between them at different instances. We covered the simple steps that you should follow when changing the Java version on your Linux system. Hopefully, you are now at ease with conveniently working with different Java versions.
About the author
Denis Kariuki
Denis is a Computer Scientist with a passion for Networking and Cyber Security. I love the terminal, and using Linux is a hobby. I am passionate about sharing tips and ideas about Linux and computing.
How To Change The Java Version In Linux?

This post is regarding how to change java version if multiple java versions are installed ?
Check what are the java versions are installed on your system
OpenJDK Runtime Environment (build 1.6.0-b09)
OpenJDK Client VM (build 1.6.0-b09, mixed mode)
So now I want to change the one version to another version.
If more than one java is installed. Execute below command to see how many java versions are installed? And what is the default version (Default version will be indicated by *)
#update-alternatives –config java
This command will display which is default java version used by your machine..
# update-alternatives –config java
There are 2 programs which provided ‘java’.
Enter to keep the current selection[+], or type selection number:
So if you want to change the java version from 1.6 (now 2 is default version as shown) to 1.4 just press “ 1 ” without quotes.
Please let us know if you know other way of changing java version.
Surendra Anne
Mr Surendra Anne is from Vijayawada, Andhra Pradesh, India. He is a Linux/Open source supporter who believes in Hard work, A down to earth person, Likes to share knowledge with others, Loves dogs, Likes photography. He works as Devops Engineer with Taggle systems, an IOT automatic water metering company, Sydney . You can contact him at surendra (@) linuxnix dot com.
Latest posts by Surendra Anne (see all)
- Docker: How to copy files to/from docker container — June 30, 2020
- Anisble: ERROR! unexpected parameter type in action: Fix — June 29, 2020
- FREE: JOIN OUR DEVOPS TELEGRAM GROUPS — August 2, 2019
- Review: Whizlabs Practice Tests for AWS Certified Solutions Architect Professional (CSAP) — August 27, 2018
- How to use ohai/chef-shell to get node attributes — July 19, 2018