- Ubuntu Wiki
- get the toolchain
- get the source code
- identify the boot partition on the target device
- get the flashing tools
- retrieve information about the boot partition
- move data from your desktop to your android device (and viceversa)
- update the kernel
- get a raw copy of the boot partition
- explode the content of a boot partition
- EduApps-CDG / Building Linux Kernel With Android.md
- Build Android Kernel and Run on QEMU with Minimal Environment: Step by Step
- Alexandr Fadeev
- Short Recipe
- Step by Step
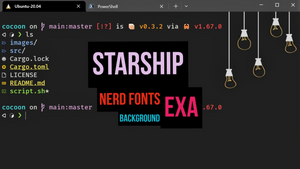
- My Configs for a Fancy-Looking Terminal (starship, exa, fonts)
- Design Patterns in Rust: 100% Unique Idiomatic Examples
- The Easiest Patterns in Rust
Ubuntu Wiki
In this page i’ll try to outline all the steps necessary to compile an Ubuntu kernel for an android device, and flash it.
get the toolchain
sudo apt-get install fakeroot build-essential kexec-tools kernel-wedge sudo apt-get install gcc-arm-linux-gnueabihf libncurses5 libncurses5-dev libelf-dev sudo apt-get install asciidoc binutils-dev sudo apt-get build-dep linux
get the source code
git clone git://phablet.ubuntu.com/CyanogenMod/android_kernel_asus_grouper.git cd android_device_asus_grouper git checkout phablet-10.1 make ARCH=arm cyanogenmod_grouper_defconfig make ARCH=arm CROSS_COMPILE=arm-linux-gnueabihf- zImage . [a lot of lines later] . Kernel: arch/arm/boot/Image is ready SHIPPED arch/arm/boot/compressed/lib1funcs.S AS arch/arm/boot/compressed/lib1funcs.o LD arch/arm/boot/compressed/vmlinux OBJCOPY arch/arm/boot/zImage Kernel: arch/arm/boot/zImage is ready
git clone git://phablet.ubuntu.com/CyanogenMod/lge-kernel-mako.git cd lge-kernel-mako git checkout phablet-10.1 make ARCH=arm mako_defconfig . [rest is the same as above]
identify the boot partition on the target device
First login in the device:
[flag@luxor ~]$ adb root adbd is already running as root [flag@luxor ~]$ adb shell root@android:/ # ubuntu_chroot shell
after the chroot $PWD is /data/ubuntu.
root@localhost:/# ls -la /dev/block/platform/sdhci-tegra.3/by-name/ total 0 drwxr-xr-x 2 root root 220 Apr 3 09:21 . drwxr-xr-x 4 root root 320 Apr 3 09:21 .. lrwxrwxrwx 1 root root 20 Apr 3 09:21 APP -> /dev/block/mmcblk0p3 lrwxrwxrwx 1 root root 20 Apr 3 09:21 CAC -> /dev/block/mmcblk0p4 lrwxrwxrwx 1 root root 20 Apr 3 09:21 LNX -> /dev/block/mmcblk0p2 lrwxrwxrwx 1 root root 20 Apr 3 09:21 MDA -> /dev/block/mmcblk0p8 lrwxrwxrwx 1 root root 20 Apr 3 09:21 MSC -> /dev/block/mmcblk0p5 lrwxrwxrwx 1 root root 20 Apr 3 09:21 PER -> /dev/block/mmcblk0p7 lrwxrwxrwx 1 root root 20 Apr 3 09:21 SOS -> /dev/block/mmcblk0p1 lrwxrwxrwx 1 root root 20 Apr 3 09:21 UDA -> /dev/block/mmcblk0p9 lrwxrwxrwx 1 root root 20 Apr 3 09:21 USP -> /dev/block/mmcblk0p6
LNX is the boot partition (where vmlinux resides) SOS is another boot partition (the recovery one but we won’t use it)
root@localhost:~# ls -al /dev/block/platform/msm_sdcc.1/by-name/ total 0 drwxr-xr-x 2 system root 540 Apr 3 10:05 . drwxr-xr-x 4 root root 600 Apr 3 10:05 .. lrwxrwxrwx 1 root root 21 Apr 3 10:05 aboot -> /dev/block/mmcblk0p12 lrwxrwxrwx 1 root root 21 Apr 3 10:05 abootb -> /dev/block/mmcblk0p15 lrwxrwxrwx 1 root root 20 Apr 3 10:05 boot -> /dev/block/mmcblk0p6 lrwxrwxrwx 1 root root 21 Apr 3 10:05 cache -> /dev/block/mmcblk0p22 lrwxrwxrwx 1 root root 21 Apr 3 10:05 DDR -> /dev/block/mmcblk0p24 lrwxrwxrwx 1 root root 21 Apr 3 10:05 grow -> /dev/block/mmcblk0p25 lrwxrwxrwx 1 root root 20 Apr 3 10:05 m9kefs1 -> /dev/block/mmcblk0p8 lrwxrwxrwx 1 root root 20 Apr 3 10:05 m9kefs2 -> /dev/block/mmcblk0p9 lrwxrwxrwx 1 root root 21 Apr 3 10:05 m9kefs3 -> /dev/block/mmcblk0p10 lrwxrwxrwx 1 root root 21 Apr 3 10:05 metadata -> /dev/block/mmcblk0p18 lrwxrwxrwx 1 root root 21 Apr 3 10:05 misc -> /dev/block/mmcblk0p19 lrwxrwxrwx 1 root root 20 Apr 3 10:05 modem -> /dev/block/mmcblk0p1 lrwxrwxrwx 1 root root 21 Apr 3 10:05 persist -> /dev/block/mmcblk0p20 lrwxrwxrwx 1 root root 20 Apr 3 10:05 recovery -> /dev/block/mmcblk0p7 lrwxrwxrwx 1 root root 21 Apr 3 10:05 rpm -> /dev/block/mmcblk0p11 lrwxrwxrwx 1 root root 21 Apr 3 10:05 rpmb -> /dev/block/mmcblk0p16 lrwxrwxrwx 1 root root 20 Apr 3 10:05 sbl1 -> /dev/block/mmcblk0p2 lrwxrwxrwx 1 root root 20 Apr 3 10:05 sbl2 -> /dev/block/mmcblk0p3 lrwxrwxrwx 1 root root 21 Apr 3 10:05 sbl2b -> /dev/block/mmcblk0p13 lrwxrwxrwx 1 root root 20 Apr 3 10:05 sbl3 -> /dev/block/mmcblk0p4 lrwxrwxrwx 1 root root 21 Apr 3 10:05 sbl3b -> /dev/block/mmcblk0p14 lrwxrwxrwx 1 root root 21 Apr 3 10:05 system -> /dev/block/mmcblk0p21 lrwxrwxrwx 1 root root 20 Apr 3 10:05 tz -> /dev/block/mmcblk0p5 lrwxrwxrwx 1 root root 21 Apr 3 10:05 tzb -> /dev/block/mmcblk0p17 lrwxrwxrwx 1 root root 21 Apr 3 10:05 userdata -> /dev/block/mmcblk0p23
in this case the boot partition is /dev/block/mmcblk0p6
get the flashing tools
root@localhost:/# apt-get update && apt-get install abootimg
retrieve information about the boot partition
root@localhost:/# abootimg -i /dev/block/mmcblk0p2 Android Boot Image Info: * file name = /dev/block/mmcblk0p2 [block device] * image size = 8388608 bytes (8.00 MB) page size = 2048 bytes * Boot Name = "" * kernel size = 4940276 bytes (4.71 MB) ramdisk size = 186898 bytes (0.18 MB) * load addresses: kernel: 0x10008000 ramdisk: 0x11000000 tags: 0x10000100 * empty cmdline * 0xea92c4df 0x1ba50966 0x61ac7815 0x254be794 0x00000000 0x00000000 0x00000000
this way we get some information about boot.img content, and we check if the target partition is actually a boot partition
move data from your desktop to your android device (and viceversa)
adb push arch/arm/boot/zImage /data/ubuntu/mykernel adb pull /data/ubuntu/foobar
update the kernel
abootimg -u /dev/block/mmcblk0p2 -k mykernel reading kernel from mykernel Writing Boot Image /dev/block/mmcblk0p2
and there it is, your new kernel is in place just reboot to see if it works.
Some more commands you might find useful:
get a raw copy of the boot partition
dd if=/dev/block/mmcblk0p2 of=./boot.img
explode the content of a boot partition
to retrieve the original zImage, initrd and the loading configuration
- 1) can’t talk to my device («device offline»):
- unplug the usb cable
- adb kill-server
- remove ~/.android (mv ~/.android ~/.foobar)
- plug the usb cable
- adb root
- answer to the security question on the device’s display
- adb shell
The repository mentioned above are the official Ubuntu one, so these kernels should work — did you do any modification to the config? In that case you are on your own.
dd if=/dev/block/mmcblk0p2 of=./boot.img
abootimg -x boot.img writing boot image config in bootimg.cfg extracting kernel in zImage extracting ramdisk in initrd.img
abootimg -u /dev/mmcblk0p2 -k zImage dd if=/dev/block/mmcblk0p2 of=./boot2.img
md5sum boot.img 9e2ef0de37718e8f9b6f3a6f83bedfa1 boot.img md5sum boot2.img 9e2ef0de37718e8f9b6f3a6f83bedfa1 boot2.img
if checksums are different, then your tools can’t operate on that device (check for new tools or ask on #ubuntu-touch)
Kernel/Dev/AndroidKernel (последним исправлял пользователь pool-71-176-33-233 2015-10-16 18:17:09)
The material on this wiki is available under a free license, see Copyright / License for details.
EduApps-CDG / Building Linux Kernel With Android.md
This guide shows how to build Linux on a Android Device and was made for people that doesn’t have s Computer.
Preparing the Environment
You need to install Termux from Google Play Store. Now we will download the Kernel so we need WGET:
apt-get update && apt-get --assume-yes install wget && cd ~ && wget https://cdn.kernel.org/pub/linux/kernel/v5.x/linux-5.4.6.tar.xz
The next step is decompress that tarball with UNXZ and TAR (integrated with Termux):
unzx -d linux-5.4.6.tar.xz && tar -xf linux-5.4.6.tar (Optional) Delete the Linux tarball:
Now we have the Linux Source on our Android, lets compile!
In Android, compile is a terror for Linux Kernel. First we need to create a config file.
If you had an Linux PC you could simply do this:
cp /boot/config-$(uname -r) linux-5.4.6/.config But you dont have, so we need to do this:
If you have a Rooted Potato Phone you can simply:
cp /proc/config.gz ~ && gzip -d config.gz && mv config linux-5.4.6/.config && cd linux-5.46
If else, first you need to download it from our repository:
wget https://eduapps-cdg.github.io/kernel-configs/raw/master/android/$(getprop | grep -i ro.product.model | sed "s/\[ro.product.model\]: //" | sed "s/\[//" | sed "s/\]//").gz && mv $(getprop | grep -i ro.product.model | sed "s/\[ro.product.model\]: //" | sed "s/\[//" | sed "s/\]//").gz config.gz && gzip -d config.gz && mv config linux-5.4.6/.config && cd linux-5.46
If the file was not found, you must generate it. It has only one command, but this command is the worst! It’s the best choice if you are developing a new device. Complete the first command of Building and type:
Once solved the dilemma, you will not need to do it again. the next step is install the compilers:
apt-get install build-essential ncurses bison flex openssl libelf clang
This command will setup to build the Kernel with full power, if you have a single core device, it doesn’t help so much but works:
make -j $(nproc) make modules_install make install And finally, the Last Step is: Enjoy the building time and drink a coffee!
Build Android Kernel and Run on QEMU with Minimal Environment: Step by Step
Get the Android Linux kernel named «Goldfish». Build. Get initrd or ext4 device image. Run QEMU.
Alexandr Fadeev
Short Recipe
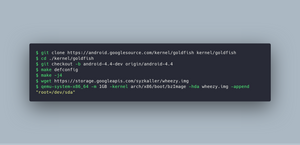
git clone https://android.googlesource.com/kernel/goldfish kernel/goldfish cd ./kernel/goldfish git checkout -b android-4.4-dev origin/android-4.4 make defconfig make -j4 wget https://storage.googleapis.com/syzkaller/wheezy.img qemu-system-x86_64 -m 1GB -kernel arch/x86/boot/bzImage -hda wheezy.img -append "root=/dev/sda" Step by Step
git clone https://android.googlesource.com/kernel/goldfish kernel/goldfish git branch -a * master remotes/origin/android-4.14 remotes/origin/android-4.4 # git checkout -b android-4.4-dev origin/android-4.4
sudo apt install qemu-system-x86
qemu-system-x86_64 -m 1GB -kernel arch/x86/boot/bzImage -initrd initrd
wget https://storage.googleapis.com/syzkaller/wheezy.img
qemu-system-x86_64 -m 1GB -kernel arch/x86/boot/bzImage -hda wheezy.img -append "root=/dev/sda"

My Configs for a Fancy-Looking Terminal (starship, exa, fonts)
My starship and exa configs for a fancy command prompt in bash and pwsh (PowerShell). How to beautify the terminal with nerd fonts and a nice background. Making it work in Windows Terminal. Within an SSH session, under both root and non-root users.
Design Patterns in Rust: 100% Unique Idiomatic Examples
GitHub: https://github.com/fadeevab/design-patterns-rust 👈 My repository contains 100% fresh unique idiomatic Rust examples covering all 23 classic design patterns.
The Easiest Patterns in Rust
A few software design patterns are seamlessly integrated into Rust, so we're using them without realizing them. Which is great! A hint: it is 2 creational patterns.