- How to copy an ISO image onto USB with dd
- 3 Answers 3
- How to Use the dd Command to Create a Live USB Drive in Linux Terminal [For Experts and Adventurers]
- Creating live USB from ISO with dd command
- Understanding the above dd command
- Step 0: Download the desired ISO
- Step 1: Get the USB disk label
- Step 2: Writing the ISO file to the USB disk
- Wrapping Up
How to copy an ISO image onto USB with dd
@Rob Can you list the dos and donts please? I would hate to waste my drive trying to make it bootable.
3 Answers 3
dd if=/path/to/your/isofile of=/your/usb/disk bs=8M status=progress try this.
updated as @Kimvais and @Kelly Bang suggested
@weis26: You can, ~ is just replace with the current users home directory path. Use it if either the if or of paths are in your home directory sure.
@weis26 Depends on whether you want to use a relative path or absolute path. By the way, using dd would make your usb device read-only and to make it a ‘normal’ usb device you shall re-partition the device.
bs=8M or so would speed this up quite a bit. also, should mention using mount to see what disk is mounted at /media/83.
@starrify — I can’t figure out what you mean by saying dd «would make your usb device read-only». dd does not change capabilities of devices, it just shoves data from input to output.
If you want to be able to view the progress or get an ETA, you can add Pipe View (pv) into the mix, e.g.:
This will give output like:
@Owen Pauling I don’t understand the «size» argument for pv . You throw out 1377M out of nowhere. What is this supposed to represent ? the size of the file in if= ? So that means we must always verify and hardtype the size manually ? And what happens if you don’t put the corresponding size then ?
@Atralb yes it’s the size of the input file. Without it you cannot get the progress percentage. This answer is a bit outdated anyway — I would use the status=progress option on dd now, then you don’t need to type the file size.
Note: This is a generic, universal approach that should work on almost any *nix system. If you’re having trouble with other recommendations, then give this one a try. So you want to run dd (disk destroyer)? Before attaching your block device, cat /proc/partitions; then attach your device and again cat /proc/partitions. The difference will indicate your target device. If there’s no difference then you lack the correct driver to recognize it or have a hardware fault.
Here’s what mine looks like on my laptop, before and after, respectively:
jcholsap@T430s:~$ cat /proc/partitions major minor #blocks name 8 0 117220824 sda 8 1 117219328 sda1 11 0 1048575 sr0 253 0 109109248 dm-0 253 1 8077312 dm-1 jcholsap@T430s:~$ cat /proc/partitions major minor #blocks name 8 0 117220824 sda 8 1 117219328 sda1 11 0 1048575 sr0 253 0 109109248 dm-0 253 1 8077312 dm-1 8 16 30670848 sdb Use the third column, size in kilobytes, to verify your block device. If you’re nervous, and you should be, you can further verify your device with dmesg. Here it is on my laptop:
jcholsap@T430s:~$ dmesg | tail -30 [ 10.197383] thinkpad_acpi: EC reports that Thermal Table has changed [ 34.599234] random: crng init done [ 35.133277] rfkill: input handler disabled [ 9737.190954] usb 4-2: new SuperSpeed USB device number 2 using xhci_hcd [ 9737.211756] usb 4-2: New USB device found, idVendor=0781, idProduct=5580 [ 9737.211762] usb 4-2: New USB device strings: Mfr=1, Product=2, SerialNumber=3 [ 9737.211765] usb 4-2: Product: Extreme [ 9737.211768] usb 4-2: Manufacturer: SanDisk [ 9737.211770] usb 4-2: SerialNumber: AA010507161254310422 [ 9737.244492] usb-storage 4-2:1.0: USB Mass Storage device detected [ 9737.245540] scsi host6: usb-storage 4-2:1.0 [ 9737.245746] usbcore: registered new interface driver usb-storage [ 9737.247465] usbcore: registered new interface driver uas [ 9738.259485] scsi 6:0:0:0: Direct-Access SanDisk Extreme 0001 PQ: 0 ANSI: 6 [ 9738.260340] sd 6:0:0:0: Attached scsi generic sg2 type 0 [ 9738.260698] sd 6:0:0:0: [sdb] 61341696 512-byte logical blocks: (31.4 GB/29.3 GiB) [ 9738.260919] sd 6:0:0:0: [sdb] Write Protect is off [ 9738.260925] sd 6:0:0:0: [sdb] Mode Sense: 53 00 00 08 [ 9738.261142] sd 6:0:0:0: [sdb] Write cache: disabled, read cache: enabled, doesn't support DPO or FUA [ 9738.267727] sd 6:0:0:0: [sdb] Attached SCSI removable disk [ 9738.496445] UDF-fs: warning (device sdb): udf_load_vrs: No anchor found [ 9738.496450] UDF-fs: Scanning with blocksize 512 failed [ 9738.505586] UDF-fs: warning (device sdb): udf_load_vrs: No anchor found [ 9738.505589] UDF-fs: Scanning with blocksize 1024 failed [ 9738.519311] UDF-fs: warning (device sdb): udf_load_vrs: No anchor found [ 9738.519324] UDF-fs: Scanning with blocksize 512 failed [ 9738.528153] UDF-fs: warning (device sdb): udf_load_vrs: No anchor found [ 9738.528157] UDF-fs: Scanning with blocksize 1024 failed [ 9738.533493] UDF-fs: INFO Mounting volume 'UDF Volume', timestamp 2011/04/12 09:38 (1000) [10100.854101] perf: interrupt took too long (2519 > 2500), lowering kernel.perf_event_max_sample_rate to 79250 There’s all the details of my thumb drive. Ah, now I’m convinced I have the right device!
But my attached device may have auto-mounted. For dd, that’s a problem. So to be certain, let’s unmount it with umount (note the difference in spelling). I’ll run the command twice because the error message let’s me know it succeeded:
jcholsap@T430s:~$ sudo umount /dev/sdb jcholsap@T430s:~$ jcholsap@T430s:~$ sudo umount /dev/sdb umount: /dev/sdb: not mounted. Now, because everything in Linux is treated as a file, dd calls the target block device, in my case /dev/sdb, an output file. So, the option-argument pair to use, here for my thumb drive, with the dd command is of=/dev/sdb. You want to get this right or else dd could mean disk destroyer for you. Here it is on my laptop:
jcholsap@T430s:~$ sudo dd of=/dev/sdb if=/home/jcholsap/centos7.iso bs=4M There’s no output from the running dd command. You’ll just get a blinking cursor until it finishes, which can be a long time. If you interrupt the process then you’ll have a partial image copy — probably not what you wanted.
How to Use the dd Command to Create a Live USB Drive in Linux Terminal [For Experts and Adventurers]
There are several graphical tools available for creating live USB. Etcher on Linux is probably the most popular. Ubuntu has its own Startup Disk Creator tool for this purpose.
However, advanced Linux users swear by the comfort and swiftness of creating live USBs in Linux terminal using the dd command.
The dd command is a CLI tool that gives you powerful features for copying and converting files.
A common use case that people use dd for is to write ISO files to an external storage device such as a USB drive, which can be used to do things like install a new Linux distribution onto a computer or laptop.
That’s what I am going to show in this tutorial. I’ll go over the commands you will need to run, finding our USB drive from the terminal, and then finally doing the actual flashing of the ISO file.
Creating live USB from ISO with dd command
Before I show you the steps, let me quickly go over the command which you’ll be using and explain what it does.
Here’s the example command for flashing of the ISO:
dd if="./filename.iso" of="/dev/sdb" status="progress" conv="fsync"Let’s go over what exactly that dd command is doing.
Understanding the above dd command
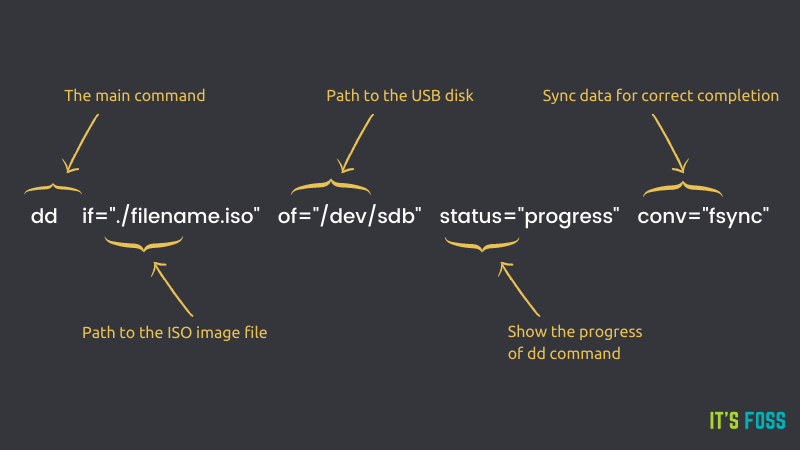
First, you enter dd . As expected, this is just the name of the program you are going to run.
Next, you specify if=»./filename.iso» . if stands for input file, which tells dd what file you are going to be writing to the external storage drive.
After that, you enter of=»/dev/sdb» . As was with if , of simply stands for output file.
The thing to remember is that the output file doesn’t technically have to be a file on your system. You can also specify things like the path to an external device (as shown in the example), which just looks like a normal file on your system, but actually points to a device connected to your machine.
status can be set to three options: none , noxfer and progress.
The progress option that you set will cause dd to show periodic statistics on how much of the ISO has been transferred to the storage drive, as well as an estimation on how much longer it will be until dd is finished.
If you were to have set the none option instead, dd would only print error messages during the writing of the ISO, thus removing things like the progress bar.
The noxfer option hides some information that’s printed after a transfer is complete, such as how long it took from start to finish.
Lastly, you set the conv option to fsync . This causes dd to not report a successful write until the entire ISO has been written to the USB drive.
If you omit this option, dd will still write just fine (and might actually appear to run quicker), but you might find your system taking quite a while before it tells you it’s safe to remove the USB drive as it will finish writing the ISO’s content in the background, thus allowing you to do other things in the meantime.
Now that you understand what you have to do, let’s see how to do it.
The command line is a double-edged sword. Be extra careful when you are running a command like dd. You must make sure that you are using the correct device for the output file destination. One wrong step and you may format your main system disk and lose your operating system.
Step 0: Download the desired ISO
This goes without saying that you need to have an ISO image file in order to flash it on a USB.
I am going to use Ubuntu 20.04 ISO (downloadable here) to test the dd command I showed earlier.
Step 1: Get the USB disk label
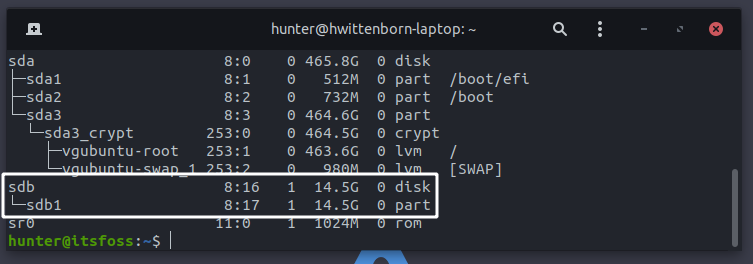
The specific path I entered for of was /dev/sdb . The USB disks are usually labelled /dev/sdb but that’s not a hard and fast rule.
This path may differ on your system, but you can confirm the path of the drive with the lsblk command. Just look for a listing that looks like the size of your USB drive, and that’ll be it.
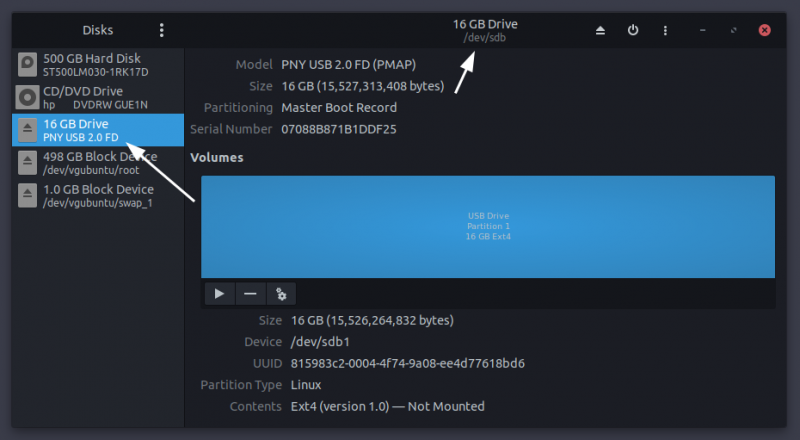
If you are more comfortable with GUI programs, you can also find the drive’s path with tools like GNOME Disks.
Now that you have established the path to our external drive, let’s create the live USB.
Step 2: Writing the ISO file to the USB disk
Open up a terminal at the directory where the ISO file is downloaded, and run the following (remember to replace /dev/sdb with the name of your storage device if it’s something different):
sudo dd if="./ubuntu-20.04.2.0-desktop-amd64.iso" of="/dev/sdb" status="progress" conv="fsync"After that, just let dd do it’s thing, and it’ll print a completion message once it’s done:
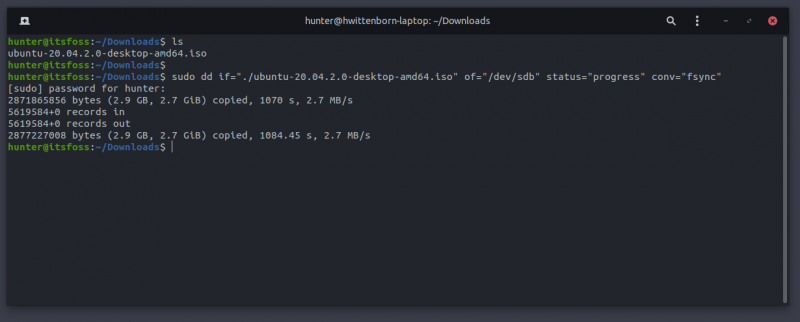
And just like that, you’ve flashed an ISO with dd command in the Linux terminal!
Wrapping Up
Now you’re on your way to doing even more things through the terminal, allowing you to do things faster and quicker than you might have been able to do before.
Got any remaining questions about the dd command, or something just not working right? Feel free to leave any of it in the comment section below.