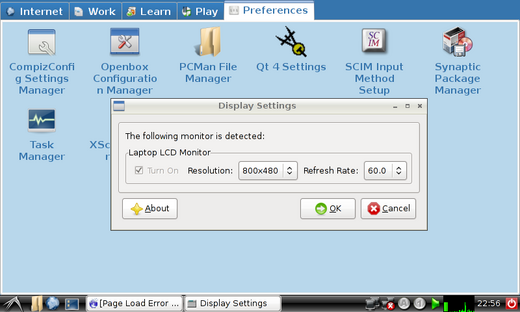
- How to set custom resolution using xrandr when the resolution is not available in ‘Display Settings’
- 7 Answers 7
- How to change screen resolution using xrandr
- How to use xrandr
- Adjusting the dpi
- Dual monitors
- Configure xrandr to boot at startup
- Graphical tools
- 15 comments, leave yours
- Leave a Comment Cancel reply
- How to Set Custom Resolution Using xrandr?
- How to set Custom Resolution Using xrandr Via Command Line?
- Conclusion
How to set custom resolution using xrandr when the resolution is not available in ‘Display Settings’
I’m a new Linux user trying to change the screen resolution as there is no option under display. I have successfully managed to add new resolutions by fluke by following online guide. I don’t have a GPU, I don’t know if this is the issue? Below is my xrandr -q output.
root@kali:~# xrandr -q xrandr: Failed to get size of gamma for output default Screen 0: minimum 1280 x 1024, current 1280 x 1024, maximum 1280 x 1024 default connected 1280x1024+0+0 0mm x 0mm 1280x1024 0.0* 1920x1200_60.00 (0x145) 193.2MHz h: width 1920 start 2056 end 2256 total 2592 skew 0 clock 74.6KHz v: height 1200 start 1203 end 1209 total 1245 clock 59.9Hz 1440x900_59.90 (0x156) 106.3MHz h: width 1440 start 1520 end 1672 total 1904 skew 0 clock 55.8KHz v: height 900 start 901 end 904 total 932 clock 59.9Hz 7 Answers 7
Here are the steps you need to add a new custom resolution and apply it. Following steps are for adding a 1920×1080 resolution, but you can use it for any other resolution you want. But make sure your monitor and onboard graphics support that resolution.
# First we need to get the modeline string for xrandr # Luckily, the tool "gtf" will help you calculate it. # All you have to do is to pass the resolution & the- # refresh-rate as the command parameters: gtf 1920 1080 60 # In this case, the horizontal resolution is 1920px the # vertical resolution is 1080px & refresh-rate is 60Hz. # IMPORTANT: BE SURE THE MONITOR SUPPORTS THE RESOLUTION # Typically, it outputs a line starting with "Modeline" # e.g. "1920x1080_60.00" 172.80 1920 2040 2248 2576 1080 1081 1084 1118 -HSync +Vsync # Copy this entire string (except for the starting "Modeline") # Now, use "xrandr" to make the system recognize a new # display mode. Pass the copied string as the parameter # to the --newmode option: xrandr --newmode "1920x1080_60.00" 172.80 1920 2040 2248 2576 1080 1081 1084 1118 -HSync +Vsync # Well, the string within the quotes is the nick/alias # of the display mode - you can as well pass something # as "MyAwesomeHDResolution". But, careful! :-| # Then all you have to do is to add the new mode to the # display you want to apply, like this: xrandr --addmode VGA1 "1920x1080_60.00" # VGA1 is the display name, it might differ for you. # Run "xrandr" without any parameters to be sure. # The last parameter is the mode-alias/name which # you've set in the previous command (--newmode) # It should add the new mode to the display & apply it. # Usually unlikely, but if it doesn't apply automatically # then force it with this command: xrandr --output VGA1 --mode "1920x1080_60.00" How to change screen resolution using xrandr
Although there is nothing wrong with this method, xorg.conf has been deprecated and can be intimidating for many users.
Use xrandr it’s more fast y simple. In addition, it has several graphical interfaces and can be used to other necessities very interesting, such as the configuration of dual monitors, etc.
How to use xrandr
First, list the different resolutions available for your monitor:
In case the resolution you are looking for is not listed, it may be because your monitor does not really support it or you need to install a better driver (ati, intel, or nvidia).
Then, set the resolution you want to use (change «1400 × 1050» to the desired resolution):
Adjusting the dpi
The dpi differs from the resolution of your screen (referenced as pixels x inch) and affects the decorations of the windows, the size of the same, the rendering of the fonts, etc.
On many monitors, xrandr will set the dpi automatically. If not, or if you prefer to change this configuration, you can specify it manually:
xrandr --dpi 96 -s 1400x1050
If that fails, you can specify the dpi in ~ / .Xdefaults
I opened an editor and put the following in that file:
This dpi will be applied to all the new windows you open. You can also log out to see the results of this change (no need to restart the system).
If 96 is not the right dpi for you, you can try 72 or 135.
Dual monitors
It is also possible to use xrandr to configure dual monitors. To do this, you must make use of the –right-of and –left-of options.
Here’s an example, using an nvidia card:
First, list the monitors using xrandr.
The result will be something like the following:
Screen 0: minimum 320 x 200, current 1920 x 1200, maximum 4096 x 4096
DVI-I-1 connected 1920x1200 + 0 + 0 (izannormal left inverted right x axis y axis) 520mm x 320mm
1920 × 1200 60.0 * +
1600 × 1200 60.0
1680 × 1050 60.0
1280 × 1024 75.0
1280 × 960 60.0
1152 × 864 75.0
1024 × 768 75.1 70.1 60.0
832 × 624 74.6
800 × 600 72.2 75.0 60.3 56.2
640 × 480 72.8 75.0 60.0
720 × 400 70.1
DVI-I-2 connected 1920x1200 + 0 + 0 (normal left inverted right x axis and axis) 520mm x 320mm
1920 × 1200 60.0 * +
1600 × 1200 60.0
1680 × 1050 60.0
1280 × 1024 75.0
1280 × 960 60.0
1152 × 864 75.0
1024 × 768 75.1 70.1 60.0
832 × 624 74.6
800 × 600 72.2 75.0 60.3 56.2
640 × 480 72.8 75.0 60.0
720 × 400 70.1
TV-1 disconnected (normal left inverted right x axis y axis)
Then use xrandr to configure the monitors. Change the names «DVI-I-1» and «DVI-I-2» to the names of your monitors. You may also need to adjust the resolution and change “–left-of” to “–right-of”.
xrandr --auto --output DVI-I-2 --mode 1920x1200 --left-of DVI-I-1
It has the same effect as:
xrandr --auto --output DVI-I-1 --mode 1920x1200 --right-of DVI-I-2
To set the primary monitor, use the –primary option:
xrandr --auto --output DVI-I-1 --mode 1920x1200 --primary --right-of DVI-I-2
Configure xrandr to boot at startup
This method varies depending on the desktop environment you use (gnome, kde, xfce).
In openbox, add the xrandr command in ~ / .config / openbox / autostart.sh.
In fluxbox, do the same operation but in the file ~ / .fluxbox / startup
Depending on the desktop environment you use, you can add xrandr in ~ / .xinit
Graphical tools
There are very good graphical interfaces for xrandr. Among the best known, we can mention lxrandr, grandr, krandr and arandr.
The content of the article adheres to our principles of editorial ethics. To report an error click here.
Full path to article: From Linux » FileLet’s UseLinux » How to change screen resolution using xrandr
15 comments, leave yours
Leave a Comment Cancel reply
Good post, some time ago I wrote an article on how to configure two screens under openbox and also generate random wallpapers for each of the screens: link
Let’s see if I understand . imagine that I do not have the resolution I want on a monitor, with any of those graphical interfaces will I be able to create that resolution and get it to work at startup? And, where do I put that file (in the case that with the graphical interfaces it is not possible) for example in Gnome and KDE ?. Thank you very much, I’ve been looking for a solution to the resolution problem for a long time, but everyone put it with the Xorg file, conf, but that file in the newer versions of the distros is no longer used.
If the resolution you want does not appear in the interface that GNOME or KDE brings to change the screen resolution, then you can try this method, yes. In any case, it is VERY likely that if the screen resolution you are looking for does not appear, it is because it is NOT supported by your monitor. Sure, there are exceptions to this rule but they are usually very rare. Hug! Paul.
No, in my case my monitor has a maximum and native resolution of 1366 × 768, in Windows it works perfectly well with the Intel driver, the monitor is an emachines (maybe it is because of the brand) .In contrast, in all distros GNU / Linux the maximum resolution was 800 × 600 or 1024 × 600, depending on the distro, but from there it did not go up. I tried with all the distros, but only in one did the correct resolution appear without using the xrandr and cvt commands my monitor, in Ubuntu 10.10, but was unable to use the graphic effects, I don’t know why, not even updating . So I’m going to test what you’ve put here, and I’ll tell you if it works . PS: it is strange, because on my brother’s HP monitor, which has a native resolution of 1600 × 900 I had no problem with the resolution, I have a theory that it may be because my monitor is not supported or is not recognized by the kernel hardware recognition system. A greeting.
It has worked for me in a resolution configuration failure that has occurred in LinuxMint in my case 12. For some reason when starting the system it does not recognize the resolution of my monitor. But I have solved it by installing ‘grandr’, creating an icon on the desktop that I must use every startup of the Desktop. I also used ‘lxrandr’ but I adapted better with ‘grandr’. Definitely highly recommended ‘grandr’. Greetings 🙂
I use a script on my netbook that makes use of xrandr, it allows me to use unsupported resolutions or at least not listed by default, since the maximum is 1024 × 600 and with the script I can set it to 1280 × 750
http://dl.dropbox.com/u/44801426/newrez
It not only works for gnome, I use it in XFCE
I can’t remember the source where I found it, but just google it; D
I use Xrandr to rotate the desktop position on the netbook only when I really need to, because it gets painfully slow. When I’m done using it I have to kill it and restart X.
How to Set Custom Resolution Using xrandr?
The “xrandr” is a built-in command line tool to customize screen resolution, orientation, and refresh rates and fix monitor-related bugs. This tool is also beneficial for setting a system-supported custom resolution unavailable in the default display settings. The “xrandr” tool first adds the specified screen resolution in the display settings and then enables it on the screen.
This guide enlists the complete procedure to set the custom resolution using the “xrandr” command line tool.
How to set Custom Resolution Using xrandr Via Command Line?
First, the resolution of the current system is checked. Then, the custom resolutions are generated which are added as a mode using the xrandr utility. This process will set the custom resolution to your system.
Step 1: Check The Current System Resolution
First, execute the “xrandr” command without passing any argument to display the current screen resolution of the Linux system:
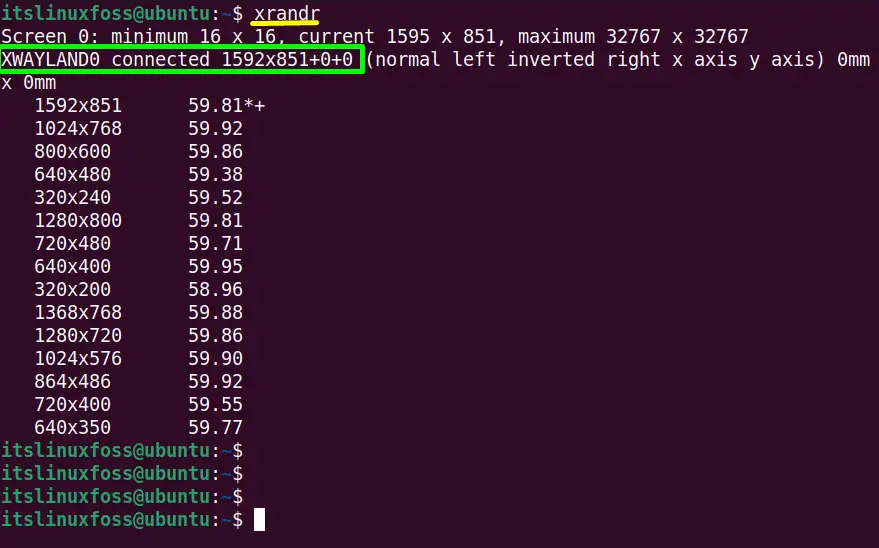
The output shows an active system monitor “XWAYLAND0” having a “1595×851” resolution and also the list of its other associated resolution.
Step 2: Generating the Custom Display Resolution
The “gtf(General Transfer Format)” provides the horizontal and vertical resolution and refresh rate in “Hz”. In this case, it is used to get the modeline (set screen resolution) string for the “xrandr” utility.
For this, specify the desired screen resolution, i.e., “1920 1080” and the refresh rate (60) with the “gtf” as a command like this:
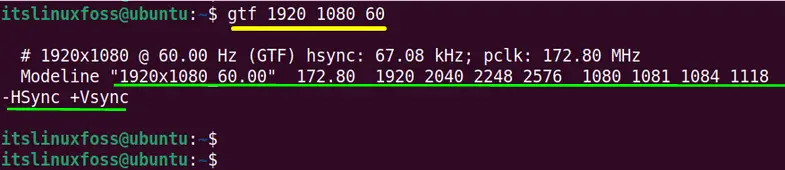
Copy the highlighted part of the “gtf” command output and run the “xrandr” command with the “– -newmode” option in this way:
$ xrandr --newmode "1920x1080_60.00" 172.80 1920 2040 2248 2576 1080 1081 1084 1118 -HSync +Vsync

- The values “172.80 1920 2040 2248 2576 1080 1081 1084 1118” represents the parameters of the new mode which specify the timing and resolution of the new mode.
- The “HSync” denotes the “horizontal sync” used for horizontal columns which indicates the beginning of the new line. The “VSync” represents the “Vertical sync” for vertical rows that denotes the start of the new field:
Step 3: Add the New Mode
Now, add the above specified “newmode” for the current monitor device “XWAYLAND0” using “xrandr” command with “addmode” flag:
$ xrandr --addmode XWAYLAND0 "1920x1080_60.00"

Step 4: Verify the Custom Resolution
Execute the “xrandr” command again to check whether the new custom version is applied or not:
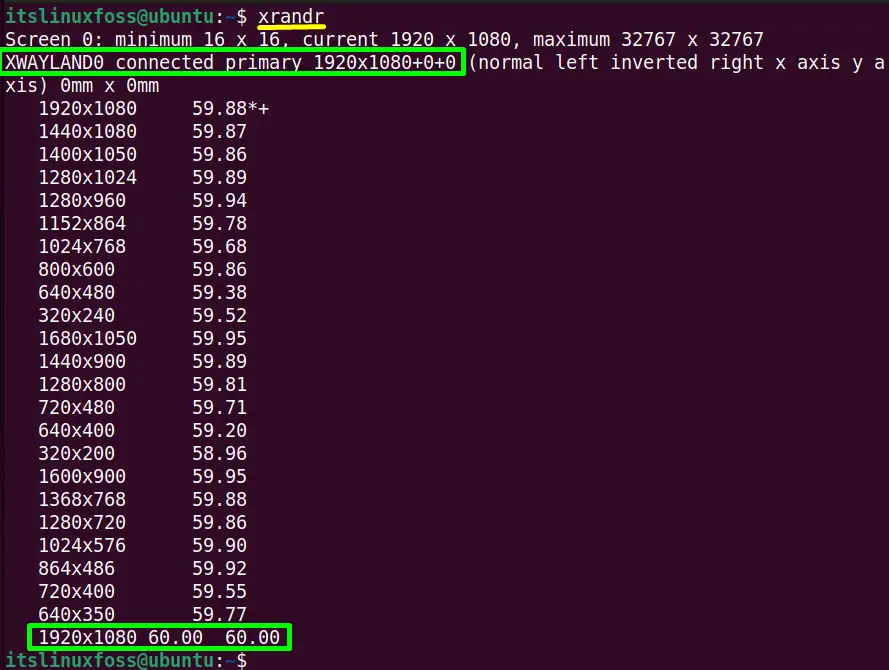
The custom display resolution “1920x1080_60” has been set as shown with the device name and at the bottom of the list.
Step 5: Set the Custom Resolution Permanently
The “XWAYLAND0” device screen resolution is set temporarily. After the system reboots, it will set back to the default resolution.
Now, open the “~/.profile” to save it permanently:
Add the “newmode” and “addmode” commands in the “~/.profile” file using the following command:
xrandr --newmode "1920x1080_60.00" 172.80 1920 2040 2248 2576 1080 1081 1084 1118 -HSync +Vsync xrandr --addmode XWAYLAND0 "1920x1080_60.00"
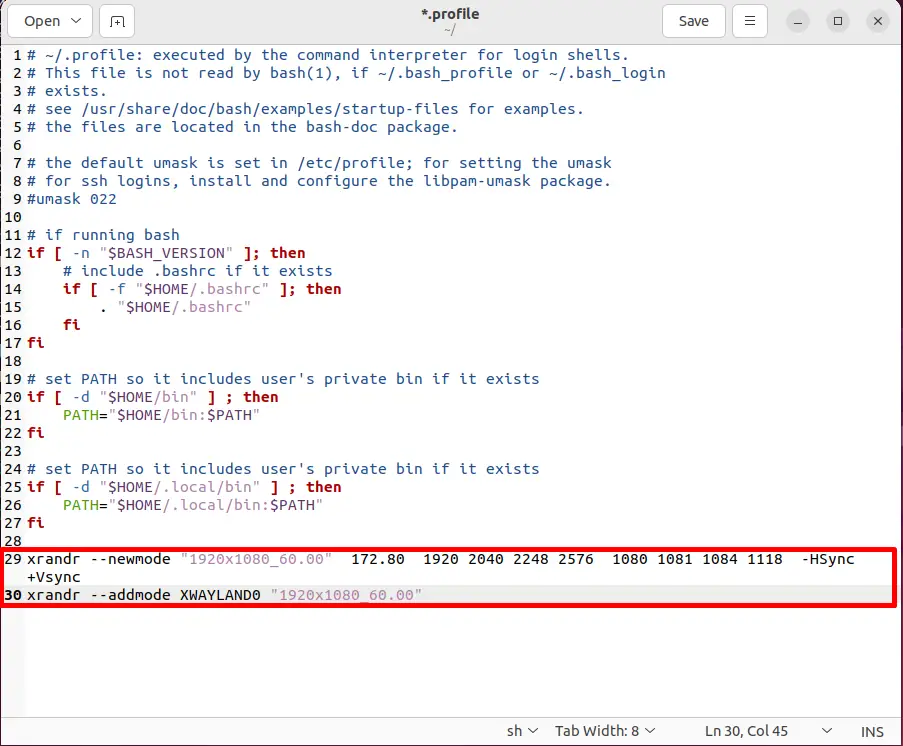
Click on the “Save” button to save the new changes in the file. The custom resolution has been set permanently for device “XWAYLAND0”.
Conclusion
In Linux, the pre-installed “xrandr” command offers the “newmode” and the “addmode” flags to set the custom resolution of the system monitor. The custom resolution is set temporarily, i.e., before rebooting. Access the “~/.profile” to permanently set the specified custom resolution.
This guide has illustrated a brief description of setting the custom resolution using the xrandr command in Linux.