Set a specific screen resolution with xrandr
So I installed LUbuntu 11.04 on my VirtualBox. I couldn’t find the 1366×768 resolution so I installed Guest Additions but it wasn’t there. So I used this code to set the correct resolution:
gtf 1366 768 60 xrandr --newmode "1368x768_60.00" 85.86 1368 1440 1584 1800 768 769 772 795 $ xrandr --addmode VBOX0 1368x768_60.00 xrandr --output VBOX0 --mode 1368x768_60.00 The problem is that I can’t find a way to save this information for the next reboot. I tried on .xinitrc and nothing happens. Then I tried on .bashrc but it’s not working, I need to start a console before this commands are executed.
I edited the file and I changed the execution bits but it’s not happening. Maybe LUbuntu works differently.
6 Answers 6
I was trying to change the default resolution of LXDE on Ubuntu (LXDE is also used in Lubuntu) and I found a solution for this problem. I also have Lubuntu installed and I’ve checked that this file actually exists which it does (Ijust tried this fix as well and it worked).
- Open up a terminal, press ctrl+alt+t
- I’m guessing you have a default Lubuntu install, so «Leafpad» would be your default editor, type/copy this into the terminal and press enter. (you may be asked for a password)
sudo leafpad /etc/xdg/lxsession/LXDE/autostart @xscreensaver -no-splash @lxpanel --profile LXDE @pcmanfm --desktop --profile LXDE @/usr/lib/policykit-1-gnome/polkit-gnome-authentication-agent-1 @xrandr --auto --output DVI-1 --primary --mode 1680x1050 --left-of DVI-0 @Severus — Open your terminal as above. type «cd /etc/xdg/lxsession/». That should take you to lxsession directory. Now type «find -name autostart». Hopefully that should show you the directory with autostart in. If I remember correctly I 2 directories you have are for the different sessions available. You could add it to both of them or just the one you are using. Hope this helps (sorry for the late reply!)
I personally put those sorts of commands, to be run at login, in a script in ~/bin , call it set_resolution
Then run gnome-session-properties and add the command to be run at login (use ~/bin/set_resolution).

still not working. I’ve added ~/.config/openbox/autostart then chmod u+x but at reboot nothing is happening.
Here’s another line added to my /etc/xdg/lxsession/LXDE/autostart file to get it working:
Update: the above was fine for awhile until I ran the GUI config tool lxrandr , which seems stupidly unaware of dual-monitor setups. So I made this change:
$ cat $HOME/.config/autostart/lxrandr-autostart.desktop [Desktop Entry] Type=Application Name=LXRandR autostart Comment=Start xrandr with settings done in LXRandR --then manually tweaked Exec=xrandr --output DVI-0 --mode 1920x1200 --rate 60.0 --output LVDS --off --output VGA-0 --primary --mode 1920x1200 --left-of DVI-0 OnlyShowIn=LXDE Note that I’m running Ubuntu 12.04 with LXDE. One would hope that a pure Lubuntu 12.04 setup would include a smarter lxrandr binary.
I ended up putting my changes in ~/.xprofile
Had the same problem as dierre, I couldn’t get the xrandr settings to stick in Lubuntu 13.10, and people suggested autostart etc. However, adding the commands to .xprofile finally worked for me. Thanks!
If anyone is still struggling with this, I tried everything I could find with no luck (I put the command line into so many files I lost count). In the end I found an easy solution through trial and error and I would try it first before all the other stuff.
Open a terminal and test the xrandr command (as have been posted by others). I am using Lubuntu on an old system just to give it a bit more life and have an old monitor rigged to it so my cmd line to change the resolution was
xrandr —auto —output VGA1 —primary —mode 1158×864
didn’t add any of the other stuff.
Then went to start->preferences->Default Applications For LXSession
Selected «autostart» menu then put the exact command line code into the white text box and clicked «add».
The only method that worked for me, was:
- run the necessary commands to get the new mode through cvt and xrandr, explained here: https://wiki.ubuntu.com/X/Config/Resolution#Adding_undetected_resolutions
- paste them in a .sh file, like set_resolution.sh, as an example it would look like this:
#!/bin/sh xrandr --newmode "1920x1080_60.00" 173.00 1920 2048 2248 2576 1080 1083 1088 1120 -hsync +vsync xrandr --addmode HDMI-1 1920x1080_60.00 xrandr --output HDMI-1 --mode 1920x1080_60.00 I’m Using LXDE9.0 with openbox on a Asus’s TinkerBoard. Tried modifying the ~/.xprofile, autostart in /etc/xdg/lxsession, autostart of openbox, xinitrc, and none of them worked for me. this is only for a session, not global for all users, but it would do the trick faster than going on xorg.conf file that was the last option that i didn’t try.
Разрешение монитора в Linux

Когда я поставил себе Ubuntu, то первой серьезной проблемой было разрешение моего монитора: ubuntu никик не хотела понимать, что мой моник (Acer AL1916W) крут и его рабочее разрешение — это 1440×900, а не 1024×768.
Да, такое бывает часто. Слава Богу, Что эту проблему достаточно просто решить. В данной статье мы рассмотрим
Изменение разрешения монитора в Linux
Для того чтобы посмотреть, на что вообще способны по мнению Linux ваши мониторы (или монитор, если он один), нужно выполнить команду xrandr из консоли (Ctrl+Alt+T):
В результате вы получите что-то типа такого (у меня 2 монитора):
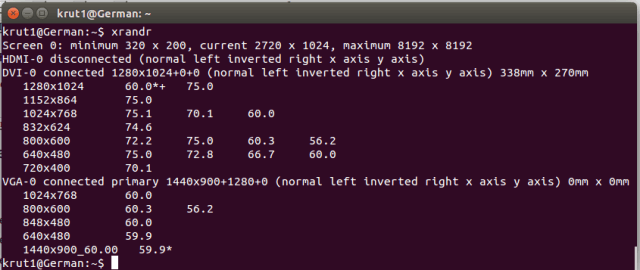
Вы можеет увидеть здесь два видеовыхода: DVI-0 и VGA-0, а ниже доступные разрешения для каждого из мониторов на этих видеовыходах. У вас выходы могут называться по разному: LVDS1 — экран ноутбука, VGA1 — экран, подключаемый через VGA, DVI1 — экран, подключаемый через DVI, HDMI — экран, подключенный через HDMI.
итак, если нужное вам разрешение присутствует в списке разрешений для вашего монитора, то применить его можно очень просто: xrandr —output Название_выхода —mode Режим. В моем случае команда будет выглядеть так:
xrandr --output DVI-0 --mode 1280x1024 Вуаля, на вашем мониторе уже должно смениться разрешение 🙂
Добавление нового разрешения монитора в Linux
А что же делать, если нужного нам разрешения нет в предлагаемых? А вот что: можно просто добавить необходимое разрешение вручную. Для этого найдите характеристики вашего монитора и посмотрите, какое разрешение он поддерживает и на какой частоте. ВНИМАНИЕ! Если вы укажите частоту, на которой монитор работать не может, то потеряете графический интерфейс вашего Linux’а.
Ну к примеру, мы выяснили, что монитор Acer AL1916W отлично работает с разрешением 1440×900 на частоте в 60Гц. Давайте сгенерим для него так называемый конфиг командой cvt:
Вывод команды будет таким:

Отсюда нам нужна вторая строчка, а именно все, что находится после «Modeline»:
«1440x900_60.00» 106.50 1440 1528 1672 1904 900 903 909 934 -hsync +vsync
Далее мы создаем принципиально новый режим:
xrandr --newmode "1440x900_60.00" 106.50 1440 1528 1672 1904 900 903 909 934 -hsync +vsync Осталось только привязать только что созданный режим к нужному монитору. Помните, в начале статьи мы смотрели, на каком выходе какой из мониторов? Привязка режима к конкретному монитору (выходу) делается так:
xrandr --addmode VGA-0 1440x900_60.00 xrandr --output VGA-0 --mode 1440x900_60.00 Ну вот, ваш монитор погас, включился и вы уже довольны 🙂
Добавление новой конфигурации монитора в автозагрузку
Да да да, вы спросите, и что, делать это каждый раз, когда запускается компьютер?
Нет, каждый раз делать этого не надо: просто не выключайте свой комп 🙂 Шучу. Можно просто добавить эту конфигурацию в автозагрузку, и Linux сам будет все это прекрасно делать при запуске. Как? Давайте по шагам:
Ну на будущее лучше создать в домашнем каталоге папку «.bin», в которой будут храниться все исполняемые скрипты (поверьте, пригодится). Ну и сразу перейдем в эту папку:
В папке создадим файл, назовем его, к примеру, load_screen.sh:
Открываем файл и добавляем в него все наши команды по созданию и добавлению режима монитора. Открыть файл:
Содержимое файла (для монитора, о котором идет речь в этой статье):
#!/bin/bash xrandr --newmode "1440x900_60.00" 106.50 1440 1528 1672 1904 900 903 909 934 -hsync +vsync xrandr --addmode VGA-0 1440x900_60.00 xrandr --output VGA-0 --mode 1440x900_60.00 Закрываем (Ctrl+X) и сохраняем. Теперь нам надо на файл выставить права, чтоб его можно было выполнять, как команду:
Ну и осталось добавить его в так называемый автозапуск.
Для Ubuntu c 12.04 до 13.10 надо править следующий файл: /etc/lightdm/lightdm.conf, для Ubuntu 14.04 и выше — /usr/share/lightdm/lightdm.conf.d/50-unity-greeter.conf. Итак, открываем файл:
sudo nano /usr/share/lightdm/lightdm.conf.d/50-unity-greeter.conf И в конец файла дописываем путь к нашему исполняемому скрипту. В итоге, файл 50-unity-greeter.conf у меня выглядит так (не забудьте, что имя пользователя у вас точно другое):
[SeatDefaults] greeter-session=unity-greeter display-setup-script=/home/krut1/.bin/load_screen.sh Всё! После перезагрузки разрешение монитора у вас уже должно сразу примениться. Ставьте лайки, друзья, если этот матриал был для вас полезен 😉

Понравилась или помогла статья? Самое лучшее, что ты можешь сделать — это поделиться ею в любой из своих соцсетей (даже если ты поделишься в твиттере или google+, которыми ты не пользуешься — это очень поможет развитию моего блога). Спасибо! А если ты еще и оставишь любой комментарий снизу в обсуждениях, то это будет двойное СПАСИБО!
Ссылка на статью на всякий случай:
 Крутов Герман © 2009-2023
  krutovgerman2007@ya.ru
  Я ВКонтате