- Zabbix — включаем шифрование для Агента (Agent Encryption)
- Установка Агента
- Создаем ключ PSK
- Настройка агента
- Установка службы и запуск
- Установка агента Zabbix в Linux
- Enable PSK Encryption for Zabbix Agents
- PSK behind a Proxy
- Troubleshooting
- Configuring PSK keys for Zabbix agent on Ubuntu and Windows
- Configuring the server
- Configuring PSK keys on the Ubuntu agent
- Configuring PSK for the Windows agent
- Conclusion
Zabbix — включаем шифрование для Агента (Agent Encryption)
Если необходимо шифровать соединение между агентом и сервером нам потребуется включить шифрование. Можно использовать шифрование по сертификату или по PSK (ключу Pre-Shared Key). В этом примере я рассмотрю именно PSK, т.к. это на мой взгляд самый удобный способ шифрования: ключ сгенерировать легко и просто, так же можно использовать несколько ключей.
Установка Агента
Если у нас Linux или что-то подобное — нам повезло, ставим агента при помощи apt, rpm и прочих удобных штук, агент уже идет со всеми необходимыми библиотеками. Если Windows — придется немного поработать руками. Загружаем агента отсюда: https://www.zabbix.com/download_agents при этом нам нужна версия с поддержкой шифрования (в поле Encryption должно быть написано OpenSSL).
Распаковываем агента в папку, например C:\Zabbix
[Устарело, официальный агент уже слинкован со всеми библиотеками]
Теперь нам нужны библиотеки OpenSSL. Самое лучшее — взять вот отсюда https://support.zabbix.com/browse/ZBXNEXT-3047 уже собранный агент Zabbix. Т.к. у них версии агентов часто довольно старенькие, можно брать последнюю версию — из нее мы и выковыряем библиотеки. Вытаскиваем из архива файлы libcrypto-1_1.dll, libssl-1_1.dll и msvcr120.dll в нашу папку C:\Zabbix
Создаем ключ PSK
For example, a 256-bit (32 bytes) PSK can be generated using the following commands: with OpenSSL: $ openssl rand -hex 32 af8ced32dfe8714e548694e2d29e1a14ba6fa13f216cb35c19d0feb1084b0429 with GnuTLS: $ psktool -u psk_identity -p database.psk -s 32 Generating a random key for user 'psk_identity' Key stored to database.psk $ cat database.psk psk_identity:9b8eafedfaae00cece62e85d5f4792c7d9c9bcc851b23216a1d300311cc4f7cb Note that “psktool” above generates a database file with a PSK identity and its associated PSK. Zabbix expects just a PSK in the PSK file, so the identity string and colon (':') should be removed from the file. Полученный ключ сохраняем в файл zabbix_agentd.psk и копируем его в C:\Zabbix
Настройка агента
Добавляем в файл zabbix_agentd.conf настройки шифрования:
TLSConnect=psk TLSAccept=psk TLSPSKIdentity=PSK001 TLSPSKFile=C:\Zabbix\zabbix_agentd.psk
Установка службы и запуск
Установка в качестве службы:
zabbix_agentd.exe --config "C:\Zabbix\conf\zabbix_agentd.conf" --install
Установка агента Zabbix в Linux
В этой статье мы рассмотрим, как установить агент Zabbix в Linux, подключить его к серверу и наcтроить шифрование данных с помощью PSK.
Для установки агента Zabbix в Linux вам нужно подключить официальный репозиторий. Проверьте версию Linux на вашем сервере, перейдите на сайт https://www.zabbix.com/download, выберите версию Zabbix Server, и версию дистрибутива Linux.
Для вас будет сгенерирован набор команд для установки репозитория и агента.

В моем случае для установки Zabbix Agent2 на Ubuntu 22.04 LTSC нужно выполнить следующие шаги.
Установить репозиторий Zabbix и обновить кеш менеджера пакетов:
$ wget https://repo.zabbix.com/zabbix/6.2/ubuntu/pool/main/z/zabbix-release/zabbix-release_6.2-4%2Bubuntu22.04_all.deb
$ sudo dpkg -i zabbix-release_6.2-4+ubuntu22.04_all.deb
$ sudo apt update
Теперь можно установить Zabbix agent2:
$ sudo apt install zabbix-agent2

Запустите службу агента Zabbix и добавьте его в автозагрузку.
$ sudo systemctl restart zabbix-agent2
$ sudo systemctl enable zabbix-agent2
Проверьте, что агент Zabbix запущен:
$ sudo systemctl status zabbix-agent2

Теперь нужно отредактировать конфигурационной файл агента:
$ sudo mcedit /etc/zabbix/zabbix_agent2.conf
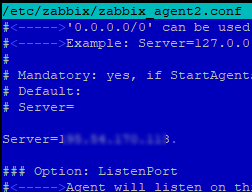
Server=ИМЯ_или_IP_Zabbix_Server ServerActive=ИМЯ_или_IP_Zabbix_Server Hostname= appsrvub1
appsrvub1 – это вашего имя узла, который мы добавим далее на сервер мониторинга Zabbix.
В Zabbix доступны два режима проверки агентов:
- Пассивный режим – данные запрашиваются сервером Zabbix
- Активный режим – агент сам отправляет данные на сервер Zabiix (в моем случае сервер с агентом находится за NAT, поэтому для него я буду использовать активный режим)
Можно полностью отключить пассивные проверки:
Перезапустите агент Zabbix.
$ sudo systemctl restart zabbix-agent2
Проверьте, что агент успешно запустился:
Агент подключается к серверу на порт TCP/10051. Поэтому порт не должен блокироваться файерволами. Вы можете проверить доступность Zabbix Server с хоста с помощью netcat:
Теперь нужно добавить новый агент через веб-интерфейс Zabbix.
- Перейдите в раздел Configuration -> Hosts и нажмите Create host;
- Укажите имя хоста (должно соответствовать значению в конфигурационном файле агента);
- Назначьте шаблон (в моем случае это Linux by Zabbix agent active) и группу хостов;
- Т.к. мой агент Zabbix находится за NAT, для интерфейса агента не нужно указывать IP адрес. Просто укажите 0.0.0.0.

- Сохраните изменения.
- Теперь проверьте, что сервер Zabbix получает данные с агента. Перейдите в Monitoring ->Latest Data, выберите в поле Hosts нужный вам хост и нажмите Apply. Как вы видите данные с агента теперь доступны на сервере Zabbix.


По умолчанию агент Zabbix передает данные на сервер в открытом виде. Если данные от агентов поступают на сервере через публичную сеть Интернет, нужно настроить шифрование с помощью pre-shared ключей (PSK).
Подключитесь к агенту и сгенерируйте 256 битный PSK ключ с помощью openssl:
# openssl rand -hex 32 > /etc/zabbix/zabbix_agent.psk
# chown zabbix:zabbix /etc/zabbix/zabbix_agent.psk
# chmod 400 /etc/zabbix/zabbix_agent.psk
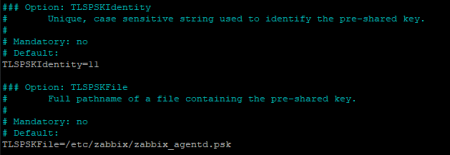
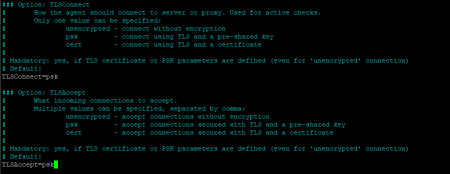
Теперь добавьте информацию о PSK ключе шифрования в конфигурационный файл:
TLSConnect=psk TLSAccept=psk TLSPSKFile=/etc/zabbix/zabbix_agent.psk TLSPSKIdentity=appsrvub1_PSK

Сохраните файл и перезапустите агент Zabbix:
$ sudo systemctl restart zabbix-agent2
Скопируйте значение PSK ключа:
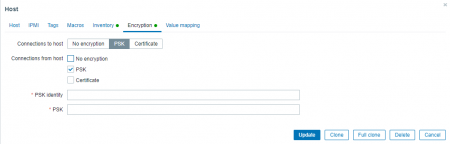
Теперь нужно указать ваш PSK ключ в настройках хоста на сервере Zabbix.
- Откройте настройки хоста и перейдите на вкладку Encryption;
- Включите опцию PSK;
- Вставьте значение TLSPSKIdentity из конфигурационного файла агента в PSK Identity;
- Вставьте ваш PSK ключ в следующее поле;
- Нажмите кнопку Update.

- Если вы все настроили правильно, в информации о хосте в Zabbix будет указано, что агент использует соединение с PSK шифрованием.


Enable PSK Encryption for Zabbix Agents
By default, agent communication is done in clear text.
For encryption, we have an option to use PSK-based encryption.
The PSK option consists of two important values, the PSK identity and the PSK Secret.
The secret should be minimum a 128-bit (16-byte PSK, entered as 32 hexadecimal digits) up to 2048-bit (256-byte PSK, entered as 512 hexadecimal digits)
You can generate a 256 bit PSK secret on your server with OpenSSL using the command
Or you can just generate a random 256 bit 32 byte hex using this button below
In this example, I also save it straight to a file.
I first create and navigate to a folder
openssl rand -hex 32 > secret.psk I also make sure that only the Zabbix user can read the file.
chown zabbix:zabbix secret.psk Furthermore, I then reconfigure the Zabbix agent configuration file.
sudo nano /etc/zabbix/zabbix_agentd.conf And change the options near the bottom,
TLSConnect=psk TLSAccept=psk TLSPSKFile=/home/zabbix/secret.psk TLSPSKIdentity=[any text] The TLSPSKIdentity value you decide will not be encrypted on transport, so don’t use anything sensitive.
sudo service zabbix-agent restart I then go into the Zabbix Server User interface and configure the PSK encryption options for the host.
‘Connections from host’ = PSK
‘PSK Identity’ = [what ever you used in the Zabbix agent config]
‘PSK’ = [the long hex string generated from the OpenSSL command above]
After a minute or two, the Zabbix Server and Agent will successfully communicate using PSK encryption.
PSK behind a Proxy
Setting up PSK encryption on Agents behind a proxy is not necessary if they are all running on the same internal private network, unless your security policy also recommends a certain level of encryption on your internal networks as well.
What you should do first instead, is enable PSK for communications between your Zabbix Server and Zabbix Proxy.
You should create a new secret, and add the PSK Identity and Secret to Administration ⇾ Proxies ⇾ [Your proxy] ⇾ Encryption and also adjust the settings inside the proxies own configuration file at /etc/zabbix/zabbix_proxy.conf
If setting up PSK encryption for agents behind a Zabbix proxy, ensure your have Zabbix Server ⇽⇾ Proxy PSK enabled first. This is because, when you start the Proxy, or do a config_cache_reload, the Proxy will download all its host settings from the server, and this also includes the servers copy of the secret. The proxy needs to know the secret since it is now managing the communications on behalf of the server.
If you want PSK encryption for any Agents behind a proxy, then you continue to set up the Agents as normal by creating a new secret, editing there Configuration ⇾ Hosts ⇾ [Your Host] ⇾ Encryption page, and also editing their own configuration file at /etc/zabbix/zabbix_agentd.conf.
Remember that, since your Agents Host configuration in the Zabbix UI will be set as Monitored by Proxy, the PSK settings will be applicable for communications happening between the Zabbix Proxy and the Agent that it is monitoring. Not between the Zabbix Server and the Agent behind the proxy.
You can also add PSK Encryption between your Zabbix Proxy and its own local Agent if you want. You would set its PSK settings in the Proxy Agents host configuration at Configuration ⇾ Hosts ⇾ [Your proxy] ⇾ Encryption, and modify the settings in the agents on configuration file at /etc/zabbix/zabbix_agentd.conf. Remember, this is only applicable to communications between the Zabbix Proxy, and its own Agent process.
When setting up PSK encryption for the Zabbix Server, Proxy and Agents, you may see an error in the Proxy logs,
cannot send proxy data to server at «zabbix.your-domain.tld»: connection of type «TLS with PSK» is not allowed for proxy «your-proxy».
Check that your Zabbix Server ⇽⇾ Proxy PSK settings are correct first. Don’t get confused between the Proxies own optional agent process, and its main Proxy process which is required.
Troubleshooting
Check the Zabbix agent logs at
tail -f /var/log/zabbix/zabbix_agentd.log Configuring PSK keys for Zabbix agent on Ubuntu and Windows
Zabbix have inbuilt encryption between parts of its monitoring network with PSK keys or certificates. Let’s look into configuring PSK encryption for the Zabbix agents.
Configuring the server
First, let’s configure the encryption mode of the host we want to use.
Open the web interface, go to Configuration -> Hosts, go to the host you want to configure PSK for, and open the Encryption tab. By default all connections are unencrypted, unmark that checkbox and choose the PSK option.
In the ‘PSK identity’ line write an ID for your key. After that create a key with any password generator of your choosing or use your own, then put it in the PSK line. Click Update.
Configuring PSK keys on the Ubuntu agent
Now we need to make a .psk file for storing the key accessible for the agent user, /etc/zabbix/zabbix_agentd.psk for example, paste your password inside the file.
Delete # symbol from the TLSConnect and TLSAccept lines, change their value to psk, and after that edit these lines to the end of the file:
TLSPSKFile=(path to key file)
TLSPSKIdentity=(ID of your key)
Restart the agent for the changes to take place.
Configuring PSK for the Windows agent
For the Windows version modify C:\\\\Program Files\\\\Zabbix Agent\\\\zabbix_agentd.conf file in the same way as those described earlier in the Ubuntu part.
Make zabbix_agentd.psk file in the default agent folder with your PSK in it.
Don’t forget to restart the agent in the services menu.

![]()
Conclusion
In this guide, we discovered how to set up PSK authorization on Windows and Ubuntu Zabbix Agents.