Boot drops to a (initramfs) prompts/busybox
I am running an HP pavilion dv6000 dual boot win7 and Ubuntu 12.04. (well, up until today). After a reboot, the boot process drops to the BusyBox shell and I end up at the prompt:
BusyBox v1.18.5 (Ubuntu 1:1.18.5-1ubuntu4) built-in shell (ash) Enter 'help' for a list of built-in commands. (initramfs) I’ve been researching others who have had this same problem, but haven’t been able to find any of those solutions to work for me. I tried the method described here, and after the final command
mount -t ntfs-3g /dev/sda1 /root -o force it does nothing and gives me another (initramfs) prompt. I can boot to a live CD (USB) and get to a terminal, but it doesn’t seem to do much good, as I can see the /dev/sda1 in the ls command, but it doesn’t recognize it when I try to cd to it. One more question: using the command fdisk -l how can I tell which mount point ( sda1 / sda2 ) is my windows partition and which one is Ubuntu?
I can’t believe Canonical hasn’t implemented yet a proper user-friendly workflow to fix this situation 🙁
There has to be a better way to fix the case. You do not need Live Ubuntu for the task, since I have managed to solve it without it. I think you can fix the thing even in (inittramfs) .
@Masi Actually, running fsck from initramfs fixes it in most cases now, but in the ubuntu release that was current when this question was posted, even after fsck was run, the same error was shown on boot again.
This very same issue happens also on Kubuntu 18.04. Whenever system suddenly freeze so I have to hard reset system; then this error occurs. I solved using with ramsudharsan’s solution.
7 Answers 7
While at initramfs console, I passed a command exit to come out of the shell. The same console was presented before me but this time with the exact name of the partition that got corrupted.
BusyBox v1.18.5 (Ubuntu 1:1.18.5-1ubuntu4) built-in shell (ash) Enter 'help' for a list of built-in commands. (initramfs) exit /dev/mapper/ubuntu--vg-root: UNEXPECTED INCONSISTENCY; RUN fsck MANUALLY. (i.e., without -a or -p options) fsck exited with status code 4. The root filesystem on /dev/mapper/ubuntu--vg-root requires a manual fsck. BusyBox v1.18.5 (Ubuntu 1:1.18.5-1ubuntu4) built-in shell (ash) Enter 'help' for a list of built-in commands. (initramfs) fsck /dev/mapper/ubuntu--vg-root -y fsck from util-linux 2.27.1 e2fsck 1.42.13 (17-May-2015) /dev/mapper/ubuntu--vg-root contains a file system with errors, check forced. After the checking is done, I rebooted the system.
BusyBox v1.18.5 (Ubuntu 1:1.18.5-1ubuntu4) built-in shell (ash) Enter 'help' for a list of built-in commands. (initramfs) reboot If reboot doesn’t work, try exit .
and that’s it, I got back into the filesystem without any errors.
I had to reboot once to see the inconsistency error. Then I just followed this and everything was clean. Thanks!
This worked on Ubuntu 16.04, thanks! My solution was fsck /dev/sda1 -y and it took 20 seconds (imgur.com/a/S90z5)
@Matt Enable the keyboard option in BIOS settings (If you have disabled keyboard during boot-up, hold the power button until you hear the reset sound from the board)
Actually the solution is easy just write the command of fsck /dev/sdax like the below and give Y if the console ask for fixing something:
X specifies mounted disk part number.
If you don’t want to manually press ‘y’ every time it asks for a fix, you can also run the command with the -y option.
Get an image of the disk before doing this. It will modify the filesystem and you could lose all your files.
On my system fsck is not recognized as a command — it’s not in the list of built-in commands when typing help. So it’s not a fix for every time this problem occurs.
@efkan: Fair comment, it’s PoP!_OS by System76, but my impression is that the only difference from vanilla Ubuntu is graphics/user interface, and not in the base system. In addition, I’m tri-booting on a Mac, so obviously there are system differences, but my only comment is that contrary to the other comments, this is not a solution for everyone.
The best and the easiest solution. But my question is why this happens. It’s not that it happened onli in my system, many other have faced the same problem. But why?
Note: Try this answer if you continue to face the issue even after attempting the steps in @ramsudharsan’s answer. If you have not tried following those instructions yet I recommend you to do so since that seems to fix the problem in most cases.
It seems that you have a bad superblock. To fix this:
Firstly, boot into a live CD or USB
Find out your partition number by using
sudo fdisk -l|grep Linux|grep -Ev 'swap' Then, list all superblocks by using the command:
sudo dumpe2fs /dev/sda2 | grep superblock Replace sda2 to your drive number
You should get a similar output like this
Primary superblock at 0, Group descriptors at 1-6 Backup superblock at 32768, Group descriptors at 32769-32774 Backup superblock at 98304, Group descriptors at 98305-98310 Backup superblock at 163840, Group descriptors at 163841-163846 Backup superblock at 229376, Group descriptors at 229377-229382 Backup superblock at 294912, Group descriptors at 294913-294918 Backup superblock at 819200, Group descriptors at 819201-819206 Backup superblock at 884736, Group descriptors at 884737-884742 Backup superblock at 1605632, Group descriptors at 1605633-1605638 Backup superblock at 2654208, Group descriptors at 2654209-2654214 Backup superblock at 4096000, Group descriptors at 4096001-4096006 Backup superblock at 7962624, Group descriptors at 7962625-7962630 Backup superblock at 11239424, Group descriptors at 11239425-11239430 Backup superblock at 20480000, Group descriptors at 20480001-20480006 Backup superblock at 23887872, Group descriptors at 23887873-23887878 Choose an alternate superblock from this list, for this case alternate superblock # 32768
Now, to check and repair a Linux file system using alternate superblock # 32768:
sudo fsck -b 32768 /dev/sda2 -y The -y flag is used to skip all the Fix? questions and to answer them all with a yes automatically
You should get similar output like this:
fsck 1.40.2 (12-Jul-2007) e2fsck 1.40.2 (12-Jul-2007) /dev/sda2 was not cleanly unmounted, check forced. Pass 1: Checking inodes, blocks, and sizes Pass 2: Checking directory structure Pass 3: Checking directory connectivity Pass 4: Checking reference counts Pass 5: Checking group summary information Free blocks count wrong for group #241 (32254, counted=32253). Fix? yes Free blocks count wrong for group #362 (32254, counted=32248). Fix? yes Free blocks count wrong for group #368 (32254, counted=27774). Fix? yes . /dev/sda2: ***** FILE SYSTEM WAS MODIFIED ***** /dev/sda2: 59586/30539776 files (0.6% non-contiguous), 3604682/61059048 blocks Now try mounting the partition
Now, try to browse the filesystem with the following commands
cd /mnt mkdir test ls -l cp file /path/to/safe/location If you are able to perform the above commands, you have most probably fixed your error.
Now, restart you computer and you should be able to boot normally.
Не загружается Ubuntu/Mint/Kali с initramfs в BusyBox

22.11.2019

VyacheslavK

Ubuntu

комментариев 13
В данной статье мы рассмотрим варианты решения проблем, когда виртуальный или физический серверы на базе Ubuntu/Mint/Kali не загружаются и отваливается в busybox в момент инициализации initramfs. При этом Linux не загружается, и пользователю доступна только командная строка initramfs.
Initramfs – это начальная файловая система в ОЗУ, основанная на tmpfs, которая не использует отдельное блочное устройство. Как и initrd, она содержит утилиты и скрипты, требуемые для монтирования файловых систем перед вызовом init, который располагается на корневой файловой системе.

Проблема с суперблоком
Если Ubuntu свалилась в busybox при инициализации initramfs, возможно на диске оказался испорченный суперблок. Linux хранит несколько копий суперблоков.
Для восстановления в случае такой проблемы, нам нужно загрузиться с образа/диска и запустить Terminal. После загрузки, в терминале вводим команду:
# sudo fdisk -l|grep Linux|grep -Ev ‘swap’
Команда вернет информацию о нашем разделе:
/dev/vda2 4096 83884031 83879936 40G Linux filesystem
Запомните имя раздела и укажите его в следующей команде:
# sudo dumpe2fs /dev/vda2 | grep superblock
Команда вернет список запасных суперблоков:
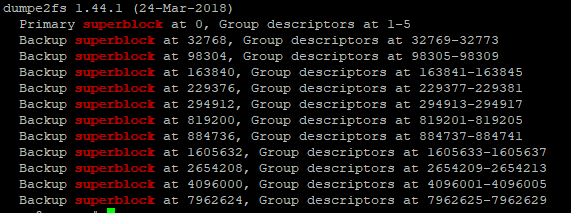
Мы будем использовать второй резервный суперблок для замены поврежденного (можно выбрать любой, кроме Primary). Выполним проверку диска с использованием резевного суберблока для восстановления:
# sudo fsck -b 98304 /dev/vda2 -y
fsck from util-linux 2.31.1 e2fsck 1.44.1 (24-Mar-2018) /dev/vda2 is mounted. e2fsck: Cannot continue, aborting
Нужно отмонтировать раздел:
# umount /dev/vda2
После успешного выполнения замены суперблока, вы должны получить такое сообщение:
fsck from util-linux 2.31.1 e2fsck 1.44.1 (24-Mar-2018) /dev/vda2 was not cleanly unmounted, check forced. Pass 1: Checking inodes, blocks, and sizes Pass 2: Checking directory structure Pass 3: Checking directory connectivity Pass 4: Checking reference counts Pass 5: Checking group summary information Free blocks count wrong for group #231 (32254, counted=32253). Fix? yes Free blocks count wrong for group #352 (32254, counted=32248). Fix? yes Free blocks count wrong for group #358 (32254, counted=27774). Fix? yes . /dev/vda2: ***** FILE SYSTEM WAS MODIFIED ***** /dev/vda2: 85986/905464576 files (0.2% non-contiguous), 3904682/905464576 blocks
Теперь перезагрузите компьютеры, отключив диск с дистрибутивом и все должно быть в порядке.
Ошибка диска fsck
Второй вариант ошибки, наличие следующей строки в окне терминала:
/dev/sda1: UNEXPECTED INCONSISTENCY; RUN fsck MANUALLY The root filesystem on /dev/sda1 requires a manual fsck.

Если вы не видите такой ошибки, попробуйте ввести (initramfs) exit в окне терминала. Ошибка может появиться после этого..
В ошибке будет указан том, который требует запуска ручной проверки диска. В командной строке initramfs выполните:
После полной проверки, нужно перезапустить сервер и проверить все ли в порядке.
Ошибка диска: /dev/sda1 does not exist
Проблема с fstab
Если при загрузке сервера вы видите ошибку:
ALERT! /dev/sda1 does not exist. Dropping to a shell.
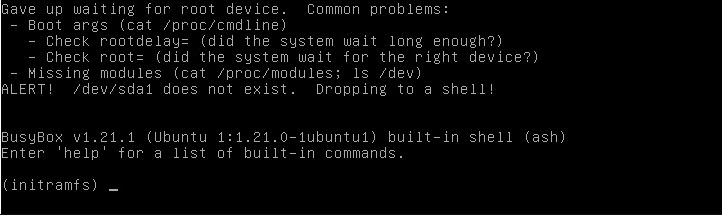
Скорее всего вы только что установили Linux или то на вашем сервере есть проблемы в fstab. Чаще всего проблема возникает при установке системы с usb-накопителя. Раздел на который ругается система, может быть какой угодно. Как и в первом случае, нам нужно загрузиться с образа системы и выполнить некоторые действия. Проверьте UUID диска командой:
Система выдаст что-то подобное:
/dev/sda2: UUID="36cce3d5-cbdb-46f4-adbf-3f9aaa01d729" TYPE="ext4" PARTUUID="fea4dab1-4e12-4327-85c6-76ade18f64e1"
Отсюда уже видно, что система должна загружаться с sda2, а по факту загружается с sda1.
Монтируем наш раздел в любую директорию, например:
Получаем в директории /mnt весь наш раздел /dev/sda2, находим там файл /etc/fstab и изменяем строку, содержащую /dev/sda1 на:
UUID=36cce3d5-cbdb-46f4-adbf-3f9aaa01d729 / ext4 errors=remount-rw 0 1
Сохраняем файл. Отмонтируем раздел от /mnt и перезагрузимся, если проблема была связана с не неправильным адресом разделе, сервер загрузится.
Так же данный вариант можно решить, загрузившись в emergency. Перемонтируйте корень для записи:
После чего измените fstab и перезапустите сервер.
Проблема с железом
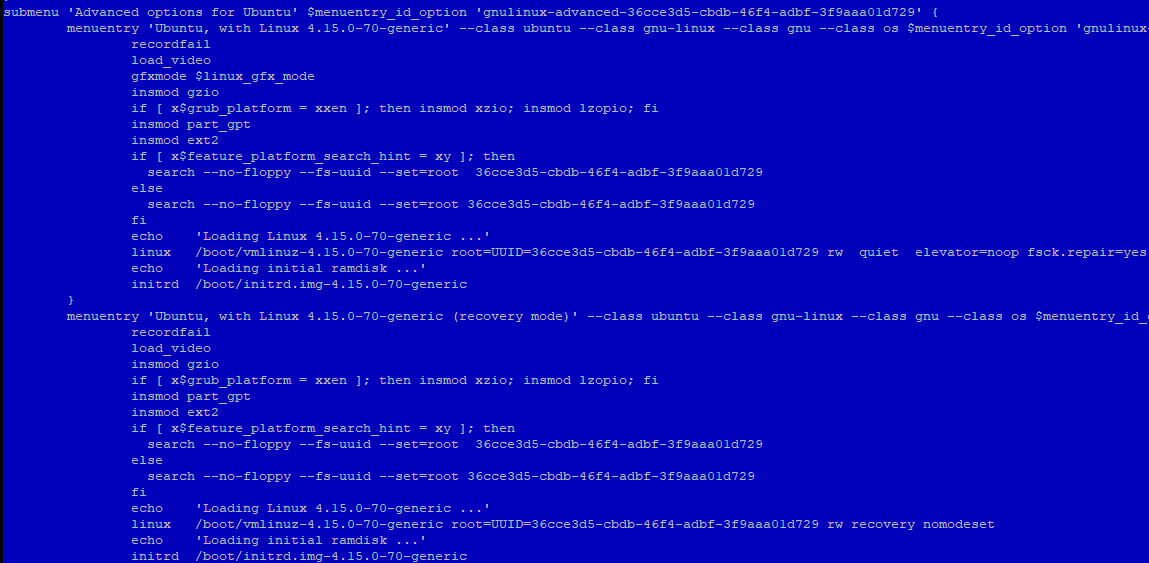
На некоторых материнских платах порты SATA могут получать произвольные номера. Это также может вызвать описанную в предыдущем пункте ошибку. Для исправления ошибки нужно изменить загрузчик grub.
Загрузитесь в режиме emergency или с live-cd и измените файл /boot/grub/grub.cfg
В строке где происходит загрузка раздела, например:
Linux /boot/vmlinuz-4.15.0-70-generic root=/dev/sda1 rw quiet elevator=noop fsck.repair=yes
Измените путь до диска на UUID:
Linux /boot/vmlinuz-4.15.0-70-generic root=UUID=36cce3d5-cbdb-46f4-adbf-3f9aaa01d729 ro quiet elevator=noop fsck.repair=yes
![]() Предыдущая статья Следующая статья
Предыдущая статья Следующая статья ![]()

Установка и настройка GLPI и FusionInventory, инвентаризация ИТ инфраструктуры
Установка и использование подсистемы Linux (WSL 2) в Windows 10
Zabbix: установка и базовая настройка системы мониторинга
Zabbix: проверка доступности запросом ICMP Ping