- How do I zip up multiple files on command line?
- How to Zip Files and Directories from Linux Command Line
- Zip Command Linux
- Why we use the zip command
- Syntax:
- Install Zip Package on Linux Distributions
- Install Zip on Ubuntu
- Install Zip on Fedora
- Install Zip on CentOS and Redhat
- Zip Files and Directories
- Bzip2 Compression Support
- Level of Compression to Files
- Zip Command Examples
- Password Protected Zip file
- Split Zip Files
- Remove Files From the Zip File
- Adding New files to an Existing Zip File
- Excluding Files, While Creating a Zip File
- Verbose Mode When Creating a Zip File
- Zip Command Options
- Conclusion
How do I zip up multiple files on command line?
Forgive this most basic question, but I couldn’t find a direct answer or simple example on stack exchange. Let’s say I have a folder of files that I would like to compress into one zip file that I can share with my terrible Windows friends (otherwise I’d just use tar and be done with it). It looks like this:
. ├── file1.txt ├── file2.txt ├── file3.txt ├── file.jpg └── test.jpg -@ file lists. If a file list is specified as -@ [Not on MacOS], zip takes the list of input files from standard input instead of from the command line. For example,
cat zip.lst file1.txt file2.txt file3.txt file.jpg test.jpg But it didn’t do anything except create a blank line on the console. And I can keep pushing Enter and it just keeps making more blank lines without seemingly executing the command. After some searching, I realized that I needed to terminate input by pressing Ctrl + D But now I get this error:
zip warning: missing end signature--probably not a zip file (did you zip warning: remember to use binary mode when you transferred it?) zip warning: (if you are trying to read a damaged archive try -F) zip error: Zip file structure invalid (zip.lst) What!? How is my simple list not a «valid file structure»? Back to the manual for more information, and I take a closer look at:
So I try it without -@ , and that at least processes it right away without having to press Ctrl + D but I’m left with the same error. Luckily, I found a comment on an answer to a nearly unrelated question that led me to realize that I needed to explicitly name the zip file. This error’d because by default it was trying to create a zip file called zip.lst . But since that’s the name of my list, one might think that it would simply overwrite it, but no, it was in fact trying to update it. And since the list obviously isn’t a zip file, we get the invalid file structure error, and now it’s clear why it said «probably not a zip file.» So then I tried:
zip files.zip zip.lst adding: zip.lst (deflated 35%) . ├── file1.txt ├── file2.txt ├── file3.txt ├── file.jpg ├── files.zip ├── test.jpg └── zip.lst unzip -l files.zip Archive: files.zip Length Date Time Name --------- ---------- ----- ---- 48 2016-05-24 15:30 zip.lst --------- ------- 48 1 file No! Well, actually that makes sense from standard usage because it just zipped up the one list file I gave it. Finally I tried again with -@ but got the same result. What am I doing wrong? BTW, I know I can use the GUI and do it with my mouse, but I need to script this, and in general I’m faster on the CLI when I know what I’m doing.
How to Zip Files and Directories from Linux Command Line

Zipped files are compressed formats of the actual content, which makes the files or directories take less data space on the device hosting them. Zipping makes files easily transferable from one device to the other.
In Linux system, zipping one or more files might seem tricky with the GUI of the operating system, but with just a line of commands through the Linux terminal, zipping your desired files or folders can be faster and more straightforward.
In this tutorial, we learn how to zip files and directories in Linux using the zip command.
Zip Command Linux
zip command is used to package a set of files in the system. It will put one or more compressed files into a single zip archive file with the .zip extension. You can easily create an entire directory into zip archives using a single command.
Using the zip command can make file upload, emailing, or in fact, downloading files faster and more compact regardless of the number of files and their size.
Zip files work by encoding into fewer bites by removing redundant data. It supports lossless data compression and the cross-compatibility of devices and operating systems. Zip compression works betters for text files than MP3 or JPG files.
By default, zip uses the deflation compression method. Zip cannot guarantee is compress all files if cannot it uses the store method to keep it as it is. You may use bzip2 compression as option to replace deflate compression method.
You can use unzip command to extract zip files and by default the extracted files are stored in your current directory.
Why we use the zip command
The zip program puts multiple files in a single zip archive to achieve the following:
- Reduce file size.
- To transfer files faster between two servers.
- Compress files into single zip archive files.
- Saving disk space.
- Temporarily compressing unused files.
Syntax:
The syntax of the Zip command:
zip OPTIONS ARCHIVE_NAME FILESThe “OPTIONS” refer to the action that the zip command will follow through such as recursive (-r), quiet (-q), removal (-d), etc.
ARCHIVE_NAME or ARCHIVE is the name you want to save the zip as, and FILES or INPATH is the name of the files or directories you are attempting to zip.
Install Zip Package on Linux Distributions
When you initiate a zip command most commonly you may end up seeing the error «zip command not found». This is because zip package is not installed on your Linux distribution.
Let’s first check how to install zip on Linux.
Install Zip on Ubuntu
To install zip utility on Ubuntu and Debian, type:
The command will prompt you to input your password in order to grant root user privilege.
Install Zip on Fedora
On the Fedora distribution of Linux, open your terminal and install zip using the following command:
Install Zip on CentOS and Redhat
On Redhat (RHEL) or CentOS Stream, installing zip will be through the following command:
Zip Files and Directories
Let’s check how to zip files and directories using the zip command.
To zip a single file named filename1 to a zip file named archive_output_file.zip, type:
zip archive_output_file.zip filename1
To confirm the zip file created, you can use ls command:

You can see that archive_output_file.zip the zipped file now exists in your current directory.
To zip multiple files, use the following command:
zip archive_output_file.zip filename1 filename2 filename3
In the above output, deflated means the file is compressed using deflate compression method and store means stored to archive but not compressed.
To zip an entire directory structure use -r option. This will enable the zip command to zip the directory recursively i.e zipping the folder along with all the files in that same directory.
To zip a directory structure recursively, run the following command:
zip -r archive_output_file.zip directory1You may specify multiple directories to get it all compressed in the zip file:
zip -r archive_output_file.zip directory1 directory2 directory3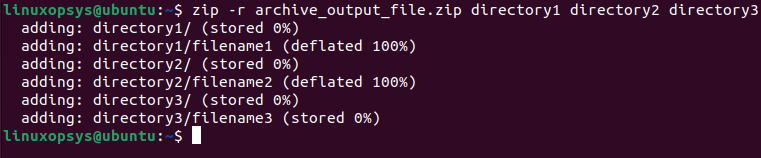
To archive all the files including the hidden files in a specified directory, type:
zip archive_output_file.zip .* *To suppress zip output which is by default showing file names that are being added to the archive and compression method, use -q option.
Bzip2 Compression Support
Zip allows support for bzip2. When bzip2 is enabled, the default compression deflate is replaced.
Use -Z option to specify the compression method:
zip -r -Z bzip2 archive_output_file.zip directory1
Level of Compression to Files
Zip command allows to regulate the speed of compression. The levels range from 0 to 9, where level 0 ( fastest compression speed ) stores files without compression and level 9 which is the optimal compression level (slowest compression speed).
Zip automatically chooses level 6 as the default compression level when archiving files.
For example, to zip all the txt files in the current working directory without compressing them by using level 0 compression, type:
zip -0 archive_output_file.zip *.txtHigher compression levels would give more stress on the CPU and time-consuming.
Zip Command Examples
Let’s look at some zip command examples showing functionalities for manipulating an archive.
Password Protected Zip file
You can protect your files in the archive file using the -e option. This keeps your files encrypted.
You will be prompted to enter a password to protect the archive file.
zip -e archive_output_file.zip file1 file2 file3
To set the password for an existing archive file, named archived_file.zip, run the following command:
zipcloak archived_file.zipSplit Zip Files
There are certain conditions where your zip file might be very large and it’s restricting you from transferring the file or emailing the file due to size restrictions, then you can split the file into the specified sizes.
To split archives into multiple files, use -s option. For example, the following command split the compressed file named archive_output_file.zip into 10MB for each new archives.
zip -r -s 10m archive_output_file.zip directory1You need to use -F option to combine the split zip files into a single zip archive.
zip -F archive_output_file.zip --out combine_archive.zipYou should combine all split files then you are able to unzip it.
An alternative command to split zip archive is zipsplit.
Remove Files From the Zip File
To delete unwanted files from the zip archive file, use -d option.
In the following example, files named file1 and file2 are removed from the myarchive.zip file.
zip -d myarchive.zip file1 file2
Adding New files to an Existing Zip File
Use -u option to add new files to an existing zip archive. For example, let’s add three new files named file1, file2, and file3 to an already existing file named myarchive.zip file.
zip -u myarchive.zip file4 file5
Excluding Files, While Creating a Zip File
Use -x option to exclude specific files while creating a zip file.
In the following example, we zip everything in my current directory except file1 and file4.
zip mybackup.zip .* * -x file1 file2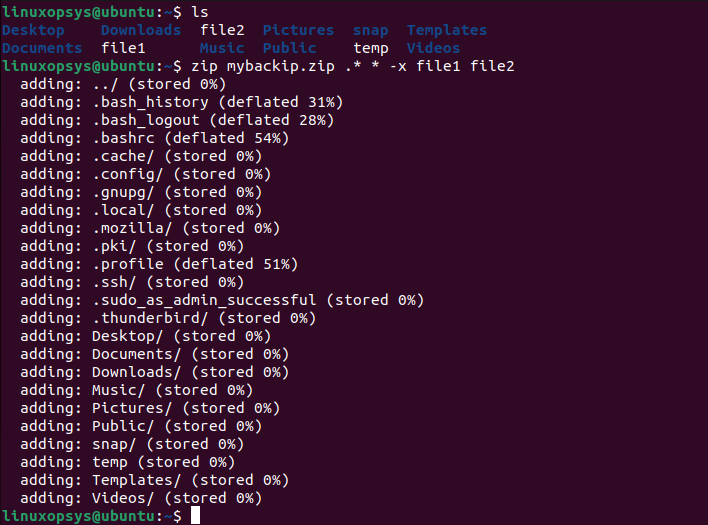
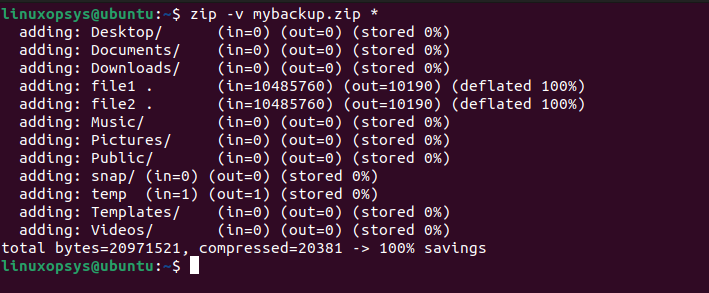
Verbose Mode When Creating a Zip File
The verbose mode prints the diagnostic screen. This shows which file got compressed and how much space each file saved and the total % of compression.
Zip Command Options
Some of the useful zip command options are:
| Options | Description |
|---|---|
| -r | Zip recursively through the directory structure |
| -u | Add new files to the existing zip file |
| -d | Delete entries from a zip file |
| -x | Exclude files or folders while zipping |
| -m | Deletes the original files after making the specified zip archive |
| -0 | Compression level — archives your file without compressing |
| -9 | Highest compresses level |
| -q | Quiet operation whereby output will not be displayed |
| -V | Verbose mode to print diagnostic information |
| -j | This option stores only file names and deletes or junks (don’t record) directory names |
| -e | Encrypt with a password |
| -Z | Set to a specific compression method |
| -D | Do not add entries for directory in zip archive |
| [email protected] | Read the list of input files from the standard input. |
| -f | Updates existing files only |
| -T | Test zip file integrity |
| -F | To fix the offsets |
| -i | To include only the listed filenames |
| -y | Stores symbolic links as such instead of the referenced file |
| -n | Exclude compression to files with given suffixes |
Conclusion
In this tutorial, we learned how to zip files and directories in Linux. The zip command is a very handy command for Linux users that deals with files and directories. This enables Linux users to move, store, or share their files easily.
If this resource helped you, let us know your care by a Thanks Tweet. Tweet a thanks