- Kali linux how to install on usb
- What You’ll Need
- Creating a Bootable Kali USB Drive on Windows (Etcher)
- Creating a Bootable Kali USB Drive on Windows (Rufus)
- Booting A USB Drive In Windows
- Kali linux how to install on usb
- What You’ll Need
- Kali Linux Live USB Install Procedure
- Creating a Bootable Kali USB Drive on Linux (DD)
- Creating a Bootable Kali USB Drive on Linux (DD with status)
- Creating a Bootable Kali USB Drive on Linux (Etcher)
Kali linux how to install on usb
One of the fastest method, for getting up and running with Kali Linux is to run it “live” from a USB drive. This method has several advantages:
- It’s non-destructive — it makes no changes to the host system’s hard drive or installed OS, and to go back to normal operations, you simply remove the Kali Live USB drive and restart the system
- It’s portable — you can carry Kali Linux in your pocket and have it running in minutes on an available system
- It’s customizable — you can roll your own custom Kali Linux ISO image and put it onto a USB drive using the same procedures
- It’s potentially persistent — with a bit of extra effort, you can configure your Kali Linux “live” USB drive to have persistent storage, so the data you collect is saved across reboots
In order to do this, we first need to create a bootable USB drive which has been set up from an ISO image of Kali Linux.
The specifics of this procedure will vary depending on whether you’re doing it on a Linux, macOS/OS X, or Windows system.
What You’ll Need
- A verified copy of the appropriate ISO image of the latest Kali build image for the system you’ll be running it on.
- If you’re running under Windows, there is not one tool that is considered the overall best for imaging. We recommend Etcher(installer or portable) as it is simpler to use, however Rufus is another popular option with its advance options. If one does not work for you, consider the other.
- A USB drive, 8GB or larger (Systems with a direct SD card slot can use an SD card with similar capacity. The procedure is identical.)
During this procedure, you might see some warnings telling you that Kali Linux contains malware, trojan, virus or whatever. This message usually comes from Windows Defender or USB Defender, or a third-party antivirus. Those warnings are expected: Kali Linux is packed with pentesting tools that are likely to be flagged as malware. Just ignore the warnings.
Creating a Bootable Kali USB Drive on Windows (Etcher)
- Plug your USB drive into an available USB port on your Windows PC, note which drive designator (e.g. “ G:\ ”) it uses once it mounts, and launch Etcher.
- Click Flash from file, and locate the Kali Linux ISO file to be imaged with.
- Click Select target and choose the USB drive you want to make bootable.
- Click the Flash! button once ready.
Note: You may get a UAC prompt asking for administrator privileges that you will need to accept.

5. Once Etcher alerts you that the image has been flashed, you can safely remove the USB drive and proceed to boot into Kali with it.
At the time of writing, Etcher will use MBR. This is to allow for the most hardware compatibility.
Creating a Bootable Kali USB Drive on Windows (Rufus)
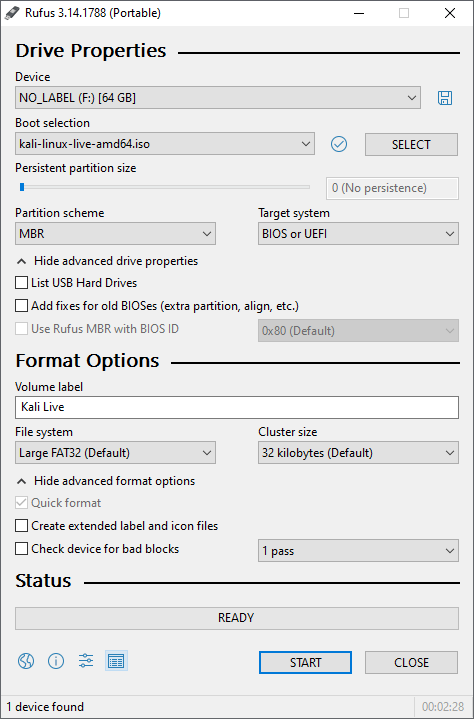
- Plug your USB drive into an available USB port on your Windows PC, note which drive designator (e.g. “ G:\ ”) it uses once it mounts, and launch Rufus.
- With Device, check the dropdown list of options for the USB drive (e.g. “ G:\ ” and size).
- Boot selection needs to point to point to the Kali Linux ISO file, which can be done by clicking the SELECT button
- Depending on your configuration, you can set the Partition scheme, as well as Target system. If you are not sure, leave it as the default values.
While you can easily create a persistent live usb with the integrated options in Rufus by increasing the persistence slider, this is not the officially supported method (check Adding Persistence to a Kali Linux Live USB Drive), as it doesn’t work for all images, like the Kali Everything Live ISO introduced in release 2022.1.
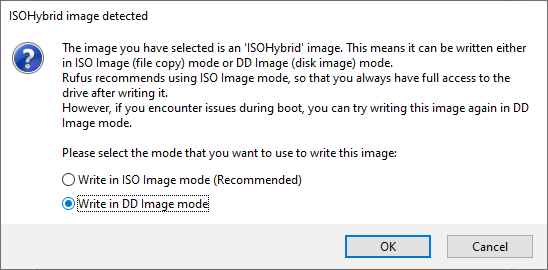
6. You may get a prompt saying about ISOHybird image. Selecting ISO image, will allow you to edit the files from the Kali Linux ISO, but at the potential lose of hardware compatibility. As a result, we recommend selecting DD Image.
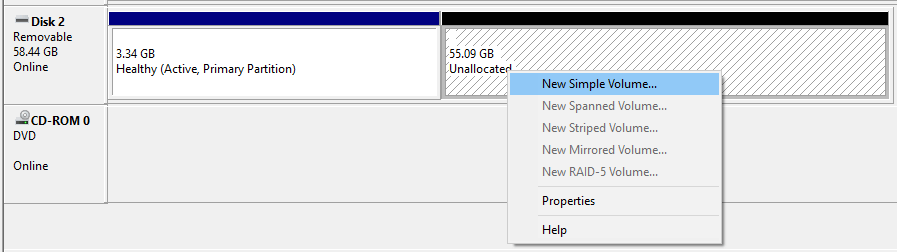
Note: If you select “DD Image” option, you can create another partition on the USB drive, allowing you to use the rest of the space. Start -> Run (Windows + R) -> diskmgmt.msc -> Locate the USB drive -> Right-click in “Unallocated” -> New Simple Volume -> Follow the rest of the wizard with next, next, next…
Booting A USB Drive In Windows
Depending on the system (such as BIOS or UEFI), as well as the version of Windows, and how they are each configured, you may need to re-image the USB drive.
- Master Boot Record (MBR) is often used on legacy systems that use BIOS as well as UEFI which has Compatibility Support Module (CSM) enabled
- GUID Partition Table (GPT) is required where UEFI has CSM disabled, forcing to use the modern standard
After writing the image to the USB drive, reboot Windows with the USB inserted. Depending on the motherboard manufacture, will also depend on the next stage. Some motherboard’s support a “temporary” boot menu, allowing for a one off selection. Others you need to enter BIOS/UEFI to configure it to try and boot from USB first. Entering either location, also depends on the motherboard. You can look up on the manufactures website and read the manual, try and read the screen when booting (however the text may be shown too quick or full logos used), or try common key combinations (such as ESC , F1 , F2 , F3 , F4 , F8 , F10 , F11 , F12 or DEL ).
Updated on: 2023-May-18
Author: g0tmi1k
Kali linux how to install on usb
Our favourite way, and the fastest method, for getting up and running with Kali Linux is to run it “live” from a USB drive. This method has several advantages:
- It’s non-destructive — it makes no changes to the host system’s hard drive or installed OS, and to go back to normal operations, you simply remove the “Kali Live” USB drive and restart the system.
- It’s portable — you can carry Kali Linux in your pocket and have it running in minutes on an available system
- It’s customizable — you can roll your own custom Kali Linux ISO image and put it onto a USB drive using the same procedures
- It’s potentially persistent — with a bit of extra effort, you can configure your Kali Linux “live” USB drive to have persistent storage, so the data you collect is saved across reboots
In order to do this, we first need to create a bootable USB drive which has been set up from an ISO image of Kali Linux.
What You’ll Need
- A verified copy of the appropriate ISO image of the latest Kali build image for the system you’ll be running it on: see the details on downloading official Kali Linux images.
- If you’re running under Linux, you can use the dd command, which is pre-installed, or use Etcher.
- A USB thumb drive, 4GB or larger. (Systems with a direct SD card slot can use an SD card with similar capacity. The procedure is identical.)
Kali Linux Live USB Install Procedure
The specifics of this procedure will vary depending on whether you’re doing it on a Windows, Linux, or macOS/OS X system.
Creating a Bootable Kali USB Drive on Linux (DD)
Creating a bootable Kali Linux USB drive in a Linux environment is easy. Once you’ve downloaded and verified your Kali ISO file, you can use the dd command to copy it over to your USB drive using the following procedure. Note that you’ll need to be running as root, or to execute the dd command with sudo. The following example assumes a Linux Mint 17.1 desktop — depending on the distro you’re using, a few specifics may vary slightly, but the general idea should be very similar. If you would prefer to use Etcher, then follow the same directions as a Windows user. Note that the USB drive will have a path similar to /dev/sdb.
WARNING: Although the process of imaging Kali Linux onto a USB drive is very easy, you can just as easily overwrite a disk drive you didn’t intend to with dd if you do not understand what you are doing, or if you specify an incorrect output path. Double-check what you’re doing before you do it, it’ll be too late afterwards.
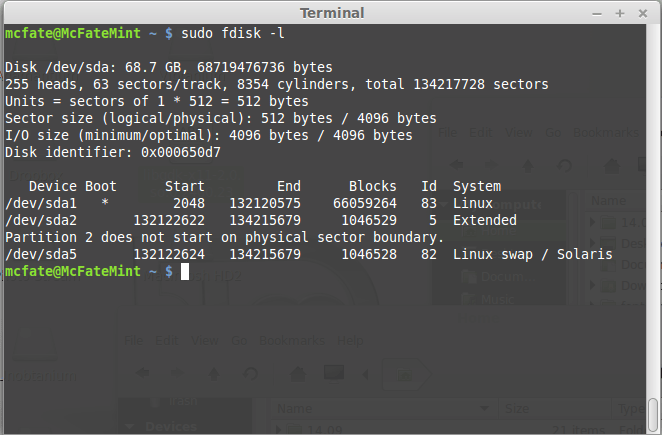
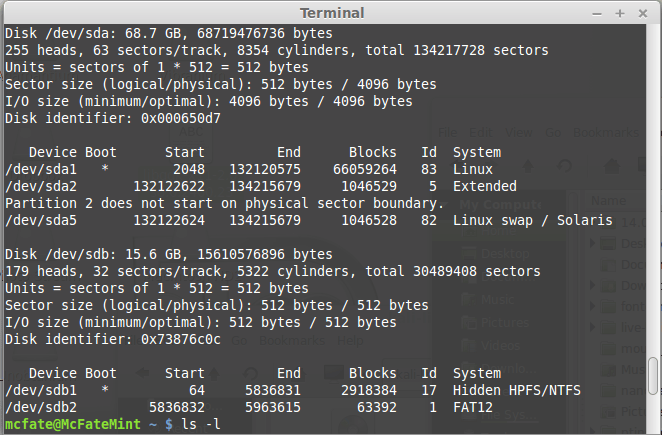
- First, you’ll need to identify the device path to use to write the image to your USB drive. Without the USB drive inserted into a port, execute the command sudo fdisk -l at a command prompt in a terminal window (if you don’t use elevated privileges with fdisk, you won’t get any output). You’ll get output that will look something (not exactly) like this, showing a single drive — “/dev/sda” — containing three partitions (/dev/sda1, /dev/sda2, and /dev/sda5):
2. Now, plug your USB drive into an available USB port on your system, and run the same command, “sudo fdisk -l” a second time. Now, the output will look something (again, not exactly) like this, showing an additional device which wasn’t there previously, in this example “/dev/sdb”, a 16GB USB drive:
3. Proceed to (carefully!) image the Kali ISO file on the USB device. The example command below assumes that the ISO image you’re writing is named “kali-linux-2023.2-live-amd64.iso” and is in your current working directory. The blocksize parameter can be increased, and while it may speed up the operation of the dd command, it can occasionally produce unbootable USB drives, depending on your system and a lot of different factors. The recommended value, “bs=4M”, is conservative and reliable. Additionally, the parameter “conv=fsync” makes sure that the data is physically written to the USB drives before the commands returns:
[email protected]:~$ dd if=kali-linux-2023.2-live-amd64.iso of=/dev/sdb conv=fsync bs=4M Imaging the USB drive can take a good amount of time, over ten minutes or more is not unusual, as the sample output below shows. Be patient!
The dd command provides no feedback until it’s completed, but if your drive has an access indicator, you’ll probably see it flickering from time to time. The time to dd the image across will depend on the speed of the system used, USB drive itself, and USB port it’s inserted into. Once dd has finished imaging the drive, it will output something that looks like this:
Creating a Bootable Kali USB Drive on Linux (DD with status)
Alternatively there are a few other options available for imaging.
The first option is dd with a status indicator. This is only available on newer systems however. To do this, we simply add the status flag:
[email protected]:~$ dd if=kali-linux-2023.2-live-amd64.iso of=/dev/sdb conv=fsync bs=4M status=progress Another option is to use pv . We can also use the size flag here to get an approximate timer. Change the size depending on the image being used:
[email protected]:~$ dd if=kali-linux-2023.2-live-amd64.iso | pv -s 2.8G | dd of=/dev/sdb conv=fsync bs=4M Creating a Bootable Kali USB Drive on Linux (Etcher)
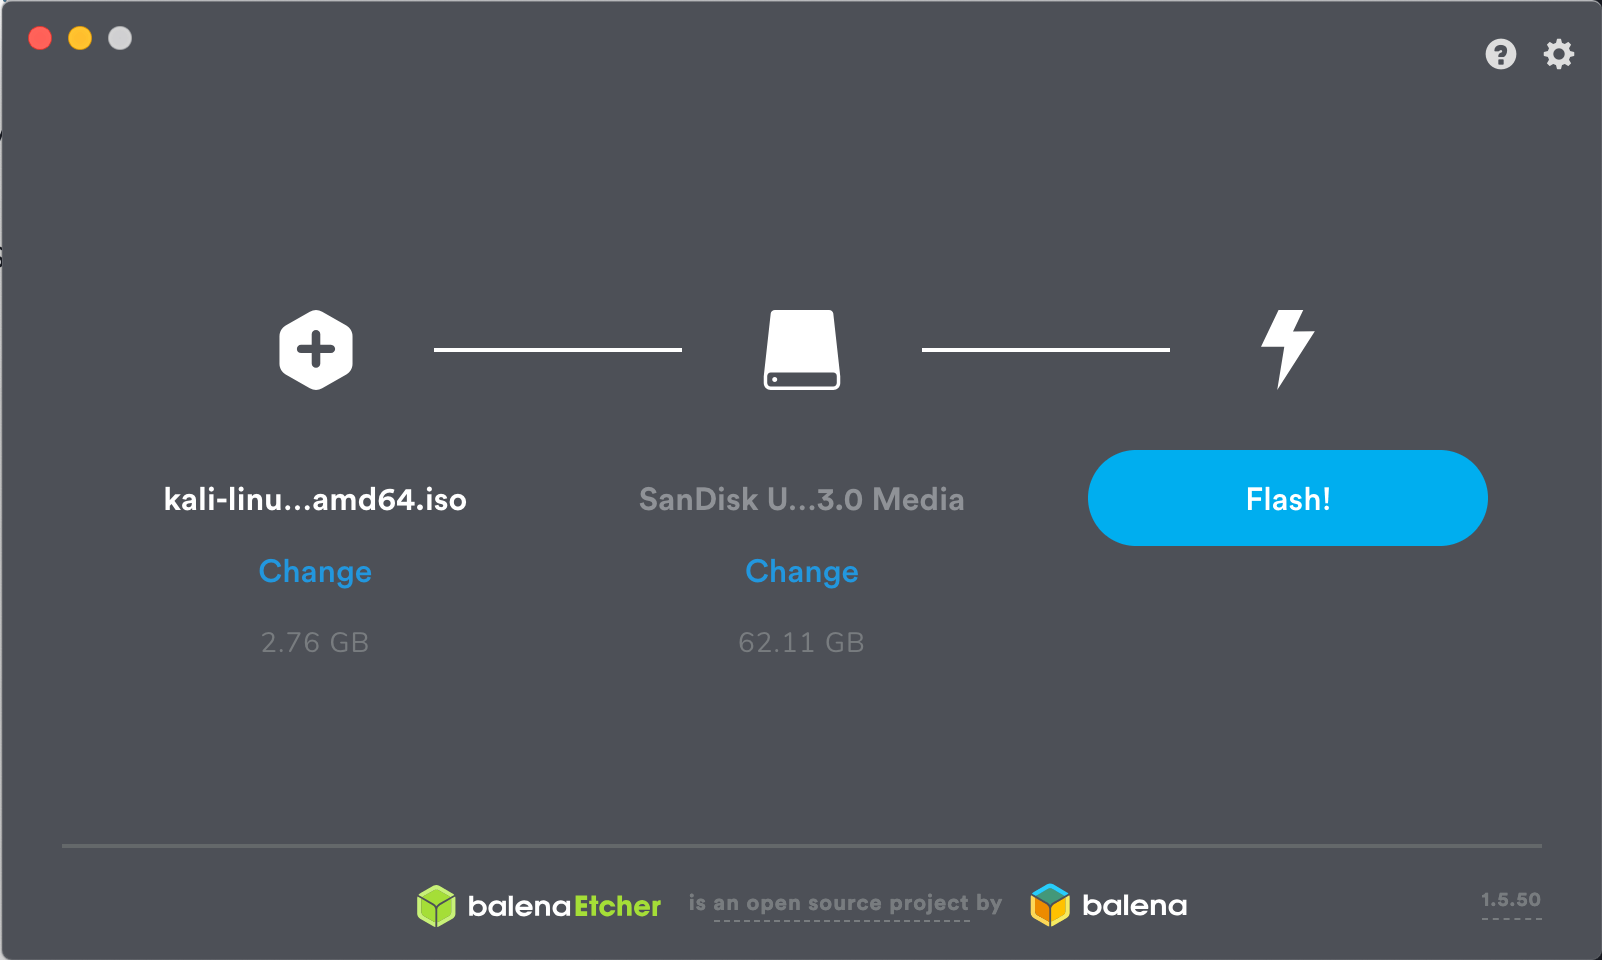
- Download and run Etcher.
- Choose the Kali Linux ISO file to be imaged with “select image” and verify that the USB drive to be overwritten is the correct one. Click the “Flash!” button once ready.
3. Once Etcher alerts you that the image has been flashed, you can safely remove the USB drive.
You can now boot into a Kali Live / Installer environment using the USB device.
Updated on: 2023-May-30
Author: g0tmi1k