Как настроить DHCP сервер на Linux Mint?
Сервером в моём случае будет выступать ноутбук с LinuxMint, который принимает интернет через WiFi. К нему по Ethernet подключается экзотическое устройство которое поддерживает режим DHCP клиента.
Посмотрел ifconfig, чтоб узнать интерфейс который будет раздавать адреса, в моем случае это enp3s0f1
enp3s0f1: flags=4163 mtu 1500 inet6 fe80::57eb:1217:90af:ab61 prefixlen 64 scopeid 0x20 ether 80:fa:5b:52:bb:43 txqueuelen 1000 (Ethernet) RX packets 89748 bytes 14684474 (14.6 MB) RX errors 0 dropped 0 overruns 0 frame 0 TX packets 73806 bytes 4988432 (4.9 MB) TX errors 25 dropped 0 overruns 0 carrier 0 collisions 0Поставил isc-dhcp-server
sudo apt-get install isc-dhcp-server
Прописал интерфейс в его конфиг /etc/default/isc-dhcp-server
# Defaults for isc-dhcp-server (sourced by /etc/init.d/isc-dhcp-server) # Path to dhcpd's config file (default: /etc/dhcp/dhcpd.conf). #DHCPDv4_CONF=/etc/dhcp/dhcpd.conf #DHCPDv6_CONF=/etc/dhcp/dhcpd6.conf # Path to dhcpd's PID file (default: /var/run/dhcpd.pid). #DHCPDv4_PID=/var/run/dhcpd.pid #DHCPDv6_PID=/var/run/dhcpd6.pid # Additional options to start dhcpd with. # Don't use options -cf or -pf here; use DHCPD_CONF/ DHCPD_PID instead #OPTIONS="" # On what interfaces should the DHCP server (dhcpd) serve DHCP requests? # Separate multiple interfaces with spaces, e.g. "eth0 eth1". #INTERFACESv4="" #INTERFACESv6="" INTERFACES="enp3s0f1"Дальше заменил файл конфигурации /etc/dhcp/dhcpd.conf на
dns-update-style none; default-lease-time 600; max-lease-time 7200; authoritative; option subnet-mask 255.255.255.0; option broadcast-address 192.168.116.0; option routers 192.168.116.254; option domain-name-servers 8.8.4.4, 8.8.8.8; subnet 192.168.116.0 netmask 255.255.255.0
/etc/init.d/isc-dhcp-server restart [ ok ] Restarting isc-dhcp-server (via systemctl): isc-dhcp-server.service.Но вот когда я проверяю статус сервиса /etc/init.d/isc-dhcp-server status
● isc-dhcp-server.service - ISC DHCP IPv4 server Loaded: loaded (/lib/systemd/system/isc-dhcp-server.service; enabled; vendor preset: enabled) Active: failed (Result: exit-code) since Wed 2020-04-22 17:40:29 EEST; 55s ago Docs: man:dhcpd(8) Process: 27053 ExecStart=/bin/sh -ec CONFIG_FILE=/etc/dhcp/dhcpd.conf; if [ -f /etc/ltsp/dhcpd.conf ]; then CONFIG_FILE=/etc/ltsp/dhcpd.conf; fi; [ -e /var/lib/dhcp/dhcpd.leases ] || touch /var/lib/dhcp/dhcpd.leases; chown root:dhcpd /var/lib/dhcp /var/lib/dhcp/dhcpd.leases; chmod 775 /var/lib/dhcp ; chmod 664 /var/lib/dhcp/dhcpd.leases; exec dhcpd -user dhcpd -group dhcpd -f -4 -pf /run/dhcp-server/dhcpd.pid -cf $CONFIG_FILE $INTERFACES (code=exited, status=1/FAILURE) Main PID: 27053 (code=exited, status=1/FAILURE) Apr 22 17:40:29 dhcpd[27053]: Apr 22 17:40:29 dhcpd[27053]: If you think you have received this message due to a bug rather Apr 22 17:40:29 dhcpd[27053]: than a configuration issue please read the section on submitting Apr 22 17:40:29 dhcpd[27053]: bugs on either our web page at www.isc.org or in the README file Apr 22 17:40:29 dhcpd[27053]: before submitting a bug. These pages explain the proper Apr 22 17:40:29 dhcpd[27053]: process and the information we find helpful for debugging.. Apr 22 17:40:29 dhcpd[27053]: Apr 22 17:40:29 dhcpd[27053]: exiting. Apr 22 17:40:29 systemd[1]: isc-dhcp-server.service: Main process exited, code=exited, status=1/FAILURE Apr 22 17:40:29 systemd[1]: isc-dhcp-server.service: Failed with result 'exit-code'.How to configure DHCP server on Linux Mint
![]()
DHCP is easier to maintain as it is a network management protocol, especially as your network grows and shrinks, compared with static addressing. Also added benefits over static addressing are the ability to manage IP addresses centrally which means that you can configure and reconfigure your network in no time. DHCP offers another advantage of preventing configuration errors caused by manually entering IP address information on every host by assigning IP addresses automatically.
It provides each device on a network with a dynamic IP address and other network setup settings to connect with other IP networks. But there is a possibility that your system is not configured correctly or configured with a static IP. This article is a comprehensive guide on how to configure a DHCP server on Linux Mint system:
How to configure DHCP server on Linux Mint
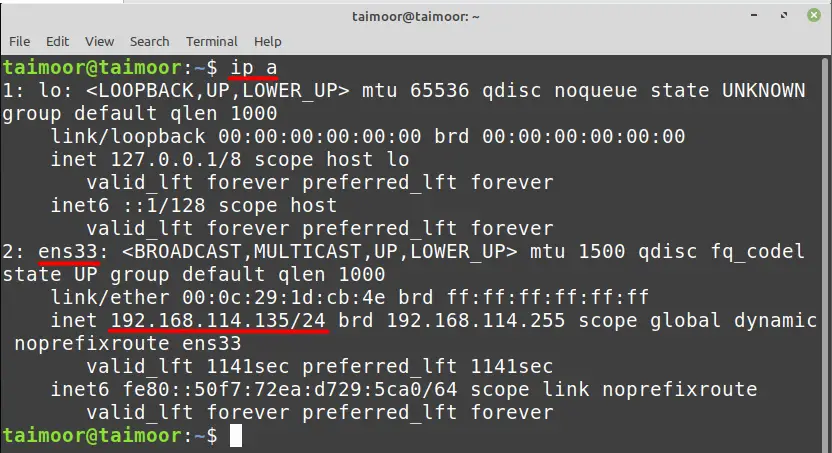
A DHCP server listens to the network and assigns the IP address and services to the host computer (DHCP client) based on that from the pool of addresses that is currently available. You can configure your DHCP server based on your IP address and for that, you need to type.
This command will provide you the name of the interface which is ”ens33” in our case and also the IP address which is 192.168.114.135 that will be different in your case.
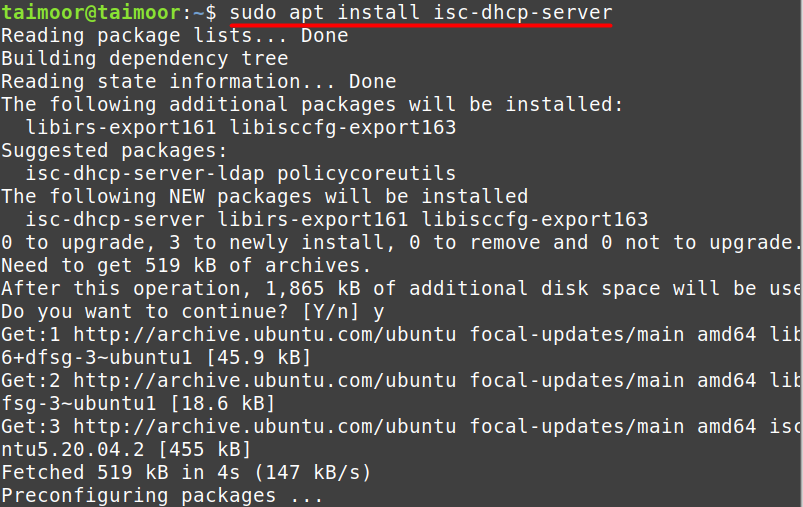
You need to first install the DHCP server utility to configure it by typing
Now the next thing is to configure the DHCP server file which you can find by accessing /etc/default/isc-dhcp-server by typing:
Now, you need to provide the network interface name which is “ens33” in our case against the Interfacesv4 field that we got from the previous step as shown below. This is a necessary step as you are telling the server that this is my network address and you need to use this for communication.

After that, you need to open and configure another file which is /etc/dhcp/dhcpd.conf by typing.
After opening this file you need to scroll down and look for the line which states “A slightly different configuration for an internal subnet”. The values that you can see in the below image are all available by default, you just need to uncomment them starting from the subnet and end at max-lease-time till the bracket (>). Now I set these values as per my network configuration. You need to set them accordingly as per your network.
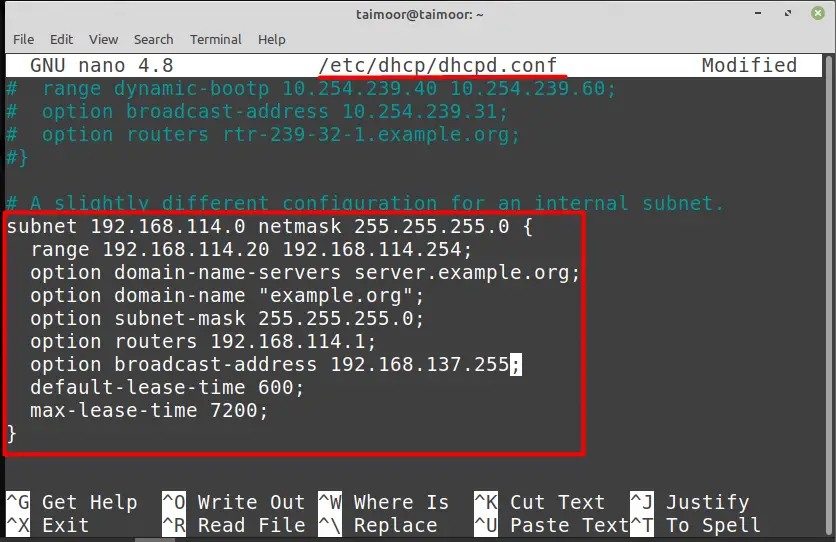
A subnet is another name of your IP or network address so you need to write the first three octets of your own IP address and you can set forth one to 0 just like we did. The next one is the netmask where you are providing the range of network addresses that can communicate with your network server. You also need to define the range of the IP address that you want to lease so you can write any range as you like. Now next you need to change is the option router which is also known as the default gateway so you need to set this value as per your IP address as well.
After this modification, you need to save and exit this file and restart the service of the DHCP server to apply these newly made settings by typing.
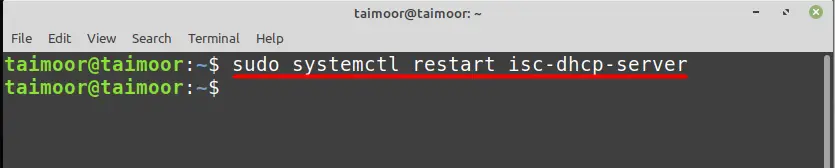
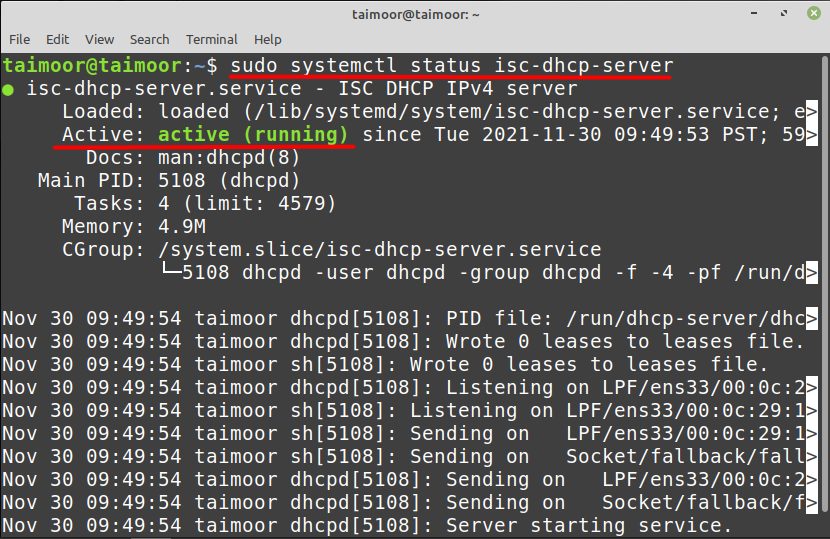
So, if you have followed the above process correctly, then you should be able to activate your DHCP server that you can see in our case by typing.
Conclusion
DHCP is a protocol that automatically configures your network settings, saving you the time and effort of manually configuring them. It also monitors your network and gives you the best possible settings, ensuring that it is reliable and efficient. So, if your network speed is poor or not operating correctly on Linux Mint OS, you need to verify if it is properly configured to DHCP, and you can obtain all the necessary information from this page.
About the author
Taimoor Mohsin
Hi there! I’m an avid writer who loves to help others in finding solutions by writing high-quality content about technology and gaming. In my spare time, I enjoy reading books and watching movies.
Установка и настройка DHCP-сервера на Debian/Ubuntu/Linux Mint

Установка и настройка DHCP-сервера на Debian/Ubuntu/Linux Mint
Хочу в данной статье рассказать как я производил установку и настройку DHCP сервера на примере в Debian. Расскажу и покажу что и как нужно делать.
1. Для начала установите DHCP-сервер на Debian/Ubuntu/ Linux Mint
# sudo apt-get install isc-dhcp-server
2. Если у вас есть много сетевых карт на сервере Ubuntu (Debian или Linux Mint), то вы должны выбрать сетевую карту, на которую мы привяжем наш DHCP. (Необязательно).
# sudo vim /etc/default/isc-dhcp-server
находим поле «INTERFACES» и прописываем в него свой интерфейс своей сетевой карты. У меня это выглядит следующим образом:
3. Настройка сервера DHCP с pool-ом адресов, маской подсети, шлюзом и так далее для клиента DHCP.
Скопируем конфиг настроек:
# sudo cp /etc/dhcp/dhcpd.conf /etc/dhcp/dhcpd.conf.bak
После чего создадим конфигурацию с нашими всеми настройками, но перед этим я удали сам файл и создам новый ( чтобы внести именно свои настройки и не искать где и что):
# rm /etc/dhcp/dhcpd.conf # vim /etc/dhcp/dhcpd.conf
Добавляем в конфиг следующие строки:
dns-update-style none; default-lease-time 600; # время в сек на которое резервируется данный ИП адрес max-lease-time 7200; # максимальное время в сек на которое резервируется данный ИП адрес authoritative; log-facility local7; option subnet-mask 255.255.255.0; # вводим маску под сети, у меня она такая option broadcast-address 192.168.116.0; # броадкаст адресс option routers 192.168.116.254; # ИП адресс для роутинга option domain-name-servers 192.168.1.1, 8.8.8.8; #собственно это мои NS option domain-name «linux-notes.org»; # доменное имя subnet 192.168.116.0 netmask 255.255.255.0 # маска
4. Перезапуск DHCP-сервера на Debian/Ubuntu/Linux Mint
# /etc/init.d/isc-dhcp-server restart
5. Настройка DHCP-клиента для получения IP от сервера DHCP
На этом «Установка и настройка DHCP-сервера на Debian/Ubuntu/Linux Mint» подошла к завершению. Если есть вопросы, то задавайте их. Так же, я вас приглашаю в свою социальную группу. Вступаем и пишем что не получается, я с радостью помогу ВСЕМ!