- How to Use Nginx as an HTTP Load Balancer in Linux
- Testing Environment Setup
- Setting Up Nginx Load Balancing in Linux
- Testing Nginx Load Balancing in Linux
- Load balancers in linux
- About Load Balancing
- About HAProxy
- About Keepalived
- Using Keepalived With VRRP
- About Combining Keepalived With HAProxy for High-Availability Load Balancing
- About NGINX
How to Use Nginx as an HTTP Load Balancer in Linux
When it comes to setting up multiple application servers for redundancy, load balancing is a commonly used mechanism for efficiently distributing incoming service requests or network traffic across a group of back-end servers.
Load balancing has several advantages including increased application availability through redundancy, increased reliability and scalability (more servers can be added in the mix when traffic increases). It also brings about improved application performance and many other benefits.
Nginx can be deployed as an efficient HTTP load balancer to distribute incoming network traffic and workload among a group of application servers, in each case returning the response from the selected server to the appropriate client.
The load balancing methods supported by Nginx are:
- round-robin – which distributes requests to the application servers in a round-robin fashion. It is used by default when no method is specified,
- least-connected – assigns the next request to a less busy server(the server with the least number of active connections),
- ip-hash – where a hash function is used to determine what server should be selected for the next request based on the client’s IP address. This method allows for session persistence (tie a client to a particular application server).
Besides, you can use server weights to influence Nginx load balancing algorithms at a more advanced level. Nginx also supports health checks to mark a server as failed (for a configurable amount of time, default is 10 seconds) if its response fails with an error, thus avoids picking that server for subsequent incoming requests for some time.
This practical guide shows how to use Nginx as an HTTP load balancer to distribute incoming client requests between two servers each having an instance of the same application.
For testing purposes, each application instance is labeled (on the user interface) to indicate the server it is running on.
Testing Environment Setup
Load Balancer: 192.168.58.7 Application server 1: 192.168.58.5 Application server 2: 192.168.58.8
On each application server, each application instance is configured to be accessed using the domain tecmintapp.lan . Assuming this is a fully-registered domain, we would add the following in the DNS settings.
This record tells client requests where the domain should direct to, in this case, the load balancer (192.168.58.7). The DNS A records only accept IPv4 values. Alternatively, the /etc/hosts file on the client machines can also be used for testing purposes, with the following entry.
Setting Up Nginx Load Balancing in Linux
Before setting up Nginx load balancing, you must install Nginx on your server using the default package manager for your distribution as shown.
$ sudo apt install nginx [On Debian/Ubuntu] $ sudo yum install nginx [On CentOS/RHEL]
Next, create a server block file called /etc/nginx/conf.d/loadbalancer.conf (give a name of your choice).
$ sudo vi /etc/nginx/conf.d/loadbalancer.conf
Then copy and paste the following configuration into it. This configuration defaults to round-robin as no load balancing method is defined.
In the above configuration, the proxy_pass directive (which should be specified inside a location, / in this case) is used to pass a request to the HTTP proxied servers referenced using the word backend, in the upstream directive (used to define a group of servers). Also, the requests will be distributed between the servers using a weighted round-robin balancing mechanism.
To employ the least connection mechanism, use the following configuration
And to enable ip_hash session persistence mechanism, use:
You can also influence the load balancing decision using server weights. Using the following configuration, if there are six requests from clients, the application server 192.168.58.5 will be assigned 4 requests and 2 will go 192.168.58.8.
Save the file and exit it. Then ensure the Nginx configuration structure is correct after adding the recent changes, by running the following command.
If the configuration is OK, restart and enable the Nginx service to apply the changes.
$ sudo systemctl restart nginx $ sudo systemctl enable nginx
Testing Nginx Load Balancing in Linux
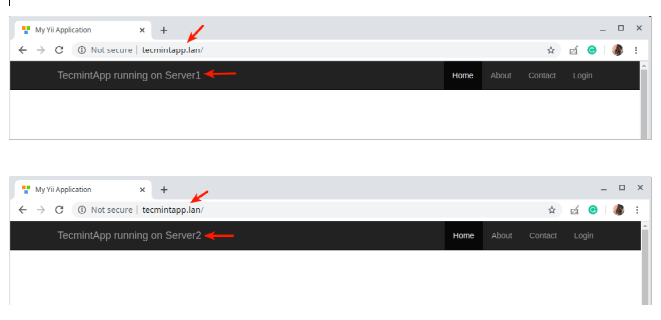
To test the Nginx load balancing, open a web browser and use the following address to navigate.
Once the website interface loads, take note of the application instance that has loaded. Then continuously refresh the page. At some point, the app should be loaded from the second server indicating load balancing.
You have just learned how to set up Nginx as an HTTP load balancer in Linux. We would like to know your thoughts about this guide, and especially about employing Nginx as a load balancer, via the feedback form below. For more information, see the Nginx documentation about using Nginx as an HTTP load balancer.
Load balancers in linux
This chapter provides an overview of the load balancer technologies that are used in Oracle Linux. Installation and configuration information is also provided in this chapter.
About Load Balancing
The term load balancing refers to the efficient distribution of incoming network traffic across a group of back-end servers. The use of load balancing ensures that your infrastructure is highly available, reliable, and that performance is not degraded. Load balancers can typically handle traffic for the HTTP, HTTPS, TCP, and UDP protocols.
Load balancers manage network traffic by routing client requests across all of the servers that can fulfill those requests. This routing maximizes speed and capacity utilization so that no one particular server becomes overloaded, thereby improving overall performance. In situations where a server may become unavailable or goes down, the load balancer redirects any incoming traffic to other servers that are online. In this way, server downtime is minimized. When a new server is added to the server group, the load balancer automatically redistributes the workload and starts to send requests to that new server.
In Oracle Linux, load balancing of network traffic is primarily handled by two integrated software components: HAProxy and Keepalived. The HAProxy feature provides load balancing and high-availability services to TCP and HTTP, while Keepalived performs load balancing and failover tasks on both active and passive routers. The NGINX feature can also be used in Oracle Linux for load balancing.
About HAProxy
HAProxy, or High Availability Proxy, is an application layer (Layer 7) load balancer and high-availability solution that you can use to implement a reverse proxy for HTTP and TCP-based Internet services. An application layer load balancer often includes many features, because it is able to inspect the content of the traffic that it is routing and can either modify content within each packet, as required, or can make decisions about how to handle each packet based on its content. This makes it simple to implement session persistence, TLS, ACLs, and HTTP rewrites and redirection.
The configuration file for the haproxy daemon is /etc/haproxy/haproxy.cfg . This file must be present on each server on which you configure HAProxy for load balancing or high availability.
For more information, see http://www.haproxy.org/#docs, the /usr/share/doc/haproxy- version documentation, and the haproxy(1) manual page.
About Keepalived
Keepalived uses the IP Virtual Server (IPVS) kernel module to provide transport layer (Layer 4) load balancing by redirecting requests for network-based services to individual members of a server cluster. IPVS monitors the status of each server and uses the Virtual Router Redundancy Protocol (VRRP) to implement high availability. A load balancer that functions at the transport layer is less aware of the content of the packets that it re-routes, which has the advantage of being able to perform this task significantly faster than a reverse proxy system functioning at the application layer.
The configuration file for the keepalived daemon is /etc/keepalived/keepalived.conf . This file must be present on each server on which you configure Keepalived for load balancing or high availability.
For more information, see https://www.keepalived.org/documentation.html, the /usr/share/doc/keepalive- version documentation, and the keepalived(8) and keepalived.conf(5) manual pages.
Using Keepalived With VRRP
VRRP is a networking protocol that automatically assigns routers that are available to handle inbound traffic. A detailed standard document for this protocol can be found at https://tools.ietf.org/html/rfc5798.
Keepalived uses VRRP to ascertain the current state of all of the routers on the network. The protocol enables routing to switch between primary and backup routers automatically. The backup routers detect when the primary router becomes unavailable and then sends multicast packets to each other until one of the routers is «elected» as the new primary router A floating virtual IP address can be used to always direct traffic to the primary router. When the original primary router is back online, it detects the new routing state and returns to the network as a backup router.
The benefit of using VRRP is that you can rely on multiple routers to provide high availability and redundancy without requiring a separate software service or hardware device to manage this process. On each router, Keepalived configures the VRRP settings and ensures that the network routing continues to function correctly.
For more information, see https://www.keepalived.org/documentation.html, the /usr/share/doc/keepalive- version documentation, and the keepalived(8) and keepalived.conf(5) manual pages.
About Combining Keepalived With HAProxy for High-Availability Load Balancing
You can combine the Keepalived and HAProxy load balancer features to achieve a high-availability, load-balancing environment. HAProxy provides scalability, application-aware functionality, and ease of configuration when configuring load balancing services. Keepalived provides failover services for backup routers, as well as the ability to distribute loads across servers for increased availability.
This complex configuration scenario illustrates how you can use different load balancing applications with each other to achieve better redundancy and take advantage of features at different layers of the stack. While this example shows how Keepalived can be used to provide redundancy for HAProxy, you can also achieve similar results by using Keepalived with alternate application layer proxy systems, like NGINX.
About NGINX
NGINX is a well-known HTTP server that provides modular functionality for reverse proxying, traffic routing, and application-layer load balancing for HTTP, HTTPS or TCP/UDP connections. You can use NGINX load balancing and proxy services to distribute traffic for improved performance, scalability, and reliability of your applications.
NGINX provides capability for the following load balancing methods:
- Round Robin . This method is one of the simplest for implementing load balancing and is the default method that is used by NGINX. Round Robin distributes requests to application servers by going down the list of the servers that are within the group, then forwarding client requests to each server, in turn. After reaching the end of the list, the load balancer repeats this same sequence.
- Least Connected . This methods works by assigning the next request to the server that has the least number of active connections. With the least-connected method, the load balancer compares the number of currently active connections to each server, then sends the request to the server with the fewest connections. You set the configuration by using the least_conn directive.
- IP Hash . This method uses a hash-function to determine which server to select for the next request, which is based on the client’s IP address. You set the configuration by using the ip_hash directive.