- How to Use Nginx as an HTTP Load Balancer in Linux
- Testing Environment Setup
- Setting Up Nginx Load Balancing in Linux
- Testing Nginx Load Balancing in Linux
- Understand Linux Load Averages and Monitor Performance of Linux
- How to Monitor Linux System Load Average
- Top Command
- Glances Tool
- Understanding System Average Load in Relation Number of CPUs
- Multi-processor Vs Multi-core
How to Use Nginx as an HTTP Load Balancer in Linux
When it comes to setting up multiple application servers for redundancy, load balancing is a commonly used mechanism for efficiently distributing incoming service requests or network traffic across a group of back-end servers.
Load balancing has several advantages including increased application availability through redundancy, increased reliability and scalability (more servers can be added in the mix when traffic increases). It also brings about improved application performance and many other benefits.
Nginx can be deployed as an efficient HTTP load balancer to distribute incoming network traffic and workload among a group of application servers, in each case returning the response from the selected server to the appropriate client.
The load balancing methods supported by Nginx are:
- round-robin – which distributes requests to the application servers in a round-robin fashion. It is used by default when no method is specified,
- least-connected – assigns the next request to a less busy server(the server with the least number of active connections),
- ip-hash – where a hash function is used to determine what server should be selected for the next request based on the client’s IP address. This method allows for session persistence (tie a client to a particular application server).
Besides, you can use server weights to influence Nginx load balancing algorithms at a more advanced level. Nginx also supports health checks to mark a server as failed (for a configurable amount of time, default is 10 seconds) if its response fails with an error, thus avoids picking that server for subsequent incoming requests for some time.
This practical guide shows how to use Nginx as an HTTP load balancer to distribute incoming client requests between two servers each having an instance of the same application.
For testing purposes, each application instance is labeled (on the user interface) to indicate the server it is running on.
Testing Environment Setup
Load Balancer: 192.168.58.7 Application server 1: 192.168.58.5 Application server 2: 192.168.58.8
On each application server, each application instance is configured to be accessed using the domain tecmintapp.lan . Assuming this is a fully-registered domain, we would add the following in the DNS settings.
This record tells client requests where the domain should direct to, in this case, the load balancer (192.168.58.7). The DNS A records only accept IPv4 values. Alternatively, the /etc/hosts file on the client machines can also be used for testing purposes, with the following entry.
Setting Up Nginx Load Balancing in Linux
Before setting up Nginx load balancing, you must install Nginx on your server using the default package manager for your distribution as shown.
$ sudo apt install nginx [On Debian/Ubuntu] $ sudo yum install nginx [On CentOS/RHEL]
Next, create a server block file called /etc/nginx/conf.d/loadbalancer.conf (give a name of your choice).
$ sudo vi /etc/nginx/conf.d/loadbalancer.conf
Then copy and paste the following configuration into it. This configuration defaults to round-robin as no load balancing method is defined.
In the above configuration, the proxy_pass directive (which should be specified inside a location, / in this case) is used to pass a request to the HTTP proxied servers referenced using the word backend, in the upstream directive (used to define a group of servers). Also, the requests will be distributed between the servers using a weighted round-robin balancing mechanism.
To employ the least connection mechanism, use the following configuration
And to enable ip_hash session persistence mechanism, use:
You can also influence the load balancing decision using server weights. Using the following configuration, if there are six requests from clients, the application server 192.168.58.5 will be assigned 4 requests and 2 will go 192.168.58.8.
Save the file and exit it. Then ensure the Nginx configuration structure is correct after adding the recent changes, by running the following command.
If the configuration is OK, restart and enable the Nginx service to apply the changes.
$ sudo systemctl restart nginx $ sudo systemctl enable nginx
Testing Nginx Load Balancing in Linux
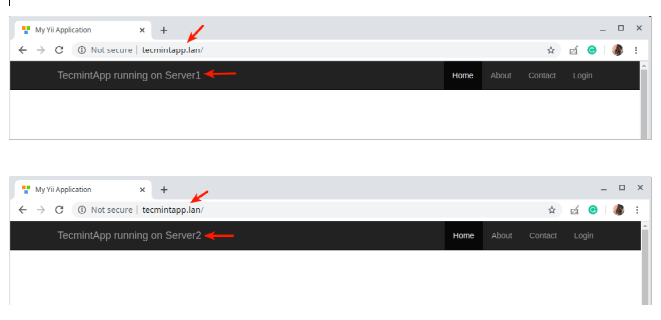
To test the Nginx load balancing, open a web browser and use the following address to navigate.
Once the website interface loads, take note of the application instance that has loaded. Then continuously refresh the page. At some point, the app should be loaded from the second server indicating load balancing.
You have just learned how to set up Nginx as an HTTP load balancer in Linux. We would like to know your thoughts about this guide, and especially about employing Nginx as a load balancer, via the feedback form below. For more information, see the Nginx documentation about using Nginx as an HTTP load balancer.
Understand Linux Load Averages and Monitor Performance of Linux
In this article, we will explain one of the critical Linux system administration tasks – performance monitoring in regards to system/CPU load and load averages.
Before we move any further, let’s understand these two important phrases in all Unix-like systems:
- System load/CPU Load – is a measurement of CPU over or under-utilization in a Linux system; the number of processes which are being executed by the CPU or in waiting state.
- Load average – is the average system load calculated over a given period of time of 1, 5 and 15 minutes.
In Linux, the load-average is technically believed to be a running average of processes in it’s (kernel) execution queue tagged as running or uninterruptible.
- All if not most systems powered by Linux or other Unix-like systems will possibly show the load average values somewhere for a user.
- A downright idle Linux system may have a load average of zero, excluding the idle process.
- Nearly all Unix-like systems count only processes in the running or waiting states. But this is not the case with Linux, it includes processes in uninterruptible sleep states; those waiting for other system resources like disk I/O etc.
How to Monitor Linux System Load Average
There are numerous ways of monitoring system load average including uptime which shows how long the system has been running, number of users together with load averages:
$ uptime 07:13:53 up 8 days, 19 min, 1 user, load average: 1.98, 2.15, 2.21
The numbers are read from left to right, and the output above means that:
- load average over the last 1 minute is 1.98
- load average over the last 5 minutes is 2.15
- load average over the last 15 minutes is 2.21
High load averages imply that a system is overloaded; many processes are waiting for CPU time.
We will uncover this in the next section in relation to number of CPU cores. Additionally, we can as well use other well known tools such as top and glances which display a real-time state of a running Linux system, plus many other tools:
Top Command
top - 12:51:42 up 2:11, 1 user, load average: 1.22, 1.12, 1.26 Tasks: 243 total, 1 running, 242 sleeping, 0 stopped, 0 zombie %Cpu(s): 17.4 us, 2.9 sy, 0.3 ni, 74.8 id, 4.6 wa, 0.0 hi, 0.0 si, 0.0 st KiB Mem : 8069036 total, 388060 free, 4381184 used, 3299792 buff/cache KiB Swap: 3906556 total, 3901876 free, 4680 used. 2807464 avail Mem PID USER PR NI VIRT RES SHR S %CPU %MEM TIME+ COMMAND 6265 tecmint 20 0 1244348 170680 83616 S 13.3 2.1 6:47.72 Headset 2301 tecmint 9 -11 640332 13344 9932 S 6.7 0.2 2:18.96 pulseaudio 2459 tecmint 20 0 1707692 315628 62992 S 6.7 3.9 6:55.45 cinnamon 2957 tecmint 20 0 2644644 1.035g 137968 S 6.7 13.5 50:11.13 firefox 3208 tecmint 20 0 507060 52136 33152 S 6.7 0.6 0:04.34 gnome-terminal- 3272 tecmint 20 0 1521380 391324 178348 S 6.7 4.8 6:21.01 chrome 6220 tecmint 20 0 1595392 106964 76836 S 6.7 1.3 3:31.94 Headset 1 root 20 0 120056 6204 3964 S 0.0 0.1 0:01.83 systemd 2 root 20 0 0 0 0 S 0.0 0.0 0:00.00 kthreadd 3 root 20 0 0 0 0 S 0.0 0.0 0:00.10 ksoftirqd/0 5 root 0 -20 0 0 0 S 0.0 0.0 0:00.00 kworker/0:0H .
Glances Tool
TecMint (LinuxMint 18 64bit / Linux 4.4.0-21-generic) Uptime: 2:16:06 CPU 16.4% nice: 0.1% LOAD 4-core MEM 60.5% active: 4.90G SWAP 0.1% user: 10.2% irq: 0.0% 1 min: 1.20 total: 7.70G inactive: 2.07G total: 3.73G system: 3.4% iowait: 2.7% 5 min: 1.16 used: 4.66G buffers: 242M used: 4.57M idle: 83.6% steal: 0.0% 15 min: 1.24 free: 3.04G cached: 2.58G free: 3.72G NETWORK Rx/s Tx/s TASKS 253 (883 thr), 1 run, 252 slp, 0 oth sorted automatically by cpu_percent, flat view enp1s0 525Kb 31Kb lo 2Kb 2Kb CPU% MEM% VIRT RES PID USER NI S TIME+ IOR/s IOW/s Command wlp2s0 0b 0b 14.6 13.3 2.53G 1.03G 2957 tecmint 0 S 51:49.10 0 40K /usr/lib/firefox/firefox 7.4 2.2 1.16G 176M 6265 tecmint 0 S 7:08.18 0 0 /usr/lib/Headset/Headset --type=renderer --no-sandbox --primordial-pipe-token=879B36514C6BEDB183D3E4142774D1DF --lan DISK I/O R/s W/s 4.9 3.9 1.63G 310M 2459 tecmint 0 R 7:12.18 0 0 cinnamon --replace ram0 0 0 4.2 0.2 625M 13.0M 2301 tecmint -11 S 2:29.72 0 0 /usr/bin/pulseaudio --start --log-target=syslog ram1 0 0 4.2 1.3 1.52G 105M 6220 tecmint 0 S 3:42.64 0 0 /usr/lib/Headset/Headset ram10 0 0 2.9 0.8 409M 66.7M 6240 tecmint 0 S 2:40.44 0 0 /usr/lib/Headset/Headset --type=gpu-process --no-sandbox --supports-dual-gpus=false --gpu-driver-bug-workarounds=7,2 ram11 0 0 2.9 1.8 531M 142M 1690 root 0 S 6:03.79 0 0 /usr/lib/xorg/Xorg :0 -audit 0 -auth /var/lib/mdm/:0.Xauth -nolisten tcp vt8 ram12 0 0 2.6 0.3 79.3M 23.8M 9651 tecmint 0 R 0:00.71 0 0 /usr/bin/python3 /usr/bin/glances ram13 0 0 1.6 4.8 1.45G 382M 3272 tecmint 0 S 6:25.30 0 4K /opt/google/chrome/chrome .
The load averages shown by these tools is read /proc/loadavg file, which you can view using the cat command as below:
$ cat /proc/loadavg 2.48 1.69 1.42 5/889 10570
On desktop machines, there are graphical user interface tools that we can use to view system load averages.
Understanding System Average Load in Relation Number of CPUs
We can’t possibly explain system load or system performance without shedding light on the impact of the number of CPU cores on performance.
Multi-processor Vs Multi-core
- Multi-processor – is where two or more physical CPU’s are integrated into a single computer system.
- Multi-core processor – is a single physical CPU which has at least two or more separate cores (or what we can also refer to as processing units) that work in parallel. Meaning a dual-core has 2 two processing units, a quad-core has 4 processing units and so on.
Furthermore, there is also a processor technology which was first introduced by Intel to improve parallel computing, referred to as hyper threading.
Under hyper threading, a single physical CPU core appears as two logical CPUs core to an operating system (but in reality, there is one physical hardware component).
Note that a single CPU core can only carry out one task at a time, thus technologies such as multiple CPUs/processors, multi-core CPUs and hyper-threading were brought to life.
With more than one CPU, several programs can be executed simultaneously. Present-day Intel CPUs use a combination of both multiple cores and hyper-threading technology.
To find the number of processing units available on a system, we may use the nproc or lscpu commands as follows:
$ nproc 4 OR lscpu
Another way to find the number of processing units using grep command as shown.
$ grep 'model name' /proc/cpuinfo | wc -l 4
Now, to further understand system load, we will take a few assumptions. Let’s say we have load averages below:
23:16:49 up 10:49, 5 user, load average: 1.00, 0.40, 3.35
On a single core system this would mean:
- The CPU was fully (100%) utilized on average; 1 processes was running on the CPU (1.00) over the last 1 minute.
- The CPU was idle by 60% on average; no processes were waiting for CPU time (0.40) over the last 5 minutes.
- The CPU was overloaded by 235% on average; 2.35 processes were waiting for CPU time (3.35) over the last 15 minutes.
On a dual-core system this would mean:
- The one CPU was 100% idle on average, one CPU was being used; no processes were waiting for CPU time(1.00) over the last 1 minute.
- The CPUs were idle by 160% on average; no processes were waiting for CPU time. (0.40) over the last 5 minutes.
- The CPUs were overloaded by 135% on average; 1.35 processes were waiting for CPU time. (3.35) over the last 15 minutes.
In conclusion, if you are a system administrator then high load averages are real to worry about. When they are high, above the number of CPU cores, it signifies high demand for the CPUs, and low load averages below the number of CPU cores tells us that CPUs are underutilized.