- How To Fix No Sound in Ubuntu And Linux Mint
- Various methods to fix no audio in Ubuntu
- Fixing dummy output in sound settings
- First Alternate method to fix no sound in Ubuntu
- Second alternate method to fix no sound in Ubuntu
- Third alternate method: remove old Pulseaudio config
- Third alternate method: Try alsamixer
- Fourth alternate method to fix no audio in Ubuntu
- Fifth alternate method (specially for Lenovo Carbon X1)
- Как исправить отсутствие звука в Ubuntu и Linux Mint
- Различные способы исправить отсутствие звука в Ubuntu
- Исправление фиктивного вывода в настройках звука
- Первый альтернативный способ исправить отсутствие звука в Ubuntu
- Второй альтернативный способ исправить отсутствие звука в Ubuntu
- Третий альтернативный метод: попробуйте alsamixer
- Четвертый альтернативный способ исправить отсутствие звука в Ubuntu
- Пятый альтернативный метод (специально для Lenovo Carbon X1)
How To Fix No Sound in Ubuntu And Linux Mint
As it happens with every Ubuntu release, you install or upgrade to a newer Ubuntu version and run in to a number of problems. But then, there is always a way to overcome these big little problems.
One of the most common problems faced is no sound after installing Ubuntu. While there could be several reasons for no sound in Ubuntu, I will share the tricks that worked for me.
Let’s see in steps how I fixed and how you can fix it.
Various methods to fix no audio in Ubuntu
There could be various reasons why there is no sound in Ubuntu. The fix depends on the kind of problem you have. Before you take the steps to fix it, I suggest get some information about your system, specially about the audio related hardware.
Now check the system, machine and audio information with this command:
You should see some information like this:
[email protected]:~$ inxi -SMA System: Host: itsfoss Kernel: 5.4.0-18-generic x86_64 bits: 64 Desktop: Gnome 3.35.91 Distro: Ubuntu 20.04 LTS (Focal Fossa) Machine: Type: Laptop System: Dell product: XPS 13 9360 v: N/A serial: Mobo: Dell model: 05JK94 v: A00 serial: UEFI: Dell v: 2.13.0 date: 11/14/2019 Audio: Device-1: Intel Sunrise Point-LP HD Audio driver: snd_hda_intel Sound Server: ALSA v: k5.4.0-18-genericLook closely in the audio section of the above output. It tells that it is Intel Sunrise Point-LP HD Audio and it has the Linux driver snd_hda_intel and the sound is served with Alsa. This information maybe useful in some stages of your audio troubleshooting.
Fixing dummy output in sound settings
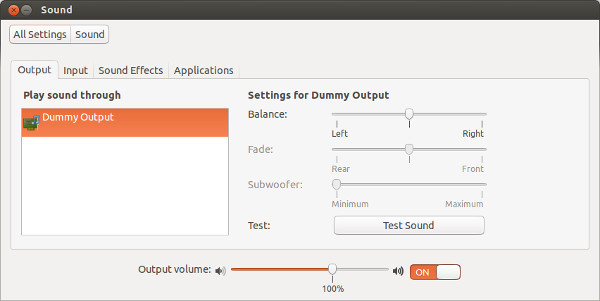
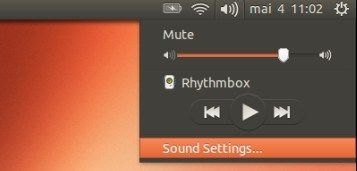
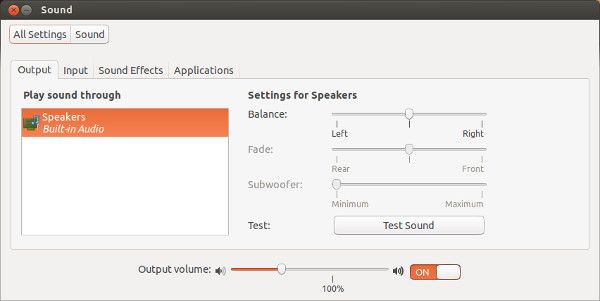
First step, just to verify, check if the sound is not muted. Once you verify this, go to Sound Settings:

In the Sound Settings, you’ll find that you have practically nothing here except a dummy output. Quite frustrating. It means that your sound card is not even recognized. Puff!
No worries. The one shot solution which fixed the sound problem for me on my Intel powered Dell Inspiron is to force reload Alsa. To do that, use the following command in terminal (Ctrl+Alt+T):
The output will be like this.
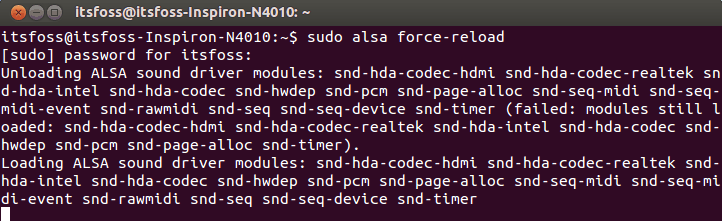
You may think that it is hanged or still in processing but it takes only couple of seconds. You can simply close it afterwards by using Ctrl+C.
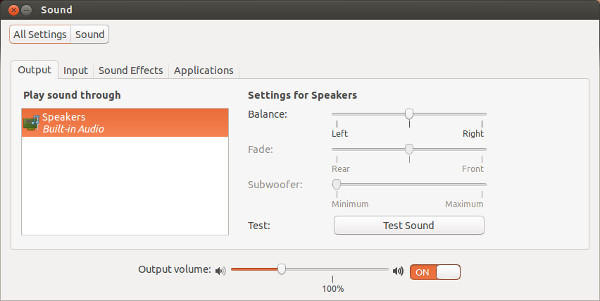
Now, you need to reboot your computer. Either play some music/video files or check in the system settings to see if it worked for you.
First Alternate method to fix no sound in Ubuntu
If the above problem did not fix it for you, try reinstalling Alsa and Pulse audio in the following manner:
sudo apt-get install --reinstall alsa-base pulseaudioAnd force reload Alsa again:
Restart and check if sound is back or not.
Second alternate method to fix no sound in Ubuntu
Try starting Pulseaudio and see if it works:
Third alternate method: remove old Pulseaudio config
Go to your home directory and then go to the hidden config directory. Rename the directory named pulse here:
mv ~/.config/pulse ~/.config/old_pulseNow reboot your system. The pulse directory should be created afresh and you should have sound.
Third alternate method: Try alsamixer
Open a terminal and use the following command to open alsamixer:
You should see a screen like this:
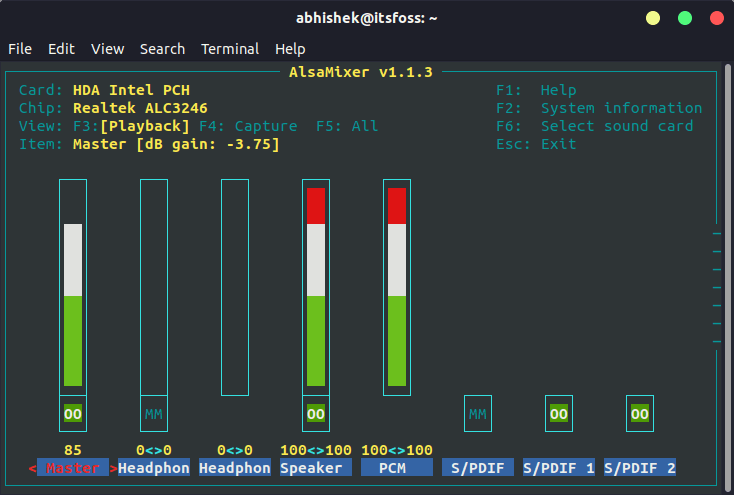
Check if the speakers or your desired audio output is muted here. MM means mute and OO means unmute. If your desired audio output (mostly it’s speakers) or the Master is muted, unmute it.
You can exit the screen using Esc key.
Note that if alsamixer command returns error, it’s probably because you have more than one sound card. In that case, you need to specify the sound card number (refer to the inxi output I mentioned in the beginning) like this:
Fourth alternate method to fix no audio in Ubuntu
Speed dispatcher is the feature that allows your system to convert text to speech. Sometimes, it conflicts with other audio settings. If you do not need this feature, you may try disabling it as it may bring your audio back.
Open the terminal and edit speech-dispatcher file by using the following command:
sudo gedit /etc/default/speech-dispatcherIn here, change RUN=yes to RUN=no . Reboot and enjoy the sound.
Fifth alternate method (specially for Lenovo Carbon X1)
A few of It’s FOSS readers mentioned that none of the above methods worked for their Lenovo Thinkpad Carbon X1 7th Gen laptop.
I looked into various places and found that this newer model has issues with Linux. While Linux kernel 5.5 and above versions has improved support for this model, it is still tricky for Ubuntu 18.04 and Mint 19 users because the kernel in use is still 5.3.
Check your Linux kernel version and if it is 5.4 or lower, try this possible workaround that is suggested by Arch Linux and Ubuntu developers.
Open the alsa configuration file (command might be different for Mint because Gedit text editor is not used in Mint):
sudo gedit /etc/modprobe.d/alsa-base.confAdd the following line to the end of this file:
options snd-hda-intel dmic_detect=0Save and close the file and reboot your system. You should have the audio back.
If it fixed your sound problem, you may want to fix brightness issue as well. Fixing the sound problem is definitely one of the must do things after installing Ubuntu.

If one of the above mentioned methods worked for you, please leave a comment below specifying the method that saved your day. Any other suggestions and feedback is also welcomed.
Как исправить отсутствие звука в Ubuntu и Linux Mint

Нет звука в свежей установке Ubuntu? Видите только фиктивный вывод? Без проблем. Вот несколько методов, с помощью которых вы можете попробовать пофиксить проблему отсутствия звука в Ubuntu и других дистрибутивах Linux
Как это происходит с каждым новым выпуском Ubuntu, вы устанавливаете или обновляете свою ось до свежей версии Ubuntu и сталкиваетесь с рядом проблем. Но всегда есть способ преодолеть эти не большие, но досадные неприятности.
Одна из наиболее распространенных проблем — отсутствие звука после установки Ubuntu. Есть несколько причин отсутствия звука в Ubuntu, но я расскажу о тех приемах, которые сработали в моем случае.
Давайте же пристальнее рассмотрим те шаги, с помощью которых я исправил подобную проблему и как можете исправить ее вы.
Различные способы исправить отсутствие звука в Ubuntu
Причины отсутствия звука в Ubuntu могут быть совершенно разными. И, так как решение зависит от типа проблемы, я предлагаю получить некоторую информацию о вашей системе, особенно об оборудовании, связанным со звуком.
Сначала установите инструмент inxi:
Теперь проверьте информацию о системе, машине и аудио с помощью этой команды:
Вы должны увидеть примерно такую информацию:
Host: itsfoss Kernel: 5.4.0-18-generic x86_64 bits: 64 Desktop: Gnome 3.35.91 Distro: Ubuntu 20.04 LTS (Focal Fossa) Type: Laptop System: Dell product: XPS 13 9360 v: N/A Mobo: Dell model: 05JK94 v: A00 serial: UEFI: Dell v: 2.13.0 date: 11/14/2019 Device-1: Intel Sunrise Point-LP HD Audio driver: snd_hda_intel Sound Server: ALSA v: k5.4.0-18-generic Присмотритесь к аудио части вышеприведенного вывода. Он сообщает, что это Intel Sunrise Point-LP HD Audio, и у него есть драйвер Linux snd_hda_intel, и звук обслуживается Alsa. Эта информация может быть полезна на некоторых этапах устранения неполадок со звуком.
Исправление фиктивного вывода в настройках звука
Первый шаг, чисто, что называется, «для отчистки совести», проверьте, не замьючен ли звук. Убедившись в этом, перейдите в Настройки звука:
В настройках звука вы обнаружите, что здесь практически ничего нет, кроме фиктивного выхода. Довольно неприятно. Это означает, что ваша звуковая карта даже не распознается. Ба-дум-тс!

Без паники. Единственное решение, которое устранило проблему со звуком на моем Dell Inspiron с процессором Intel, — это принудительная перезагрузка Alsa. Для этого используйте в терминале следующую команду (Ctrl + Alt + T):

Вы можете подумать, что процесс подвис или все еще обрабатывается, но сам процесс занимает всего пару секунд. Вы можете просто закрыть террминал, нажав Ctrl + C.
Теперь вам нужно перезагрузить компьютер. А после: либо воспроизвести музыкальные или видеофайлы, либо заглянуть в настройки системы, что бы выяснить сработал ли этот способ.
Первый альтернативный способ исправить отсутствие звука в Ubuntu
Если прошлый способ не помог вам в устранении проблемы, попробуйте переустановить Alsa и Pulse audio следующим образом.
sudo apt-get install --reinstall alsa-base pulseaudioИ снова принудительно перезагрузите Alsa:
Перезагрузитесь и проверьте, вернулся ли звук.
Второй альтернативный способ исправить отсутствие звука в Ubuntu
Перейдите в свой домашнюю директорию, а затем перейдите в скрытый каталог конфигурации. Переименуйте здесь каталог с именем pulse:
mv ~/.config/pulse ~/.config/old_pulseТеперь перезагрузите вашу систему. Каталог Pulse будет создан заново, и у вас должен восстановиться звук.
Третий альтернативный метод: попробуйте alsamixer
Откройте терминал и используйте следующую команду, чтобы открыть alsamixer:
Вы должны увидеть такой экран:

Проверьте, отключены ли здесь динамики или желаемый аудиовыход. MM означает отключение звука, а OO означает включение. Если желаемый аудиовыход (в основном это динамики) или мастер отключен, включите его.
Вы можете закрыть экран alsamixer, нажав клавишу Esc.
Обратите внимание: если команда alsamixer возвращает ошибку, возможно, это связано с тем, что у вас более одной звуковой карты. В этом случае вам нужно указать номер звуковой карты (см. Вывод inxi, который я упоминал в начале) следующим образом:
Четвертый альтернативный способ исправить отсутствие звука в Ubuntu
Диспетчер скорости (speed dispatcher) — это функция, которая позволяет вашей системе преобразовывать текст в речь. Иногда она конфликтует с другими настройками звука. Если вам не нужна эта функция, вы можете попробовать отключить ее, возможно это вернет вам звук.
Откройте терминал и отредактируйте файл диспетчера речи с помощью следующей команды:
sudo gedit /etc/default/speech-dispatcherЗдесь измените RUN = yes на RUN = no. Перезагрузитесь и наслаждайтесь звуком.
Пятый альтернативный метод (специально для Lenovo Carbon X1)
Некоторые из наших читателей отметили, что ни один из вышеперечисленных методов не помог их ноутбуку Lenovo Thinkpad Carbon X1 7-го поколения.
Я изучил проблему и обнаружил следующее. У этой модели есть проблемы с Linux. Хотя в ядре Linux 5.5 и более поздних версиях улучшена поддержка этой модели, но для пользователей Ubuntu 18.04 и Mint 19, в которых используется ядро более ранней версии — 5.3, все еще остаются проблемы.
Проверьте версию ядра Linux, и если она 5.4 или ниже, попробуйте следующий обходной путь, предложенный разработчиками Arch Linux и Ubuntu.
Откройте файл конфигурации alsa (команда может быть другой для Mint, потому что текстовый редактор Gedit не используется в Mint):
sudo gedit /etc/modprobe.d/alsa-base.confДобавьте в конец этого файла следующую строку:
options snd-hda-intel dmic_detect=0Сохраните и закройте файл и перезагрузите систему. После этих действий звук должен вернуться.
Устранение проблемы со звуком, безусловно, является одним из обязательных действий после установки Ubuntu.
Если один из вышеупомянутых методов сработал для вас, оставьте комментарий ниже, указав метод, который сэкономил вам время. Также приветствуются любые другие предложения и отзывы.