- how to mount or load an USB flash drive in linux
- Required Permissions for mounting the USB drive
- Finding the device name
- Mounting the device
- Unmouting the drive
- Как смонтировать USB-HDD в Linux
- 1. Обнаружение USB-диска
- 2. Создание точки монтирования
- 3. Монтирование USB-диска
- 4. Доступ к данным на USB-диске
- Размонтирование USB-диска
- Постоянное монтирование USB-диска в Linux
- Заключение
This post and this website contains affiliate links. See my disclosure about affiliate links.
how to mount or load an USB flash drive in linux
Most modern Linux and Unix distros are mostly plug and play when it comes to using data storage devices like the USB flash drive or an external hard drive. Some of the desktop environments like the KDE or Gnome will also auto mount the device when it is plugged in and make it writable as well.
That being the case, if you have an older system then the system may not recognize any of the data storage devices unless it is explicitly mounted. Another situation is when you are logged in remotely into a machine using ssh or telnet or if your machine does not have a desktop environment installed, then knowing how to mount and read from a USB flash drive might be helpful.
Another scenario where this comes quite handy is when your KDE or Gnome would not start up for any reason and you have to get some configuration files or packages copied and installed from the console to get the environment to run again. If you run the unstable testing version of the Gentoo distribution while compiling all the bleeding edge softwares willy-nilly, you will have this scenario more often than you think.
Required Permissions for mounting the USB drive
In order to mount an USB flash drive and for that matter any data storage device, you need to have the appropriate permissions. The easiest way to make sure that you have all the required permissions is to use the superuser credentials. If you prefer not to use the superuser account or do not have access to the super user, then you will have to make sure that you have the permissions to access and mount the USB drives on the machine.
If there is going to be only a specific number of flash drives that will be used at one time and also if you know the specifics of the drive then adding them to the fstab configuration will enable it to be auto-mounted when plugged in. But, if you want permissions to mount the drive manually as an user, then it is a little more complicated. It involves playing around with the sudoers configuration files (eg. /etc/sudoers) and is beyond the scope of this particular post.
The easiest way as I mentioned earlier is to use the super user credentials. If you are not the super user, then contact the administrators to grant you permissions.
Finding the device name
Next, you need to find if the plugged in device has been detected by the system and if so, which device name the USB flash drive is attached to. There are several ways to find this as explained below.
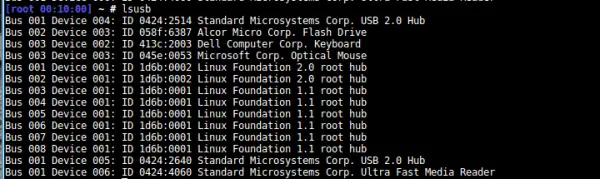
lsusb: This is a quick handy command that lets you verify that the flash drive was detected by the machine. This does not exactly show you the device name that you are looking for, but is a quick way to see if the drive is detected. In the output of the command, look for the flash drive name and description. If you are unable to find or identify it, then remove the drive and execute the lsusb command. Then plug in the drive, execute the command again and compare the output to the previous one.
/proc/scsi/scsi: Another method to check if the drive is identified correctly is to check the /proc filesystem for scsi devices. You can view all the currently identified SCSI devices by printing out the /proc/scsi/scsi.

If your device is still not getting identified, then your best bet is to start a scan of all scsi devices. You can do this with the rescan-scsi-bus command, and your device should be identified.
fdisk -l: This command lists all the partitions on all the devices. You should be able to identify the device name from the output of the command. Look for something like /dev/sdc1 or /dev/sdd1 towards the end of the output.
dmesg | grep sd: This command will print out the attached devices on /dev/ with the prefix sd, which is usually the default. You are basically looking for lines which says something like “Attached SCSI removable disk“, so a more specific grep expression might be dmesg | grep SCSI.
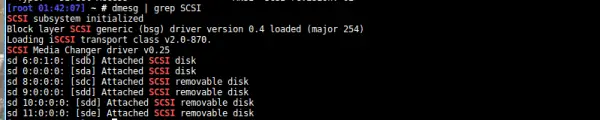
From this output, you will see that the device name we are looking for is /dev/sde which was the last USB drive or a removable disk to be plugged in.
Mounting the device
Once you have successfully identified the device name, then you need to mount the file system on the device so that you can start accessing it. In order to do that, you need a mount directory or a mount point as it is called. This can be any directory on your file system or you can create new one for this. Here we create a new directory called myusbdrive.
Now we can mount the device file system to this folder using the mount command. The general syntax of the mount command is “mount something somewhere“. So, to mount the usb device to myusbdrive folder,
bash$ mount /dev/sde1 /mnt/myusbdrive
If the filesystem on the usb drive is identified by the system, then it will use that to load it. Sometimes, the system cannot identify the file system format correctly or you want to force the system to use a particular FS format. You can specify almost any of the file system formats like vfat, ext3, reiserfs etc while you mount the drive
bash$ mount -t vfat /dev/sdc1 /mnt/myusbdrive
Once the device has been mounted, it can then be used just as any other Linux folder or directory. You can copy, delete and create files into the drive just as you would do with a directory. Once you have completed the work on the USB flash drive or the data storage device, you want to unmount it gracefully so that you can remove the flash drive. This is similar to the eject function in Windows.
Also, remember that it is possible to mount the same device onto multiple locations.
Unmouting the drive
To unmount the device, you can use the umount command to do so. You cannot un-mount the file system if it is in a ‘busy‘ state such as a file being open or a copy or delete command is still executing.
bash$ umount /mnt/myusbdrive
You should always un-mount using the mount point, the directory where the device was mounted. Specifying the device name (eg; /dev/sdc1) will also work, but it will fail if the device have been mounted to multiple directories.
Как смонтировать USB-HDD в Linux
В данной статье описано, как подключить USB-диск в системе Linux с помощью терминала и командной строки shell. Если вы пользуетесь менеджером рабочего стола, то, скорее всего, сможете использовать его для монтирования USB-диска.
Монтирование USB-диска ничем не отличается от монтирования флешки или даже обычного SATA-диска.
В этом руководстве вы узнаете, как:
1. Обнаружение USB-диска
После подключения USB-устройства к USB-порту система Linux добавляет новое блочное устройство в каталог /dev/. На данном этапе вы не можете использовать это устройство, так как файловая система устройства USB должна быть смонтирована, прежде чем вы сможете получить или сохранить какие-либо данные. Чтобы узнать, какое имя имеет файл блочного устройства, нужно выполнить команду fdisk -l.
Команда fdisk требует административных привилегий для доступа к необходимой информации, поэтому ее необходимо выполнять от имени пользователя root или с использованием префикса sudo.
После выполнения вышеуказанной команды вы получите результат, аналогичный приведенному ниже:
Disk /dev/sdc: 7.4 GiB, 7948206080 bytes, 15523840 sectors Units: sectors of 1 * 512 = 512 bytes Sector size (logical/physical): 512 bytes / 512 bytes I/O size (minimum/optimal): 512 bytes / 512 bytes Disklabel type: dos Disk identifier: 0x00000000 Device Boot Start End Sectors Size Id Type /dev/sdc1 * 8192 15523839 15515648 7.4G b W95 FAT32
В приведенном выше отчете, скорее всего, будет перечислено несколько дисков, подключенных к вашей системе. Найдите свой USB-диск по его размеру и файловой системе. Когда все готово, запишите имя блочного устройства раздела, который вы собираетесь монтировать. Например, в нашем случае это будет /dev/sdc1 с файловой системой FAT32.
2. Создание точки монтирования
Прежде чем использовать команду mount для монтирования раздела USB-диска, необходимо создать точку монтирования. Точкой монтирования может быть любой новый или существующий каталог в файловой системе хоста. Используйте команду mkdir для создания нового каталога точки монтирования, в который вы хотите смонтировать USB-устройство. Например:
3. Монтирование USB-диска
На этом этапе можно монтировать раздел USB-диска /dev/sdc1 в точку монтирования /media/usb-drive:
# mount /dev/sdc1 /media/usb-drive/
Чтобы проверить, правильно ли смонтирован ваш USB-диск, снова выполните команду mount без каких-либо аргументов и используйте grep для поиска имени устройства USB-блока:
# mount | grep sdc1 /dev/sdc1 on /media/usb-drive type vfat (rw,relatime,fmask=0022,dmask=0022,codepage=437,iocharset=utf8,shortname=mixed,errors=remount-ro
Если команда mount не выводит никаких данных, ваш USB-раздел не смонтирован. Кроме того, проверьте, правильно ли вы использовали имя устройства блока в приведенной выше команде.
4. Доступ к данным на USB-диске
Если все прошло успешно, мы можем получить доступ к нашим данным на накопителе USB, просто перейдя к ранее созданной точке монтирования /media/usb-drive:
Размонтирование USB-диска
Прежде чем размонтировать наш раздел расположенный на USB-диске, мы должны убедиться, что ни один процесс не использует каталог точки монтирования и не обращается к нему, иначе мы получим сообщение об ошибке, подобное приведенному ниже:
umount: /media/usb-drive: target is busy (In some cases useful info about processes that use the device is found by lsof(8) or fuser(1).)
Для размонтирования USB-диска, выполните следующую команду linux:
Постоянное монтирование USB-диска в Linux
Если у вас имеет место постоянное подключение USB-диска и чтобы после перезагрузки диск автоматически монтировался, добавьте следующую строку в конфигурационный файл /etc/fstab:
/dev/sdc1 /media/usb-drive vfat defaults 0 0
Обращение к USB-диску по имени блочного устройства из /etc/fstab может оказаться не лучшим решением. В зависимости от количества USB-накопителей, доступных в вашей системе Linux, имя блочного устройства может меняться. Хотя это может послужить хорошим временным решением, но лучше использовать исходное имя блочного устройства UUID, как описано ниже.
По этой причине рекомендуется использовать UUID раздела. Для этого сначала найдите UUID вашего USB-диска:
# ls -l /dev/disk/by-uuid/* lrwxrwxrwx 1 root root 10 Mar 27 23:38 /dev/disk/by-uuid/2016-08-30-11-31-31-00 -> ../../sdb1 lrwxrwxrwx 1 root root 10 Mar 27 23:38 /dev/disk/by-uuid/3eccfd4e-bd8b-4b5f-9fd8-4414a32ac289 -> ../../sda1 lrwxrwxrwx 1 root root 10 Mar 27 23:38 /dev/disk/by-uuid/4082248b-809d-4e63-93d2-56b5f13c875f -> ../../sda5 lrwxrwxrwx 1 root root 10 Mar 28 01:09 /dev/disk/by-uuid/8765-4321 -> ../../sdc1 lrwxrwxrwx 1 root root 10 Mar 27 23:38 /dev/disk/by-uuid/E6E3-F2A2 -> ../../sdb2
На основании вышеприведенного результата команды ls мы видим, что UUID, принадлежащий блочному устройству sdc1, имеет значение 8765-4321, поэтому наша строка монтирования в /etc/fstab будет иметь следующий вид:
/dev/disk/by-uuid/8765-4321 /media/usb-drive vfat 0 0
Теперь выполните команду mount -a, чтобы смонтировать все еще не смонтированные устройства, без перезагрузки системы
Заключение
В этой статье мы рассмотрели, как монтировать USB-диск в системе Linux, чтобы получить доступ к его данным и сохранить на нем новые данные. Linux позволяет либо временно монтировать USB-диск, который мы вставляем, либо сделать постоянное монтирование устройств хранения, которые мы не планируем извлекать. Независимо от того, есть ли у вас маленькая флешка или огромный внешний диск, приведенные здесь команды должны помочь смонтировать ваш USB-накопитель.
Если не указано иное, содержимое этой вики предоставляется на условиях следующей лицензии:
CC Attribution-Noncommercial-Share Alike 4.0 International