- Setup localhost site in apache?
- 3 Answers 3
- How To Create A Localhost Web Site In Linux Using Apache Web Server
- Apache Server Installation
- Site Creation
- how can I get the localhost IP for the ubuntu linux [closed]
- 1 Answer 1
- Quickly setup a localhost environment in Ubuntu
- Install LAMP stack
- Test Apache Webserver
- Test PHP
- Install phpMyAdmin
- Test phpMyAdmin
- Building products is quite hard!
- Thank you for subscribing!
Setup localhost site in apache?
I’ve been searching for weeks on how to setup the localhost enviroment on ubuntu without any good solutions. This is what I want to achieve: I want to have My root folder as such /home/’username’/Sites/’projectname.pl’ or /home/’username’/Sites/pl/’projectname’/public (or simular) When accessing my localhost i don’t wanna have to write localhost/’projectname’/public (or whatnot) I would like to be able to access the project just by typing http://’projectname’.pl I know this is achievable on the apache server on OSX but I haven’t been able to find any guides to achieve this on my Ubuntu-machine. I would really be grateful of any help, and I really hope it’s possible. Regards!
3 Answers 3
You can set up your vhosts in
For every vhost you like to have make a conf file in this directory. In the vhost configuration you can set your document root. The name of the file must end with .conf
So for example: /etc/apache2/sites-available/projectname.conf:
ServerName projectname.pl DocumentRoot "/home/Sites/projectname/public" Now enable your site with:
sudo a2ensite projectname sudo /etc/init.d/apache2 restart Then edit your /etc/hosts file.
Now you can access your site with http://projectname.pl
Thank you for your answer. I used som illegal chars in my question which resulted in som text falling out. I have updated my question now. Please refer to it again and see if there is something else I have to do to get it to work. Regards!
The two key points here are naming the apache config with an extension of config and restarting apache afterwards.
Just to add to the other answers here, the way I have configured such behaviour is with symlinks. Seems to work fine. It is very easy to do, and does not require any configuration files.
sudo ln -s ~/path/to/yoursite/ /var/www/html/yoursite The last portion of the above may be different for you. The above is what I use in Linux Mint 17. The ‘/var/www/html/’ directory is the default apache «site» folder.
So yeah, for anyone who is looking for a clean, easy method to map a site without actually placing their site’s directory in the default apache folder, there ya go.
Note: I am not sure if the above is appropriate for production environments, but for local development, it seems to be okay. The reason I am unsure is because the symlink carries the permissions of the folder in the home directory, which is (most likely) «owned» by the user. If you need to, you can obviously change that to the more secure ‘root’ like the apache directory, but I leave mine alone as I am just using this in a development environment.
How To Create A Localhost Web Site In Linux Using Apache Web Server
Localhost is a hosting place in your own computer. There are a vast number of Localhost servers you can use. The most used and popular of them is Apache. Localhost enables you to test your work on your computer itself, instead of testing on a live server on the web. If you are creating a project, Localhost is the best place to test that project. In this tutorial I will show you how to create a localhost site running on Apache Server in any Linux Distribution.
This tutorial is for Ubuntu versions 10.10 and below. The latest versions from 11.04 should see this tutorial.
Apache Server Installation
We need to install Apache server first. To install Apache Web Server open Terminal and do the following command :
sudo apt-get install apache2The Apache Server will be downloaded and installed automatically. After installation continue to the next part of this tutorial.
Site Creation
Open the Terminal CTRL + ALT + T. Make a copy of /etc/apache2/sites-available/default, let’s make the copy name mysite. (Name depends on the site you wish to create). The following command wil copy the file and name the new file as mysite.
sudo cp /etc/apache2/sites-available/default /etc/apache2/sites-available/mysiteNow edit the new file to configure :
sudo gedit /etc/apache2/sites-available/mysiteThen, Add the following contents in the file using gedit we just opened. Please read the 3 conditions below and then paste the content.
- You will need to change the codes ‘username’ shown below to your home folder name.
- You will need to change the names ‘mysite’ shown below to your desired site name.
- You can also change the web address of your site by renaming «mysite.com» to the site address you want.
Content that should be added to the file :
*:80> ServerAdmin [email protected] ServerName mysite.com DocumentRoot /home/username/mysite /home/username/mysite/> Options Indexes FollowSymLinks MultiViews AllowOverride All Order allow,deny allow from all ErrorLog /var/log/apache2/mysite/error.log # Possible values include: debug, info, notice, warn, error, crit, # alert, emerg. LogLevel warn CustomLog /var/log/apache2/mysite/access.log combined Once you’ve saved these changes, you’ll need to enable the site. ( You will need to change the name ‘mysite’ shown below to the name of the file you create at «/etc/apache2/sites-available/« ).
cd /etc/apache2/sites-available && sudo a2ensite mysiteWe specified a separate directory for storing log files, so we’ll need to create that log directory.( You have to change the name ‘mysite’ shown below to the name you given in the configuration file on «/etc/apache2/sites-available/« ).
sudo mkdir /var/log/apache2/mysiteFinally, we need to point the site address to localhost in your hosts file. For that, Edit /etc/hosts :
and add the following at the end of the file. ( You need to change the web address «mysite.com» shown below to your address given on the file in sites-available folder ).
Now we restart Apache Server using Terminal to apply all the changes we made.
sudo /etc/init.d/apache2 restartYou can now store all your work in /home/ you home name / site name and navigate to it by pointing your browser to the address you gave.
how can I get the localhost IP for the ubuntu linux [closed]
Closed. This question does not meet Stack Overflow guidelines. It is not currently accepting answers.
This question does not appear to be about a specific programming problem, a software algorithm, or software tools primarily used by programmers. If you believe the question would be on-topic on another Stack Exchange site, you can leave a comment to explain where the question may be able to be answered.
I want to setup a Linux server, but the first step is how can I get the localhost IP for the Linux, thus I can load this IP to show the page on another machine. Thanks
1 Answer 1
This probably belongs on serverfault but:
- First off, calling it localhost is incorrect terminology. Your localhost IP address is 127.0.0.1, which also happens to be my localhost IP address and most everyone else who doesn’t get clever.
- I’m assuming you meant the public IP address of the machine. /sbin/ifconfig should give you that information, and there are also Graphical ways to get. Are you looking to do this programatically or is that sufficient? (Or ip addr since i keep forgetting ifconfig has been «deprecated»)
- Caveat one: depending on your web server (or other server), you may or may not need to modify your firewall and/or your settings so that it is served on your public IP address. (Some servers, e.g. the django development server, default to only listening on your local interface and are therefore only accessible locally on that server and not to other servers.)
- Caveat two: if you’re running on a home network, you probably have a private IP address (e.g. 192.168.1.6); this is accessible to other computers on your home network but not to the outside world. Enabling the latter generally requires enabling port forwarding which is a separate question and may or may not be allowed by your ISP.
Terminology must depend on context. In the Java runtime library, getLocalHost() and getLoopbackAddress() are distinct methods. getLoopbackAddress() always returns the loopback address which is what you’re calling localhost. getLocalHost() essentially looks up the hostname and then gets the address for that, so it may return the external address. Just a bit of trivia.
Quickly setup a localhost environment in Ubuntu
Although, I use Ubuntu, this should apply to a large number of linux distros. Every developer uses a local environment to develop locally before testing it live. I kinda avoid that root by mounting my FTP webspace in Ubuntu and directly working on live files (there is no need of download and upload as you […]
Although, I use Ubuntu, this should apply to a large number of linux distros. Every developer uses a local environment to develop locally before testing it live. I kinda avoid that root by mounting my FTP webspace in Ubuntu and directly working on live files (there is no need of download and upload as you might think), but I wanted to do some CPU intensive job for a client for which I needed to setup a localhost environment, so I thought I would share this with everyone on my blog.
Install LAMP stack
Fire up a terminal (Applications > Accessories > Terminal) and enter this command:
sudo apt-get install lamp-server^

Enter y for yes when it asks to continue after estimation of how much data will be downloaded and how much will be used on disk.
It will install quickly and can take a few minutes depending on your internet speed, and then it will ask you to setup the password for MySQL user root. It is usually left blank on localhost machines as they are used only for development purposes but last time I left it blank, I had to deal with the issues that it didn’t change the password to blank but has something else and I had to turn off the password prompt for root access. Avoid doing all that by just selecting “root” or anything you want as the password of the root user of MySQL.
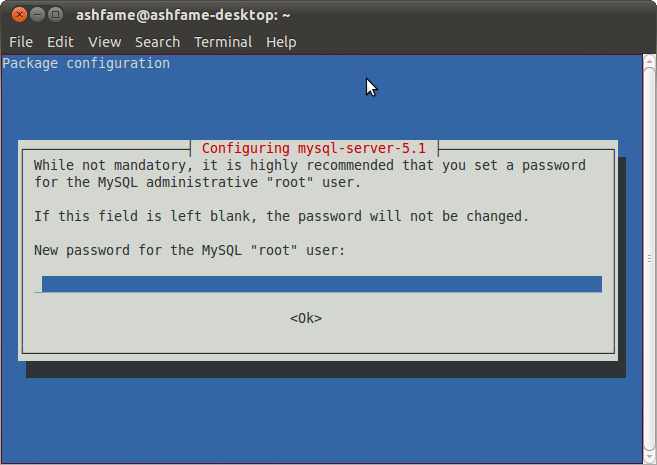
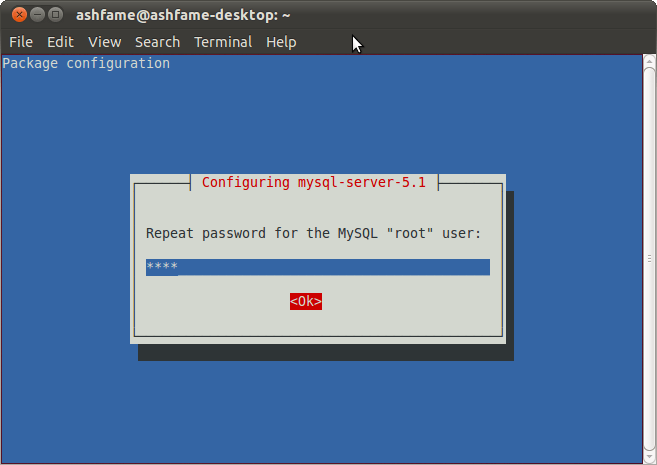
Confirm it once (Type the password and press Tab key).
Test Apache Webserver
Just open http://localhost/ in your browser and it will show up a message “It works!” which means Apache is working fine.
Test PHP
Create a file named phpinfo.php in /var/www/ to check if PHP is working fine.
sudo nano /var/www/phpinfo.php
Enter the content as and save the file by hitting Ctrl + X and then y (for yes) and return key (enter).
Restart Apache webserver by the following command – sudo /etc/init.d/apache2 restart
Now open http://localhost/phpinfo.php and it will show up a page with lots of php related information, if you can see it, PHP is working fine.
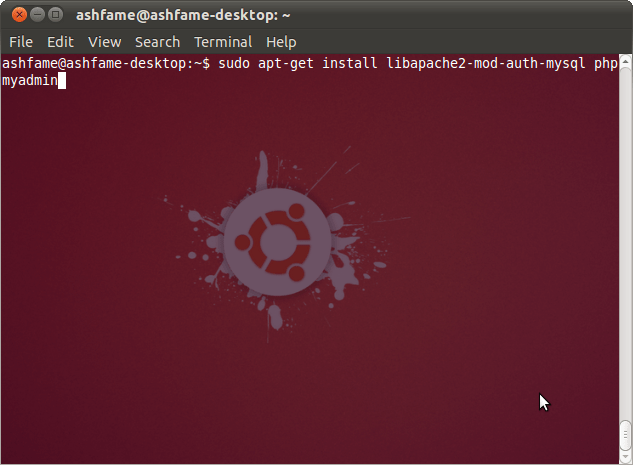
Install phpMyAdmin
Enter this command in terminal – sudo apt-get install libapache2-mod-auth-mysql phpmyadmin
Select Apache as the web server by pressing Space and then Tab key and press enter key.

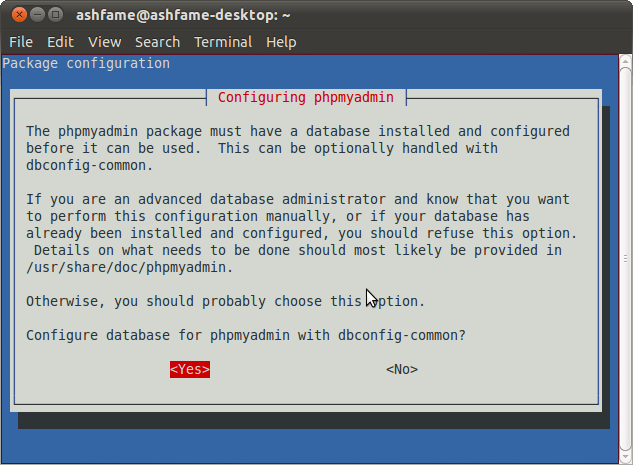
Press Yes to configure database for phpmyadmin.
Provide password which we set as “root” earlier.

Again, enter “root“.

Confirm it, and then you are done.

Test phpMyAdmin
Now open http://localhost/phpmyadmin/ in your brower to access phpmyadmin and you can login with username and password both as root.
Everything is done, you have your web root at /var/www/ where you will need super user permissions to write files, I will do a follow up post on how you can make this easier by keeping your files in your Home directory instead and a bit of extra which will make it totally complete.
Subscribe so that you don’t miss updates! RSS/Email options are in the sidebar.
Building products is quite hard!
Interested in hearing stories of my adventures?
Put your email below. No BS, I promise.
Thank you for subscribing!
I also live tweet stuff, a lot — @ashfame