- 10 locate command examples in Linux [Cheat Sheet]
- locate command vs. find command
- How to install locate command
- How to use locate command
- Different examples to use locate command
- 1. locate files having a specific name
- 2. Update a database file
- 3. Print only existing files at the time locate is run
- 4. Count the number of matching entries
- How to Use the locate Command in Linux
- How to Install locate
- How to Use the locate Command in Linux With Examples
- Search for a File
- Format the Output
- Show the Existing Files
- Count the Existing Files
- Disable Errors While Searching
- Limit the Number of Search Results
- Ignore Case Sensitive Files
- Search for a File with an Exact Name
- Separate Output Entries with ASCII NUL
- View Database Statistics
- Update locate Database
- Choose a Different mlocate Database
- Ignore Diacritics and Accent Differences
10 locate command examples in Linux [Cheat Sheet]
There are multiple tools in Linux that allows you to search files and directories in the system. locate is one of the most used tools for searching files in Unix-based operating systems. It locates the files by their names. It searches for files whose names match a specified pattern in the command.
locate command vs. find command
find is another popular command-line tool for searching files and directories in the Linux system. Both locate and find commands have similar functionality, but they work in different ways. locate searches files in the database whereas find searches files in the entire file system. Due to this, locate is faster than the find command in searching files. find has advanced options to search files based on different conditions, making it more powerful than the locate command.
How to install locate command
locate command is not installed by default in Linux systems. You can install locate command using the package manager tool of your Linux distros.
Install locate on Ubuntu, Debian, and Linux Mint:
Install locate on Fedora, CentOS, AlmaLinux, and Red Hat:
plocate is a replacement for the older mlocate package. If your system is unable to locate plocate package, use mlocate instead. When installing the plocate package, the plocate database is also initialized on the system.
How to use locate command
The syntax for using locate command is as follows:
Different examples to use locate command
1. locate files having a specific name
You can specify a file name to the locate command and search for all files that match the specified pattern. The following command locates all files having name test1.txt .
Sample Output:

2. Update a database file
If you just created new files, you have to update the database to show them in the locate command output. Also, if you get the deleted files in the output, then the database has not been updated yet.
You can manually update the database using the command below.
Sample Output:
After updating the database, you will get the updated file results.

The database is regularly updated every 24 hours automatically.
3. Print only existing files at the time locate is run
When you have not updated the database, the deleted files still appear in the result when locate command is used. To get only the names of files that exist at the time locate command is run, you can use -e or —existing flag.
Sample Output:

4. Count the number of matching entries
With -c or —count option, locate command displays the number of matching entries instead of printing their full path. The following command counts the number of all .txt files on the computer.
Sample Output:
How to Use the locate Command in Linux
The locate command is a Unix utility used for quickly finding files and directories. The command is a more convenient and efficient alternative to the find command, which is more aggressive and takes longer to complete the search.
Opposite to find , the locate command doesn’t search the entire filesystem, but looks through a regularly updated file database in the system. Thus, the search completes much faster.
In this tutorial, you will learn to install and use the locate command in Linux.

How to Install locate
Depending on which Linux distribution you are using, the locate package may not be pre-installed.
To check if locate is installed, enter:
If locate is installed on your distribution, the command prints the following output:

For this tutorial, we have used Ubuntu 20.04, which doesn’t come with the locate utility pre-installed. In this case, the output message is:

Install locate on Ubuntu and Debian
Follow the steps below to install locate on Ubuntu or Debian:
1. Update the package repository:
2. Install the locate package by running:
Install locate on CentOS and Fedora
Follow the steps below to install locate on CentOS or Fedora:
1. Update the package repository:
2. Run the following command to install locate :
Note: Installing the mlocate package creates a cron job that runs the updatedb command every 24 hours and updates the database. To manually update the database, use sudo updatedb .
How to Use the locate Command in Linux With Examples
The locate command finds files in Linux using the file name. locate is used for obtaining instantaneous results, and it is an essential utility when speed is a priority.
The command performs the search using a database containing bits of files with the corresponding paths in the system. However, locate doesn’t check for files outside the database, which means it doesn’t report about files created after the most recent database update.
The syntax for the locate command is:
| Option | Description |
|---|---|
| -A, —all | Displays only the entries matching all the specified pattern(s). |
| -b, —basename | Matches only the base name against the specified patterns. |
| -c, —count | Outputs the number of matching entries instead of the file names. |
| -d, —database [DBPATH] | Replaces the default database with [DBPATH] — a colon-separated list of database file names. |
| -e, —existing | Only displays entries for existing files. |
| -L, —follow | Use to check whether files exist if the —existing option is specified. The —follow option omits broken symbolic links. |
| -i, —ignore-case | Ignores pattern case sensitivity. |
| -p, —ignore-spaces | Ignores punctuation and spaces when matching patterns. |
| -t, —transliterate | Uses iconv transliteration to ignore accents and diacritics when matching patterns. |
| -l, —limit, -n [LIMIT] | Use to exit successfully after finding a [LIMIT] number of entries. |
| -0, —null | Separates output entries using the ASCII NUL character instead of printing each entry in a new line. |
| -S, —statistics | Prints the statistics about each read database to standard output instead of searching for files. |
| -q, —quiet | Hides any errors encountered while reading and processing databases. |
| -r, —regexp [REGEXP] | Used for searching a basic regular expression [REGEXP] . Specifying this option doesn’t allow [pattern] arguments. |
| -w, —wholename | Matches only the whole path name against the specified patterns. |
| -h, —help | Displays the help file with a list of all available options. |
The following sections list helpful examples of using the locate command.
Search for a File
The simplest way to use the locate command is to input the pattern you want to search for.
For example, search for all files containing the mysql pattern in the filename by running the following command:
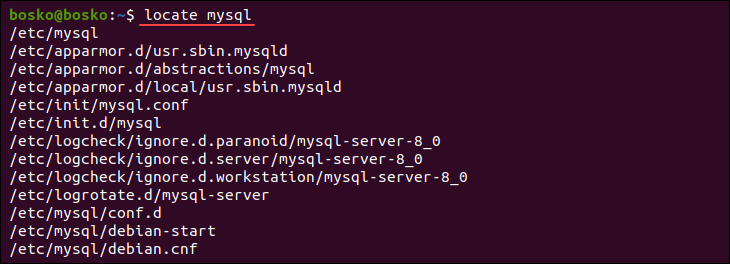
The output lists all the absolute paths for the files containing the mysql pattern in the filename.
Format the Output
When the search result is a long list of files, pipe the locate command into less for better readability and easier scrolling.

Navigate the output by pressing the Space bar to move forward, b to reverse, or Q to quit.
Show the Existing Files
While the locate command retrieves results almost instantaneously, the speed comes with a cost. Sometimes deleted files appear in the results because the database that locate reads hasn’t been updated since the files were deleted. Also, new files don’t appear in the results if they were created after the last database update.
Eliminate these shortcomings using the -e option to search the filesystem and include only the existing files in the results.

In the example above, we first deleted a file using rm . Searching for the file with locate shows the deleted file’s location. However, when using the -e option, locate shows no results since the file was removed.
Note: To permanently delete a file and prevent its recovery, use the shred command.
Count the Existing Files
Print the number of matched files instead of the file names and their absolute paths by specifying the -c option.

The output contains only the number of files containing the mysql string in the filename. All other information is suppressed.
Disable Errors While Searching
The -q option instructs locate to suppress any errors that might show up while reading a database.
In the following example, locate uses a different database to perform the search. The command first reports that the database doesn’t exist.
However, specifying the -q option suppresses the error:

Limit the Number of Search Results
Limit the number of search results with the -n option to avoid redundant results. For example, limit the search to only ten results by entering:
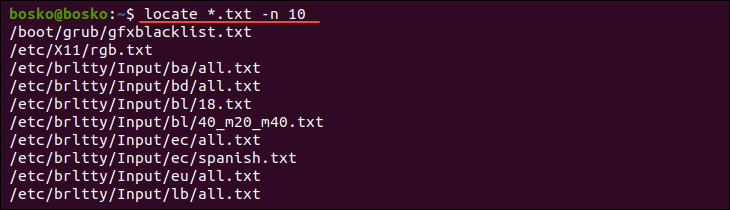
The output shows only the first ten files matching the search pattern.
Ignore Case Sensitive Files
By default, locate performs a case-sensitive search when processing the input query. Instruct locate to ignore case sensitivity using the -i option.
In the following example, we first searched for example_file in lowercase, and locate showed no output because the filename contains uppercase letters.
Searching for the file in uppercase shows the file’s location:

Performing the same search in lowercase and specifying the -i option ignores case-sensitivity and shows the file in the output:

Search for a File with an Exact Name
By default, locate parses the input pattern as a string and shows all files containing the input pattern within the filename. For example, searching for mysql shows all files containing the mysql string as part of the filename, instead of files whose entire filename is mysql.
Search for a file with an exact name using the -r (regular expression) option.

The output shows only the files whose filename completely matches the input pattern.
Note: The dollar sign ( $ ) at the end of a regular expression marks the end of a line. The forward slash character ( / ) denotes regular expression boundaries.
Separate Output Entries with ASCII NUL
The output entries that locate produces are separated by a newline ( \n ) character. Use the -0 option to separate entries with ASCII NUL instead of the newline character.
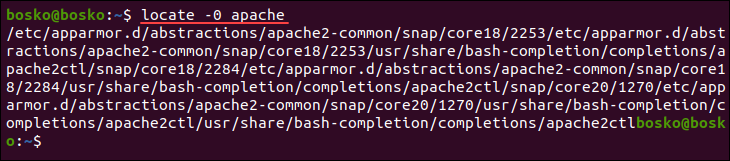
The default separator is no longer the newline character, and the entries are separated with ASCII NUL .
View Database Statistics
The locate command allows you to see various database statistics, including the number of directories and files stored in the database. To display database statistics, specify the -S option:

The output states which database locate is currently using, the number of directories and files, and the database size in bytes.
Note: Learn everything about databases in our comprehensive article on databases and database systems.
Update locate Database
The database that locate uses automatically updates daily at the same time. To update the database manually and make sure the file index is correct, run the following command:
The update process takes a few seconds to complete, depending on the number of files on the system.
Choose a Different mlocate Database
Instruct locate to use a database other than the default one by specifying the -d option. The feature is helpful when looking for results not present in the default mlocate database.
To specify a different database, use the following syntax:
locate -d [new database path] [pattern]Ignore Diacritics and Accent Differences
The locate command uses ordinary letters for result matching, which means that filenames containing letters with diacritics do not appear in the search results. Use the -t option to instruct locate to ignore such differences between letters and include diacritics in the results.

Searching for the nice-cafe pattern shows no results in the example above because the filename contains a diacritical mark. Searching for the same pattern again and specifying the -t option shows the nice-café file path as a result, ignoring the diacritic in the filename.
This guide showed how to use the locate command to quickly search for files in a filesystem. While the utility has its drawbacks, the utility is an excellent solution for finding files when speed is a priority.
For other useful Linux commands, check out our comprehensive Linux commands cheat sheet with a downloadable PDF document.