- Configuring Virtual Loopback and Null Interfaces on Cisco IOS XR Software
- Table Of Contents
- Configuring Virtual Loopback and Null Interfaces on the Cisco ASR 9000 Series Router
- Contents
- Prerequisites for Configuring Virtual Interfaces
- Information About Configuring Virtual Interfaces
- Virtual Loopback Interface Overview
- Null Interface Overview
- Virtual Management Interface Overview
- Active and Standby RPs and Virtual Interface Configuration
- How to Configure Virtual Interfaces
- Configuring Virtual Loopback Interfaces
- Restrictions
- SUMMARY STEPS
- Артём Санников
- Настройка интерфейса loopback на маршрутизаторе. Cisco packet tracer.
- Записи по теме
- Реализация интерфейса loopback в RouterOS
Configuring Virtual Loopback and Null Interfaces on Cisco IOS XR Software
The documentation set for this product strives to use bias-free language. For the purposes of this documentation set, bias-free is defined as language that does not imply discrimination based on age, disability, gender, racial identity, ethnic identity, sexual orientation, socioeconomic status, and intersectionality. Exceptions may be present in the documentation due to language that is hardcoded in the user interfaces of the product software, language used based on RFP documentation, or language that is used by a referenced third-party product. Learn more about how Cisco is using Inclusive Language.
Table Of Contents
Configuring Virtual Loopback and Null Interfaces on the Cisco ASR 9000 Series Router
This module describes the configuration of loopback and null interfaces on the Cisco ASR 9000 Series Aggregation Services Routers.
Loopback and null interfaces are considered virtual interfaces.
A virtual interface represents a logical packet switching entity within the router. Virtual interfaces have a global scope and do not have an associated location. Virtual interfaces have instead a globally unique numerical ID after their names. Examples are Loopback 0, Loopback 1, and Loopback 99999. The ID is unique per virtual interface type to make the entire name string unique such that you can have both Loopback 0 and Null 0.
Loopback and null interfaces have their control plane presence on the active route switch processor (RSP). The configuration and control plane are mirrored onto the standby RSP and, in the event of a failover, the virtual interfaces move to the ex-standby, which then becomes the newly active RSP.
Feature History for Configuring Loopback and Null Interfaces on Cisco IOS XR Software
Contents
Prerequisites for Configuring Virtual Interfaces
You must be in a user group associated with a task group that includes the proper task IDs. The command reference guides include the task IDs required for each command. If you suspect user group assignment is preventing you from using a command, contact your AAA administrator for assistance.
Information About Configuring Virtual Interfaces
Virtual Loopback Interface Overview
A virtual loopback interface is a virtual interface with a single endpoint that is always up. Any packet transmitted over a virtual loopback interface is immediately received by the selfsame interface. Loopback interfaces emulate a physical interface.
In Cisco IOS XR software, virtual loopback interfaces perform the following functions:
•Loopback interfaces can act as a termination address for routing protocol sessions. This allows routing protocol sessions to stay up even if the outbound interface is down.
•You can ping the loopback interface to verify that the router IP stack is working properly.
In applications where other routers or access servers attempt to reach a virtual loopback interface, you must configure a routing protocol to distribute the subnet assigned to the loopback address.
Packets routed to the loopback interface are rerouted back to the router or access server and processed locally. IP packets routed out the loopback interface but not destined to the loopback interface are dropped. Under these two conditions, the loopback interface can behave like a null interface.
Null Interface Overview
A null interface functions similarly to the null devices available on most operating systems. This interface is always up and can never forward or receive traffic; encapsulation always fails. The null interface provides an alternative method of filtering traffic. You can avoid the overhead involved with using access lists by directing undesired network traffic to the null interface.
The only interface configuration command that you can specify for the null interface is the ipv4 unreachables command. With the ipv4 unreachables command, if the software receives a nonbroadcast packet destined for itself that uses a protocol it does not recognize, it sends an Internet Control Message Protocol (ICMP) protocol unreachable message to the source. If the software receives a datagram that it cannot deliver to its ultimate destination because it knows of no route to the destination address, it replies to the originator of that datagram with an ICMP host unreachable message.
The Null 0 interface is created by default on the RSP during boot and cannot be removed. The ipv4 unreachables command can be configured for this interface, but most configuration is unnecessary because this interface just discards all the packets sent to it.
The Null 0 interface can be displayed with the show interfaces null0 command.
Virtual Management Interface Overview
Configuring an IPv4 virtual address enables you to access the router from a single virtual address with a management network without prior knowledge of which RSP is active. An IPv4 virtual address persists across route switch processor (RSP) failover situations. For this to happen, the virtual IPv4 address must share a common IPv4 subnet with a management Ethernet interface on both RPs.
On a Cisco ASR 9000 Series Router where each RSP has multiple management Ethernet interfaces, the virtual IPv4 address maps to the management Ethernet interface on the active RSP that shares the same IP subnet.
Active and Standby RPs and Virtual Interface Configuration
The standby RSP is available and in a state in which it can take over the work from the active RSP should that prove necessary. Conditions that necessitate the standby RSP to become the active RSP and assume the active RSP’s duties include:
•Failure detection by a watchdog
•Administrative command to take over
•Removal of the active RSP from the chassis
If a second RSP is not present in the chassis while the first is in operation, a second RSP may be inserted and automatically becomes the standby RSP. The standby RSP may also be removed from the chassis with no effect on the system other than loss of RSP redundancy.
After failover, the virtual interfaces all are present on the standby (now active) RSP. Their state and configuration are unchanged and there has been no loss of forwarding (in the case of tunnels) over the interfaces during the failover. The routers use nonstop forwarding (NSF) over bundles and tunnels through the failover of the host RSP.
| Note The user need not configure anything to guarantee that the standby interface configurations are maintained. Protocol configuration such as tacacs source-interface, snmp-server trap-source, ntp source, logging source-interface are not using the virtual mgmt ip address as their source by default. Use the command «ipv4 virtual address use-as-src-addr» to have the protocol use the virtual ipv4 address as its source address.Alternatively, you can also configure a loopback address with the designated/desired ipv4 address and set that as source for protocols such as TACACS+ via the command «tacacs source-interface» |
How to Configure Virtual Interfaces
Configuring Virtual Loopback Interfaces
This task explains how to configure a basic loopback interface.
Restrictions
The IP address of a loopback interface must be unique across all routers on the network. It must not be used by another interface on the router, and it must not be used by an interface on any other router on the network.
SUMMARY STEPS
1. configure
2. interface loopback instance
3. ipv4 address ip-address
4. end
or
commit
5. show interfaces type instance
Артём Санников
Данная книга является руководством для начинающих специалистов в области анализа и обработки данных. В книге рассматривается язык SQL и его процедурное расширение PL/SQL от компании Oracle.

Главная › Cisco › Cisco Packet Tracer › Настройка интерфейса loopback на маршрутизаторе. Cisco packet tracer.
Настройка интерфейса loopback на маршрутизаторе. Cisco packet tracer.
Интерфейс loopback — это логический интерфейс внутри маршрутизатора. Он не назначается физическому порту, поэтому его нельзя подключить к другому устройству. Он считается программным интерфейсом, который автоматически переводится в состояние up (активен) во время работы маршрутизатора.
Важно: На маршрутизаторе можно активировать несколько интерфейсов loopback. IPv4-адрес для каждого интерфейса loopback должен быть уникальным и не должен быть задействован другим интерфейсом.
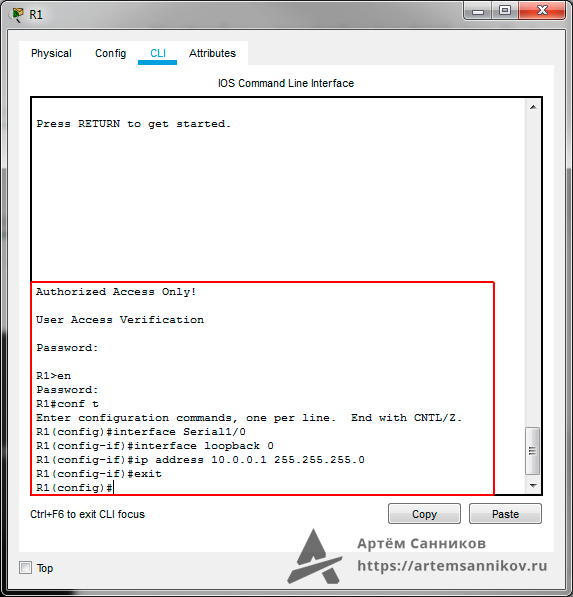
R1>en // Переходим в привилегированный режим EXEC
R1#conf t // Переходим в режим глобальной конфигурации
Enter configuration commands, one per line. End with CNTL/Z.
R1(config)#interface Serial1/0 // Выбираем интерфейс для дальнейшей настройки
R1(config-if)#interface loopback 0 // Включаем интерфейс loopback
R1(config-if)#ip address 10.0.0.1 255.255.255.0 // Назначаем loopback адрес
R1(config-if)#exit // Выходим из режима конфигурации интерфейса
Результат настройки интерфейса loopback на маршрутизаторе.
Записи по теме
Реализация интерфейса loopback в RouterOS

Когда мы говорим о loopback, большинство людей будут иметь в виду IP-адрес loopback (хорошо известный адрес 127.0.0.1 или :: 1 в IPv6). Этот адрес используется для тестирования стека TCP или для перенаправления любого соединения обратно на тот же узел.
Имя FQDN этого адреса IP — localhost. Можете убедиться — откройте командную строку (или терминал Linux) и введите:
И это самый запутанный момент. Если IP-адрес loopback указывает на localhost, как можно создать интерфейс loopback? И в чем разница?
Для чего нужен интерфейс loopback?
Нам необходимо создать программный интерфейс внутри маршрутизатора таким образом, чтобы он работал при любых обстоятельствах, пока маршрутизатор находится в рабочем состоянии.
Рассмотрим подробнее это длинное предложение. Возьмём любой RouterBoard, например RB750UP. У него 5 портов Ethernet. Теперь, если сетевой кабель отключен от любого порта, этот порт будет в нерабочем состоянии (то есть в состоянии link down). Наш маршрутизатор объявит такой интерфейс неработоспособным и автоматически переключит его адрес IP в состояние ошибки. Следовательно, любая служба, которая зависит от этого IP-адреса, будет находиться в состоянии ошибки и не работать (например, DHCP-сервер, PPPoE-сервер, любой IP-маршрут и т. Д.).
Нам необходимо определить новый интерфейс внутри маршрутизатора, который сможет:
Если у такого интерфейса есть IP-адрес, то мы можем использовать его в сетевых операциях. Эта концепция широко используется во многих передовых сетевых технологиях, таких как динамическая маршрутизация.
В RouterOS концепция интерфейса loopback реализуется с помощью моста (bridge). В WinBox щелкните пункт меню Bridge. Появится новый диалог:


Назовём этот интерфейс Loopback.

Всё, мы создали интерфейс loopback. Теперь мы можем назначить ему любой адрес IP.