- управление raid lsi megaraid с помощью megacli
- Загрузиться с RIPLinuX и подключиться по SSH
- Получить статус и конфигурацию всех адаптеров
- Cтатус и параметры всех логических дисков
- Статус и параметры физических устройств
- Статус и параметры диска в 4-м слоте
- Создание RAID6 массив MegaCLI
- Пример конфигурирования JBOD на LSI 2208 (Supermicro X9DRH-7TF)
- Создать виртуальный диск RAID
- Создать RAID10
- Инициализация массива
- Управление CacheCade
- Замена неисправного диска
- Использование smartctl
- How to Set Up Hardware RAID Using MegaCLI
- Install and Set Up MegaCLI
- Step 1: Verify Your Hardware RAID Controller
- Step 2: Download MegaCLI
- Step 3: Extract the MegaCLI Package
- Step 4: Install MegaCLI
- Step 5: Create an Alias
- Hardware RAID Setup with MegaCLI
- Clear Configuration
- Configure RAID 0
- Configure RAID 1
- Configure RAID 5
- Configure RAID 10
- Configure RAID with CacheCade
- Check Adapter, Device Status and Configuration
управление raid lsi megaraid с помощью megacli
Можно использовать MegaRAID Storage Manager™, но чтобы его поставить….
Проще использовать консольную утилиту MegaCli
Загрузиться с RIPLinuX и подключиться по SSH
ifconfig eth0 77.72.128.140 netmask 255.255.255.192 ip r add default via 77.72.128.129 chmod +x /etc/rc.d/rc.sshd echo "" > /etc/hosts.deny passwd /etc/rc.d/rc.sshd start
Получить статус и конфигурацию всех адаптеров
Cтатус и параметры всех логических дисков
Статус и параметры физических устройств
Статус и параметры диска в 4-м слоте
megacli -pdInfo -PhysDrv[252:4] -a0
Создание RAID6 массив MegaCLI
Давайте предположим, что у нас есть сервер с MegaRAID SAS
Получим список физических дисков:
megacli -PDlist -a0 | grep -e '^Enclosure Device ID:' -e '^Slot Number:' Enclosure Device ID: 29 Slot Number: 0 Enclosure Device ID: 29 Slot Number: 1 Enclosure Device ID: 29 Slot Number: 2 Enclosure Device ID: 29 Slot Number: 3 Enclosure Device ID: 29 Slot Number: 4 Enclosure Device ID: 29 Slot Number: 5 Enclosure Device ID: 29 Slot Number: 6 Enclosure Device ID: 29 Slot Number: 7 Enclosure Device ID: 29 Slot Number: 8 Enclosure Device ID: 245 Slot Number: 12
Пример конфигурирования JBOD на LSI 2208 (Supermicro X9DRH-7TF)
При загрузке BIOS эти команды можно выполнить если зайти в preboot CLI по комбинации клавиш Ctrl+Y
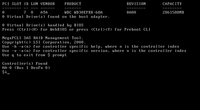
Команды megacli и preboot CLI различаются по виду.
Например команда проверки поддержки JBOD для BIOS preboot CLI будет выглядеть так:
AdpGetProp enablejbod -aALL
А для megacli это используется как набор опций и параметров:
megacli -AdpGetProp enablejbod -aALL
megacli -AdpSetProp EnableJBOD 1 -aALL
Список доступных физических устройств:
megacli -PDList -aALL -page24
В списке надо найти значения полей Enclosure Device ID (например 252), Slot Number и Firmware state
Нужно отметить каждое из устройств которое надо сделать JBOD, как Good в поле Firmware state .
megacli -PDMakeGood -PhysDrv[252:0] -Force -a0
Или сразу много устройств:
megacli -PDMakeGood -PhysDrv[252:1,252:2,252:3,252:4,252:5,252:6,252:7] -Force -a0
Теперь можно создавать JBOD
megacli -PDMakeJBOD -PhysDrv[252:0] -a0 megacli -PDMakeJBOD -PhysDrv[252:1,252:2,252:3,252:4,252:5,252:6,252:7] -a0
Создать виртуальный диск RAID
Перед настройкой массива, возможно, потребуется удалить использованную ранее конфигурацию. Для того чтобы просто удалить логические устройства используйте CfgLdDel
megacli -CfgLdDel -Lall -aAll
Для того чтобы удалить всё (в том числе политику кэша) используйте «Очистку конфигурации»
Настройка RAID-0, 1 или 5. Вместо «r0» введите соответственно «r1» или «r5» (диски находятся в Enclosure 29, на портах 0 и 1, WriteBack включен, ReadCache адаптивный, Cache также включен без BBU)
megacli -CfgLdAdd -r0 [29:0,29:1] WB ADRA Cached CachedBadBBU -sz196GB -a0
Создать RAID10
megacli -PDList -aAll | egrep "Enclosure Device ID:|Slot Number:|Inquiry Data:|Error Count:|state"

Создать массив из 6 дисков
megacli -CfgSpanAdd -r10 -Array0[252:0,252:1] -Array1[252:2,252:4] -Array2[252:5,252:6] -a0
Показать как диски были определены в RAID-массиве:
Инициализация массива
Начать полную инициализацию для массива с >
MegaCli -LDInit -Start -full -L0 -a0
Проверить текущий статус инициализации:
MegaCli -LDInit -ShowProg -L0 -a0
Управление CacheCade
Создать и назначить CacheCade для массива 0 (-L0) из зеркала (-r1) в режиме обратной записи (WB) на основе SSD дисков в слотах 6 и 7 (-Physdrv[252:6,252:7])
megacli -CfgCacheCadeAdd -r1 -Physdrv[252:6,252:7] WB -assign -L0 -a0
megacli -Cachecade -assign -L0 -a0
megacli -Cachecade -remove -L0 -a0 Successfully removed VD from Cache
megacli -CfgCacheCadeDsply -a0 megacli -LDInfo -LAll -a0
Замена неисправного диска
megacli -AdpSetProp -AlarmSilence -a0
Обратите внимание, что это не навсегда отключает сигнализацию, а просто выключает сигнал по текущей аварии.
Просмотреть состояние диска (подставьте нужное значение [E:S]):
megacli -pdInfo -PhysDrv [29:8] -a0
Пометить диск требующий замены как потерянный (если контроллер не сделал этого сам)
megacli -PDMarkMissing -PhysDrv [E:S] -aN
Получить параметры потерянного диска
Вы должны получить ответ подобный этому:
Adapter 0 - Missing Physical drives No. Array Row Size Expected 0 0 4 1907200 MB
Подсветить диск который надо менять (подставьте нужное значение [E:S]):
megacli -PdLocate -start -PhysDrv [29:8] -a0
На некоторых шасси могут быть проблемы с индикацией. Это лечится такой командой:
В этом случае для маркировки диска будет использоваться лампочка активности.
Удаляем неисправный и вставляем новый диск.
Прекращаем подсветку и проверяем состояние диска:
megacli -PdLocate -stop -PhysDrv [29:8] -a0 megacli -pdInfo -PhysDrv [29:8] -a0
Может так случится, что он содержит метаданные от другого массива RAID (Foreign Configuration). Ваш контроллер не позволит использовать такой диск. Для проверки наличия Foreign Configuration
megacli -CfgForeign -Scan -aALL
Команда удаления Foreign Configuration (если вы уверены)
megacli -CfgForeign -Сlear -aALL
megacli -PdReplaceMissing -PhysDrv [32:4] -Array0 -row4 -a0
megacli -PDRbld -Start -PhysDrv [32:4] -a0
Проверка процесса ребилда
megacli -PDRbld -ShowProg -PhysDrv [32:4] -a0
Использование smartctl
megacli -PDlist -a0 | grep '^Device Id:'| awk ''
Получить данные смарт по диску с >
smartctl /dev/sda -d megaraid,9 -a
для диска с интерфейсом sata
smartctl /dev/sda -d sat+megaraid,9 -a
пример срипта для получения данных о всех дисках
#!/bin/sh for arg in `megacli -PDlist -a0 | grep '^Device Id:'| awk ''` do smartctl /dev/sda -d sat+megaraid,$ -l devstat #smartctl /dev/sda -d sat+megaraid,$ -a done
Для контроля состояния дисков с помощью демона smartd нужно закомментировать DEVICESCAN в /etc/smartd.conf и добавить:
/dev/sda -d sat+megaraid,0 -a -s L/../../3/02 /dev/sda -d sat+megaraid,1 -a -s L/../../3/03 /dev/sda -d sat+megaraid,2 -a -s L/../../3/04 /dev/sda -d sat+megaraid,3 -a -s L/../../3/05
Значения параметров типа /3/02 — /3/05 определяют время запуска тестов для заданного диска
How to Set Up Hardware RAID Using MegaCLI
MegaCLI is a tool used as a command-line interface to communicate with the LSI family of RAID controllers. It manages and reports on MegaRAID SAS cards.
In this article, you will learn how to install MegaCLI and set up a hardware RAID.
- A Linux system (installation instructions apply to CentOS/RHEL and Ubuntu based distros)
- Access to the command-line/terminal window
- A MegaRAID hardware controller
- An unzip utility tool
Install and Set Up MegaCLI
MegaCLI supports MS Windows, FreeBSD, Solaris and all major Linux distributions. This article provides instructions on installing MegaCLI on CentOS 8 and Ubuntu.
Step 1: Verify Your Hardware RAID Controller
To use MegaCLI, you need a MegaRAID SAS controller. If you are unsure which RAID controller you are using, start by verifying it.
Use the lspci command to verify the RAID controller on your system.
The output will display your RAID controller. See the example outputs below:
output 1 LSI Logic / Symbios Logic MegaRAID SAS 1078 (rev 04)output 2 01:00.0 RAID bus controller: Adaptec AAC-RAID (rev 09)output 3 02:00.0 RAID bus controller: LSI Logic / Symbios Logic MegaRAID SAS 2208 [Thunderbolt] (rev 05)If you do not receive any output, like in the image below, it is an indication that the system is not identifying any RAID controller. Make sure that the controller is set up correctly.
If the output indicates that you indeed have a MegaRAID SAS controller, move on to installing MegaCLI.
Step 2: Download MegaCLI
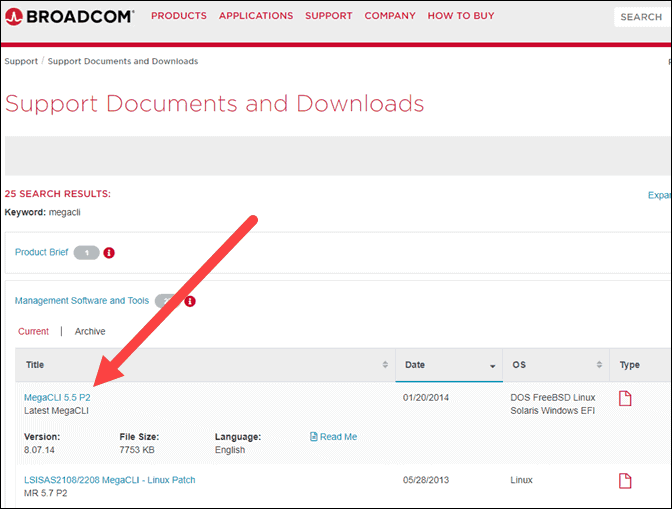
Download MegaCLI by navigating to the Support Documents and Downloads section of the Broadcom website. The MegaCLI install file is under the Management Software and Tools list as shown below.
Step 3: Extract the MegaCLI Package
Next, move into the Downloads folder.
3. Extract the 8-07-14_MegaCLI.zip file.
Step 4: Install MegaCLI
Option 1: Install MegaCLI on CentOS 8
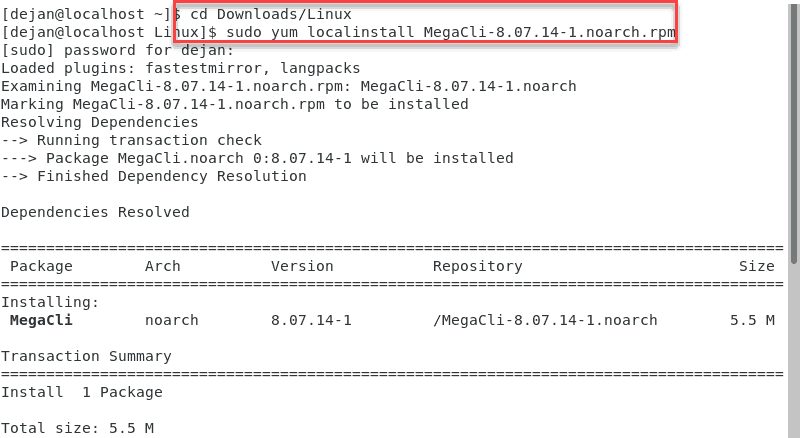
Move into the Downloads/Linux folder by typing:
Once in the Linux folder, run the following command to install MegaCLI on CentOS 8:
yum localinstall MegaCli-8.07.14-1.noarch.rpmOption 2: Install MegaCLI on Ubuntu
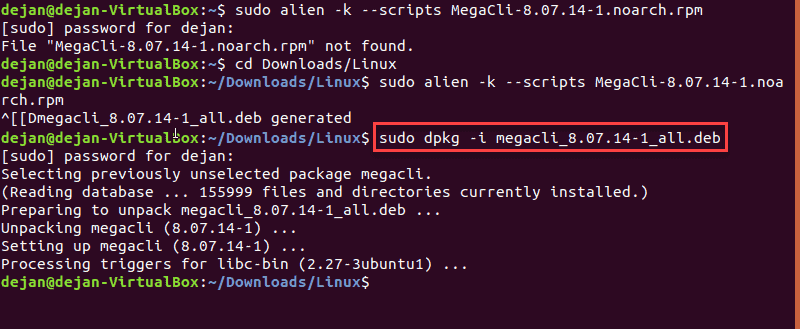
LSI distributes MegaCLI as an rpm package. Ubuntu does not support rpm packages, but the MegaCLI install package can be converted for use with Ubuntu by using Alien.
Start by moving into the Downloads/Linux folder.
Convert the MegaCLI rpm package with Alien:
alien -k --scripts MegaCli-8.07.14-1.noarch.rpmInstall the newly created .deb file with the dpkg command:
dpkg -i megacli_8.07.08-1_all.debNote: If you don’t have Alien on your Ubuntu system, run the following command to install it:
sudo apt-get install alien
Step 5: Create an Alias
Finally, create an alias for easier reference in the future:
alias megacli='/opt/MegaRAID/MegaCli/MegaCli64'Now that you have MegaCLI set up, examine the list of common commands you will be using to manage RAID disks.
Hardware RAID Setup with MegaCLI
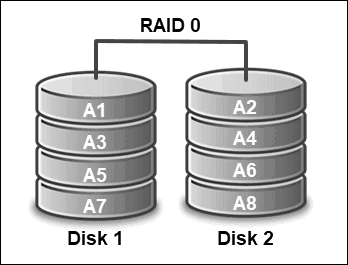
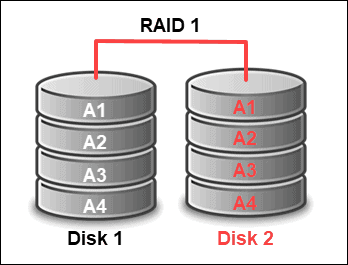
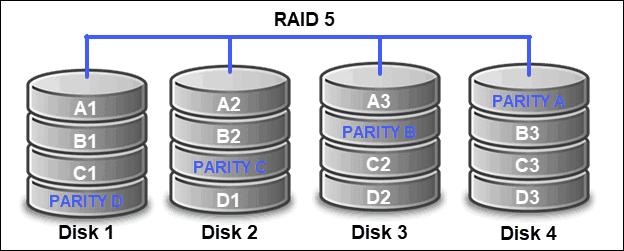
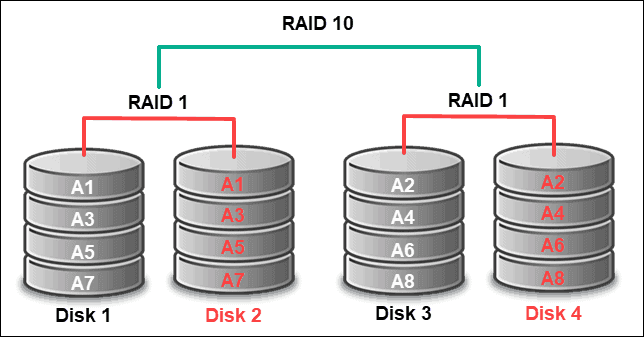
MegaCLI supports configuring all widely used hardware RAID levels:
Note: The three basic techniques of RAID levels are disk striping, disk mirroring, and parity. Depending on how these techniques are implemented, different RAID types and levels can be established. To learn more, check out our article on RAID levels and types.
Clear Configuration
Before you configure any disks, make sure to delete any previous configuration you may have on them. The following commands will allow you to do so:
megacli -CacheCade -remove -LALL -aALLmegacli -CfgCacheCadeDel -LALL -aALLmegacli -CfgLdDel -LAll -aAllmegacli -CfgClr -force -aAllConfigure RAID 0
To configure disks as RAID 0 which will strip data across two or more disks, use the commands:
megacli -CfgEachDskRaid0 -a0Configure RAID 1
To configure a RAID 1 setup of two disks from slot 0 to 1, type:
megacli -CfgLdAdd -r1 [252:0,252:1] -a0Configure RAID 5
To configure a RAID 5 device made up of disks from slots 0 to 5 use the command:
megacli -CfgLdAdd -r5 [252:0,252:1,252:2,252:3,252:4,252:5] -a0Configure RAID 10
To configure RAID 10 consisting of 8 disks placed in slots 0 to 7, type:
megacli -CfgSpanAdd -r10 -Array0[252:0,252:1] -Array1[252:2,252:3] -Array2[252:4,252:5] -Array2[252:6,252:7] -a0Configure RAID with CacheCade
You can also create additional CacheCade in RAID 1 on SSD disks.
For example, if you have 6 disks in slots 0 through 5. You can create a RAID 5 device consisting of four disks and an additional CacheCade on the remaining two disks.
1. Configure RAID 5 on disks 0 through 4 with the command:
megacli -CfgLdAdd -r5 [252:0,252:1,252:2,252:3,252:4] -a02. Next, create CacheCade configuration using SSDs for slots 5 and 6:
megacli -CfgCacheCadeAdd -r1 -Physdrv[252:5,252:6] WB -assign -L0 -a0Check Adapter, Device Status and Configuration
There are several commands you can use to check the status of your adapters and RAID devices.
To see details of all adapters use:
To see status and configuration of all logical drives:
To show information of all physical disks use:
For enclosure information type:
After reading this article you should now be more informed on how to install and use MegaCLI to effectively manage your RAID devices and configurations.
Dejan is the Head of Content at phoenixNAP with over 8 years of experience in Web publishing and technical writing. Prior to joining PNAP, he was Chief Editor of several websites striving to advocate for emerging technologies. He is dedicated to simplifying complex notions and providing meaningful insight into data center and cloud technology.
RAID (redundant array of independent disks) is a setup consisting of multiple disks for data storage. They.
There are programs that answer two of the most common questions web administrators and SEO’s keep asking when.
Reducing server response time to the bare minimum is one of the primary goals of website owners and SEO.
Mechanical hard drives were once a major bottleneck on every computer system with speeds capped around 150.
