- Enabling a Wi-Fi access point on OpenWrt
- Using the web admin GUI
- Using the SSH command line
- Guest Wi-Fi on a dumb wireless AP using LuCI
- 1. Define a new network
- 2. Edit the newly created interface
- 3. Set up the firewall zone
- 4. Set up the firewall traffic rules
- Guest Wi-Fi using LuCI
- Create and configure a new wireless controller
- Configure the new interface
- Configure the firewall
- Troubleshooting
Enabling a Wi-Fi access point on OpenWrt
Devices that have Ethernet ports have Wi-Fi turned off by default. This is a basic description of how to enable a Wi-Fi network and most importantly, how to properly configure your country code such that your Wi-Fi network complies with the legal regulations of your country.
Using the web admin GUI
Go to Network → Wireless. This page lists a separate Wi-Fi configuration section for each of your physical radios, (many devices you may have, will have one radio for 2.4 GHz and a second one for 5 GHz ).
On the first Wi-Fi network that you configure, go to the Device Configuration and open the tab Advanced Settings: in the Country Code field, select the correct county code, where your OpenWrt device is installed. This is important to ensure your OpenWrt device meets the legal regulations in your country. (all other configured radios will use the same device settings)
In the tab Wireless Security, select an Encryption method (e.g. “WPA2-PSK”, recommended for home/small office networks)
In the tab Wireless Security, enter a Key , a secret phrase which clients must use to connect to your Wi-Fi network. NB: With WPA2-PSK, the Key must be at least eight (8) characters.
If needed, configure further settings according to your needs. Other default settings ordinarily correct for general usage.
If you have configured 5GHz Wi-Fi and have just enabled it, but the 5 GHz Wi-Fi does not seem to start up, consider the following: If your device supports Wi-Fi channels > 100, your OpenWrt device first must scan for weather radar on these channels, before you can actually use such channels for Wi-Fi. This may take 1-10 minutes onetime after first reboot depending on your Wi-Fi situation and depending on the number of device-supported channels > 100. You may also experience 1 minute delay on each automatic channel change, as the same scan delay is required for regulation compliance.
Network / Wireless / Edit / Interface Configuration / General Setup / Network should be left to the “lan” default or to another interface where there is an active DHCP server, DO NOT select “wan” or “wan6” as that’s the upstream interface for Internet connection only
Using the SSH command line
This is not a complete howto on how to create a fine tuned Wi-Fi network on the command line.
It just shows you the important steps to initially set the basics for properly enabling the Wi-Fi on the command line, to meet the legal regulations of your country:
Execute uci show wireless to see all the wireless configurations and how many Wi-Fi chips (called “radio” in the config) there are on the device. Identify the radio number (0, 1, 2, etc) that are you aiming to. E.g., radio0 , radio1 , radio2 , radioX .
Find out your country in a list of ISO/IEC 3166 alpha2 country codes. There is a list in the Wikipedia article about ISO 3166-1 alpha-2.
Execute uci set wireless.radioN.country=’XX’ to set the country code XX for each (N = 0, 1, 2) radio devices your router may have.
This website uses cookies. By using the website, you agree with storing cookies on your computer. Also you acknowledge that you have read and understand our Privacy Policy. If you do not agree leave the website. OK More information about cookies
Self-registration in the wiki has been disabled.
If you want to contribute to the OpenWrt wiki, please post HERE in the forum or ask on IRC for access.
Except where otherwise noted, content on this wiki is licensed under the following license:
CC Attribution-Share Alike 4.0 International
Guest Wi-Fi on a dumb wireless AP using LuCI
Guest Wi-Fi provides internet access to your network members. It also provides firewall security rules to isolate your guest network from the rest. This recipe is based on the Guest Wi-Fi basics and Guest Wi-Fi extras, providing a more user-friendly approach through the LuCI web interface.
The changes below assume an OpenWrt default configuration. We assume that you have a private WLAN set on 192.168.1.xxx and want a guest WLAN on 192.168.2.xxx.
1. Define a new network


Give it an SSID and add it to the guest network.
2. Edit the newly created interface

At the interfaces, edit the `guest` interface that you just created.

Switch the protocol to a static address.
Fill in the static IP , subnet mask and enable DHCP .
Make sure the static IP is on a different subnet.
3. Set up the firewall zone

At firewall settings, create a new guest firewall zone.
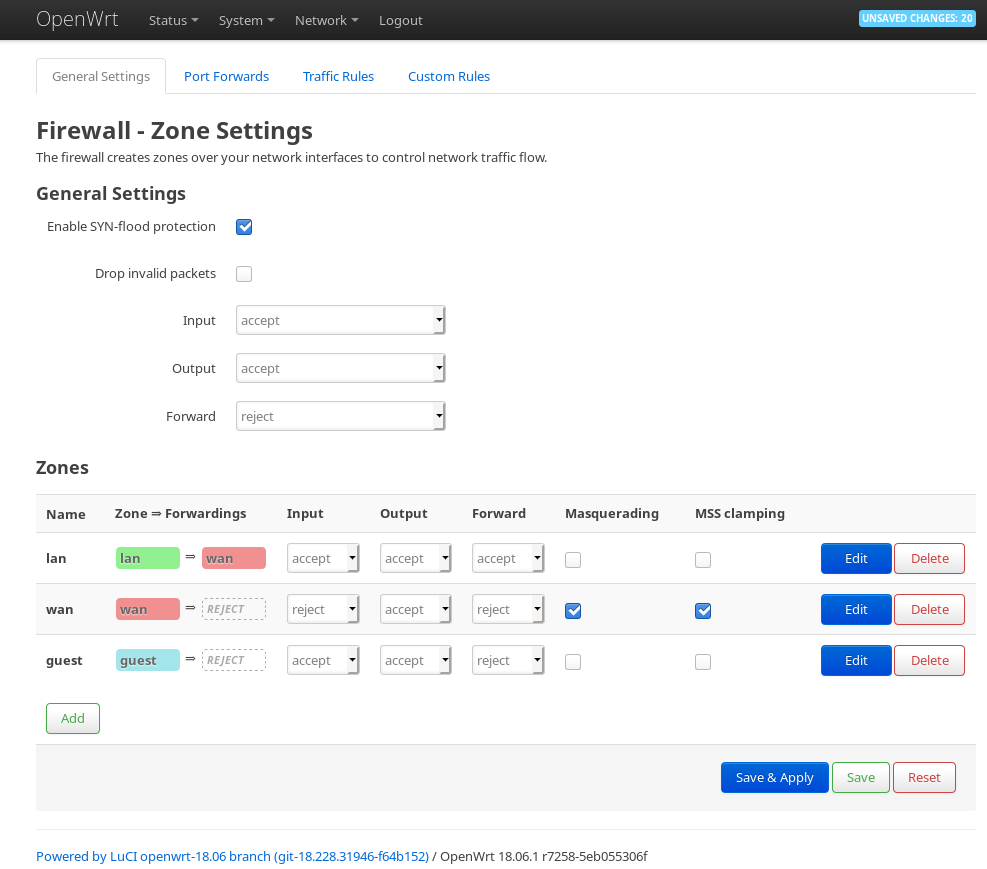
At the firewall settings, edit the newly created guest zone.
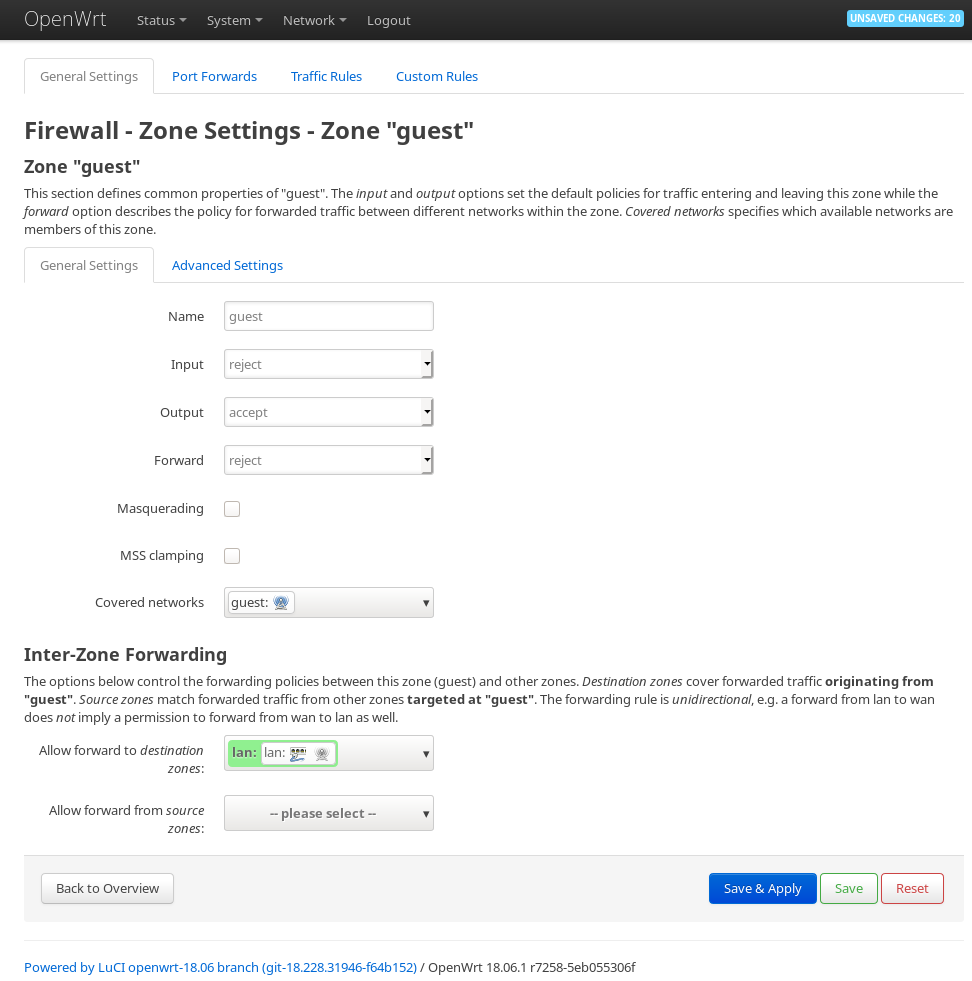
Set Input to REJECT, Output to ACCEPT and Foward to REJECT. Allow forward to destination zone: `lan`.
It should look as follows
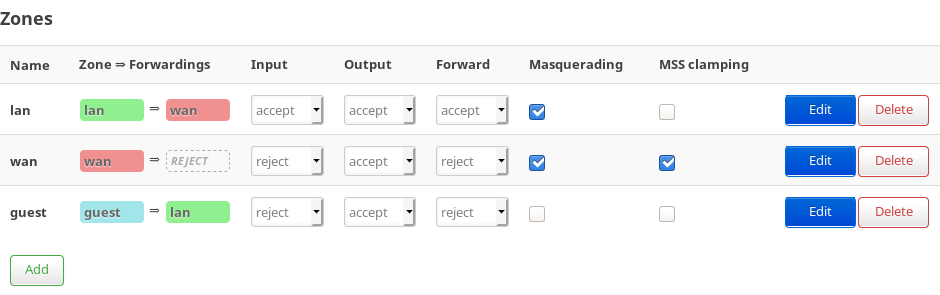
Also enable masquarading for lan
4. Set up the firewall traffic rules
Now go to the traffic rules tab inside firewall and add the following three rules:

This website uses cookies. By using the website, you agree with storing cookies on your computer. Also you acknowledge that you have read and understand our Privacy Policy. If you do not agree leave the website. OK More information about cookies
Self-registration in the wiki has been disabled.
If you want to contribute to the OpenWrt wiki, please post HERE in the forum or ask on IRC for access.
Except where otherwise noted, content on this wiki is licensed under the following license:
CC Attribution-Share Alike 4.0 International
Guest Wi-Fi using LuCI
Guest Wi-Fi provides internet access to your network members. It also provides firewall security rules to isolate your guest network from the rest. This recipe is based on the more comprehensive Guest Wi-Fi basics, providing a more user-friendly approach through the LuCI web interface.
Note that all MAC addresses have been redacted from the screenshots.
Create and configure a new wireless controller
After logging into the web-interface, manoeuvre to the Wireless page under Network. Click Add over the wireless controller (e.g., the 2.4 GHz radio) you want to have your guest network on. A new interface will be added as shown here:

As you can see, our new wireless controller is created, and we named it guest. Next up is configuring it. Choose the Edit option for the controller. You will need to create a new network, as you can see we named our new network guest here:

Also, be sure to set up wireless security if you want to protect the connection.
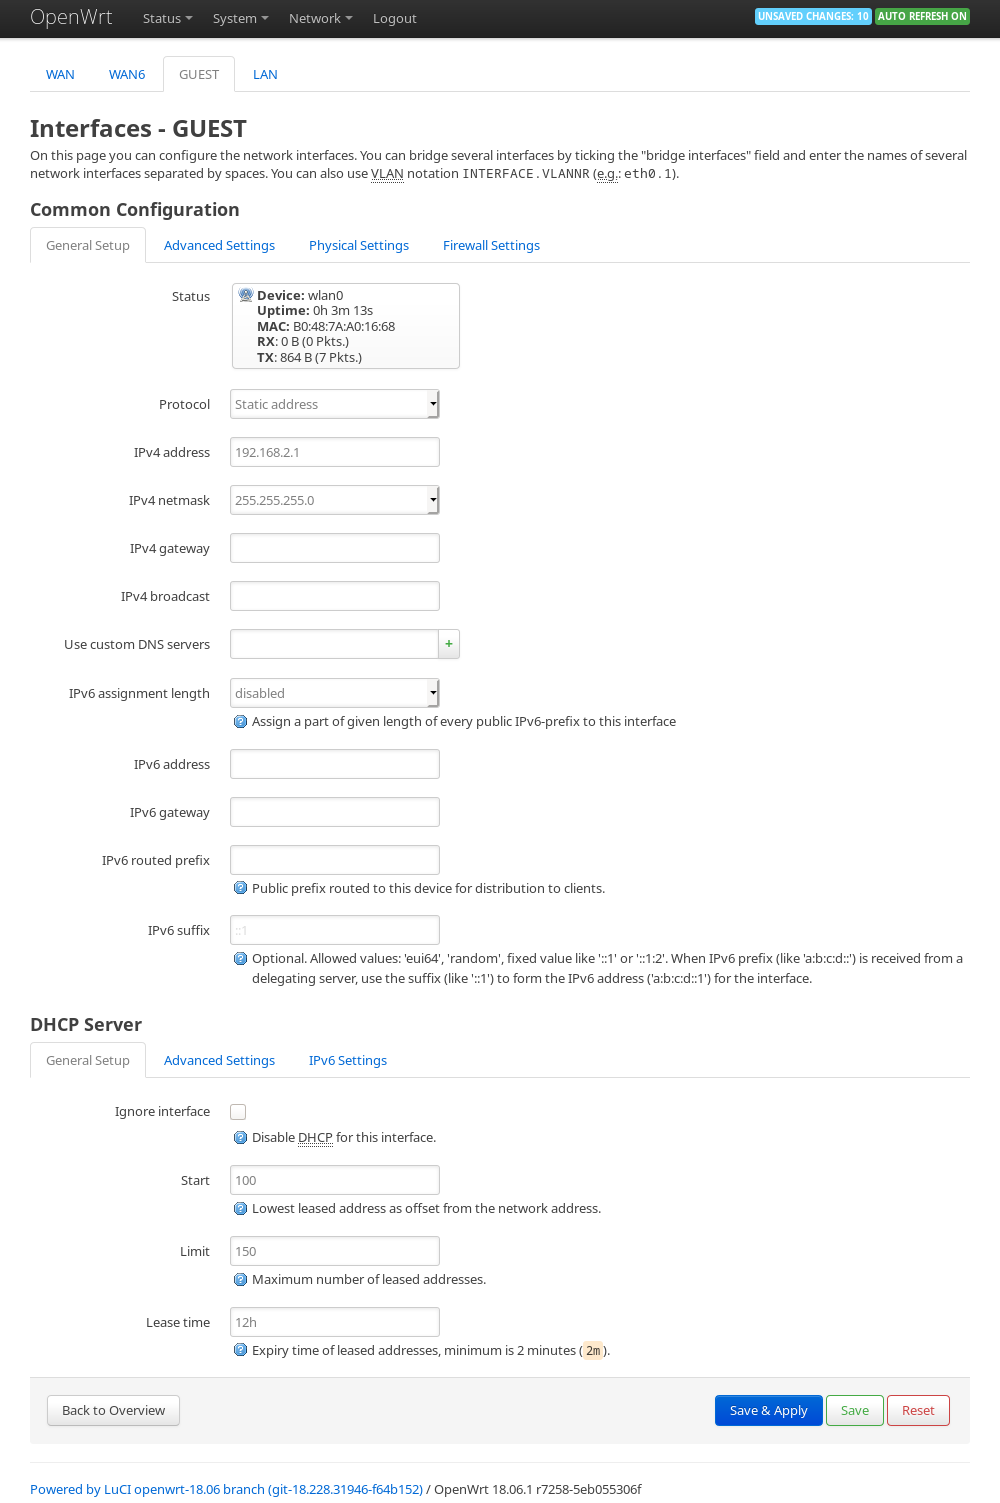
Configure the new interface
Now if you manoeuvre to the Interfaces page under Network, and you should see your new interface, looking similar to this:

You will need to configure your interface before it is useful. Choose Edit, pick the protocol Static address, and fill out your chosen IPv4 address. We chose 192.168.3.1 here, but you may have different preferences. However, avoid using 192.168.1.1 or 10.0.0.1 as they may already be in use and prevent your guests from acquiring IP -addresses. Remember to set the netmask. If you are using a newer version of the web interface, the netmask must be entered together with the IPv4 address, for example 192.168.3.1/24. You will also need to enable DHCP , we chose to go with the default options here except for the Leasetime which is only one hour, suitable for environments where a large number of guests connect and leave through a day.

Notice that you have a Firewall Settings tab to the far right of the General Setup tab. Make sure you visit this tab, and create a new zone for your guest, like we have done here:

Configure the firewall
Now you are just about done. That last thing we need to do is to allow traffic between your guest network and WAN in the firewall. Go to the Firewall page under Network, choose Edit for your guest zone. Set Input to REJECT and tick wan under Allow forward to destination zones. Correctly configured it should look like this:

Remember to click Save & Apply. The last thing we need to do is to give our guests access to the Internet.
Right now neither DNS nor DHCP traffic will be accepted. We need to create two rules, which we can do from the Traffic rules tab under the Firewall tab. Both rules can be put in under Open ports on router:. We name the first one Guest DNS here (you can name it what you want), setting both TCP and UDP traffic and port 53:

We need to configure the rule, so choose to edit it. Set Source zone to guest, and set Destination zone to Device (input) like shown here:

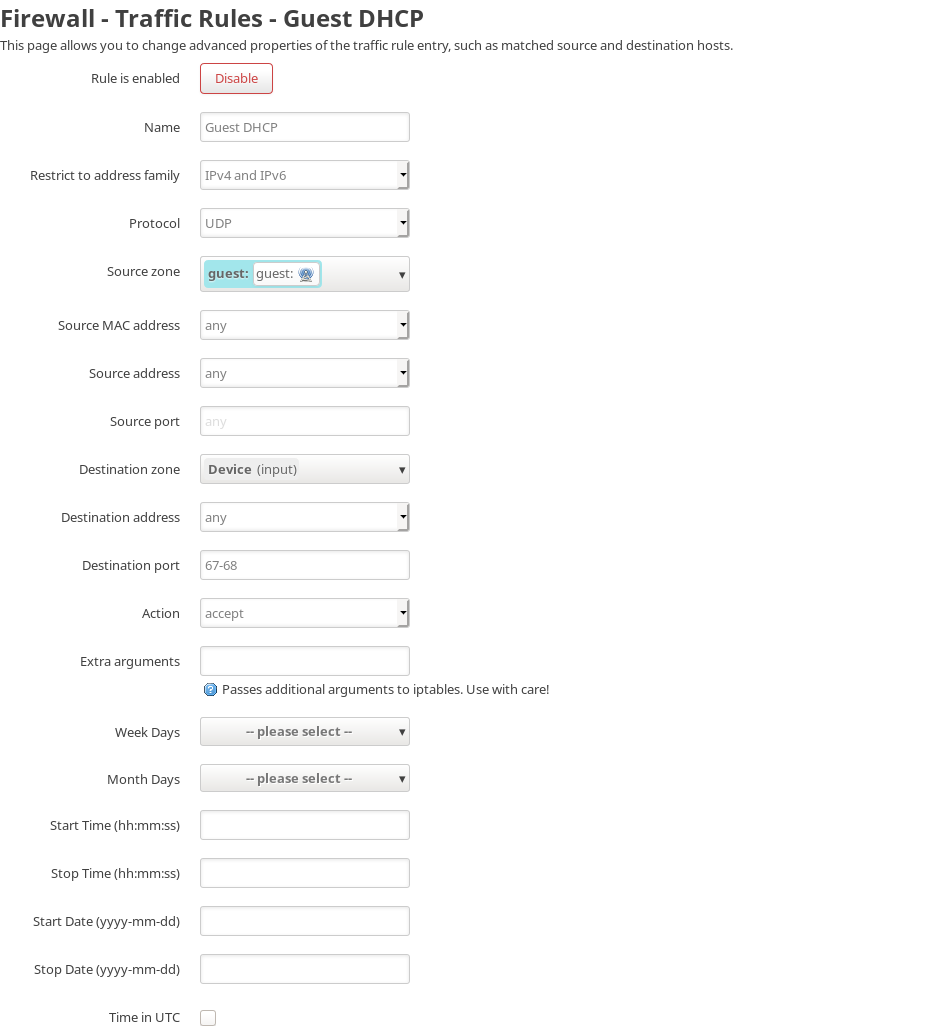
Similarly, create a new rule to allow DHCP for guests. We name this rule Guest DHCP , choose UDP as protocol, and set 67 for port. Again edit the rule, setting Source zone to guest, and set Destination zone to Device (input). When you are done it should look like this:

If you had firewall rules to implement Parental Control, you might have to review them now. If the Reject rules were defined with LAN as Source Zone, they will not apply to the Guest network.
Troubleshooting
If you are able to connect to the Guest wireless network and also do get an IP address from the DHCP server but can not access the internet, make sure the Guest interface has a netmask configured. If you forget to set this, the default /32 netmask will not work.
This website uses cookies. By using the website, you agree with storing cookies on your computer. Also you acknowledge that you have read and understand our Privacy Policy. If you do not agree leave the website. OK More information about cookies
Self-registration in the wiki has been disabled.
If you want to contribute to the OpenWrt wiki, please post HERE in the forum or ask on IRC for access.
Except where otherwise noted, content on this wiki is licensed under the following license:
CC Attribution-Share Alike 4.0 International