- Create root filesystem snapshots with LVM
- Prerequisites
- Setup
- Option 1: Helper Scripts
- Option 2: Manual Configuration
- Usage
- Backup
- Revert updates
- LVM backup and restore snapshot in Linux
- LVM backup and restore in Linux step by step
- Install LVM on major Linux distros
- Create partitions
- Create physical volumes
- Create a volume group
- Create logical volumes
- Create a filesystem on logical volumes
- Logical Volume Snapshot
- Understanding Snaphosts
- LVM backup and restore in Linux from Logical Volume Snapshot
- Closing Thoughts
- Related Linux Tutorials:
Create root filesystem snapshots with LVM
This article describes how to set up root filesystem LVM snapshot creation during system start. Such snapshots can be used for full system backups with minimal downtime or testing system updates with the option to revert them.
Prerequisites
You need a system with LVM root filesystem and systemd. Ensure that LVM snapshots prerequisites are correctly setup.
Setup
Option 1: Helper Scripts
An AUR package is available, make-lvm-snapshot AUR , which can help automate the following process. It implements similar service and target files to those included in this article. The projects README contains important setup information.
Option 2: Manual Configuration
If you prefer a fully «manual» setup, you will need to write a systemd service to create a clean snapshot of the root volume during system startup.
/etc/systemd/system/mk-lvm-snapshots.service
[Unit] Description=make LVM snapshots Requires=local-fs-pre.target Wants=local-fs.target DefaultDependencies=no Conflicts=shutdown.target After=local-fs-pre.target Before=local-fs.target [Install] WantedBy=make-snapshots.target [Service] Type=oneshot ExecStart=/usr/sbin/lvcreate -L10G -n snap-root -s lvmvolume/root
Adapt the lvcreate command to match your root volume group and volume name. Adjust the snapshot size if necessary. If additional filesystems should be snapshotted during startup you may extend the ExecStart property with addtional lvcreate commands, separated with ; (consider there is a space before and after the semicolon, see systemd.service(5) § COMMAND LINES for details).
Note: You should test the lvcreate command in the running system until it works as desired. Remove the test snapshots with lvremove . The snapshots taken from a running system are not as consistent as snapshots taken in single user mode or during startup.
Create a new systemd target:
/etc/systemd/system/make-snapshots.target
[Unit] Description=Make Snapshots Requires=multi-user.target
Adapt the base target, if multi-user.target is not your default target. If you want to get into your desktop, you need to change it to graphical.target .
If the system is started with the new target, LVM snapshot(s) are created just after mounting the local filesystems. To get a GRUB menu entry starting this target create /boot/grub/custom.cfg based on the grub.cfg entry for your normal startup. The kernel command line is extended to start the new make-snapshots.target :
### make snapshots ### menuentry 'Arch GNU/Linux, make snapshots' --class arch --class gnu-linux --class gnu --class os < . echo 'Loading Linux core repo kernel . ' linux /boot/vmlinuz-linux root=/dev/lvmvolume/root ro systemd.unit=make-snapshots.target echo 'Loading initial ramdisk . ' initrd /boot/initramfs-linux.img >
Remember to adjust custom.cfg if grub.cfg changes.
After restarting the system with this grub entry lvs should show up the newly created snapshot.
Tip: To get the messages of the new service, run journalctl -u mk-lvm-snapshots.service as root.
Usage
Backup
To use this functionality for a full system backup, restart your system with the snapshot creation target. Mount the snapshot volume (and further volumes, if required), preferably using the read only ( -o ) option. Then backup your system, for example with tar as described in Full system backup with tar.
During backup you can continue to use your system normally, since all changes to your regular volumes are invisible in the snapshots. Do not forget to delete the snapshot volume after the backup – changes to your regular volume will use up space in the snapshot due to the copy-on-write operations. If the snapshot space becomes fully used, and LVM is not able to automatically grow the snapshot, LVM will deny further writes to your regular volumes or drop the snapshot, which should be avoided.
Revert updates
Another use for LVM snapshots is testing and reverting of updates. In this case create a snapshot for the system in a known good state and perform updates or changes afterwards.
If you want to permantly stick to the updates just drop the snapshot with lvremove. If you want to revert to the snapshotted state issue a lvconvert —merge for the snapshot. During the next restart of the system (use the default target) the snapshot is merged back into your regular volume. All changes to the volume happened after the snapshot are undone.
Note: After merging the snapshot no longer exists. Recreate a new snapshot if further testing with rollback option is desired.
LVM backup and restore snapshot in Linux
Logical Volume Manager (LVM) is used on Linux to manage hard drives and other storage devices. As the name implies, it can sort raw storage into logical volumes, making it easy to configure and use.
In this tutorial, you will learn how to create LVM backup and restore in Linux system. LVM works the same on any Linux distribution, so you can use any of the commands below on your own system.
Follow along with us as we use LVM to create partitions, physical volumes, a volume group, logical volumes, and filesystems on a hard disk. We’ll also show how to mount, extend, and remove our newly created logical volumes. At the end of this tutorial, we will take a snapshot of the volume, and then show how to restore the backup.
In this tutorial you will learn:
- How to create a logical volume in LVM
- How to create a snapshot of a logical volume
- How logical volume snapshots work
- How to restore a backup of a logical volume

| Category | Requirements, Conventions or Software Version Used |
|---|---|
| System | Any Linux distro |
| Software | Logical Volume Manager (LVM) |
| Other | Privileged access to your Linux system as root or via the sudo command. |
| Conventions | # – requires given linux commands to be executed with root privileges either directly as a root user or by use of sudo command $ – requires given linux commands to be executed as a regular non-privileged user |
LVM backup and restore in Linux step by step
Install LVM on major Linux distros
Your Linux system may already have LVM installed, but it doesn’t come installed by default on every distro. Use the appropriate command below to install LVM with your system’s package manager.
Create partitions
The first thing we will do is create partitions on our disk. This is to facilitate the creation of physical volumes in the next section, which can either be created on raw, unpartitioned block devices or single partitions. For the sake of this tutorial, we will work on the latter.
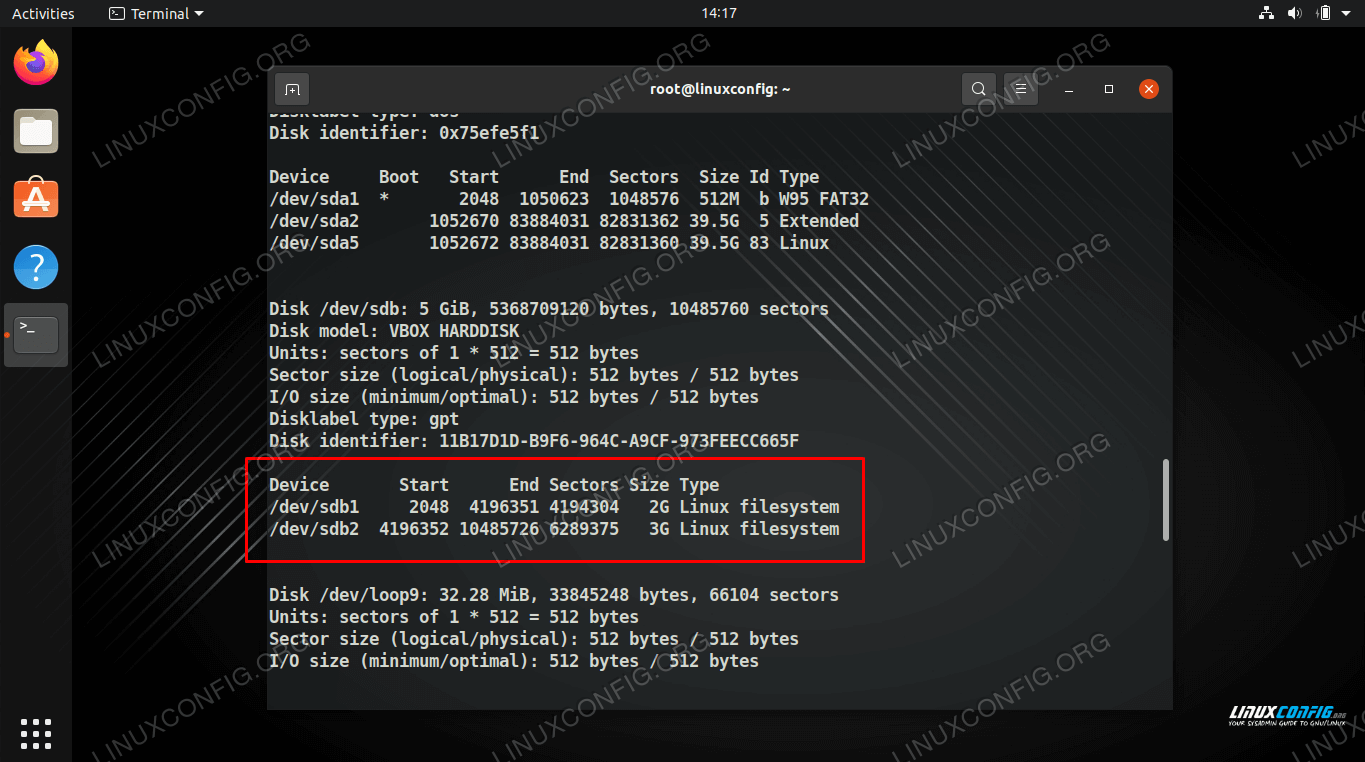
For this example, the disk we’ll be working with is /dev/sdb , which is a 5GB (and currently unpartitioned) hard disk.
We can see our /dev/sdb disk and its pertinent details with the following command.

An interface will open in your console, which is quite intuitive to use. We’ve created the following two partitions as an example.
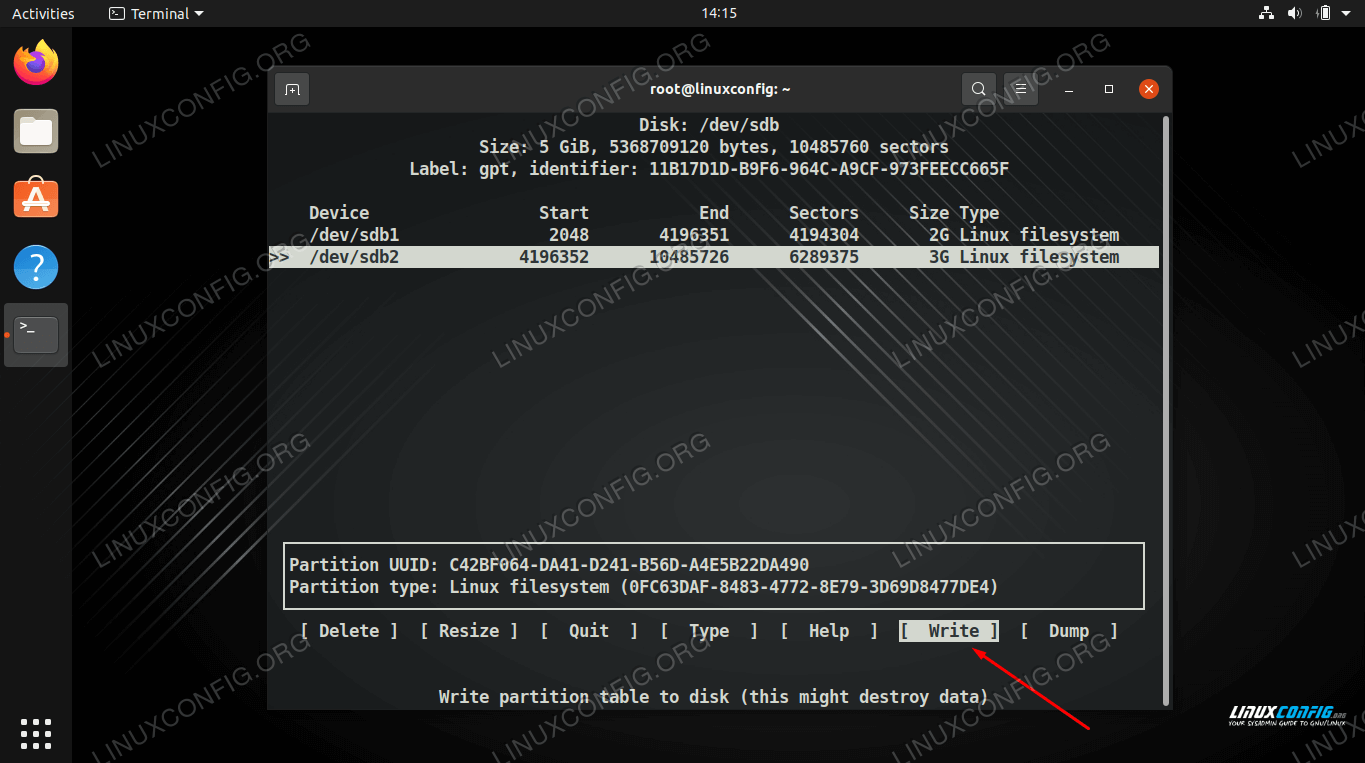
Finalize your changes by choosing “write,” then exit the utility when done. We can now see our partition listed when we execute fdisk -l again.
Create physical volumes
We can now create physical volumes on our new partitions by using the pvcreate command.
# pvcreate /dev/sdb1 Physical volume "/dev/sdb1" successfully created. # pvcreate /dev/sdb2 Physical volume "/dev/sdb2" successfully created.
Use the pvdisplay command to see information about all the physical volumes on your system, or specify a particular volume you wish to view details about.
# pvdisplay OR # pvdisplay /dev/sdb1

Create a volume group
At this stage we need to create a volume group which will serve as a container for our physical volumes. In this example, we’ll call our volume group “mynew_vg” which will include the /dev/sdb1 partition, with the following Linux command:
# vgcreate mynew_vg /dev/sdb1
Or, to include both partitions at once:
# vgcreate mynew_vg /dev/sdb1 /dev/sdb2
Use the following command to display information about the volume group(s).

We can add more physical volumes to the group by using the vgextend command.
# vgextend mynew_vg /dev/sdb2 Volume group "mynew_vg" successfully extended
Create logical volumes
Now we can move on to creating logical volumes. It may help to think of our volume group as a “big cake,” from which we can cut “pieces” (logical volumes) that will get treated as partitions on our Linux system.
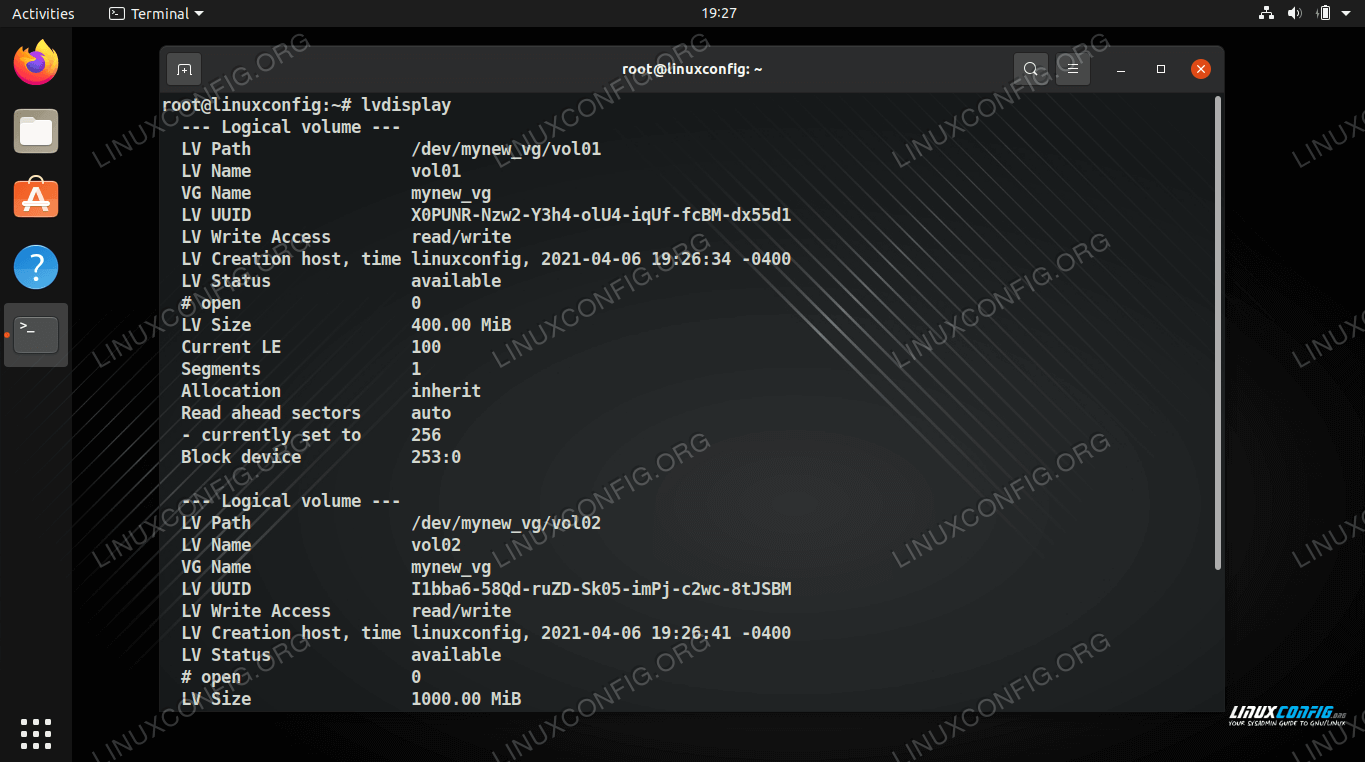
The following command will create a logical volume named vol01 with a size of 400MB.
# lvcreate -L 400 -n vol01 mynew_vg
Then, we’ll create another volume named vol02 with a size of 1GB.
# lvcreate -L 1000 -n vol02 mynew_vg
Finally, we can use the lvdisplay command to see the logical volumes we’ve just created.
Create a filesystem on logical volumes
The logical volume is almost ready to use. All we need to do is to create a filesystem on it with the mkfs command.
# mkfs.ext4 -m 0 /dev/mynew_vg/vol01
The -m option specifies the percentage reserved for the super-user, we can set this to 0 to use all the available space (the default is 5%).

Logical Volume Snapshot
Finally, we have come to the point where we can take a snapshot of our logical volume created in the previous sections. For this we will also need some sample data on our Logical Volume “volume1” so once we revert from the snapshot we can confirm the entire process by comparing original data with data recovered from the snapshot.
Understanding Snaphosts
In order to understand how snapshots work, we first need to understand what logical volume consists of and how data is stored. This concept is similar to well known symbolic links. When you create a symbolic link to a file, you are not creating a copy of the actual file but instead you simply create only a reference to it. Logical volume stores data in a similar fashion and it consists of two essential parts:
When a snapshot is created, Logical Volume Manager simply creates a copy of all Metadata pointers to a separate logical volume. Metadata does not consume much space and therefore you are able to create a snapshot of, let’s say 2GB logical volume to 5MB snapshot volume.
The snapshot volume only starts to grow once you start altering data of the original logical volume. Which means, that every time you remove or edit a file on the original logical volume, a copy of that file (data) is created on the snapshot volume. For a simple change, you may need to create a snapshot volume of around 5-10% of the logical volume original size. If you are prepared to make many changes on your original logical volume then you will need a lot more than 10%.
LVM backup and restore in Linux from Logical Volume Snapshot
Now we are ready to get started. Follow the step by step instructions below to create LVM backup and restore in Linux from the logical volume snapshot.
- First, we will create a new mount point for our logical volume, and then mount the volume.
$ sudo mkdir -p /mnt/volume1 $ sudo mount /dev/mynew_vg/vol01 /mnt/volume1
$ sudo cp -av /usr/bin/* /mnt/volume1 $ du -s /usr/bin 162528
$ sudo lvcreate -s -L 20M -n volume1_snapshot /dev/mynew_vg/vol01 Logical volume "volume1_snapshot" created
$ sudo lvconvert --merge /dev/mynew_vg/vol01/volume1_snapshot Can't merge over open origin volume Merging of snapshot volume1_snapshot will start next activation.
- After execution of the above command, the logical volume “volume1” will rollback once it is activated. Therefore, what needs to be done next is to re-activate “volume1”. First, make sure that you unmount your the volume we are trying to recover.
$ sudo lvchange -a n /dev/mynew_vg/vol01 $ sudo lvchange -a y /dev/mynew_vg/vol01
$ sudo mount /dev/mynew_vg/vol01 /mnt/volume1 $ du -s /mnt/volume1 162528
Closing Thoughts
The above was a basic example of snapshot manipulation using Logical Volume Manager and how to perform LVM backup and restore in Linux. The usefulness of logical volume snapshots is enormous and it will sure help you with your tasks whether you are system administrator or a developer. Although you can use the setup above to create multiple snapshots for a backup recovery, you also need to know that your backup will find its limits within your Logical Volume Group. Therefore, any low level physical volume problems may render your snapshot useless.
Related Linux Tutorials:
Comments and Discussions