- Samba network from Ubuntu to MacOS
- How to set up Samba in Ubuntu/Linux, and access it in Mac OS and Windows
- Now, your turn!
- Sharing ubuntu 16.04 vm folder with mac os (with samba)
- 1 Answer 1
- Stage 1: Install VirtualBox Guest Additions:
- Stage 2: Shared Folders Setup:
- Stage 3: Auto mounting host_folder into /opt/shared_folder_dir :
- How to set up Samba in Ubuntu and access it in MacOS/Windows
- Installation
- Debian/Ubuntu
- Setting up Samba
- Setting up User Accounts and Connecting to Share
- Connecting to share
- fschiettecatte / Samba_MacOS.md
Samba network from Ubuntu to MacOS
This is my first attempt at setting up a network, so I apologize if some of this should be obvious. I’m attempting to share a directory between my Ubuntu 18.04 desktop and my MacOS High Sierra 10.13.5 MacBook Pro using Samba. Here’s what I’ve done thus far: I’ve done the following on my Ubuntu Desktop:
$ sudo apt install tasksel $ sudo tasksel install samba-server $ sudo cp /etc/samba/smb.conf /etc/samba/smb.conf_backup $ sudo bash -c 'grep -v -E "^#|^;" /etc/samba/smb.conf_backup | grep . > /etc/samba/smb.conf' $ sudo smbpasswd -a $ sudo nano /etc/samba/smb.conf [Shared File Name] comment = Ubuntu File Share create mask = 0777 guest ok = Yes path = path/to/shared/file read only = No $ sudo service smbd restart $ sudo chmod 0777 path/to/shared/file Then I determined the IP address of the Ubuntu desktop using this site: https://whatismyipaddress.com/?u=TRUE Then on the mac, I did the following:
1) Disabled the FireWall
2) Opened Finder
3) Menu Go -> Connect to server (command-k)
4) entered smb://UBUNTU-IP-ADDRESS in the “Server Address” text box
5) Pressed Connect At this point I get the following error:
There was a problem connecting to the server «UBUNTU-IP-ADDRESS» The server may not exist or it is unavailable at this time. Check the server name or IP address, check your network connection, and then try again.
Other Info: I’m trying to network these computers with WiFi rather than through ethernet cables, so I can use the Mac Laptop anywhere. On my Ubuntu system I have a mounted file (icon of an ethernet port overlays the file) that appeared on my desktop labeled: «Shared File Name» on user-desktop.local This mounted file contains the folders and files of the desired directory I’d like to share across the network. However, some of the folders have been renamed with names like _9GP6I~F.18 or _13ZOZ~B.18 while others have kept their original name. At this point my questions are:
1) What mistakes have a made that don’t allow me to mount the folder on my Mac? 2) Are there other things I need to do with the Mac, to get it to connect to a Network. Online tutorials have hinted at this but I couldn’t find any concrete steps. 3) Are there naming conventions for folders and files that must be followed to avoid the renaming that occurs in the file mounted on the Ubuntu Desktop? Thank you for taking the time to read this, I appreciate any input.
How to set up Samba in Ubuntu/Linux, and access it in Mac OS and Windows
Samba allows to share files and printers with other computers remotely, regardless their operating system (linux, windows, Mac, . ). This guide show how to intall and configure the Samba service in a Ubuntu machine and access it through windows and mac.
Setting up the Samba File Server on Ubuntu/Linux:
- Open the terminal
- Install samba with the following command: sudo apt-get install samba smbfs
- Configure samba typing: vi /etc/samba/smb.conf
- Set your workgroup (if necesary). Go down in the file, until you see :
# Change this to the workgroup/NT-domain name your Samba server will part of workgroup = WORKGROUP
# Adrian's share [MyShare] comment = YOUR COMMENTS path = /your-share-folder read only = no guest ok = yes
- Open finder
- Menu Go -> Connect to server (command-k)
- In the «Server Address» textbox, type: smb://
- Connect
- Select guest and OK
- Your all set, you’ll be able to see / from here.
port type port no udp 137 udp 138 tcp 139 tcp 445
Now, your turn!
- Found a typo? Edit this post.
- Got questions? comment below.
- Was it useful? Show your support and share it.

About the author
Adrian Mejia is a Software Engineer located in Boston, MA. Currently working at Google. Adrian enjoys writing posts about Algorithms, programming, JavaScript, and Web Dev. Also, he likes to travel ✈️ and biking 🚴.
Sharing ubuntu 16.04 vm folder with mac os (with samba)
I tried smb://192.168.0.104/testshare , smb://192.168.0.104/media/testshare
I have no idea how to make it work. Help!

Might help, this is what I get when I run
$ sudo netstat -tulpn | egrep «samba|smbd|nmbd|winbind» : * I know that the ip is different now (192.168.0.104 => 192.168.0.109), its a new vm, don’t pay attention to that.
1 Answer 1
Host OS: macOS El Capitan
VM (guest) OS: Ubuntu Server 16.04.5 LTS
VirtualBox v5.2.18
Both host OS and guest OS must have same user (further in the text: username).
Stage 1: Install VirtualBox Guest Additions:
1.1. Locate the VirtualBox Guest Additions,
$ cd /Applications/VirtualBox.app/Contents/MacOS/ $ cp VBoxGuestAdditions.iso ~/Downloads/ 1.3. Click the CD icon in the bottom right task bar
1.4. Select «Choose disk image. «» and search for the VBoxGuestAdditions.iso
1.5. In the guest terminal type (you can also do this from the host terminal if you SSH into it):
$ sudo su $ apt update $ apt upgrade $ apt-get install dkms build-essential linux-headers-generic gcc make $ mount /dev/cdrom /mnt $ cd /mnt $ sh ./VBoxLinuxAdditions.run $ reboot Stage 2: Shared Folders Setup:
- Stop the VM
- Go to Settings > Shared Folders
- Click in the Add new port forwarding rule green button in the top right of the window.
- Search and select the folder you would like to share (e.g.: /path/to/shared/host_folder)
- Select the Auto-mount and Make Permanent options
- Start the VM
2.2. To mount shared folder on /opt you must create shared_folder_dir subfolder and set appropriate permissions to it:
$ sudo mkdir -p /opt/shared_folder_dir $ sudo chmod ug+w -Rv /opt/shared_folder_dir $ sudo chown username:username -Rv /opt/shared_folder_dir 2.3. Add username to the vboxsf group:
$ sudo adduser username vboxsf $ sudo usermod -a -G vboxsf username 2.4. Reboot VM to apply changes:
Stage 3: Auto mounting host_folder into /opt/shared_folder_dir :
and place following right above exit 0 :
# 'folder_name' = given in the shared folders configuration # 'path/to/shared/folders' = guest path to access the shared folders from # 'id' = prints uid/gid # sudo mount -t vboxsf -o uid=,gid= sleep 5 sudo mount -t vboxsf -o uid=1000,gid=1000 host_folder /opt/shared_folder_dir exit 0 >> Note: I’ve added sleep 5 to execute mount operation after VirtualBox Guest Additions has started. You can check that by journalctl -b command.
3.2. Reboot VM to apply changes:
How to set up Samba in Ubuntu and access it in MacOS/Windows
Samba is a way to share files across the different operating systems over a network. It let you access all your files from one PC to another without any 3rd party application.
Today, we will install and set up Samba in our Linux system and share files over the network.
Installation
To install Samba in Linux, make sure to have an account with SUDO privileges and your system is connected to the working internet.
Type or Copy-Paste the below command in the Linux terminal respective to your Linux distribution.
Debian/Ubuntu
$ sudo apt update $ sudo apt install sambaAlways update your repository before any packages installation to full fill any missing dependencies.
We can check if Samba is installed successfully in our system using the below command.
Above command output, you the version of Samba is installed in your system. In my case, right now, version 4.13.3 is the latest.
Setting up Samba
Now that Samba is successfully installed in our system. Time to create a directory where we place all files and folders we want to share.
$ mkdir /home/[username]/trendoceansHere I am creating a directory with the name trendoceans, which I will share over the network later.
Before that, we have first to add this directory to a Samba configuration file. The default location for the Samba configuration file is /etc/samba/smb.conf.
Copy-Paste the below code to the Samba configuration file to share our directory over the network.
[sambashare] comment = Samba on Linux path = /home/[username]/trendoceans read only = no browsable = yes- comment: You can write anything; it is just for you. You can even skip this if you do not require it.
- path: This is the path which we want to share over the network.
- readonly: We can only modify files and folders if the value of readonly is set to no.
- browsable: Set value to yes to list it in the file manager network tab and make it appear as a shared directory.
Now we have a new shared folder in our configuration file, make sure to restart the Samba daemon.
Setting up User Accounts and Connecting to Share
Since Samba doesn’t use a user account for login, we need to set up samba’s password using the below command.
$ sudo smbpasswd -a [username]The username must belong to your system account; otherwise, it won’t log in.
Connecting to share
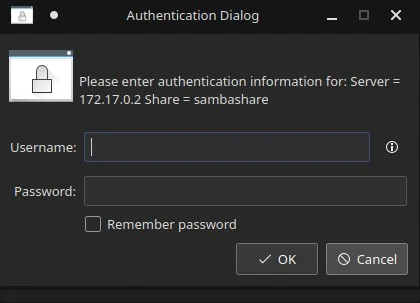
Open file manager and go to the Network tab and connect to the server using remote IP.
![]()
Now log in using your system username and password, which you have set using smbpasswd .
Innovative tech mind with 12 years of experience working as a computer programmer, web developer, and security researcher. Capable of working with a variety of technology and software solutions, and managing databases.
fschiettecatte / Samba_MacOS.md
I recently switched from using Netatalk to Samba for file access from MacOS to linux.
Obviously the Samba is a great resource, on the Samba Wiki the Configure Samba to Work Better with Mac OS X was invaluable for setting up the /etc/samba/smb.conf file, and the vfs fruit man page contains documentation for all the options.
Here is the /etc/samba/smb.conf file I use:
[global] workgroup = LINUX server string = linux.internal (Samba) security = user # Password backend passdb backend = tdbsam # Always sync to disk (optional) # For some reason 'sync always = yes' does not play well with Ventura 13.4 and Samba 4.17.5 # strict sync = yes # sync always = yes # Added for Mac Client support # https://wiki.samba.org/index.php/Configure_Samba_to_Work_Better_with_Mac_OS_X # https://www.samba.org/samba/docs/current/man-html/vfs_fruit.8.html min protocol = SMB2 ea support = yes vfs objects = fruit streams_xattr fruit:metadata = stream fruit:model = MacSamba fruit:veto_appledouble = no fruit:nfs_aces = no fruit:posix_rename = yes fruit:zero_file_id = yes fruit:wipe_intentionally_left_blank_rfork = yes fruit:delete_empty_adfiles = yes # Use extended POSIX ACLs inherit acls = yes # Set default file & directory permissions create mask = 0664 directory mask = 0775 # Linux supports kernel oplocks kernel oplocks = yes # printing = cups # printcap name = cups # load printers = yes # cups options = raw [homes] comment = Home Directories valid users = %S, %D%w%S browseable = no writeable = yes There is an option worth noting, Apple changed something with their SMB client in Ventura and I needed to add the ‘kernel oplocks = yes’ options because MacOS would place opportunitics locks on the files I was editing and I would get a ‘text file busy’ error on the linux side when I tried to run scripts. Setting ‘kernel oplocks = yes’ helped to work around this.
I also made some changes to ‘/etc/nsmb.conf’ on the Mac, here is the version I use:
[default] # SMB client signing is not required signing_required=no # How to disable SMB 1 or NetBIOS in macOS # https://support.apple.com/en-us/HT211927 # Require SMB2/3 # 7 == 0111 SMB 1/2/3 should be enabled # 6 == 0110 SMB 2/3 should be enabled # 4 == 0100 SMB 3 should be enabled protocol_vers_map=6 # No SMB1, so disable NetBIOS port445=no_netbios # Configure SMB Multichannel behavior # https://support.apple.com/en-us/HT212277 # Disable multichannel support # mc_on=no # Some Wi-Fi networks advertise faster speeds than the connected wired network mc_prefer_wired=yes