Printing from Mac to Linux: the cheat sheet
For the last few years, desktop Linux and Mac OS X alike have used CUPS (Common Unix Printing System) as their native printing subsystem. In an ideal world, this would mean it’s really easy to set them up to talk to each other.
In the world we live in, however, things are not so easy. Configuring CUPS remains a black art, compounded by the absolutely abysmal reporting of errors to the printer UI on both OSes. To have any clue what’s going on you have to seek out and find the log files…
I can understand that on Linux, but really, how did Steve Jobs let this out the door on his precious Macintosh? Heck, Apple even bought the company that developed CUPS a few years back. Stop making our iPods smaller for a couple minutes and fix your printing error messages! 😉
The situation:
I have a relatively straightforward setup: an Ubuntu Linux desktop PC (stormcloud.local) with a well-supported USB printer hooked up, and a Mac laptop (nimbus.local) which roams the world. When at home, it’s nice to be able to print directly from the Mac rather than print to PDF, copy the file, and then print.
The cheat sheet:
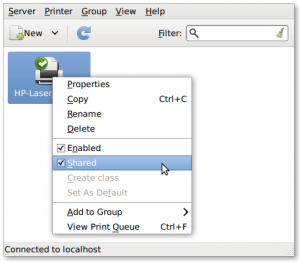
First the basics — make sure printer sharing is enabled on Linux; this much you should be able to do through the regular GUI:
Now the voodoo! Add to /etc/cups/cupsd.conf on Linux:
# Allow remote access ServerAlias * Port 631 sudo /etc/init.d/cupsd restart
Now, you can add the printer on the Mac; be sure to fill everything out!

Several gotchas I discovered:
Listening isn’t enough
Very early in my journey I made sure that the Linux box’s cupsd.conf was set to listen on the network as well as to itself:
BAD: Listen localhost:631 GOOD: Port 631 But when I’d try to hit the CUPS web administration pages I’d just get a “400 Bad Request”. After some experimentation, I found that it actually responds just fine… as long as in the HTTP headers I call it “localhost” instead of by its proper local network name.
To get it working (so eg http://stormcloud.local:631/ would actually pull something up!) I had to add this to cupsd.conf:
GOOD: ServerAlias * No, setting the name I wanted in ServerName mysteriously wasn’t enough.
Pick a queue, any queue
The Mac’s IPP printer setup dialog says you can leave the “Queue” field “blank for default queue”. This is a lie! Despite having only one printer available, I could only get printing working if I listed the queue explicitly.
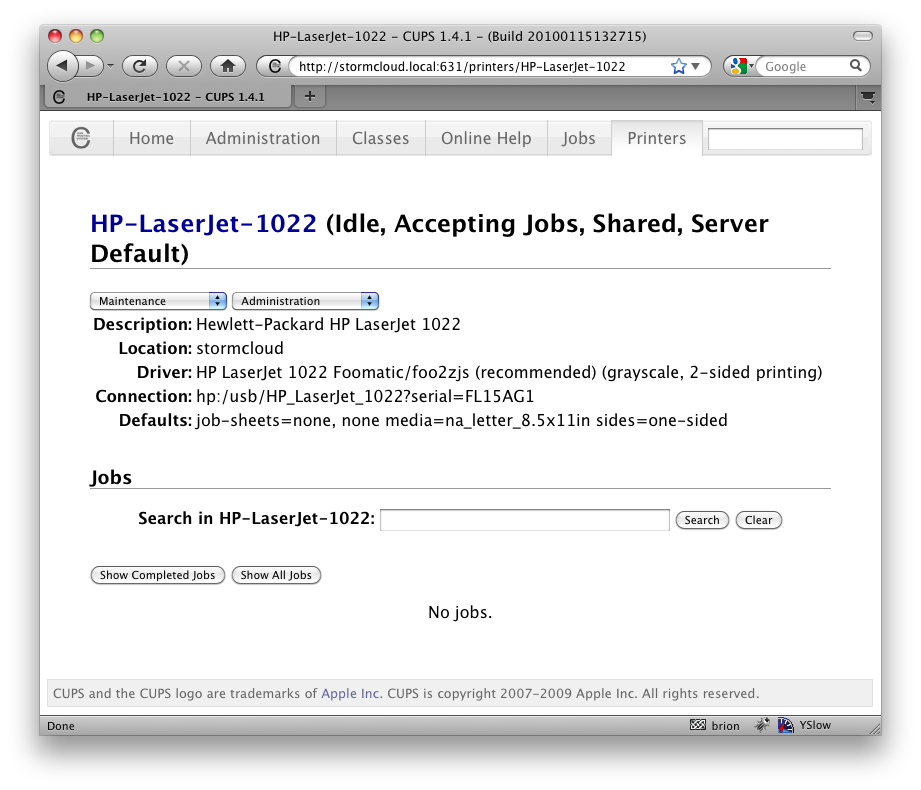
To add insult to injury, you need to include the “printers/” prefix. This is easiest if you find the printer on the web interface and copy-paste the path from the URL…
Now I can print my dang Fandango tickets, which I’m pretty happy about!
I’ve been using the native driver for the printer on the Mac side. It should also work to just leave it at Generic PostScript as long as the Linux box has a driver, but I feel safer with it there. 😉
3 thoughts on “Printing from Mac to Linux: the cheat sheet”
Printing has been our one major headache (aside from OpenOffice Impress) since switching to Linux for all our computers a few months back. Network printing works sometimes, but it’s really hard to predict when it will quit and why.
Can (CUPS) ppd files for Mac OS X be used for linux?
I am looking at buying a printer (actually an all-in-one I prefer for the features it provides, but I want to focus on the printer part here) which does not provide linux drivers, but does provide Mac OS X drivers. I know that both operating systems (can) use CUPS for printing. Does this mean that I could copy the ppd (driver) file from the Mac OS X driver package and use it (modified) under linux? When looking into the file, there are Mac OS X print dialog-specific lines such as
*APPrinterIconPath: "/Library/Printers/.icns" *APDialogExtension: "/Library/Printers/.plugin" *APAutoSetupTool: "/Library/Printers/" *cupsFilter: "application/vnd.cups-raster 0 /Library/Printers/" *OKDitherLibrary: "/Library/Printers/.dylib" that I don’t know what to do with. As with the last line, there are quite a number of other lines with keywords starting with ‘OK’, which I think are vendor-specific, such as
*OKPaperCheckManualFeed_CheckOFF: True *OKSupportCUPaperSizeCheck: True *OKSupportCustomManualFeed_CheckOFF: True *OKSupportPCLMediaTypeUSERTYPE: Yes *OKSupportMarginCentering: True which I also don’t know what to do with. (As a fallback, given that the printer supports PCL6, I could use the generic driver for that, but then miss out on miss out on possibly interesting functionality.)
3 Answers 3
I was in the same situation. I’ve got a Fuji Xerox Docuprint CM305df and unfortunately Fuji Xerox do not provide linux drivers (why. ). But they do provide a Mac OSX PPD driver!
A simple case of just using that, right? Well, PostScript Printer Description (PPD) files are platform independent, but as you (and I) found out, it can contain operating system specific entries (e.g. Mac OSX) which renders the PPD unusable on another operating system (e.g. Linux), unless you make some changes first.
I was able sucessfully get my printer working on Linux Mint 13 (CUPS 1.5.3) by editing the Mac OSX PPD file and removing superficial Mac OSX specific entries and substituting a Linux cupsFilter in place of the MacOSX one (as mentioned by Gilles, see Step 3 below — I hope it works for you too).
As you’ve noted, the *OK. lines are probably vendor specific entries for your OKI printer. I’d leave those as they are because it might provide you with settings/options for managing the printer as I spotted some *FX. lines when I was editing my PPD file. I ended up having 11 pages of options when using the Fuji Xerox driver as opposed to only 4 pages when using the «Generic PCL Laser Printer (en)» driver.
Just in case anyone else wants to do the same, here’s what I did.
1) Download the «Mac PPD and Plug-in Installer» from Fuji Xerox’s website and extract the PPD file (I installed it on a Mac running 10.6 and I found the PPD file inside /Library/Printers/PPDs/Contents/Resources/FX DocuPrint CM305 PS.gz).
2) Delete the following lines:
*APPrinterIconPath: «/Library/Printers/FujiXerox/Icons/FX DocuPrint CM305.icns» *APDialogExtension: «/Library/Printers/FujiXerox/PDEs/FXOPSCJHAccount.plugin» *APDialogExtension: «/Library/Printers/FujiXerox/PDEs/FXOPSCJHImageOptions.plugin»
3) Replace the following line:
[OLD] *cupsFilter: «application/vnd.cups-postscript 0 /Library/Printers/FujiXerox/Filter/FXOPSCJHFilter»
[NEW] *cupsFilter: «application/vnd.cups-postscript 0 pstops»
How to use Mac printer driver in ubuntu?
thanks for reading! Just bought a Canon G1000, but there’s no Linux support yet. I have mailed them and the answer is no Linux driver at the time. I’m a linux user for years, but I’m really new to CUPS (never had to struggle with a printer until this one!). 1- Since the Mac OS X drivers are available, I was wondering if I could extract the PPD from it to feed my Ubuntu? I have xar the dmg file, but couln’t find any PPD from it. 2- If possible, how to use files extracted from DMG file to be used as Linux driver? Any help appreciated!
3 Answers 3
I managed to extract the PPD file from the OSX cups drivers. Since I don’t know whether I can post it for license reasons, here are the steps to reproduce.
I haven’t managed to get the printer to work yet however, but I’m posting this with the hope that someone might be able to solve the remaining bits of problems.
- download OSX CUPS driver from Canon site: http://support-id.canon-asia.com/contents/ID/EN/0100700802.html
- 7z x mcpd-mac-g1000-13_13_0_0-ea21_3.dmg (or whatever the file you got is called)
- 7z x «2 — disk image(Apple_HFS:2)» which was extracted from original .dmg file
- cd «PrinterDriver_G1000 series/»
- 7z x «PrinterDriver_G1000 series_131300.pkg» which gives you a G1000.pkg folder among other files
- cd G1000.pkg
- zcat Scripts | cpio -i
- cd CIJModules
- tar xzf CanonIJPPD.tgz gives you CanonIJG1000series.ppd.gz which is the PPD you want. It still needs editing as it includes a number of lines pointing to OSX paths (» /Library/. «)
I am still trying to figure out what is wrong with my setup, but at least you can work on the PPD now 🙂
The question is about using the Mac driver of Canon G1000 as a source of driver for this printer in Ubuntu. My answer is not exactly regarding that. But I assume that what the poster wanted is to have a completely working driver for Linux. My answer addresses this:
The options for a person trying to install Canon’s G1000 and G2000 are limited to the following:
- Compile and install gutenprint (Recommended). Gutenprint, formerly named Gimp-Print, is a suite of printer drivers for linux. It works just like native drivers and supports cups based printing. It is completely free.
- Buy a third party linux printing driver and utility, called Turboprint. It too has excellent support. An added bonus is a GUI for checking printer spooling, and configuring varied options like Paper type, resolution etc. The cost of an individual license is upwards of $34.
If you decide to go with the first solution, the steps include the following. My system is a Ubuntu Xenial 64bit.
First you need some developmental headers. So add to your sources.list the following lines if you dont have them. Modify these according to your version of Linux(Debian/Ubuntu):
deb http://jp.archive.ubuntu.com/ubuntu/ xenial-proposed main restricted universe multiverse deb-src http://jp.archive.ubuntu.com/ubuntu/ xenial-proposed main restricted universe multiverse Update your sources and install the build dependencies:
sudo apt-get build-dep cups-common gimp-gutenprint libgutenprint-dev sudo apt-get install build-essential Now download the source release package for gutenberg (version >=5.2.13) from Sourceforge.
wget https://sourceforge.net/projects/gimp-print/files/gutenprint-5.2/5.2.13/gutenprint-5.2.13.tar.bz2/download tar xvf download cd gutenprint-5.2.13 Alternately clone the git repo.
git clone https://git.code.sf.net/p/gimp-print/source gimp-print-source cd gimp-print-source Now configure, make and install.
./configure make sudo make install Worked for me, many many thanks droidzone! printer canon G1500.
I have 64bit Ubuntu 16.04.2 LTS xenial with xcfe xubuntu
I try to add some details for people not competent like myself. and in case they have problems (like in my case) with the source.list (forgive my English, I am Italian)
We are trying to install the drivers of the printer. we want to add 2 web addresses from which download the drivers. one way is to open the window «software and updates» tab «software for ubuntu» activate option «source code» then tab «Other software», press «add» paste:
deb http://jp.archive.ubuntu.com/ubuntu/ xenial-proposed main restricted universe multiverse
deb-src http://jp.archive.ubuntu.com/ubuntu/ xenial-proposed main restricted universe multiverse
close «software and updates»
we open a terminal and give the command » sudo apt update » — maybe will ask to restart and we can then restart the computer.
command » sudo apt-get build-dep cups-common gimp-gutenprint libgutenprint-dev «
if, as happened to me, the answer is like » Reading package list . Done E: It is necessary to insert some «source» URIs in the sources.list file » it means that it does not have an address from which download the programs you can go to point 2. bellow ;
if every thing went fine (no answers) then go to the answer from Droidzone at step: sudo apt-get install build-essential
2. we should check the file sources.list in /etc/apt/ we open sources.list in /etc/apt/
if in front of the addresses starting with «deb-src http://. there is the character # in my case solved getting rid of the character #
to edit the file sources.list (make copy of the file sources.list and paste in the desktop) in the terminal you can write the the command: » sudo mousepad /etc/apt/sources.list » (mousepad is a text editor, but you can use gedit or others. )
once opened cancel the characters # in front of the addresses starting as «deb-src http://. then save the file
now you can try again with command «sudo apt-get build-dep cups-common gimp-gutenprint libgutenprint-dev»
then go to the answer from Droidzone at step: sudo apt-get install build-essential