- Отправка почты из командной строки Linux
- Подготовка
- Синтаксис
- Примеры использования командной строки для email-отправки
- 1. Отправка письма с вложением
- 2. Несколько получателей
- 3. Отправка с копией
- 4. Указать отправителя
- 5. Отправка через другой SMTP сервер
- Mutt
- Примеры использования Mutt
- How to Use the Linux mail Command
- Install Linux mail Command
- Linux mail Command Syntax
- Linux mail Command Options
- Linux mail Command Examples
- Example 1: Send Mail with Subject and Body
- Example 2: Send Mail Using echo
- Example 3: Send Email Using Redirection
- Example 4: Send Email from File
- Example 5: Send Mail to Multiple Receivers
- Example 6: Send Attachments
- Example 7: Read Mail
- Example 8: Delete Mail
- Example 9: Save Attachments
- Example 10: Incorporate mail in Scripts
Отправка почты из командной строки Linux

Обновлено: 05.05.2022 Опубликовано: 31.03.2017
Подготовка
Для начала устанавливаем утилиту для отправки почты. В противном случае мы увидим ошибку mail: command not found. В Debian / Ubuntu:
Синтаксис
* в данном примере будет отправлено письмо на электронный адрес master@dmosk.ru с темой Test title и телом письма — Test text. Если при отправке возникли проблемы, можно проверить логи следующей командой:
Примеры использования командной строки для email-отправки
1. Отправка письма с вложением
echo ‘Attachment’ | mail -s ‘Subject attachment message’ -a /var/log/maillog -a /var/log/maillog2 master@dmosk.ru
echo ‘Attachment’ | mail -s ‘Subject attachment message’ -A /var/log/maillog -A /var/log/maillog2 master@dmosk.ru
* где /var/log/maillog и /var/log/maillog2 — файлы, которые будут прикреплены к письму. Обратите внимание, что обе команды отличаются по регистру опции a и A — все зависит от версии и сборки Linux (в каких-то нужно использовать маленькую, в каких-то — большую). Также обратите внимание, что в примере для Ubuntu мы отправим 2 файла — для этого просто добавляем к команде еще одну опцию прикрепления файла.
2. Несколько получателей
* в данном примере мы отправил письмо на ящики master@dmosk.ru и shmaster@dmosk.ru.
3. Отправка с копией
4. Указать отправителя
5. Отправка через другой SMTP сервер
echo «Test text» | mail -s «Test title» -a «Smtp: smtp.mail.ru:25» -a «From: postmaster@dmosk.ru» -a «Return-path: postmaster@dmosk.ru» master@dmosk.ru
Однако, если сторонний почтовый сервер работает по шифрованному каналу и требует аутентификацию, необходимо ввести следующее:
echo «Test text» | mail -v -s «Test title» -S smtp=»smtp.dmosk.ru:587″ -S smtp-use-starttls -S smtp-auth=login -S smtp-auth-user=»master@dmosk.ru» -S smtp-auth-password=»password» -S ssl-verify=ignore -S nss-config-dir=/etc/pki/nssdb -S from=postmaster@dmosk.ru master@dmosk.ru
* где smtp.dmosk.ru — сервер smtp; 587 — порт для подключения к серверу отправки; smtp-use-starttls указывает на использование шифрования через TLS; smtp-auth=login задает аутентификацию с использованием логина и пароля; smtp-auth-user и smtp-auth-password — соответственно логин и пароль; ssl-verify=ignore отключает проверку подлинности сертификата безопасности; nss-config-dir указывает на каталог с базами nss; from задает поле FROM
Mutt
При возникновении проблем, можно воспользоваться программой mutt. Сначала поставим ее. а) если используем CentOS / Red Hat:
Примеры использования Mutt
echo «Mail From» | mutt -s «subject» -e ‘my_hdr From: Дмитрий
* данной командой mutt отправит письмо от postmaster@dmosk.ru. 3. Отправка через другой сервер. Для начала, открываем файл с конфигурацией Mutt:
* в данном примере мы отправим всю нашу почту через узел smtp.mail.ru, порт 25. Или при необходимости авторизации на почтовом сервере:
set smtp_url=»smtp://smtp_user@smtp.mail.ru:465″
set smtp_pass = password
set ssl_verify_host = no
set ssl_verify_dates = no
set ssl_starttls = no
set ssl_force_tls = yes
- smtp_user — имя учетной записи, под которой нужно авторизоваться на SMTP.
- smtp_pass — пароль для аутентификации.
- ssl_verify_host — нужно ли проверять валидность сертификата.
- ssl_verify_dates — нужно ли проверять дату действия сертификата.
- ssl_starttls — нужно ли использовать STARTTLS (обычно, при подключении по порту 587).
- ssl_force_tls — нужно ли использование SSL/TLS (обычно, при подключении по порту 465).
Теперь можно отправлять письмо:
echo «Mail From» | mutt -s «subject» -e ‘my_hdr From: Дмитрий ‘ — master@dmosk.ru
How to Use the Linux mail Command
The mail command is a utility that enables users to send and receive emails via the command line. The tool is useful for systems without a GUI environment or for sending automated emails using shell scripts.
In this tutorial, you will learn to use the Linux mail command.
- A system running Linux.
- Access to the terminal (Ctrl+Alt+T).
- An account with root privileges to install the utility.
Install Linux mail Command
In RHEL-based systems, the mail command is a part of the mailx rpm packages, while in Debian-based systems, the command is a part of the mailutils package. Check if the utility is installed by running:
If the output states that the command is not installed, follow the steps below to install mail :
1. Run one of the following commands to install mail, depending on your operating system:
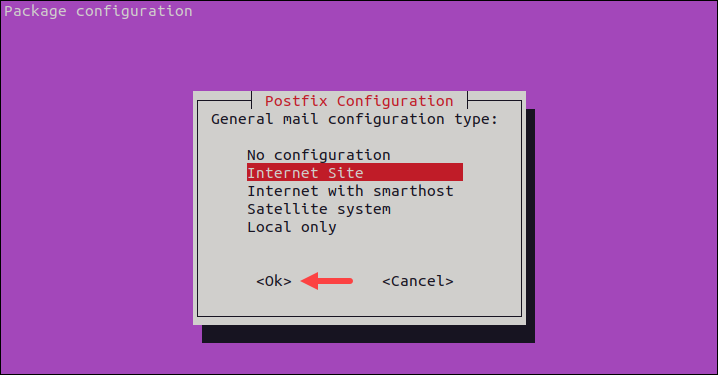
sudo apt install mailutils2. When prompted to configure the postfix package, press TAB to select Ok and confirm with Enter.
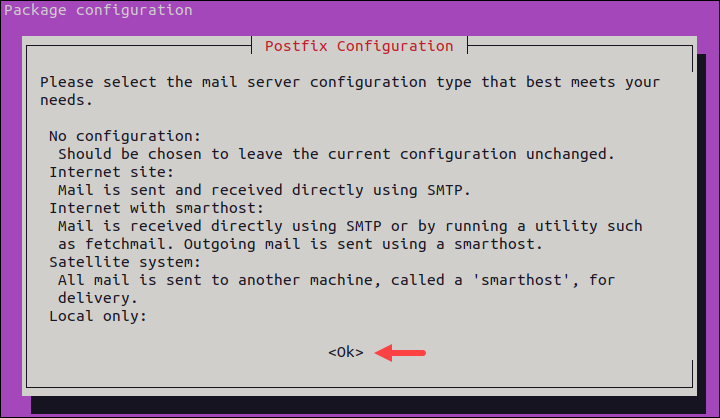
2. Select Internet Site in the package configuration window. Press TAB to select Ok and press Enter to confirm.
3. Complete the basic configuration by entering the system mail name (the machine’s fully qualified domain name).
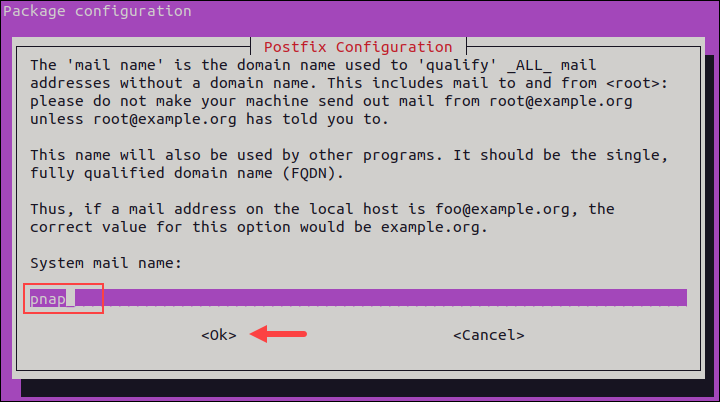
Wait for the installation to complete.
Linux mail Command Syntax
The basic syntax for sending an email using the mail command is:
mail [ options ] -s [ subject ] [recipient_address]- The available [options] are explained in the section below.
- The -s flag specifies the email subject.
- The [recipient_address] is the email address/username of the person you are emailing.
After entering the command, mail prompts for any Cc recipients. If there are none, leave the field blank and press Enter to write the email body.
To send the email, press Ctrl+D.
Important: The mailutils package allows users to connect to a local SMTP (Simple Mail Transfer Protocol) server. Although it is possible to configure it for use with external domains, it requires additional postfix configuration. Moreover, the latest update from Google complicates the setup for Gmail as Google no longer allows less secure apps to sign into a Google account (except for Google Workspace or Google Cloud Identity clients).
Linux mail Command Options
The mail command options allow users to attach files, obtain debugging information, and further customize the program’s operation.
Some of the available options are:
| Option | Description |
|---|---|
| -A [file_path] | Attaches a file to the email. |
| -a=[header] | Allows users to append the specified message to the email. It can also be used to send Carbon copies or Blind carbon copies of the email. |
| -d | Outputs various information useful for debugging. |
| -E | Prevents sending messages with an empty body. |
| -f | Use to specify an alternate mailbox. Defaults to the user’s mbox if no other file is specified. After quitting, mail writes the undeleted messages back to this file. |
| -I | Forces the interactive mode, even when input is not a terminal. For example, the special ~ command character is only available in interactive mode. |
| -i | Causes mail to ignore tty interrupt signals. |
| -N | Prevents initial message headers when reading mail or editing a mail folder. |
| -n | Inhibits reading /etc/mail.rc on startup. |
| -s «subject» | Used to specify the email subject on the command line. Encase the subject in double quotes. |
Refer to the sections below for concrete examples of using the mail command.
Linux mail Command Examples
In this tutorial, we will send mail to specific users on the system by specifying the username in place of the recipient address. To send mail to external domains, make sure to set up postfix to relay an external SMTP server.
Example 1: Send Mail with Subject and Body
The basic way of using mail to send emails is to specify the email subject using the -s flag and add the recipient. The command then enters the interactive mode, asking if you want to send Ccs and asking for the email body.
After entering all the information, press Ctrl+D to send the email.
For example, the following email is sent from the user ‘bosko’ to the ‘root’ user:

After sending the email, the command exits the interactive mode.
Example 2: Send Mail Using echo
Use the echo command to send an email without entering the interactive mode of the mail command. Write the email body and pipe the echo command output to the mail command.
echo "[email body]" | mail -s "[subject]" [recipient]![]()
The echo command takes the string, and the pipe ( | ) passes the string to the mail command.
Example 3: Send Email Using Redirection

In the above example, we create an email using the mail command and pass the string as the message body using redirection.
Example 4: Send Email from File
The mail command allows users to provide the email body from an existing file. This option saves time and facilitates sending large messages without writing them in the command line.
![]()
The command takes input from the specified file and sends it as the email body. Providing input from files is useful when calling the mail command from shell scripts or other programs, such as the ones written in Perl or PHP.
Example 5: Send Mail to Multiple Receivers
To send mail to multiple receivers, specify the list of recipients in a comma-separated list. The syntax is:
mail -s "[subject]" [recipient1], [recipient2] 
Alternatively, send a carbon copy by entering the command's interactive mode. To send a blind carbon copy of the email, use the -a ( --append ) flag. The syntax is:
mail -s "[subject]" --append='BCC:[recipient1],[recipient2]. '

First, we specify the subject and the Bcc recipients, and then the command enters interactive mode, asking for the email recipient, Cc recipients, and email body. The difference between Cc and Bcc is that Cc allows all recipients to see who else got the email, which isn't the case with Bcc.
Example 6: Send Attachments
The mail command allows users to send email attachments using the -A flag. Specify the file path to attach the file to the email. Note that the file is base64 encoded before sending and that the recipient must decode it upon receiving.
mail -s "[subject]" -A [file_path]

Press Ctrl+D to send the mail with the encoded attachment. Refer to the section below on saving attachments to see the result.
Example 7: Read Mail
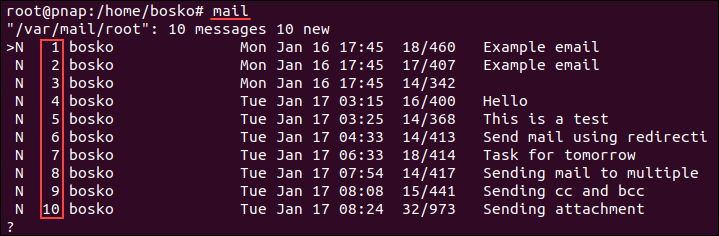
Check the mailbox for the current user by running the mail command without any options or flags. Since most emails in the tutorial were sent to the root user, we will check the mailbox for that user:

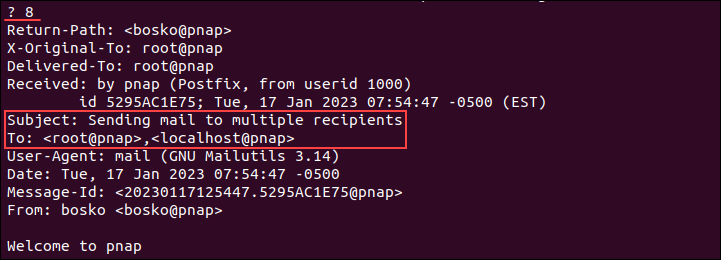
The output shows the new messages, the sender, the date it was received, and the subject. To open an email, enter the email number and press Enter. For example, we will open email number 8:

The output shows the sender's address, the email subject, the recipients, the email date and time, and the contents.
After opening the email, the command waits for further input from the user. Open the next email by entering ( + ) in the prompt, or access the previous email by entering ( - ). Return to the mailbox by pressing Ctrl+D.
Example 8: Delete Mail
To delete an email, open the email you want to delete, press d, and confirm with Enter. To delete multiple emails at once, open the mailbox and enter d followed by the email numbers you want to delete.
For example, the following command deletes emails numbered 1 and 2:
To delete a range of emails, specify the first and last email in the range separated by a dash. For example, to delete emails 1-10, open the mailbox and run:
To delete all received mail, open the mailbox and run:
Example 9: Save Attachments
The mail command sends attachments after encoding them in base64. That means that the attachments are converted into text, and the recipient must decode them.
For example, we have previously sent an email with an attachment to the root user. After opening the email, the output states that it contains the email body (text) and additional content encoded in base64:

To decode the attachment, save the encoded data in a file, and use the base64 command to decode it. The syntax is:
base64 -d [encoded-data-file-path]
For example, the decoded file we sent looks like this:

Example 10: Incorporate mail in Scripts
The mail command can be incorporated in shell scripts to automate some tasks. For example, follow the steps below to create a Bash shell script that reports disk usage via email:
2. Paste the following lines and replace the [recipient] with the address/es you want the report to go to:
#!/bin/bash du -sh | mail -s "Disk usage report" [recipient]
3. Save the file and execute the script using the following syntax:
The script executes and sends an email to the specified address with the du command output.
This tutorial showed how to use the mail command in Linux. The command is a great CLI utility that saves time and automates tasks. Users can easily combine mail with other commands and send the output to the desired address.
Read our tutorial to learn more about important Linux commands and download a cheat sheet to always have them at hand.