- Make a bootable USB drive on any Linux distro
- Make a bootable USB drive in Linux
- Options explained:
- Restore the USB drive
- Conclusion
- How to Create a Bootable Linux USB Flash Drive?
- Create a Bootable Linux USB with Etcher (Linux, Windows, macOS)
- Create a Bootable Linux USB with dd (Linux, macOS)
- dd for windows
- Create a Bootable Linux USB with Rufus (Windows)
- Create a Bootable Linux USB with EtchDroid (Android)
- About the author
- David Morelo
- Create a bootable USB stick on Ubuntu
- 2. Requirements
- 3. Launch Startup Disk Creator
- 4. ISO and USB selection
- 5. Confirm USB device
- 6. Installation complete
- Finding help
Make a bootable USB drive on any Linux distro
I know that many of you are scared of the Linux command line. Of course, you can use graphical programs to make a bootable USB in Linux. But believe me, you will benefit so much if learn the Linux command line tools. For example, if you need to make a bootable USB drive in Linux, different distributions provide different graphical programs to do that, but every Linux distribution has the same built-in tool to do the same job. So, you will benefit for it long-term.
Make a bootable USB drive in Linux
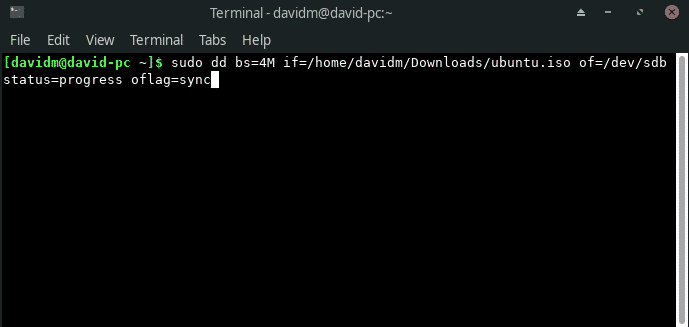
To make a bootable USB drive in Linux, you just need to learn one simple command. The command is dd .
sudo dd bs=4M if=path-to-the-ISO of=/dev/sdX status=progress && sync Options explained:
sudo means to give admin privileges to this command.
dd is the program name.
bs=4M means to use a block size of 4M, so the system will read and write the data in chunks of 4M. This option is simply meant to speed up the process.
if specifies the source to read. Simply put, this is an ISO file of the Linux image you download from the Linux distribution website.
path-to-the-ISO — path to the ISO file. For example, ~/Downloads/archlinux.iso
of specified the destination or where to write this ISO file. In other words, it is your USB drive. This is the most important part of the command, If you do mistake here, you can screw up your whole system. So, be very-very careful.
/dev/sdX means the name assigned to a device by your Linux system. It is some kind of analogy of disks C, D, E in Windows systems.
To find out the name Linux assigned to your flash drive, run this command:
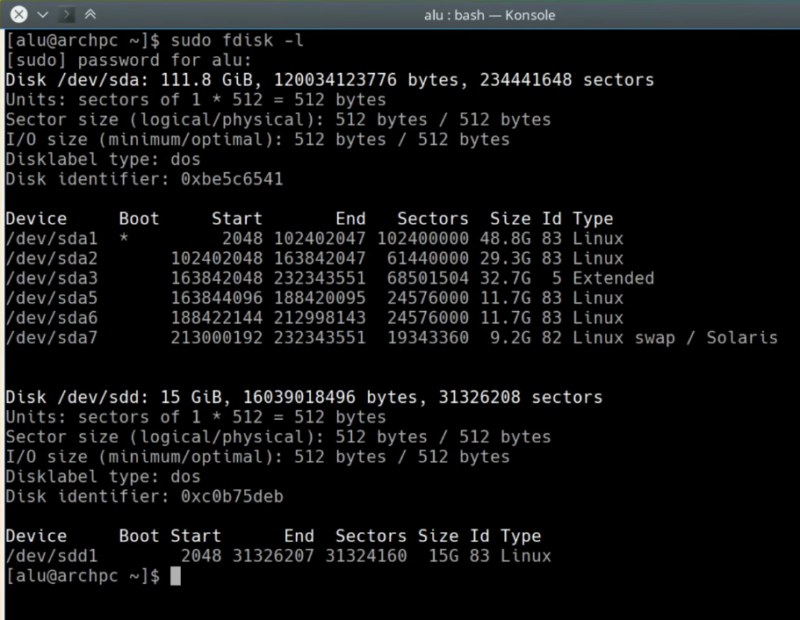
Then you need to analyze the output like the one above. Usually, the USB devices are listed at the end. You find your flash drive by its size. It usually has only one partition. I know that my flash drive is 15Gb. So, its name is sdd. This name is not permanent and it depends on the order the drives are mounted to the system. So, you need to check your USB drive name every time you insert it into the computer
status=progress is not necessary. However, it is helpful because it will show you the progress during the writing process. Without this option, nothing will be printed on the terminal screen.
sync is actually another command, not an option. Sync clears the cache. Thanks to the && signs it will be executed as a chain with dd. This will make sure that all the data is written to the flash drive and nothing is left in the cache.
NOTE: I also need to WARN you that this procedure will wipe all the data from your USB flash drive. So, if you have any important data on it, copy it somewhere else before you run this command. I also recommend to back up the data from other hard drives, so you do not destroy them accidentally.
So, when you are sure that there is no valuable data on the flash drive and you specified all the names correctly, especially the of option, press Enter.
It usually takes several minutes to complete. When the process is finished, you can reboot your system and boot from a newly created bootable USB.
That is the way you can make a bootable USB drive in Linux.
Restore the USB drive
After you have used the bootable USB flash drive, you need to restore it back to its normal not-bootable state. So, to do that, you need to remove the bootable system from it. Run this command:
Then, where again sdX is your flash drive name without any number (in my case it is sdd). You can check it with:
After that create a new partition on it:
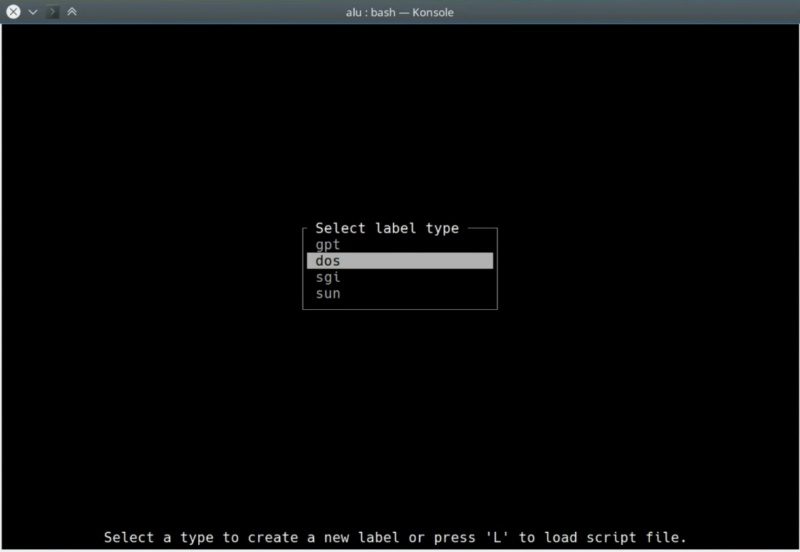
And press enter to create a new partition.
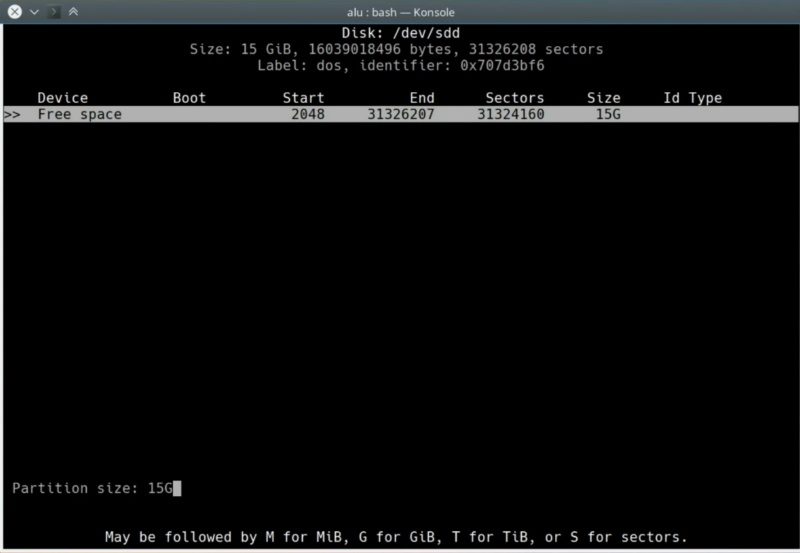
Keep it at its maximum size. So, press enter.
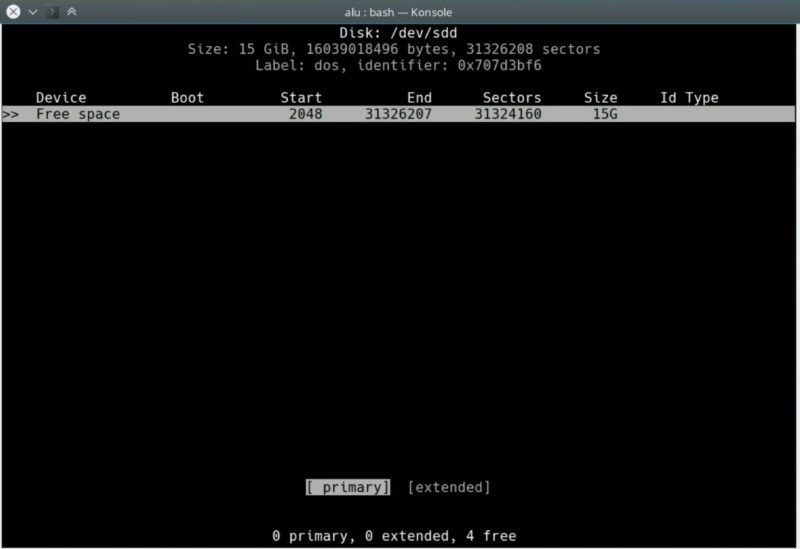
Next, press enter again to make it primary. Navigate with the arrow keys to write and press Enter to write the changes.
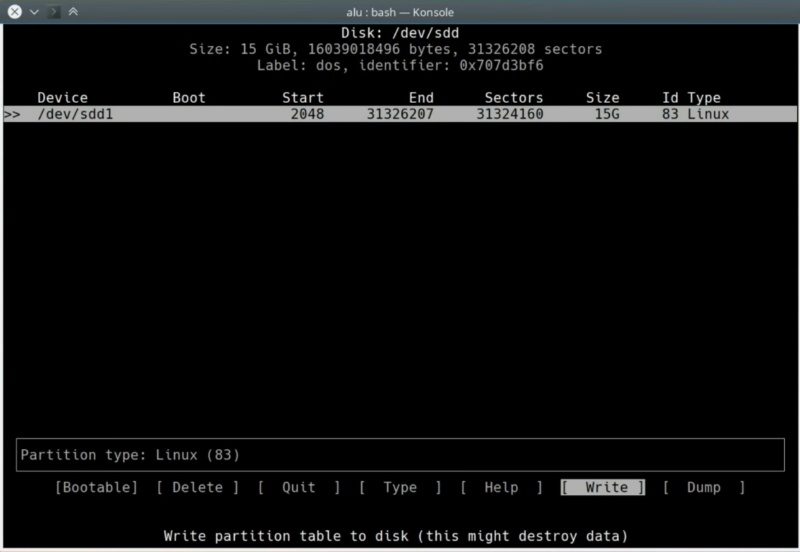
Finally, type yes to confirm and quit the program.

Then, run this command, to check if a new partition has been created:
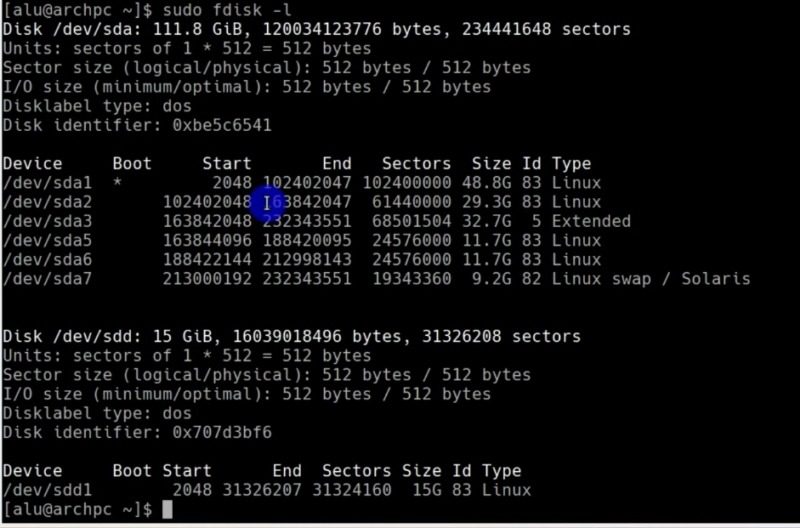
As you can see, the new partition has been created. It is named sdd1 in my example.
Then, format this partition as FAT file system:
sudo mkfs.vfat -n 'ALU' /dev/sdd1 
Where ‘ALU’ is the label I give to this drive, you can use your name instead. And sdd1 is the partition name. Unlike in all the previous steps, where you used the device names, in this command you need to specify the partition name which ends with the number.
After these uncomplicated steps, your flash drive is like new and you can use it to store files.
Conclusion
Now you know how to make a bootable USB drive in Linux. You can now proceed to the installation process or test Linux live distributions.
So, leave your comment and give your opinion about this tutorial. Did you like it? Did you know about this tool?
Average Linux UserFollow I am the founder of the Average Linux User project, which is a hobby I work on at night. During the day I am a scientist who uses computers to analyze genetic data.
How to Create a Bootable Linux USB Flash Drive?
![]()
One great thing about Linux is that you can try it out without installing it on your hard drive. Most Linux distributions provide disk images (ISO files) that contain everything you need to boot into a live environment and, optionally, begin installation.
But how do you transfer a downloaded disk image to a USB flash drive? In this article, we provide three solutions to help you create a bootable Linux USB flash drive on Linux, Windows, macOS, and even Android.
Create a Bootable Linux USB with Etcher (Linux, Windows, macOS)
Written in Electron, Etcher is a cross-platform open source utility for flashing disk images to USB drives and memory cards. It runs on Windows, macOS, and Linux and provides an approachable graphical user interface that reduces the process of creating a bootable Linux USB to just three simple steps.
Unlike other similar software tools, Etcher prevents users from accidentally wiping their entire hard drives, which is something you’ll definitely appreciate if you’ve never created a bootable USB before and understandably feel anxious about the process.
To create a bootable Linux USB with Etcher:
1. Download Etcher from its official website.
3. Select the ISO file you want to flash to your USB drive.
4. Specify the target USB drive if the correct drive is not selected already.
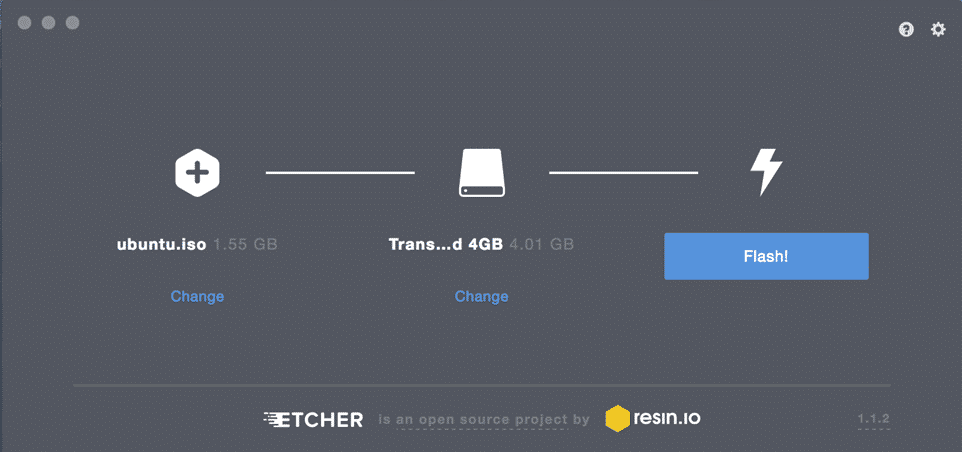
5. Click the Flash! button and wait for the process to finish.
Create a Bootable Linux USB with dd (Linux, macOS)
dd is a command-line utility for Unix-like operating systems whose primary purpose is to read/write data from/to device files, such as USB flash drives. Because dd is bundled in GNU coreutils, you can find it on virtually all Linux distributions, as well as on macOS.
To create a bootable Linux USB with dd:
- Open your favorite terminal emulator.
- Issue the following command (replace /dev/sdx with your drive and path/to/ubuntu.iso with the actual path to the ISO file you want to flash):
The version of dd included in GNU coreutils doesn’t provide any progress indication. If you’d like some reassurance that the transfer is progressing as it should, you can use the following command (replace dd-pid with the process-id of dd, which you can find using htop):
dd for windows
There’s actually a version of dd for Windows that provides all the functionality you need to transfer an ISO file to a USB flash drive. To install it:
- Download the latest version from its official website.
- Extract the downloaded archive to a new folder on your hard drive.
- Open Command Prompt and navigate to the folder with dd for Windows.
- Use dd for Windows just like you would the version included in GNU coreutils.
Unfortunately, dd for Windows was last updated in 2010, and many users have reported issues when using the utility in Windows 10. Considering that dd for Windows doesn’t even support data conversion, such as byte order swapping and conversion to and from the ASCII and EBCDIC text encodings, you’re probably better off using either Etcher or Rufus, which we describe in the next chapter.
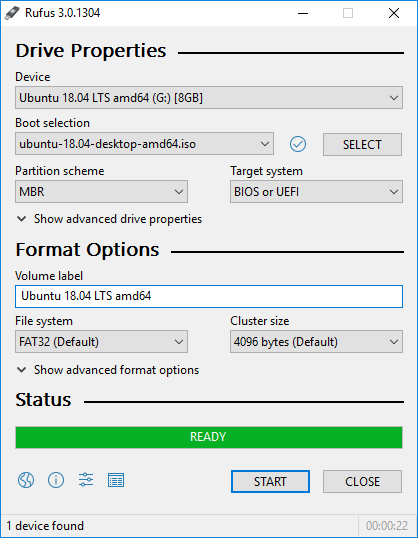
Create a Bootable Linux USB with Rufus (Windows)
Before the release of Etcher in 2016, Rufus was the best way to create a bootable Linux USB in Windows. This bootable USB flash drive creator is much faster than all of its Windows competitors, and it can create live USB drives for systems with both BIOS and UEFI. Rufus has been translated into several dozen languages, and it’s compatible with Windows 7 and newer, both 32- and 64-bit.
To create a bootable Linux USB with Rufus:
- Download Rufus from its official website.
- You can choose between an installer and a portable version.
- Install it if you’ve downloaded the installer. Otherwise, you can just launch it.
- Select the target USB device.
- Click the SELECT button next to the boot selection dropdown menu and specify the ISO file you want to flash.
- Choose the correct partition scheme for your system.
- Click the START button.
- Wait for Rufus to finish.
In addition to creating live Linux USB flash drives, Rufus can also flash Windows disk images.
Create a Bootable Linux USB with EtchDroid (Android)
The last utility we want to describe is called EtchDroid, and its purpose is to write OS images to USB drives on Android smartphones and tablets.
Why would you want to use your Android device to create a bootable Linux USB? Well, imagine you find yourself in the middle of nowhere, and your laptop stops working after a botched system update. Without another computer to use, your only option on how to create a bootable Linux USB to fix the issue is your Android device, and that’s where EtchDroid comes in.
To create a bootable Linux USB with EtchDroid:

- Download EtchDroid from Google Play or F-Droid.
- Connect a USB flash drive to your Android device using a USB OTG adapter.
- Launch EtchDroid and select the Write raw image or ISO option.
- Select your ISO image.
- Select the USB flash drive.
- Tap Write to write the image to the USB flash drive.
EtchDroid has been tested with Ubuntu and its derivatives, Debian, Fedora, Arch Linux, and Raspberry PI SD card images. It doesn’t work with Windows, macOS, and old GNU/Linux distros. Support for Windows installation ISO files is on the developer’s to-do list.
About the author
David Morelo
David Morelo is a professional content writer in the technology niche, covering everything from consumer products to emerging technologies and their cross-industry application
Create a bootable USB stick on Ubuntu
Creating a bootable Ubuntu USB stick is very simple, especially from Ubuntu itself, and we’re going to cover the process in the next few steps.
Alternatively, we also have tutorials to help you create a bootable USB stick from both Microsoft Windows and Apple macOS.
2. Requirements
- A 4GB or larger USB stick/flash drive
- Ubuntu Desktop 14.04 or later installed
- An Ubuntu ISO file. See Get Ubuntu for download links
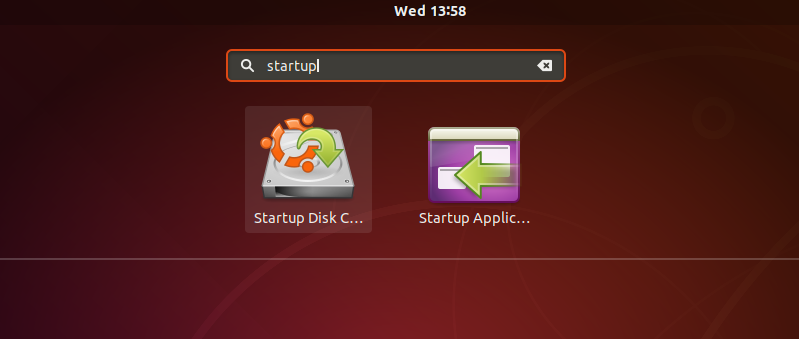
3. Launch Startup Disk Creator
We’re going to use an application called ‘Startup Disk Creator’ to write the ISO image to your USB stick. This is installed by default on Ubuntu, and can be launched as follows:
- Insert your USB stick (select ‘Do nothing’ if prompted by Ubuntu)
- On Ubuntu 18.04 and later, use the bottom left icon to open ‘Show Applications’
- In older versions of Ubuntu, use the top left icon to open the dash
- Use the search field to look for Startup Disk Creator
- Select Startup Disk Creator from the results to launch the application
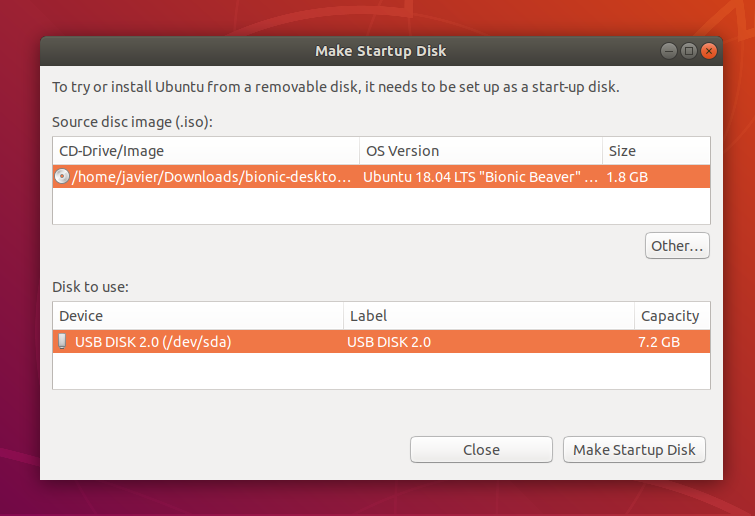
4. ISO and USB selection
When launched, Startup Disk Creator will look for the ISO files in your Downloads folder, as well as any attached USB storage it can write to.
It’s likely that both your Ubuntu ISO and the correct USB device will have been detected and set as ‘Source disc image’ and ‘Disk to use’ in the application window. If not, use the ‘Other’ button to locate your ISO file and select the exact USB device you want to use from the list of devices.
Click Make Startup Disk to start the process.
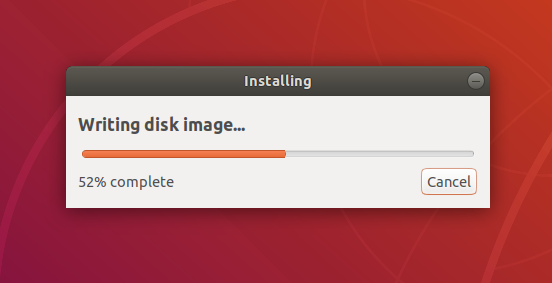
5. Confirm USB device
Before making any permanent changes, you will be asked to confirm the USB device you’ve chosen is correct. This is important because any data currently stored on this device will be destroyed.
After confirming, the write process will start and a progress bar appears.
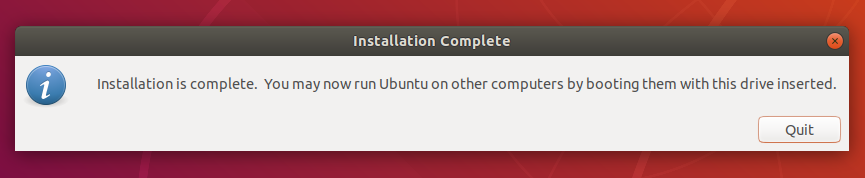
6. Installation complete
That’s it! You now have Ubuntu on a USB stick, bootable and ready to go.
If you want to install Ubuntu, take a look at our install Ubuntu desktop tutorial.
Finding help
If you get stuck, help is always at hand: