- Saved searches
- Use saved searches to filter your results more quickly
- License
- CookieCrumbs19212/Guide-to-Create-Desktop-Entries
- Name already in use
- Sign In Required
- Launching GitHub Desktop
- Launching GitHub Desktop
- Launching Xcode
- Launching Visual Studio Code
- Latest commit
- Git stats
- Files
- README.md
- Программа для создания desktop-файлов
- Немного о desktop-файлах
- Краткое описание
- Как работает
Saved searches
Use saved searches to filter your results more quickly
You signed in with another tab or window. Reload to refresh your session. You signed out in another tab or window. Reload to refresh your session. You switched accounts on another tab or window. Reload to refresh your session.
Guide to creating .desktop files in Linux.
License
CookieCrumbs19212/Guide-to-Create-Desktop-Entries
This commit does not belong to any branch on this repository, and may belong to a fork outside of the repository.
Name already in use
A tag already exists with the provided branch name. Many Git commands accept both tag and branch names, so creating this branch may cause unexpected behavior. Are you sure you want to create this branch?
Sign In Required
Please sign in to use Codespaces.
Launching GitHub Desktop
If nothing happens, download GitHub Desktop and try again.
Launching GitHub Desktop
If nothing happens, download GitHub Desktop and try again.
Launching Xcode
If nothing happens, download Xcode and try again.
Launching Visual Studio Code
Your codespace will open once ready.
There was a problem preparing your codespace, please try again.
Latest commit
Git stats
Files
Failed to load latest commit information.
README.md
Guide to Create a Linux Desktop Entry
How to create a desktop entry?
Desktop entries are created using .desktop files. These files allow your application (or any executable) to show up in the Application Launcher.
Step 1: Choose where to save the .desktop file
Is this desktop entry for all users or just you?
Decide whether you want to create the desktop entry for all users in your system or just for yourself. If you choose to create the desktop entry for all users, it will show up in the application launcher of every user in the system. Depending on the situation, you may or may not want everyone in the system to have the desktop entry pop up in their application launcher.
NOTE: You require root access to create the desktop entry for all users.
TIP: When creating a desktop entry for all users, ensure that the executable file and app icon file are located in a directory accessable by root and outside any local user’s file structure.
Option 1: Create a desktop entry for all users:
First you’ll need to enable root privileges.
Then enter the root password. This should give you root privileges.
Next, cd to the /usr/share/applications/ directory.
Option 2: Create a desktop entry just for yourself:
cd to the ~/.local/share/applications/ directory.
$ cd ~/.local/share/applications/
Step 2: Create the .desktop file
Let’s say our application’s name is foo. Then we will create the desktop file foo.desktop to store the desktop entry.
Step 3: Edit the .desktop file
Open the .desktop file you just created in your preferred code editor and paste the following code:
[Desktop Entry] Encoding=UTF-8 Version=1.0.0 Type=Application Terminal=false Exec=/path/to/executable/file Name=Name of Application Icon=/path/to/application/icon/file
Let’s elaborate on the important variables:
| Variable | Description |
|---|---|
| Version | The version of the application, it is not a critical variable but you are free to modify it to reflect the version of the application. |
| Terminal | When set to true , a terminal will open up and run the executable. When set to false , the terminal is not opened up. |
| Exec | Absolute path to the executable file. All Linux executable files are accepted; shell, bin, etc. |
| Name | The name of your application. This is the name that will be displayed in the application launcher and show up in searches. |
| Icon | Absolute path to the application icon file. The icon file can be almost any image file format. With that said, PNG format is desirable as it gives you the freedom of the alpha channel which allows for transparent backgrounds in the icon. |
Remember to save the changes made to the .desktop file.
And that’s it, you have successfully created a desktop entry for your executable.
Программа для создания desktop-файлов
В дистрибутивах GNU/Linux значки приложений в меню описываются специальными текстовыми файлами. Эти файлы имеют расширение .desktop и при установке приложения создаются автоматически. Но иногда бывают ситуации когда нужно самому создать такой файл. Это может быть когда у вас на руках имеется только исполняемый файл приложения, то есть когда приложение не упаковано должным образом. В некоторых дистрибутивах из коробки имеются программы для создания значков запуска, а в некоторых их нет и нужно искать такие приложения в репозиториях. Я создал свой вариант такой программы и в этом посте расскажу, что она из себя представляет.
Немного о desktop-файлах
Вот пример desktop-файла для консольной игры nsnake:
[Desktop Entry] Version=1.1 Type=Application Name=nsnake GenericName=Classic snake game on the terminal NoDisplay=false//отображать в меню Icon=nsnake Exec=nsnake Terminal=true//запускать в терминале Actions= Categories=ActionGame;Game; Keywords=snake;ncurses;textual;terminal;Тут и так все понятно, но я все-таки прокомментировал пару позиций. Самое главное, что нужно прописать это название приложения (Name), путь до исполняемого файла (Exec) и путь до иконки (Icon). Если иконки нет и нет желания ее искать или создавать, то некоторые окружения рабочего стола установят иконку по умолчанию.
Краткое описание
Исходники приложения находятся здесь. Программа довольно простая. Выглядит она вот так:
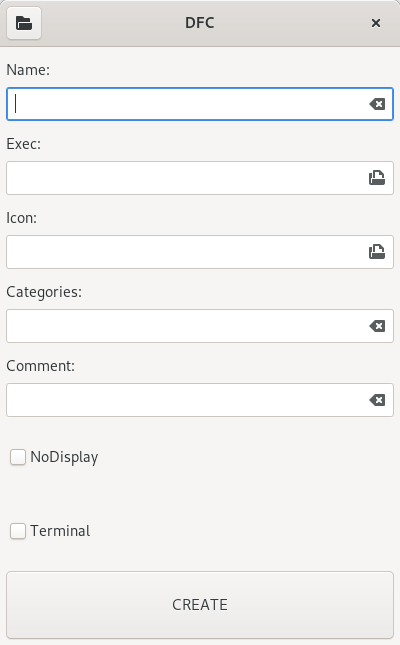
Нужно заполнить необходимые поля, отметить нужные чекбоксы и нажать кнопку CREATE. Программа запросит подтверждение и после согласия оповестит об успешном или неуспешном создании файла.
В хидербаре находится кнопка, при нажатии на которую в файловом менеджере откроется папка, находящаяся по пути /.local/share/applications. Именно там программа сохраняет созданные файлы.
Как работает
Приложение написано на языке Vala с помощью среды разработки GNOME Builder. Устанавливал самую свежую версию среды (40.0) из репозитория Flathub. Оказалось, что визуальный дизайнер в этой версии еще багованнее, чем в предыдущей, поэтому интерфейс делал в Glade.
После того как созданы значки в полях ввода и к ним, также как и к другим кнопкам, привязаны необходимые действия, записываем в переменную directory_path путь до папки с desktop-файлами. Также на всякий случай надо проверить наличие этой папки перед запуском приложения и если папка по каким-то причинам отсутствует, то вывести специальное сообщение и деактивировать кнопку CREATE, так как в этом случае в ней нет необходимости.
button_open.clicked.connect(on_open_directory); button_create.clicked.connect(on_create_file); directory_path = Environment.get_home_dir()+"/.local/share/applications"; GLib.File file = GLib.File.new_for_path(directory_path); if(!file.query_exists()) При нажатии на кнопку CREATE вызывается метод on_create_file:
private void on_create_file () < if(is_empty(entry_name.get_text()))GLib.File file = GLib.File.new_for_path(directory_path+"/"+entry_name.get_text().strip()+".desktop"); if(file.query_exists()) var dialog_create_desktop_file = new Gtk.MessageDialog(this,Gtk.DialogFlags.MODAL,Gtk.MessageType.QUESTION, Gtk.ButtonsType.OK_CANCEL, "Create file "+file.get_basename()+" ?"); dialog_create_desktop_file.set_title("Question"); Gtk.ResponseType result = (Gtk.ResponseType)dialog_create_desktop_file.run (); dialog_create_desktop_file.destroy(); if(result==Gtk.ResponseType.OK) < create_desktop_file();//создаем файл >>Он предназначен для проверки ввода имени файла и проверки возможных совпадений с именами уже существующих в папке файлов, а также для вывода запроса подтверждения на создание файла. Если все проверки пройдены и пользователь подтвердил создание файла, то вызывается метод create_desktop_file:
private void create_desktop_file()< string display; if(checkbutton_no_display.get_active())else < display="false"; >string terminal; if(checkbutton_terminal.get_active())else < terminal="false"; >string desktop_file="[Desktop Entry] Encoding=UTF-8 Type=Application NoDisplay="+display+" Terminal="+terminal+" Exec="+entry_exec.get_text().strip()+" Icon="+entry_icon.get_text().strip()+" Name="+entry_name.get_text().strip()+" Comment="+entry_comment.get_text().strip()+" Categories="+entry_categories.get_text().strip();//записываем содержимое будущего файла в переменную string path=directory_path+"/"+entry_name.get_text()+".desktop"; try < FileUtils.set_contents (path, desktop_file);//создаем файл >catch (Error e) < stderr.printf ("Error: %s\n", e.message); >GLib.File file = GLib.File.new_for_path(path); if(file.query_exists())else < alert("Error! Could not create file"); >>Чтобы просмотреть готовые файлы существует метод on_open_directory. Он срабатывает при нажатии на кнопку в хидербаре.
private void on_open_directory()< try< Gtk.show_uri_on_window(this, "file://"+directory_path, Gdk.CURRENT_TIME); >catch(Error e) < alert("Error!\n"+e.message); >>Для выбора исполняемого файла используется следующий код:
private void on_open_exec() < var file_chooser = new Gtk.FileChooserDialog ("Choose a file", this, Gtk.FileChooserAction.OPEN, "_Cancel", Gtk.ResponseType.CANCEL, "_Open", Gtk.ResponseType.ACCEPT); if (file_chooser.run () == Gtk.ResponseType.ACCEPT) < entry_exec.set_text(file_chooser.get_filename()); >file_chooser.destroy (); >А для выбора иконки код сложнее, так как данный диалог, помимо фильтра, содержит функционал предварительного просмотра изображения:
private void on_open_icon () < var file_chooser = new Gtk.FileChooserDialog ("Select image file", this, Gtk.FileChooserAction.OPEN, "_Cancel", Gtk.ResponseType.CANCEL, "_Open", Gtk.ResponseType.ACCEPT); Gtk.FileFilter filter = new Gtk.FileFilter (); file_chooser.set_filter (filter);//установка фильтра для изображений filter.add_mime_type ("image/jpeg"); filter.add_mime_type ("image/png"); Gtk.Image preview_area = new Gtk.Image (); file_chooser.set_preview_widget (preview_area);//установка области предпросмотра file_chooser.update_preview.connect (() => < string uri = file_chooser.get_preview_uri (); string path = file_chooser.get_preview_filename(); if (uri != null && uri.has_prefix ("file://") == true) < try < Gdk.Pixbuf pixbuf = new Gdk.Pixbuf.from_file_at_scale (path, 250, 250, true); preview_area.set_from_pixbuf (pixbuf);//установка изображения preview_area.show ();//показываем область предпросмотра >catch (Error e) < preview_area.hide ();//скрываем область предпросмотра >> else < preview_area.hide (); >>); if (file_chooser.run () == Gtk.ResponseType.ACCEPT) < entry_icon.set_text(file_chooser.get_filename()); >file_chooser.destroy (); >Метод для вывода сообщений пользователю:
private void alert (string str)
Чтобы проверить введено ли какое-либо значение в текстовое поле используется такой метод:
private bool is_empty(string str)
На этом все! Надеюсь, что пост был для Вас полезен.
Дополнительная ссылка на SourceForge. До встречи в следующих постах!