How to Set Up a Linux Home Server: The Ultimate Guide
A Linux home server is an excellent addition to your home network, providing you with a centralized location to store files, share media, run applications, and host websites. This ultimate guide will walk you through the steps needed to set up a Linux home server from scratch, focusing on the most popular Linux distribution for home servers: Ubuntu Server.
Hardware Selection and Preparation:
The first step in setting up your Linux home server is to choose the appropriate hardware. You can use an old computer, a dedicated server machine, or even a small, low-power device like a Raspberry Pi. Consider the following factors when selecting hardware:
a. CPU and RAM: Choose a processor and memory that can handle your intended tasks. For basic file sharing and media streaming, a low-power CPU and 2GB of RAM should suffice. For more demanding tasks, consider upgrading to a more powerful CPU and additional memory.
b. Storage: Select a hard drive or SSD with enough capacity to store your files and media. A minimum of 1TB is recommended for most users, but you may need more depending on your needs.
c. Network Interface: Ensure your device has a reliable network interface, either wired (Ethernet) or wireless (Wi-Fi). Wired connections are recommended for better performance and reliability.
d. Expansion: Make sure your chosen hardware has USB ports or expansion slots for adding additional storage or peripherals as needed.
Once you have selected your hardware, assemble the components, and make sure everything is properly connected.
With your hardware prepared, it’s time to install the Ubuntu Server operating system. Follow these steps:
Домашний linux сервер своими руками
Хочется поделиться с хабросооществом информацией о том как я собирал домашний сервер.
- torrent клиент с web-мордой
- DHCP — раздаем ip адреса и сетевые настройки
- TFTP — для сетевой загрузки
- OpenVPN — для хождения в сеть с нетбука из недоверенных сетей
- FTP/Samba/NFS — сетевые шары для доступа с домашних машин
- Radius — для WPA2 авторизации
- DigiTemp — мониторинг домашней температуры
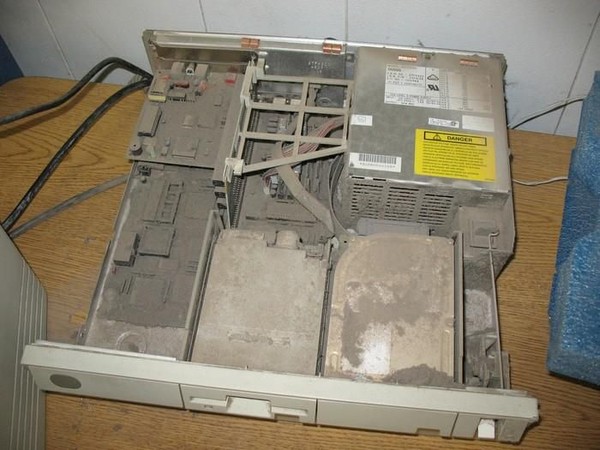
Аппаратная часть
- старенький комп
- самосбор на базе mini-ITX
- тонкий клиент HP T5000
- тонкий клиент на базе Neoware CA2
Первый вариант был сразу же отброшен из-за шума, пыли и энергопотребления. Второй был заказан, пока шли комплектующие, я успел передумать (захотелось шум и энергопотребление свести до минимума). В итоге, на Ebay были куплены тонкие клиенты HP t5000 и Neoware CA2. Месяц спустя пришли тонкие клиенты и из двух, после долгих размышлений, был выбран Neoware CA2. В него идеально поместился 2.5′ HDD и вторая сетевая карта.
После допиливания, в буквальном смысле, Neoware CA2 я принялся ставить на него Ubuntu 9.10 с офисного TFTP сервера. Установку производил самую минимальную. Если бы не было набора для сетевой установки, ставил бы Debian с USB CD-ROM и netinstall диска. Сам я ярый фанат RHEL/CentOS, но на домашний сервер решил ставить что-то из debian семейства, для расширения кругозора.
Софт
Torrent клиент и вебморда
Теперь перейдем к установке torrent клиента и вебморды. Была выбрана связка rtorrent + rutorrent, установка из репозитариев была отметена сразу, т.к. «родной» пакет был собран без xmlrpc-c который расширяет функционал rutorrent. Ниже фактически, скрипт для авто-установки rtorrent+rutorrent+lighttpd+php.
Устанавливаем всё что необходимо для компиляции xmlrpc-c, libtorrent, rtorrent
apt-get install checkinstall subversion build-essential make autoconf autotools-dev automake libtool libcurl4-openssl-dev libsigc++-2.0-dev pkg-config libncurses5-dev
apt-get remove rtorrent libtorrent11 libxmlrpc-c3 libxmlrpc-c3-dev libxmlrpc-core-c3 libxmlrpc-core-c3-dev
Компилируем и «заворачиваем» в .deb пакет xmlrpc-c, libtorrent, rtorrent
svn co xmlrpc-c.svn.sourceforge.net/svnroot/xmlrpc-c/advanced xmlrpc-c
cd xmlrpc-c
./configure —prefix=/usr && make && checkinstall -D
cd ..
wget libtorrent.rakshasa.no/downloads/libtorrent-0.12.6.tar.gz
tar zxfv libtorrent-0.12.6.tar.gz
cd libtorrent-0.12.6
rm -f scripts/.m4 # для Debian
./autogen.sh && ./configure —prefix=/usr && make && checkinstall -D
cd ..
wget libtorrent.rakshasa.no/downloads/rtorrent-0.8.6.tar.gz
tar zxfv rtorrent-0.8.6.tar.gz
cd rtorrent-0.8.6
rm -f scripts/.m4 # для Debian
./autogen.sh && ./configure —with-xmlrpc-c —prefix=/usr && make && checkinstall -D
К сожалению, rtorrent не умеет работать в режиме daemon, по этому будем использовать screen
apt-get install screen -y
wget libtorrent.rakshasa.no/raw-attachment/wiki/RTorrentCommonTasks/rtorrentInit.sh —output-document=/etc/init.d/rtorrent
chmod +x /etc/init.d/rtorrent
sed -i ‘s/»user»/»torrents»/’ /etc/init.d/rtorrent
update-rc.d rtorrent defaults
useradd -d /torrents -m torrents
Создаем конфиг и папки для сессий и готовых торрент закачек, после чего стартуем rtorrent.
mkdir /torrents/.rtorrent_session
cat >> /torrents/.rtorrent.rc port_range = 32001-32049
dht = auto
dht_port = 32000
peer_exchange = yes
use_udp_trackers = yes
directory = /torrents/
upload_rate = 10
download_rate = 100
session = /torrents/.rtorrent_session
scgi_port = 127.0.0.1:5000
EOF
chown -R torrents:torrents /torrents
/etc/init.d/rtorrent start
Теперь займемся вебмордой rutorrent. Для работы rutorrent необходим вебсервер и интерпретатор php.
apt-get install lighttpd php5-cgi php5-cli php5-curl curl -y
lighty-enable-mod fastcgi
echo ‘server.modules += ( «mod_scgi» )’ >> /etc/lighttpd/lighttpd.conf
cat >> /etc/lighttpd/lighttpd.conf scgi.server = (
«/RPC2» =>
( «127.0.0.1» =>
(
«host» => «127.0.0.1»,
«port» => 5000,
«check-local» => «disable»
)
)
)
EOF
/etc/init.d/lighttpd force-reload
Вебсервер готов, теперь будем ставить rutorrent и несколько полезных плагинов к нему.
cd /var/www/
svn checkout rutorrent.googlecode.com/svn/trunk/rutorrent
cd /var/www/rutorrent/plugins/
svn checkout rutorrent.googlecode.com/svn/trunk/plugins/tracklabels
svn checkout rutorrent.googlecode.com/svn/trunk/plugins/cookies
svn checkout rutorrent.googlecode.com/svn/trunk/plugins/autotools
svn checkout rutorrent.googlecode.com/svn/trunk/plugins/erasedata
chown -R www-data:www-data /var/www/
Теперь можно заходить по server_ip/rutorrent и начинать пользоваться.
DHCP
Теперь установим DHCP сервер и создадим для него конфиг таким образом чтобы клиенты получали:
router 192.168.1.1
dns сервер 8.8.8.8
сервер времени time.nist.gov
tftp сервер 192.168.1.1
и для примера фиксированная выдача 192.168.1.100 клиенту с MAC-адресом 00:1B:FC:33:F0:25
aptitude install dhcp3-server
cat >> /etc/dhcp3/dhcpd.conf ddns-update-style interim;
not authoritative;
option domain-name-servers 8.8.8.8;
option subnet-mask 255.255.255.0;
option ntp-servers 192.43.244.18;
option option-150 code 150 = ip-address;
option option-150 192.168.1.1;
subnet 192.168.1.0 netmask 255.255.255.0 authoritative;
range 192.168.1.110 192.168.1.254;
option routers 192.168.1.1;
allow unknown-clients;
allow booting;
allow bootp;
next-server 192.168.1.1;
filename «pxelinux.0»;
host shakirov-home option host-name «shakirov-home»;
hardware ethernet 00:1B:FC:33:F0:25;
fixed-address 192.168.1.100; >
>
EOF
/etc/init.d/dhcp3-server restart
строчки с option-150 нужны для моего VoIP телефона Cisco 7940.
TFTP и сетевая установка
aptitude install xinetd atftpd atftp
cat >> /etc/xinetd.d/tftp service tftp
disable = no
socket_type = dgram
protocol = udp
wait = yes
user = root
server = /usr/sbin/in.tftpd
server_args = —tftpd-timeout 300 —retry-timeout 5 —mcast-port 1758 —mcast-addr 239.239.239.0-255 —mcast-ttl 1 —maxthread 100 —verbose=5 /tftpboot
per_source = 11
cps = 100 2
flags = IPv4
>
EOF
/etc/init.d/xinetd restart
Теперь проверим, работает ли tftp сервер
root@dvr:~# echo bla > /tftpboot/123
root@dvr:~# atftp 127.0.0.1
tftp> get 123
tftp>
root@dvr:~# cat 123
bla
Всё нормально, теперь создадим netinstall наборы для нескольких ОС: Ubuntu karmic, Ubuntu lucid, Debian lenny, Debian sid, Debian squeeze, Fedora 13, CentOS 5.5, Mandriva 2010.0, Suse 11.2, Slackware 13.1, Hardware Detection Tool, memtest и MHDD. Для этого предлагаю использовать слегка модифицированный скрипт который я взял с HowtoForge.
apt-get install lftp -y
wget itblog.su/tftpboot_installs.sh
bash tftpboot_installs.sh
Теперь добавим SystemRescueCd в PXE меню
wget «http://downloads.sourceforge.net/project/systemrescuecd/sysresccd-x86/1.6.3/systemrescuecd-x86-1.6.3.iso?use_mirror=citylan»
mount -o loop systemrescuecd-x86-1.6.1.iso /mnt/
cp /mnt/sysrcd.* /var/www/
cp /mnt/isolinux/initram.igz /tftpboot/
cp /mnt/isolinux/rescuecd /tftpboot/
cat >> /tftpboot/pxelinux.cfg/default label linux
menu label SystemRescue-CD x86-1.6.1
kernel rescuecd
append initrd=initram.igz showopts vga=normal video=ofonly setkmap=us rootpass=123321 netboot=http://192.168.1.1/sysrcd.dat #eth0=192.168.1.213/24
EOF
Без особого труда в это меню можно добавить продукты Acronis, инсталляцию и запуск Windows XP и прочее.
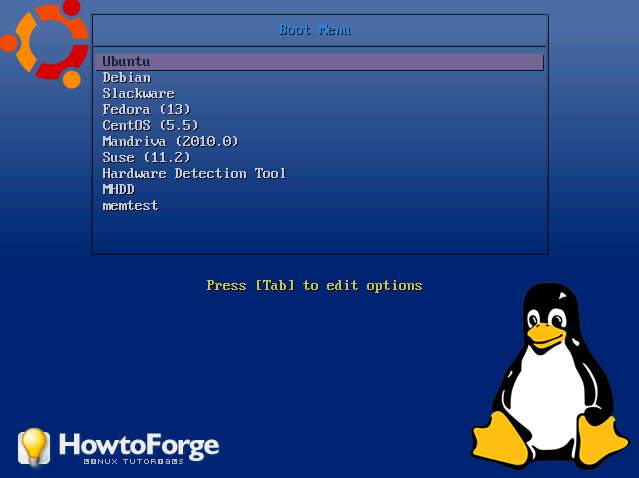
Вот так будет выглядеть наше меню:
- OpenVPN сервер для «хождения» в сеть из не доверенных сетей (например из гостиницы)
- FTP/Samba/NFS сетевые шары
- Radius для авторизации wi-fi клиентов
- DigiTemp зачатки умного дома, мониторинг температуры в квартире и за окном
- festival — говорящий будильник
- бакапы с хостинга
и подытожит статью скрипт который всё это установит в «два клика».
С удовольствием выслушаю замечания и дополнения.