- How to make a very easy Bluetooth speaker at home
- You need to make:-
- About Circuit:-
- Circuit Diagram
- DIY Bluetooth Speaker
- Attachments
- Step 1: Parts & Materials
- Step 2: Hacking Time! — How I Got My Parts for Free!
- Step 3: Drilling the Holes for the Parts
- Step 4: Painting the Case
- Step 5: Hot Gluing the Speakers & Components
- Step 6: Soldering Them Together
- Step 7: Sealing the Enclosure
- Step 8: You’re Done!
- Attachments
- Step 9: Meet the «Version 2.0» (SUPERCHARGED)
- DIY набор — собери сам Bluetooth колонку.
How to make a very easy Bluetooth speaker at home
Hello friends, in this article i will describe to you how you can make your own mini Bluetooth speaker with good quality sound.
it is designed as very easy & simple for beginners.
You need to make:-
- PAM8403 3W 5 volt audio amplifier board
- Bluetooth Audio module
- 470mf /25volt electrolytic capacitor
- Speaker
- Micro USB socket
- Phone charger (5v 1 amp)
- A plastic container
- wire
About Circuit:-
The main component is of this project Bluetooth audio module which is very low priced.it is receiving the digital audio signal from paired devices.
The PAM8403 3W 5-volt audio amplifier board is also a low price component it is 3W+3W stereo audio amplifier but we are using only one side, that means 3W amplifier for output the speaker .
The 470mf /25v electrolytic capacitor is using for filter
This circuit is powered by 5volt from any 1amp smartphone charger.you can use power bank if you want to run it in without AC
Circuit Diagram
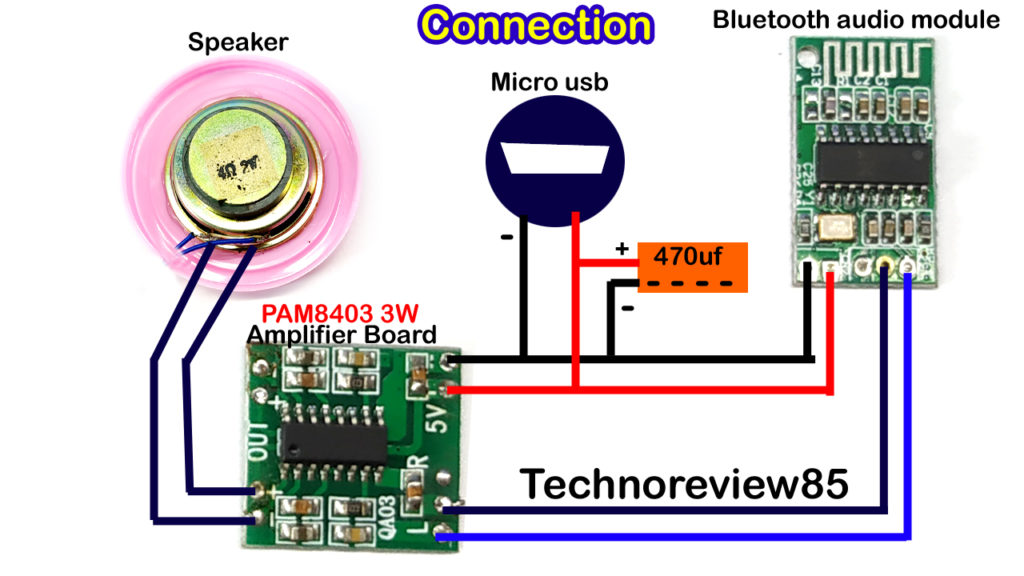
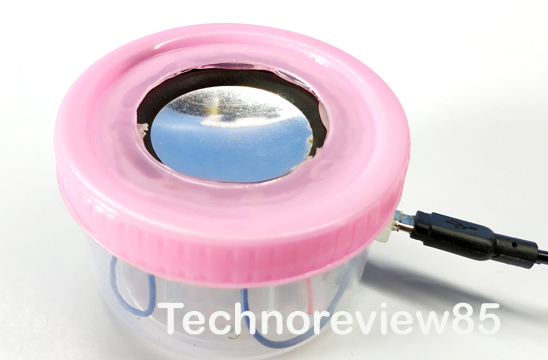
All components I have inserted in a small plastic container
DIY Bluetooth Speaker


Meet the PartyBar™! Make a wireless speaker, loud enough to fill an entire room! With a budget less than $15, you can have your own Bluetooth speakers made from scratch materials! It’s slick, stylish, descent and most of all it’s compact and fits in your pocket. This is a great weekend projects for enthusiasts and audiophiles.
It’s small but packs quite a punch. With the help of «35mm Neodymium Drivers» the PartyBar™ delivers a solid stereo sound. It’s equipped with a 1000mAh Li-ion battery meant to last for 9 straight hours, replacing it with a 2,400 LiPo will result to a staggering 22 hours of continuous playback!
Are those ready made speakers?
A lot of people thought that this was a ready made product, well it’s not. It’s actually made from recycled materials such as broken speakers, radios & old modules. The project box came from my eyeglass’s container 😀

Techie Description:
The PartyBar™ is equipped with two outstanding Neodymium Speaker drivers. Neodymium itself is a rare-earth metal. Magnets made from neodymium are light and very powerful, making the speakers more compact and gives a higher clarity rate.
Of course good speakers must be powered by good amplifiers thanks to Nsiway’s NS4263 dual 3W SMD chip, the PartyBar™ delivers an excellent audio, good enough to compete in today’s market. It has a class AB amplifier with a THD rating of 0.1%. A Class AB amplifier delivers fully symmetrical wave amplification, in short the audio given off by this amplifier is pure and clear.
Specifications:
— 1,000 mAh Rechargeable Li-ion Battery (9hrs Playback)
— Dual 3W (4ohms) 35mm Neodymium Drivers
— High Efficiency 2x3W Amplifier (0.1%THD)
— 15 meter Standard Bluetooth Range
— 3.5mm Auxiliary Ready
— Mini USB Charge Plug
Attachments
Step 1: Parts & Materials
The links are just alternatives. Read the next step and find out how I got my parts for under $15 :))
Tools & Equipment:
— Cordless Drill (w/ 5mm Bit)
— Rotary Tool (w/ Flute Bit)
— Leatherman Multitool
— 40W Soldering Iron
— Hot Glue Gun
— Super Glue
Step 2: Hacking Time! — How I Got My Parts for Free!
That Is An Awesome Case! Where Did You Get It?
My dad is an eye doctor & surgeon (ophthalmologist). Since I’m a guy who uses corrective lenses, I have a huge pile of unused eye-wear containers. One day I came across this funny, Garfield case (from my grade school days). The first thing that poped-up in my mind was to make a Bluetooth speaker out of it.
Where I Got My Speaker Drivers:
Okay let’s get started! To start of, I got these awesome «Speed-Boat Speaker» for a cheap price of P320 ($6.50). Of course cheap products aren’t that reliable, it broke after 6 months. Since I’m a hobbyist, I prefer breaking down defective products and studying the parts instead of surrendering it to the warranty center.
If you want to buy better ones, PartsExpress.com serves a wide variety of options!
Where I Got My Amplifier:
I got my amplifier from DealExtreme (dx.com). Apparently it’s a discontinued product. I got it for $1.70 on a clearance sale.
Where I Got My Bluetooth Module:
I bought my Bluetooth module from DealExtreme (dx.com). Again, my Bluetooth model was discontinued and no longer available. I got it for $6 on a clearance sale. Right now there’s an alternative model but costs more than the previous one ($12).
Isn’t this just a repackaged project?
No it’s not! The speaker drivers inside the «boat speaker» was indeed good but to be honest, it didn’t come with the best built in amplifier. It was made from bare SMD transistors and not a SMD I.C. package, it was not that effecient, and lacked power to drive off these 4 ohm speakers.
Step 3: Drilling the Holes for the Parts
1st.) Use your pencil to mark the soon to be cut holes.
2nd.) Get your rotary tool and flute bit, cut off the plastic on where the speakers will be mounted.
3rd.) Attatch a 5mm bit to your cordless drill and bore a hole for the auxiliary input.
Step 4: Painting the Case
Before mounting the speakers and components be sure to paint the case first. You don’t want to spray paint over your drivers
Looking good on a matt black paint job! 😀
Step 5: Hot Gluing the Speakers & Components
Carefully hot glue the speaker drivers to your plastic casing. Be sure to cover all the gaps, it must be 100% airtight. If air escapes the case, the «PartyBar» would sound like crap 😀
If you are concerned that the hot glue could melt because of the heat given off by the amplifier module. There’s nothing to worry about since the «class AB high-efficiency amplifier» doesn’t heat up that much.
Step 6: Soldering Them Together
Solder all the modules together. This project requires a little experience in electronics. If you need help, feel free to write a comment!
To make your work easier, you can follow the block diagram above.
Step 7: Sealing the Enclosure
Apply enough superglue around the edges to seal the enclosure. Be sure to cover all the gaps, it must be 100% airtight. If air escapes the case, the «PartyBar» would sound like crap 😀
Step 8: You’re Done!
Attachments
Step 9: Meet the «Version 2.0» (SUPERCHARGED)
Meet AirJam, the DIY Supercharged Bluetooth speaker. Ready your tools, we are making one from scratch! Thanks to your comments and suggestions, I was able to make a v2.0, named AirJam.
Click Here To Visit:DIY Supercharged Bluetooth Speaker (v2.0)
______________________________________________________
SMALL SIZE, BIG SOUND:
Despite AirJam’s tiny size, it has the ability to surpass its competitor’s performance. Thanks to the sandwiched speaker orientation, I was able to fit 4 Full-ranged speaker drivers in one tiny enclosure (2x7x2″). A «passive radiator» was added to extend the lower bass frequencies, thus resulting to a much punchier bass. Compared to its rivals, the AirJam has 4 active drivers and one passive radiator, offering deeper bass and wider mids.
CHANGE TRACKS WIRELESSLY (works with Siri!)
Thanks to Bluetooth 4.0, AirJam can receive Bluetooth transmissions up to 30 meters! Whether you are using your laptop, tablet or phone, you can easily switch tracks wirelessly. The handsfree feature works great with Speakerphone, Skype, FaceTime and also Siri!
______________________________________________________
Specs & Features:
— Includes Handsfree Microphone (Speakerphone Function)
— Quad 3W Fullrange Speakers (4Ω — 35mm drivers)
— Quad 3W High Efficiency Amplifier (class AB)
— Li-Po Battery 1,300mAh (20hrs Playback)
— Command Buttons (Volume/Pause//Play)
— Tested dB (via SPL): 96dB @2ft
— 30m Bluetooth Range (v4.0)
— Single Passive Radiator
— 3.5mm Auxiliary Ready
DIY набор — собери сам Bluetooth колонку.
Всем доброго времени суток!
Предлагаю на ваш суд обзор на Kit набор для сборки небольшой Bluetooth колонки. Правда в колонке всего 1 динамик хотя можно было и два поставить, ну да будем собирать что есть.
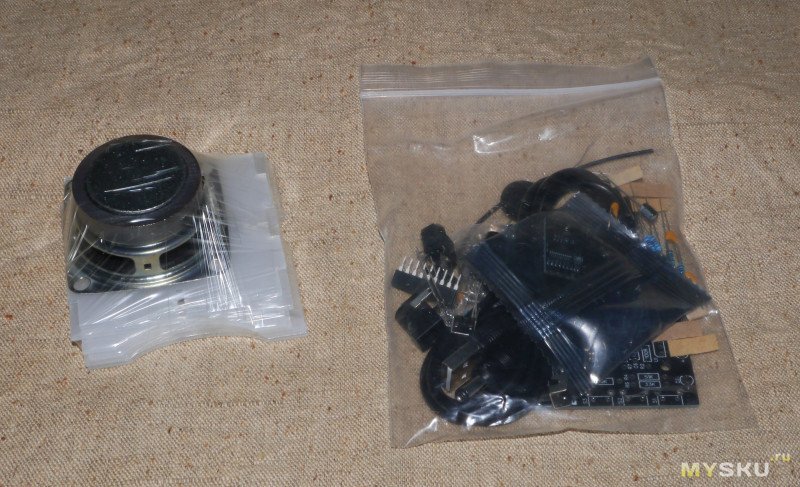
Приехал набор в простом пакете. Внутри сверток с корпусом и динамиком и еще один пакет с платой и деталями.
Плата набора набольшая. размер всего лишь 6х6 см.
На лицевую поверхность нанесена маркировка всех элементов, правда кое-что на китайском. 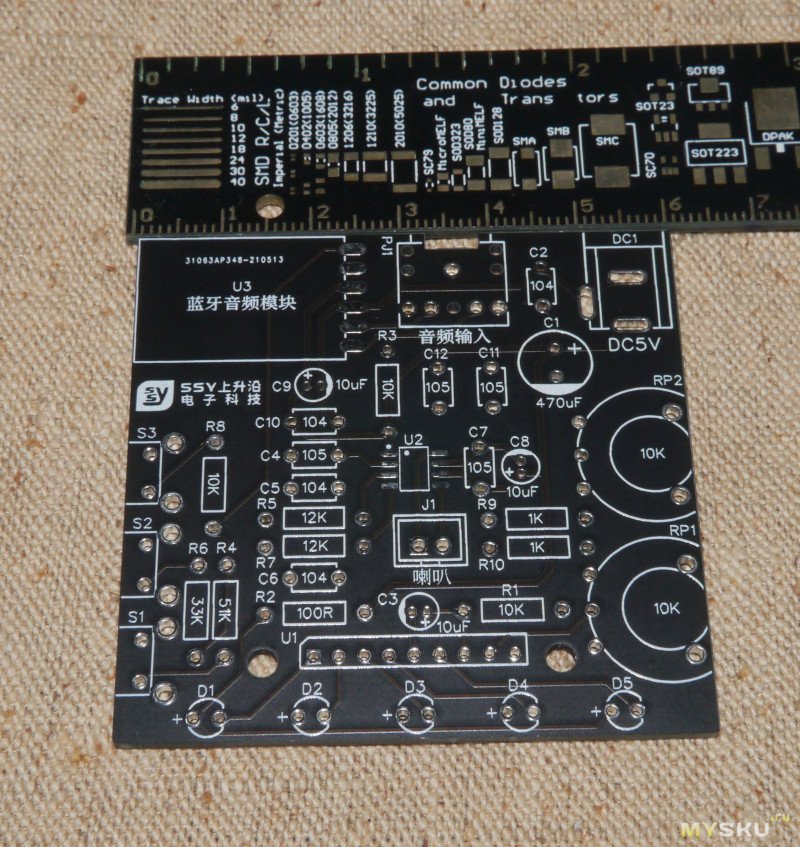
С обратной стороны пояснение для чего и как использовать кнопки и переменные резисторы, опять же на китайском. 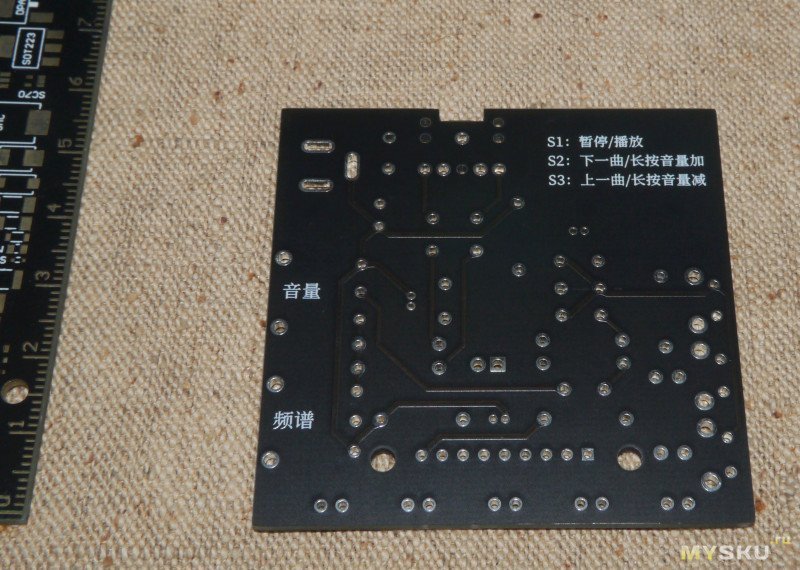
После изучения платы и переводчика стало ясно что кнопки отвечают за регулировку громкости на выходе с Bluetooth приемника, переключение треков и Play/Stop. А вот резисторами можно регулировать громкость усилителя и чувствительность индикатора громкости.
В качестве усилителя производитель установил микросхему HT6872, довольно простой и бюджетный одноканальный усилитель, собственно поэтому и динамик в колонке всего один. 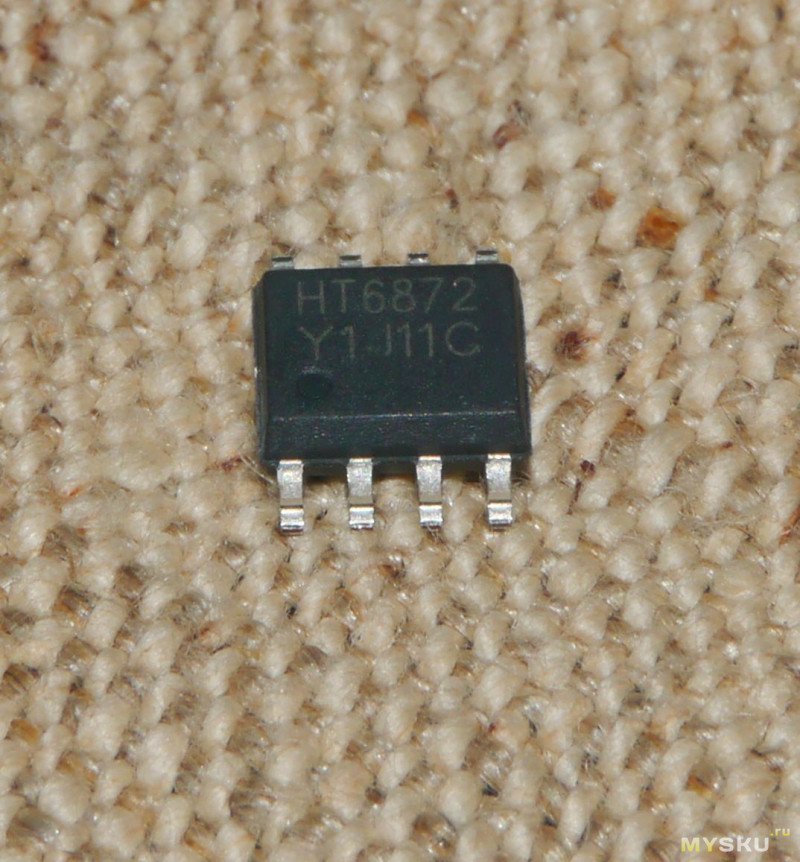
Индикатор уровня громкости КА2284 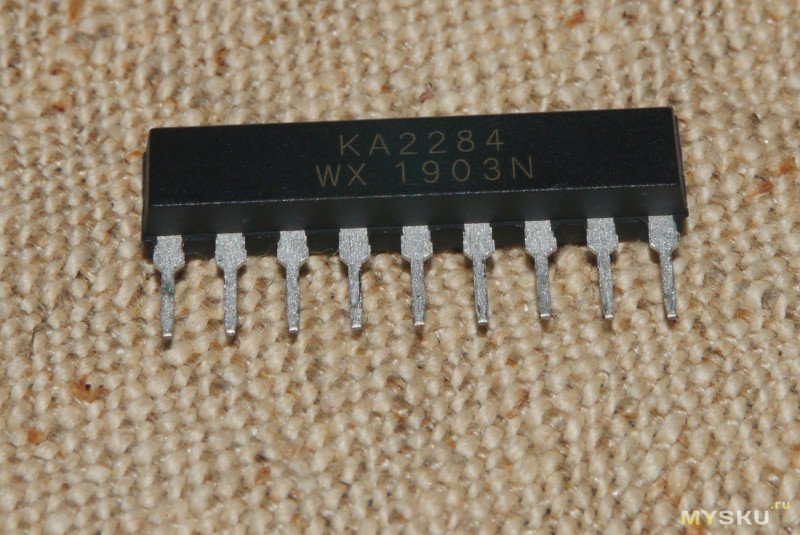
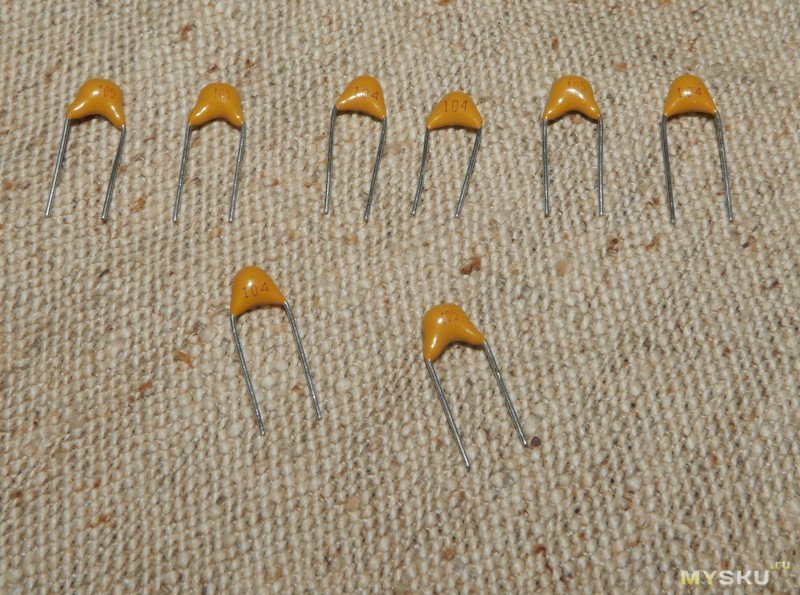
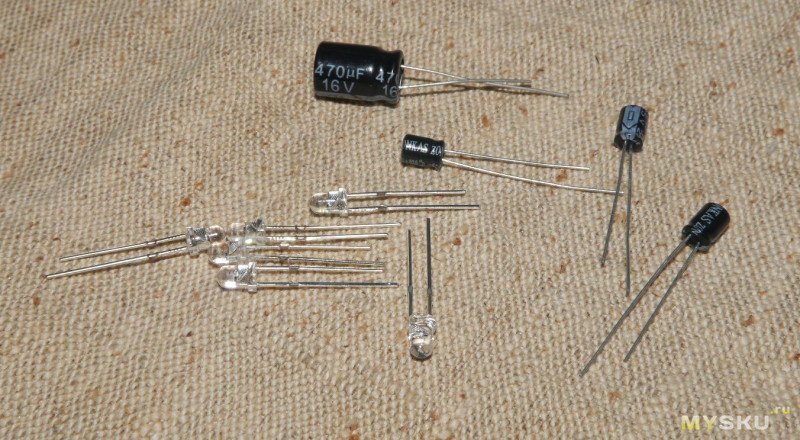
Для обвязки микросхем и работы кнопок управления блютуз модулем в набор положили немного резисторов и конденсаторов. 
Кстати выход на наушники идет напрямую с платы Bluetooth так что там есть полноценное стерео. 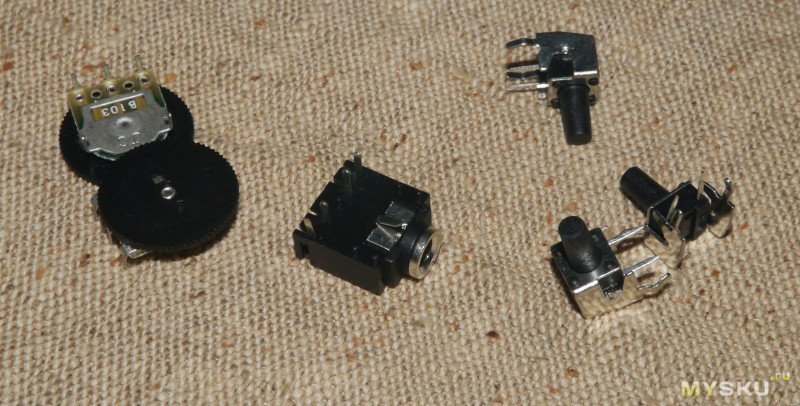
Звезда набора Bluetooth MH-M18 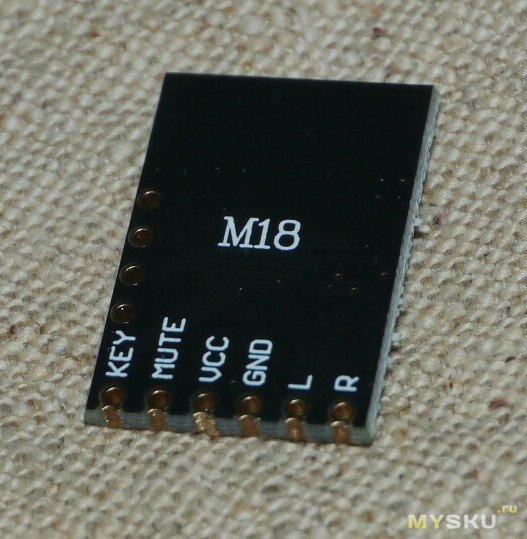
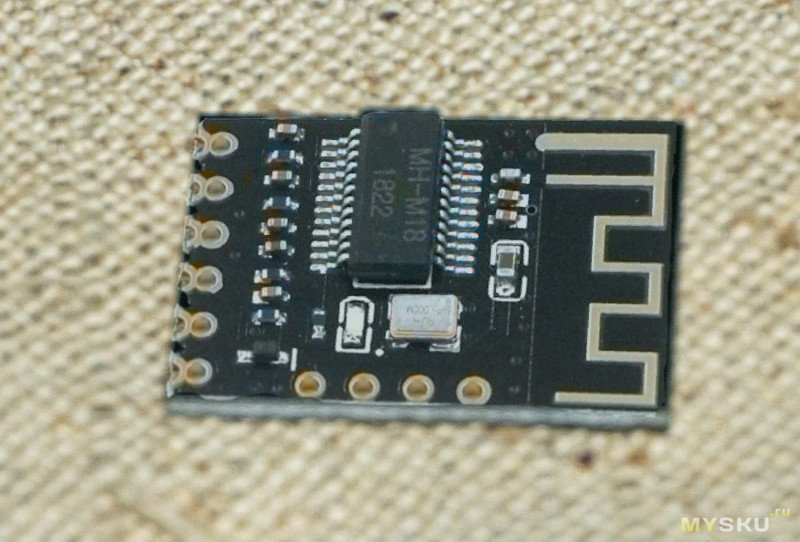
Управление модулем просто до безобразия всего шесть контактов.
Один используется для управления, на него можно установить до четырех кнопок которые через определенные номиналы резисторов соединяют этот контакт с землей.
Еще два контакта выход звука, правый и левый каналы. Плюс питания, общая земля и отдельный контакт mute используется для отключения звука если на нем присутствует положительный уровень. 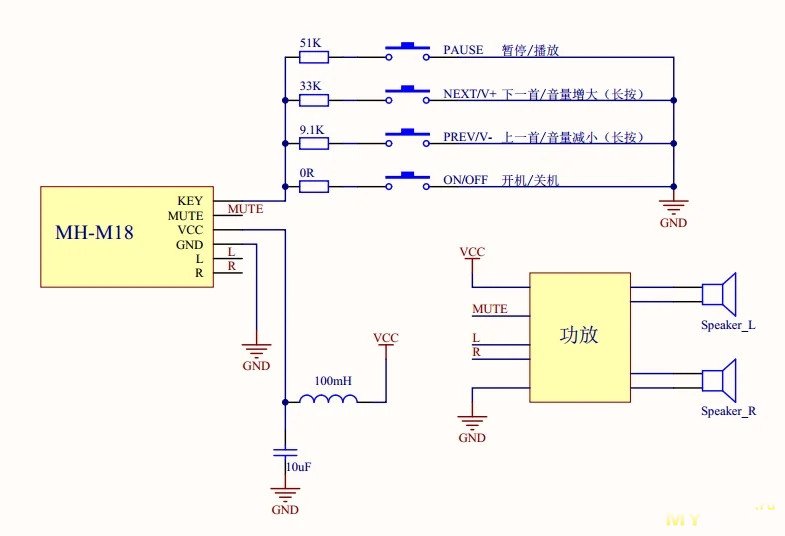
Сборка
Для начала установил на плату микросхему усилителя и часть резисторов. 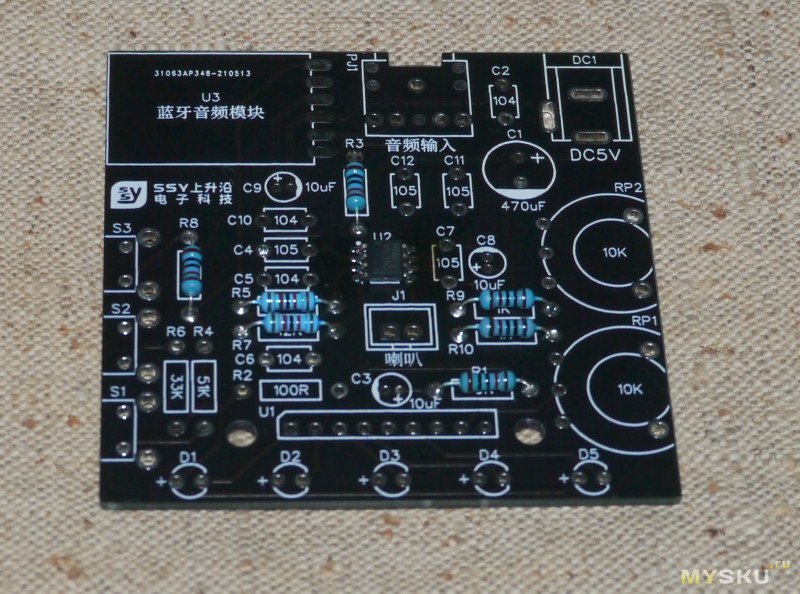
Затем остальные резисторы и конденсаторы. 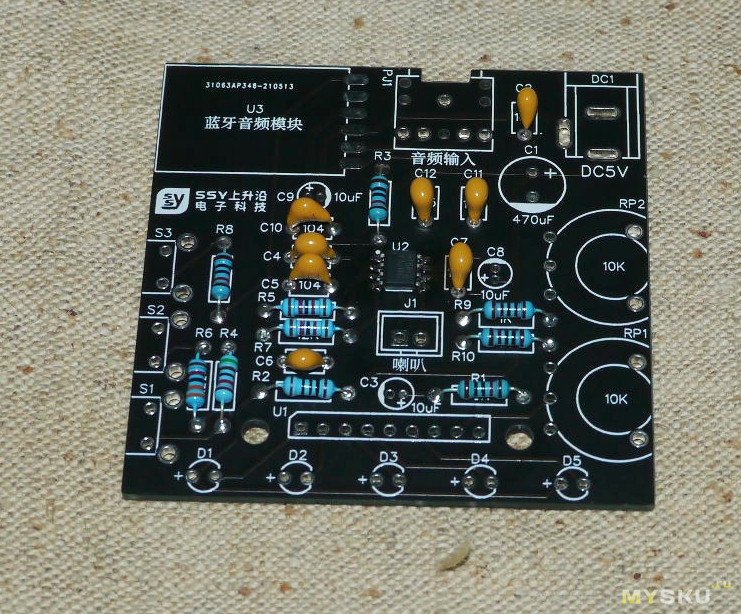
Потом электролиты, кнопки, микросхему индикатора уровня звука и переменные резисторы 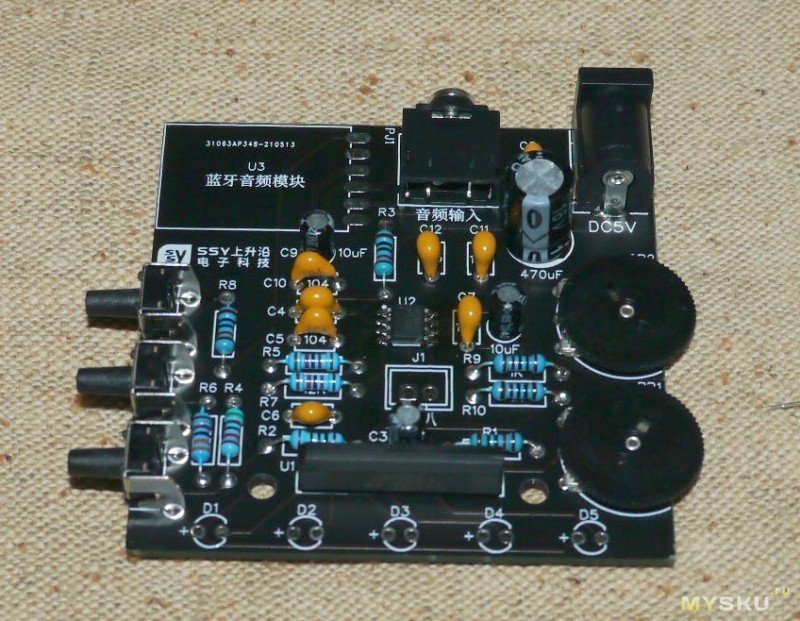
А потом и все остальное, кроме модуля блютуз, вплоть до двух проводков (которые производитель заботливо положил в набор) для подключения динамика. 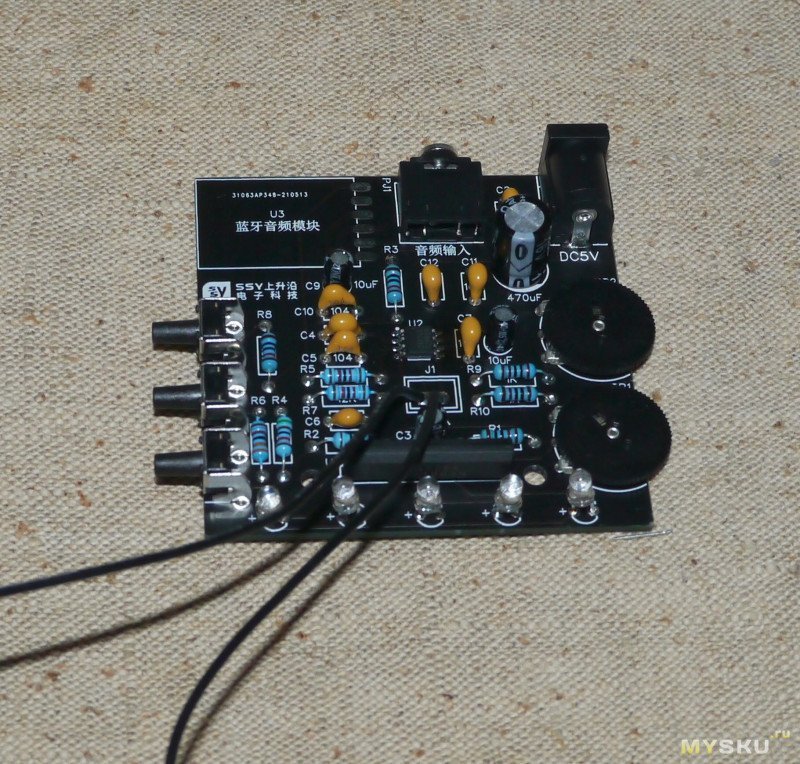
Теперь отмывка платы от флюса и остается только припаять Bluetooth и провода к динамику. Светодиоды пока что установлены вертикально, но при сборке корпуса их придется загнуть что бы они попали в свои отверстия в корпусе. 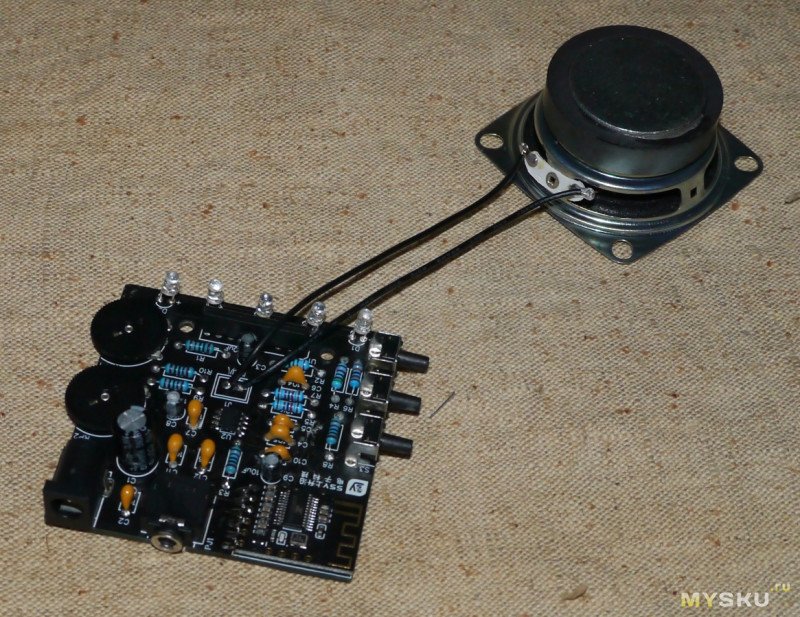
Корпус уже по традиции для таких наборов выполнен из акрила и состоит из 6-ти частей. 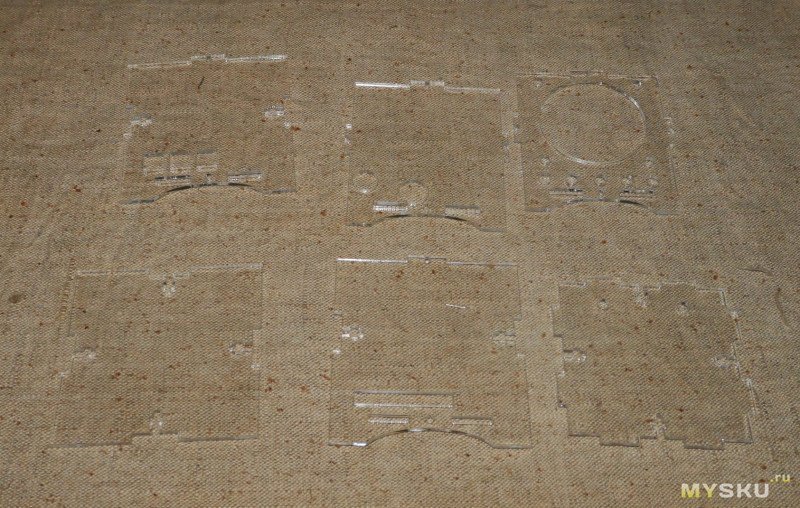
Получилось вот такое изделие 
Немного об использовании
При подаче питания активируется модуль Bluetooth и колонка ожидает подключения, при этом на плате модуля часто мигает синий светодиод, имя Bluetooth устройства XFW-M18, пароль для подключения не требуется.
Управление блютуз модулем стандартное по даташиту, первая кнопка выполняет функцию Старт/Стоп остальные две переключение трека при коротком нажатии и регулировка громкости при длительном.
Переменные резисторы служат для регулировки уровня громкости динамика и чувствительности индикатора громкости. Подключение следующее, левый и правый каналы после гнезда наушников через конденсаторы и резисторы сводятся в один и потом то что получилось через один переменный резистор отправляется на вход индикатора сигнала, а через второй на вход усилителя.
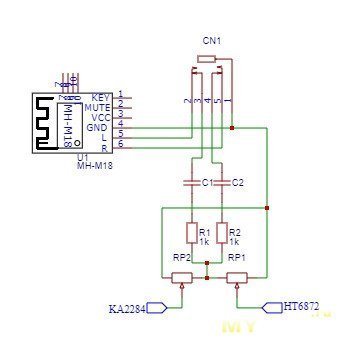
На схеме это выглядит вот так
Соответственно первый переменник отвечает за мигание светодиодов и в зависимости от его положения можно либо заставить их работать почти как индикатора уровня громкости, а в другом положении светодиоды будут почти постоянно светится и переливаться, обеспечивая некое подобие цветомузыки.
Второй резистор отвечает за громкость динамика у колонки два регулятора громкости, на выходе из блютуза кнопками, и на входе усилителя резистором.
При подключении штекера наушников сигнал перестает подаваться дальше на плату и динамик отключается, звук идет только через наушники и громкость регулируется только на блютуз модуле.
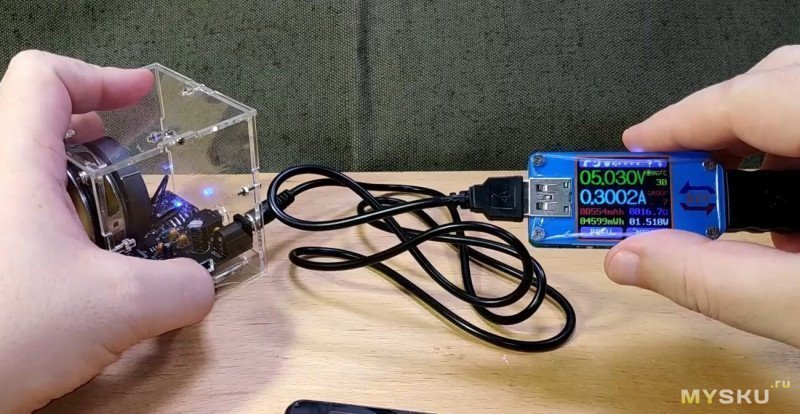
При максимальной громкости колонка кушает до 300 мА что на мой взгляд не мало.
Небольшой вывод: В целом изделие рабочее, собирается быстро и без каких-то подводных камней, но вот практическое применение оставляет желать лучшего.
Купон на покупку BG529ff3 цена с купоном $8.29 до 29-го сентября
Заранее приношу свои извинения за орфографию и грамматику текста, все допущенные ошибки сделаны не специально, а только по незнанию и в связи с несовершенством программ автоматической проверки текстов.
Товар для написания обзора предоставлен магазином. Обзор опубликован в соответствии с п.18 Правил сайта.