- How do I zip/unzip on the unix command line?
- 9 Answers 9
- How To Zip Files in Linux
- Creating a Zip Archive in Linux
- Creating a ZIP Archive Selecting Only Specific File Types
- Create a ZIP archive Which Contains a Directory
- Change the Level of Data Compression for a ZIP Archive
- Extracting Zip Archives
- Extracting a ZIP Archive to a Specified Location
- Stay on the Cutting Edge
How do I zip/unzip on the unix command line?
@joachim, you should ask the question in a question and provide an answer in an answer. There’s no problem with answering your own questions but not as part of the question itself, since that breaks down the whole community-votes-on-the-best-answer advantage of SO. In addition, this is probably better suited for superuser since it’s not programming related.
@rlb.usa: I work in a lot of different places on a lot of different servers. Using SA for a note like this helps other people too, as I see it.
9 Answers 9
Typically one uses tar to create an uncompressed archive and either gzip or bzip2 to compress that archive. The corresponding gunzip and bunzip2 commands can be used to uncompress said archive, or you can just use flags on the tar command to perform the uncompression.
If you are referring specifically to the Zip file format, you can simply use the zip and unzip commands.
zip squash.zip file1 file2 file3 this unzips it in your current working directory.
Just as a side note: zip can create many different flavors of .ZIP archives, as well as use many different compressors. On the other hand, there are a number of other compression tools named similarly: 7-Zip, gzip, bzip2, rzip, etc. which are not interchangeable.
I’m confused, I did this and get a long list of inflations and extractions but when I check the directory it is empty, save for the original zip file? Where is it all going?
For the record, use unzip -d myfolder squash.zip to extract into a separate new directory ( myfolder ) instead of putting all the files directly into the current directory, which can be annoying if the zip file contains many files and directories in its top level. This mimics how most UI unzip tools work.
There are a truly vast number of different ways to compress and uncompress under UNIX derivatives so I’m going to assume you meant «zip» in the generic sense rather than a specific file format.
You can zip files up (in compressed format) with the GNU tar program:
which will do the current directory. Replace . with other file names if you want something else.
That’s assuming of course that you have a tar capable of doing the compression as well as combining of files into one.
If not, you can just use tar cvf followed by gzip (again, if available) for compression and gunzip followed by tar xvf .
For specific handling of ZIP format files, I would recommend downloading 7zip and using that — it recognises a huge variety of file formats, including the ZIP one.
Or use tar jcvf file.tar.bz2. to compress in bzip2 format or tar Jcvf file.tar.xz . for xz compression.
@Starfish, that’s certainly within your rights, thanks for at least explaining why, so many people don’t take the time to do that 🙂 I took «zip» in the more generic sense (compression) rather than a specific format, so I’ll make that more clear.
Be aware that tar archives may not work correctly when moving between different platforms, mac to linux or vice versa. Zip is much safer, as it works correctly on all systems.
I suppose technically this is gzip, so that’s fine. I guess. Pretty obviously not what the question asked for though.
If you don’t have zip and unzip packages installed and you have java, you can use jar to unzip:
Well, when it comes to distributing files for a variety of operating systems, I’d recommend 7-zip.
Usually in the package p7zip , you’ll get the 7z and 7za command, with which you can create your own 7z archives.
7za can also decompress standard (pkzip) zip archives (and create them as well with the -tzip switch).
7za a archive.7z file1 file2 directory/ It can also create self-extracting archives with the -sfx switch:
7za a -sfx archive.exe files1 file2 dir I recommend this method in case Windows users can’t open 7z archives (in case you want to advice a tool for that: PeaZip).
If you want to use the same compression algorithm with your tarballs, use the -J switch with tar :
tar cJf archive.tar.xz file1 file2 dir xz is a UNIX tool, that uses LZMA2 for compression, but works the way gz , bz2 , etc works. It even works as a filter.
7z doesn’t create archives with full filesystem information on UNIX, so you’d need to use tar before using 7z (but since 7z stores other information about the tar file, I’d recommend using xz , as it is designed for it):
tar cf - file1 file2 dir | 7za z -si archive.tar.7z How To Zip Files in Linux
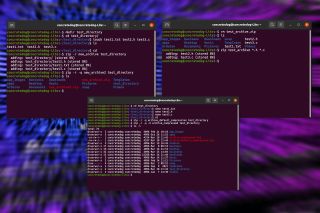
Compress files into a ZIP archive using the terminal emulator in Linux.
In this how-to, we’ll look at the zip command, a useful utility that enables us to specify lists of files, set a level of data compression and create compressed archives.
Whilst you become accustomed to these commands it’s good to work with example test files and directories and you should take extra care to ensure you are carefully following the instructions.
All the commands in this how-to will work on most Linux machines. We’ve used an Ubuntu 20.04 install but you could run this how-to on a Raspberry Pi. All of the how-to is performed via the Terminal. You can open a terminal window on most Linux machines by pressing ctrl, alt and t.
Creating a Zip Archive in Linux
To begin, let’s create some empty test files and then add them to an archive. We’ll use the touch command to create files, the ls command to check that the files have been created and then the zip command to create a basic archive.
1. Create a test directory where we can safely try out the command. Change directory so that you are inside the new directory.
mkdir test_directory cd test_directory2. Create some test files to add to our archive. Note the 3 different file suffixes.
$ touch test1.txt test2.h test3.c 3. List the files to check that they have been created correctly.
4. Using the zip command, create a ZIP archive of the newly created files. To create a ZIP archive, we simply use the command zip followed by the name we are giving the archive and then a list of the files we wish to include in the archive. The following command will create a ZIP archive called test_archive.zip and the archive will include the three test files. Note that we don’t need to add the archive suffix .zip to the name of the archive when using the zip command.
zip test_archive test1.txt test2.h test3.c 5. Check that the ZIP archive has been created.
Creating a ZIP Archive Selecting Only Specific File Types
It’s possible to supply the zip command with arguments that only add specific file types to the archive. This is a powerful feature that is efficiently achieved on the command line.
1. Delete any previous test archives and check you still have the original three test files. Note that, unlike when creating the ZIP archive, you have to include the .zip file extension when referencing an existing archive.
2. Create a new ZIP archive which contains only the test files ending .h and .c . After creating the archive, if you check its contents it will only contain the files test2.h and test3.c and won’t contain test1.txt.
3. To check the contents use less.
Create a ZIP archive Which Contains a Directory
Often we need to make a ZIP archive containing directories which contain files, we can do this by adding the recursive argument -r to the zip command.
1. Delete the archives inside the test_directory but keep the other files. To avoid confusion it would be good practice to delete the archives leaving only the original files that we created.
2. Go up one directory and check that you are not inside the directory to archive. We can’t be inside the directory that we wish to add to the archive.
3. Create a ZIP archive containing the test_directory directory and its contents. Notice when you create the archive using the -r argument that you see a verbose output detailing each stage of the command as it descends into the directory and archives the files and folder.
zip -r new_archive test_directory 4. Make another similar ZIP archive using the -q (quiet) argument to disable the verbose output. You should see that this time that no steps are reported to the terminal in the creation of this archive. Then use ls to check the new archive has been created.
zip -r -q new_archive2 test_directory ls Change the Level of Data Compression for a ZIP Archive
By default, the zip command uses a compression value of 6 taken from a range of 0-9 with 0 being uncompressed and 9 being the maximum allowable level of compression. We can simply add a numerical argument to change the level of compression.
1. Add random data to the test files. Right now our test files test1.txt, test2.h and test3.c are empty. They have zero bytes of data but we can add random “garbage data” to the files using a quick terminal command that will dump 64MB into each file.
cd test_directory head -c 64M test1.txt head -c 64M test2.h head -c 64M test3.c 2. Return to the parent directory and create a new ZIP archive with the default compression level of 6.
cd zip -r -q archive_default_compression test_directory 3. Create another archive with the same contents but increase the compression level to 9. Check the details of the new archive and the previous archive using ls -l , you should see that the size of the new archive is smaller than the previous archive as the data compression has been increased.
$ zip -r -q -9 archive_compressed test_directory $ ls -l Extracting Zip Archives
We will create a ZIP archive called test_archive.zip which contains a directory test_directory which in turn contains 3 empty test files, test1.txt, test2.h, test3.c . To extract this archive we will use the unzip command.
1. Create a test folder containing the test files. After creating the test directory and files check the files have been created using ls before returning to the parent directory.
mkdir test_directory cd test_directory touch test1.txt test2.h test3.c ls cd 2. Create a ZIP archive called test_archive.zip that contains the test_directory. Check that the archive has been successfully created using ls. The zip command has two arguments, the name of the archive that we wish to create, and the source of the files to be put into the archive.
zip -r test_archive test_directory ls 3. Delete the un-archived directory. If we extract the test_archive.zip in the parent directory which contains the test_directory we would be asked if we want to replace or rename the archive.
4. Unzip the test_archive.zip file. Using unzip with no extra arguments we see a verbose output report of each step of extracting the archive.
Extracting a ZIP Archive to a Specified Location
Often we will want to extract an archive into a different specified location. We can add the-d argument to the unzip command to achieve this.
1. Extract the test_archive.zip to a specified directory. We can specify a relative or absolute location. In this example we extract the contents to the Music directory using a relative path. We could also pass an absolute path which provides the full path to the target location.After extracting the archive, move into the specified directory and use ls to check the archive has been extracted.
unzip test_archive.zip -d ./Music 2. Change directory and list the contents to verify the files have been extracted correctly.
With these few basic uses of the zip command you now have lots of options when creating ZIP archives in the linux terminal. Being able to select specific file types and being able to set the compression level in the terminal emulator gives quick access to these powerful tools that are often hard to find in a GUI application.
Stay on the Cutting Edge
Join the experts who read Tom’s Hardware for the inside track on enthusiast PC tech news — and have for over 25 years. We’ll send breaking news and in-depth reviews of CPUs, GPUs, AI, maker hardware and more straight to your inbox.
By submitting your information you agree to the Terms & Conditions and Privacy Policy and are aged 16 or over.
Jo Hinchliffe is a UK-based freelance writer for Tom’s Hardware US. His writing is focused on tutorials for the Linux command line.