- How to Install Linux OS on USB Drive and Run it On Any PC
- Requirements:
- Step 1: Create Bootable Linux Installation Media
- Step 2: Create Partitions On Main USB Drive
- Step 3: Install Linux on USB Drive
- Step 4: Customize the Lubuntu System
- Create a bootable USB stick on Ubuntu
- 2. Requirements
- 3. Launch Startup Disk Creator
- 4. ISO and USB selection
- 5. Confirm USB device
- 6. Installation complete
- Finding help
- Create a bootable USB stick with Rufus on Windows
- 2. Requirements
- 3. USB selection
- 4. Select the Ubuntu ISO file
- 5. Write the ISO
- 6. Additional downloads
- 7. Write warnings
- 8. Writing the ISO
- 9. Installation complete
- Finding help
How to Install Linux OS on USB Drive and Run it On Any PC
Ever thought of using any computer which is not yours, with all your personal stuff and configuration? It is possible with any Linux distribution. Yes! You can use your own, customized Linux OS on any machine with just a USB drive.
This tutorial is all about installing Latest Linux OS on your pen-drive ( fully reconfigurable personalized OS, NOT just a Live USB ), customize it, and use it on any PC you have access to. Here I am using Lubuntu 18.04 Bionic beaver for this tutorial (but, you can use any Linux distribution). So let’s gets started.
Requirements:
- One Pendrive 4GB or More (Let’s call it as Main USB drive/Pendrive).
- One more Pen drive or DVD disk to use as bootable Linux installation media.
- Linux OS ISO file, for example Lubuntu 18.04.
- One PC (Warning: Disconnect internal hard drives to prevent boot record alteration).
Important: While this procedure will not cause loss of data, some users have experienced changes to their internal drive’s bootup behavior depending on Linux distributions selected. To prevent any possibility of this occurrence, you may wish to disconnect your hard drive before continuing with the USB install portion of the tutorial.”
TIP: Use 32 bit Linux OS to make it compatible with any available PC.
That’s it! Go, and collect all of these. It’s time to do something new.
Step 1: Create Bootable Linux Installation Media
Use your Linux ISO image file to create a bootable USB installation media. You can use any software like Unetbootin, Gnome Disk Utility, Yumi Multi Boot, xboot, Live USB Creator, etc. to create bootable USB with the help of ISO image file.
Alternatively, you can use DVD disk by writing that ISO image to it (but that is the old school method).
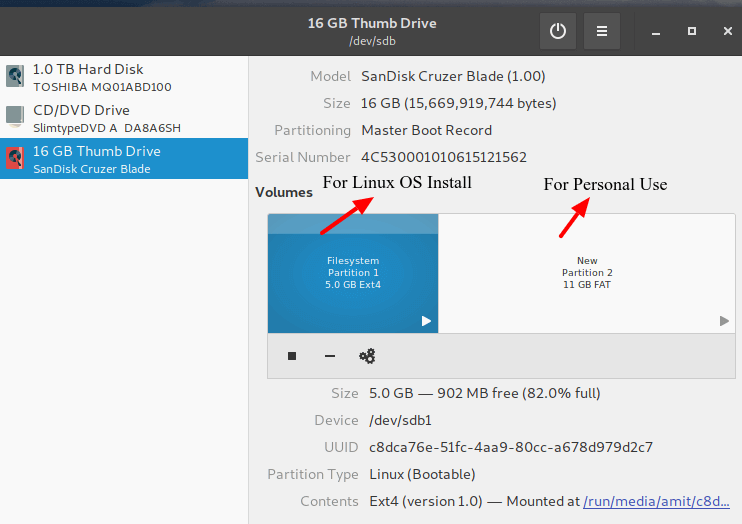
Step 2: Create Partitions On Main USB Drive
You have to make two partitions on your Main USB drive using Gparted or Gnome Disk Utility, etc.
- The root partition of format ext4 of size according to your use.
- Optionally you can use the rest of the space as a FAT partition for using it as a normal USB drive.
I am having 16GB USB drive and I have created one root partition of 5GB and using rest 11GB as normal FAT partition. So my 16 GB USB drive is converted to 11GB drive for normal use on any PC. Sounds good.
This step you can do while installing Linux also, but it will be very complex while installing Operating Systems like Arch Linux.
Once you have created required partitions on the Main USB drive. Now take a deep breath because it’s time to go for Linux installation section.
Step 3: Install Linux on USB Drive
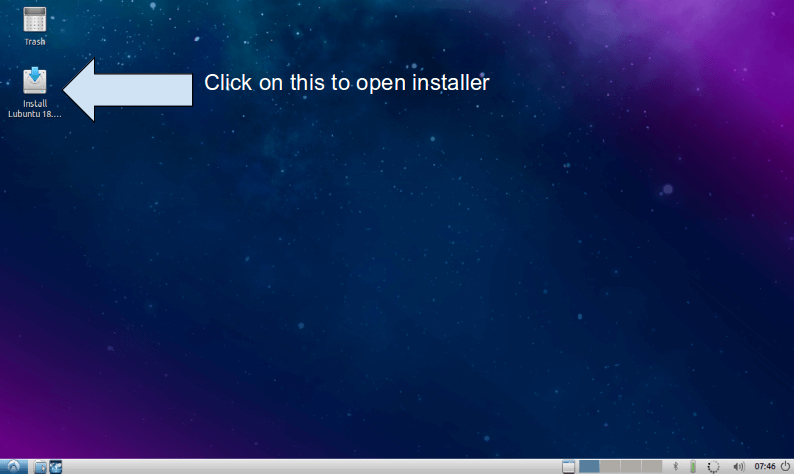
1. First, boot Linux OS (Lubuntu 18.04) from your bootable installation media and launch installation application from a live session. Live session of Lubuntu 18.04 will look like this.
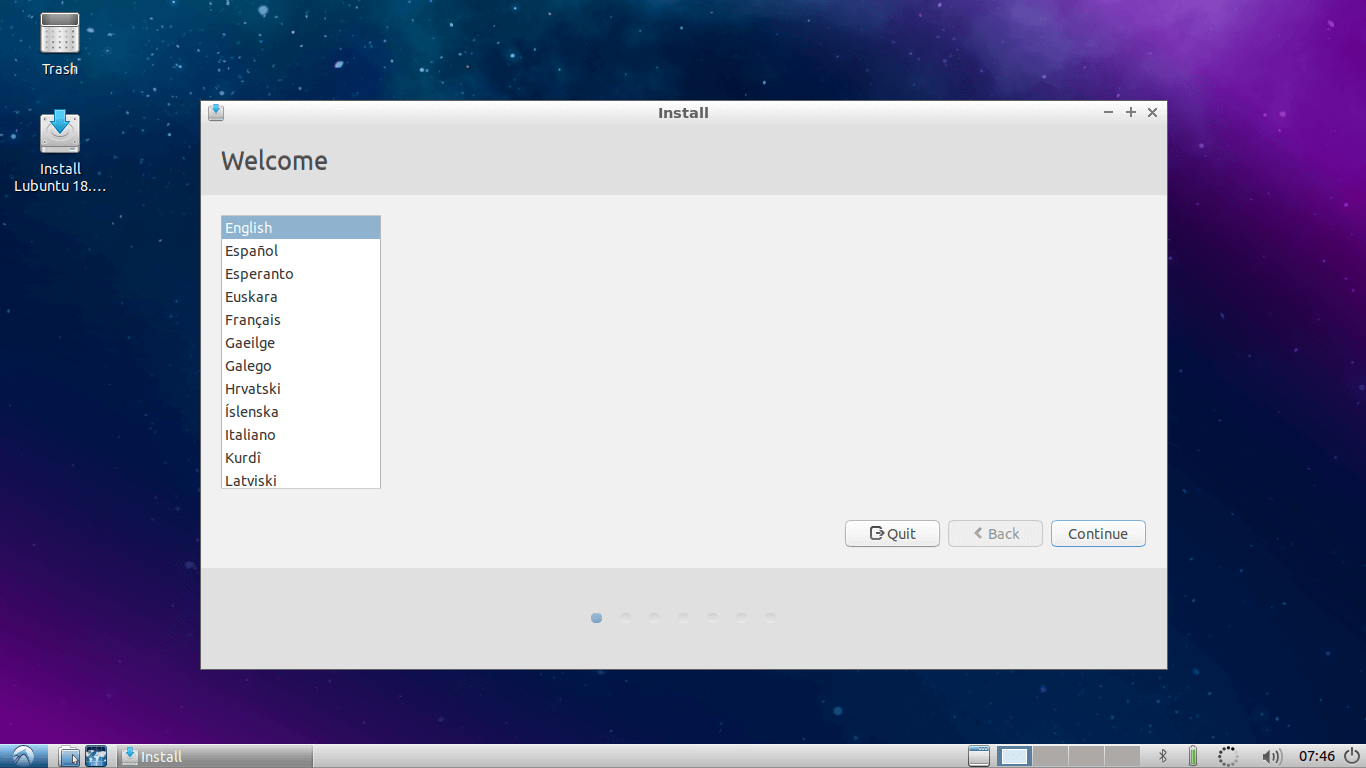
2. Installer welcome screen will appear, select Language there and hit Continue.
3. Select Keyboard Layout and continue…

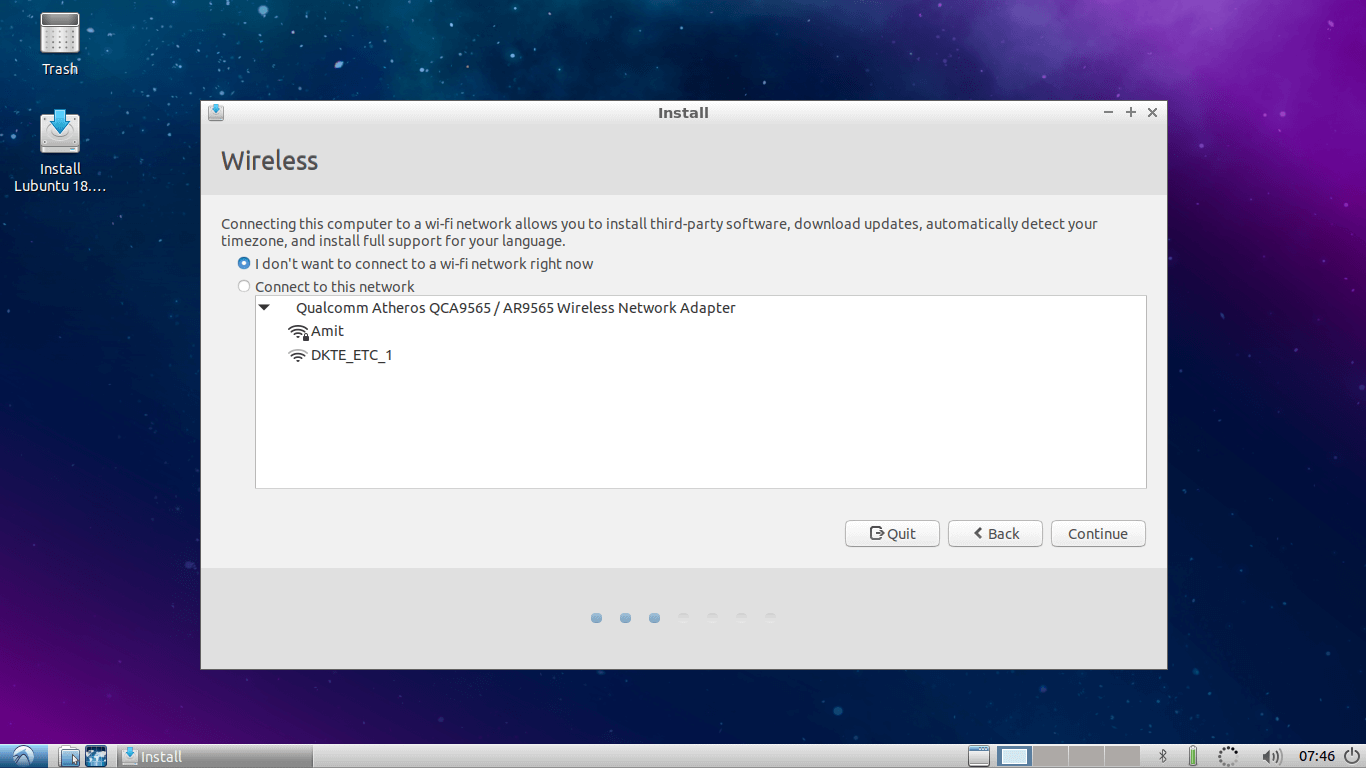
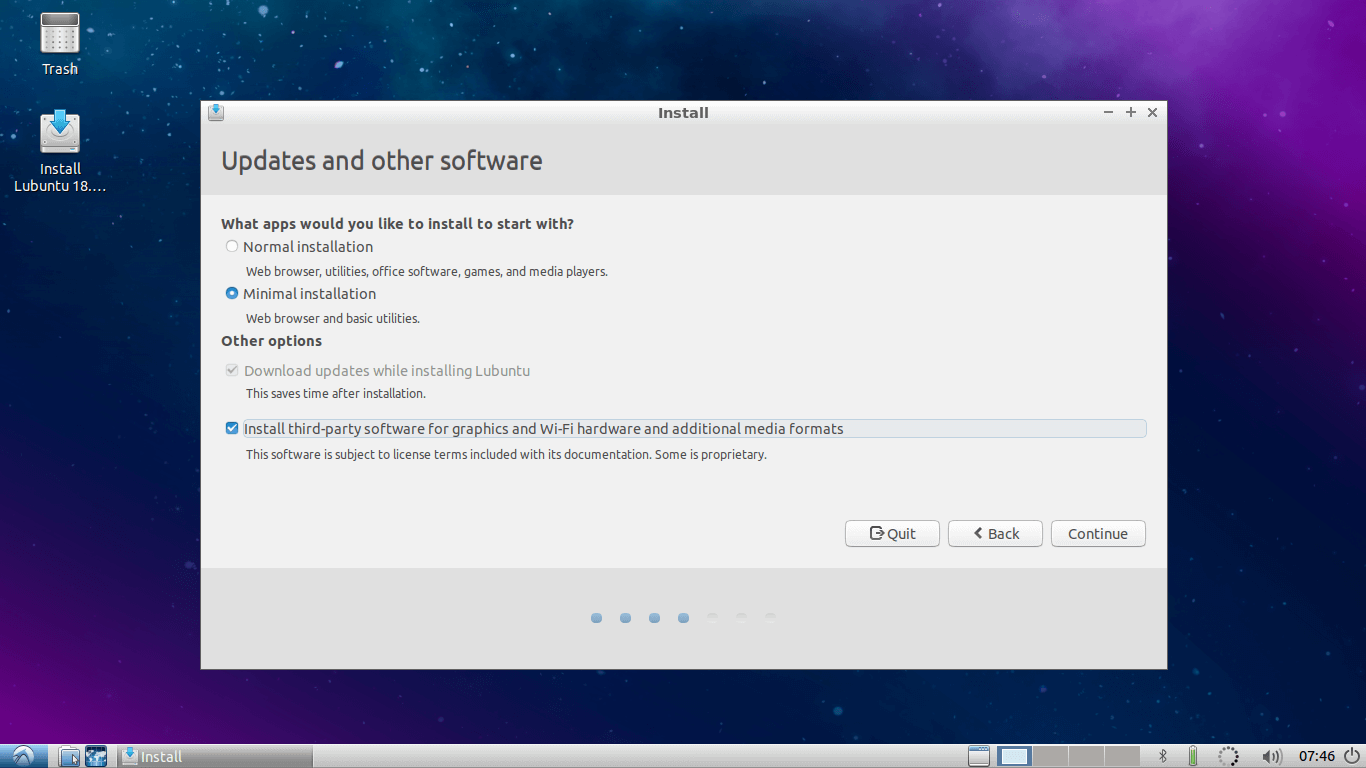
4. Select Wifi internet if you want to update Lubuntu while installation. I will skip it.
5. Select Installation Type and Third-party installation as per your choice and go to next..
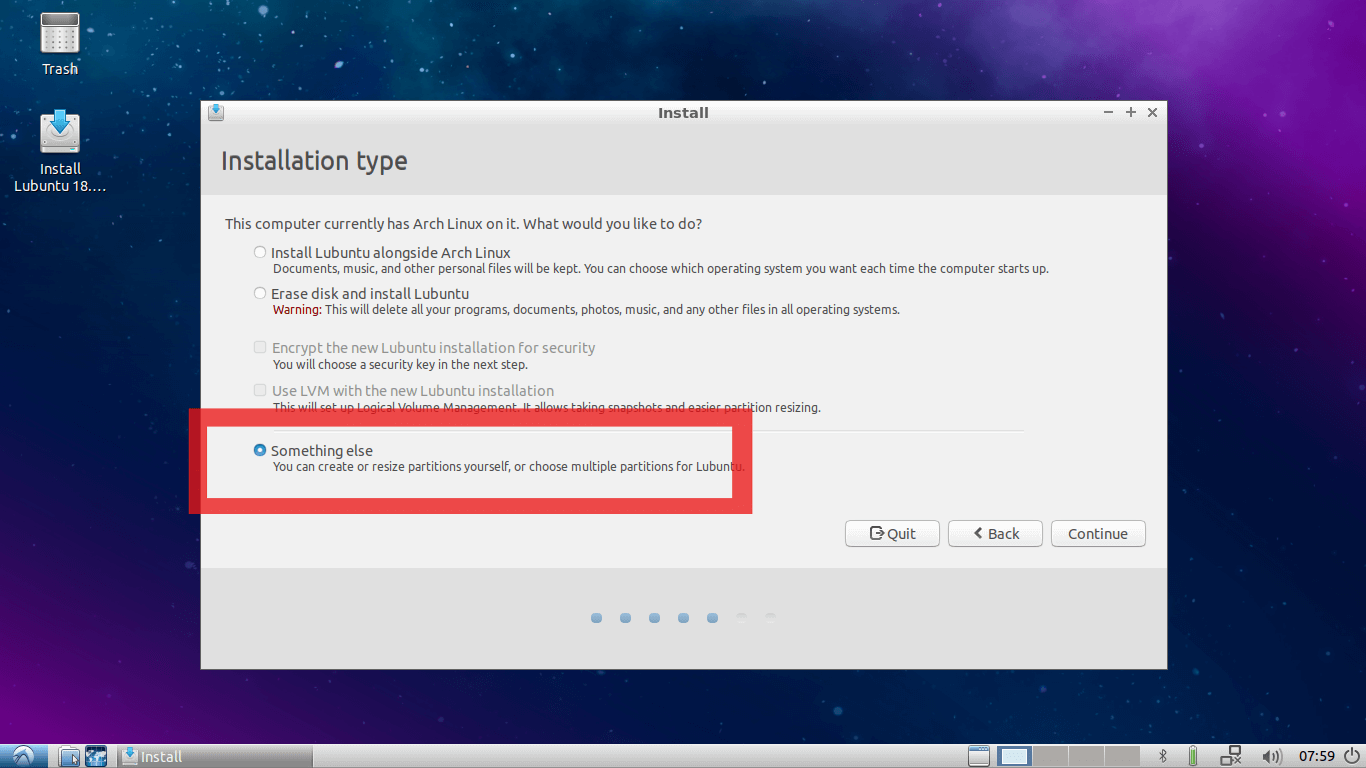
6. Here select Something Else Option (It is Mandatory) and go to next…
7. This is an Important step, here you need to find out where your Main USB drive is mounted.
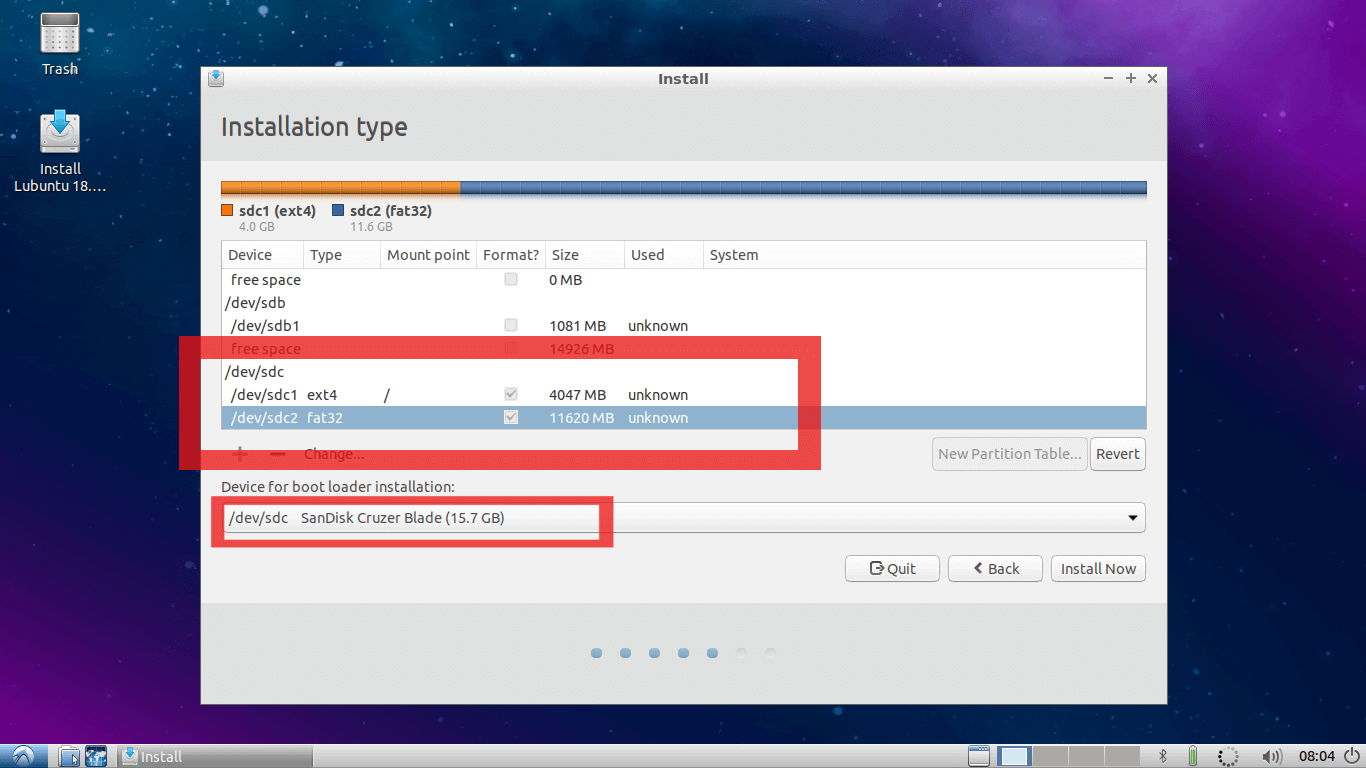
In my case /dev/sda are an internal hard disk of the PC and I am using /dev/sdb is USB Lubuntu Installation media from where this live session is booted.
And /dev/sdc is my Main USB drive where I want to install my Linux system and where I have made two partitions in step number 2. If you have skipped step 2, you can also make partitions in this window.
First, change the mount point of the first partition on this Main USB drive to ROOT (i.e. “ / ” ). And as shown in the second red square select bootloader installation device as the Main USB drive.
In my case it is /dev/sdc . This is the most important step in this tutorial. If it is not done correctly your system will boot only on the current PC you are using, which is exactly opposite of your motivation to follow this tutorial.
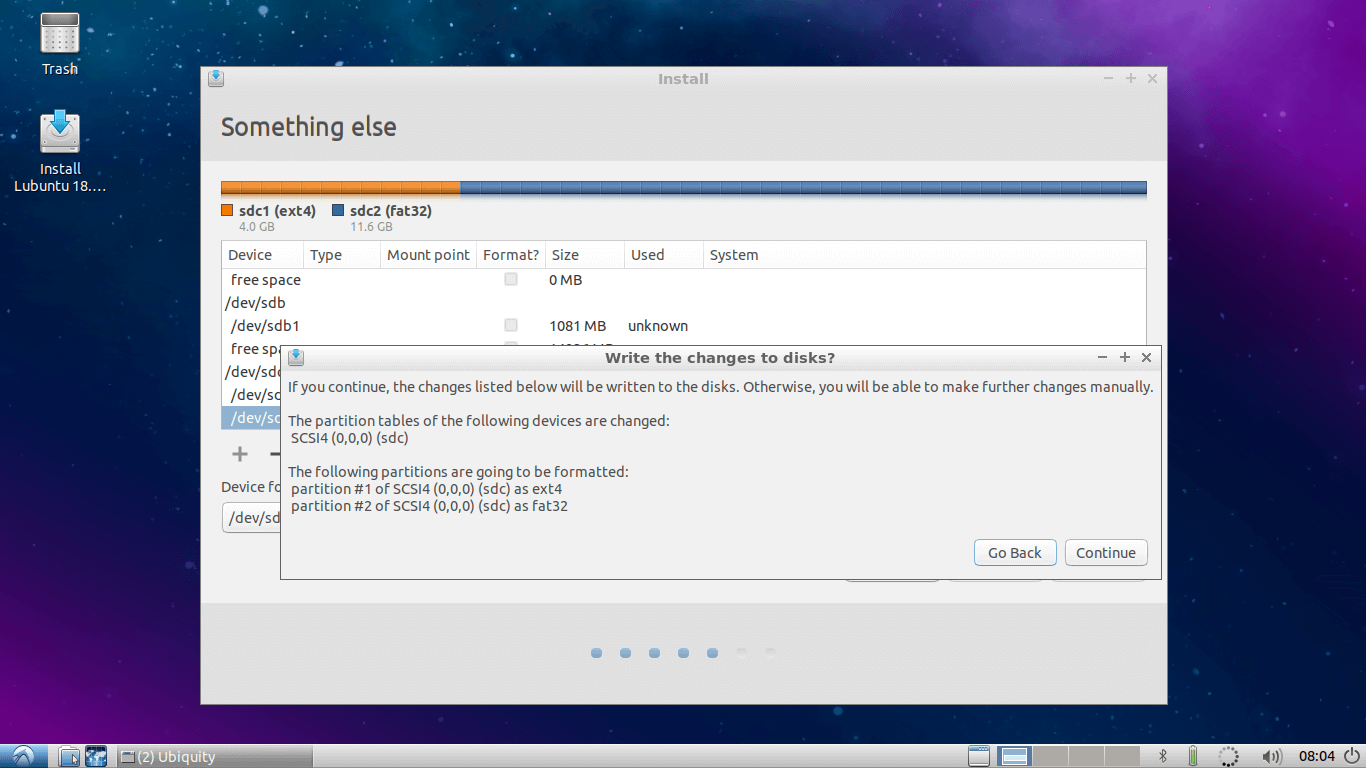
Once it is completed, double-check it and hit continue. You will get a small window showing devices and drive which will be affected.
8. Make sure that the device and drives shown on this window are of your Main USB drive, which is in my case /dev/sdc . Hit continue…
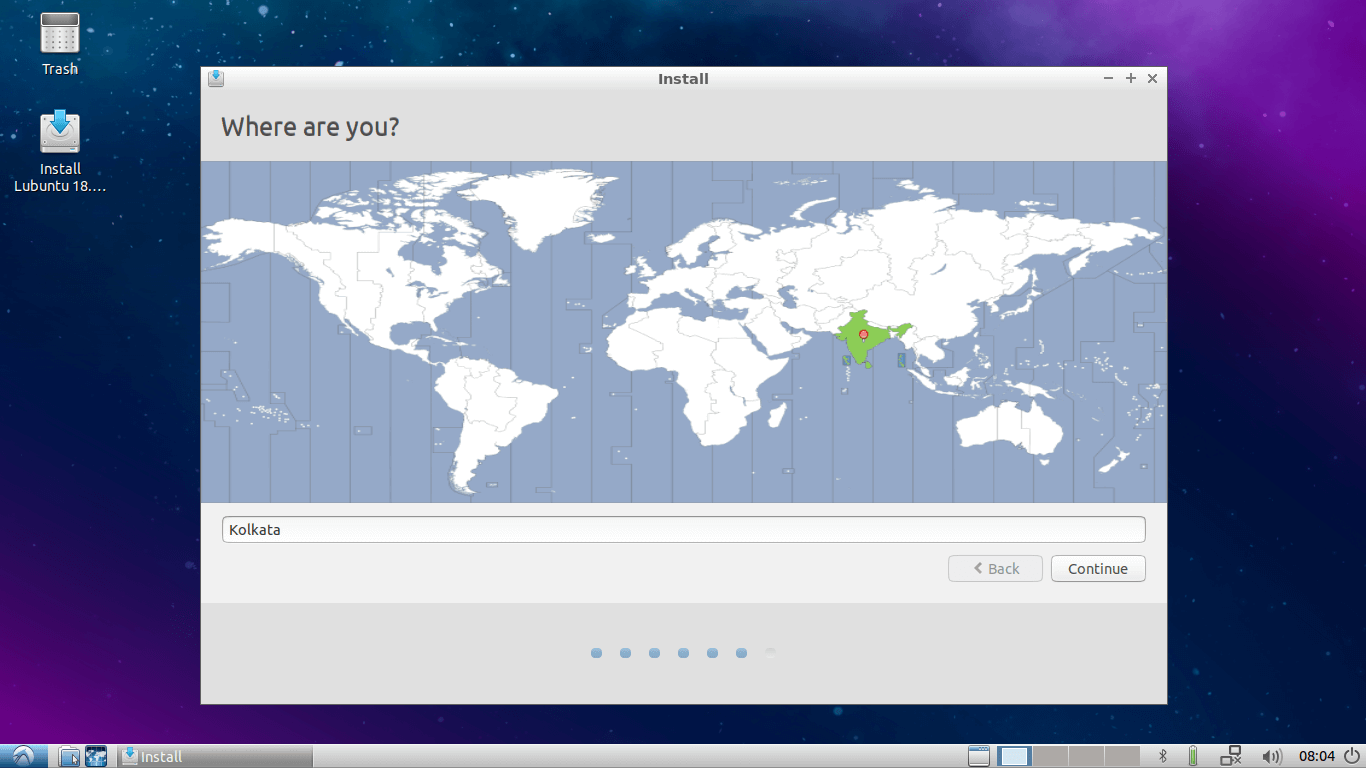
9. Now select your Region and hit Continue…
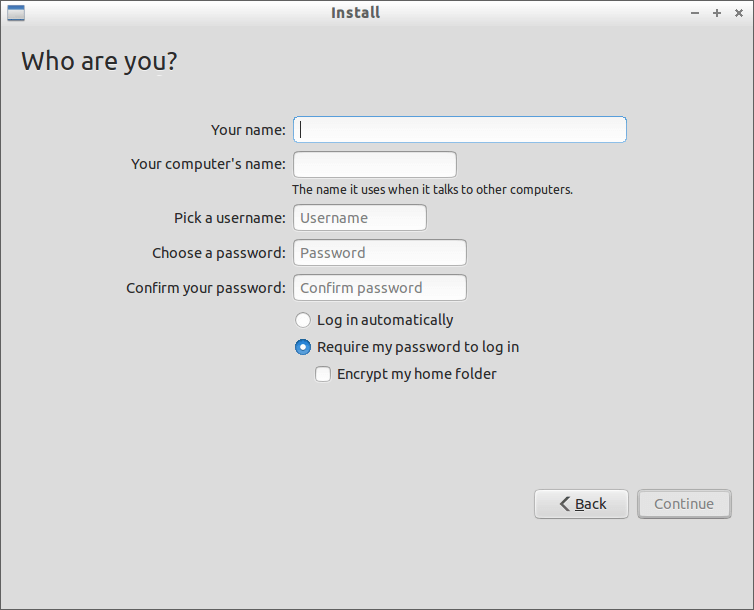
10. Add username, password, and hostname, etc…
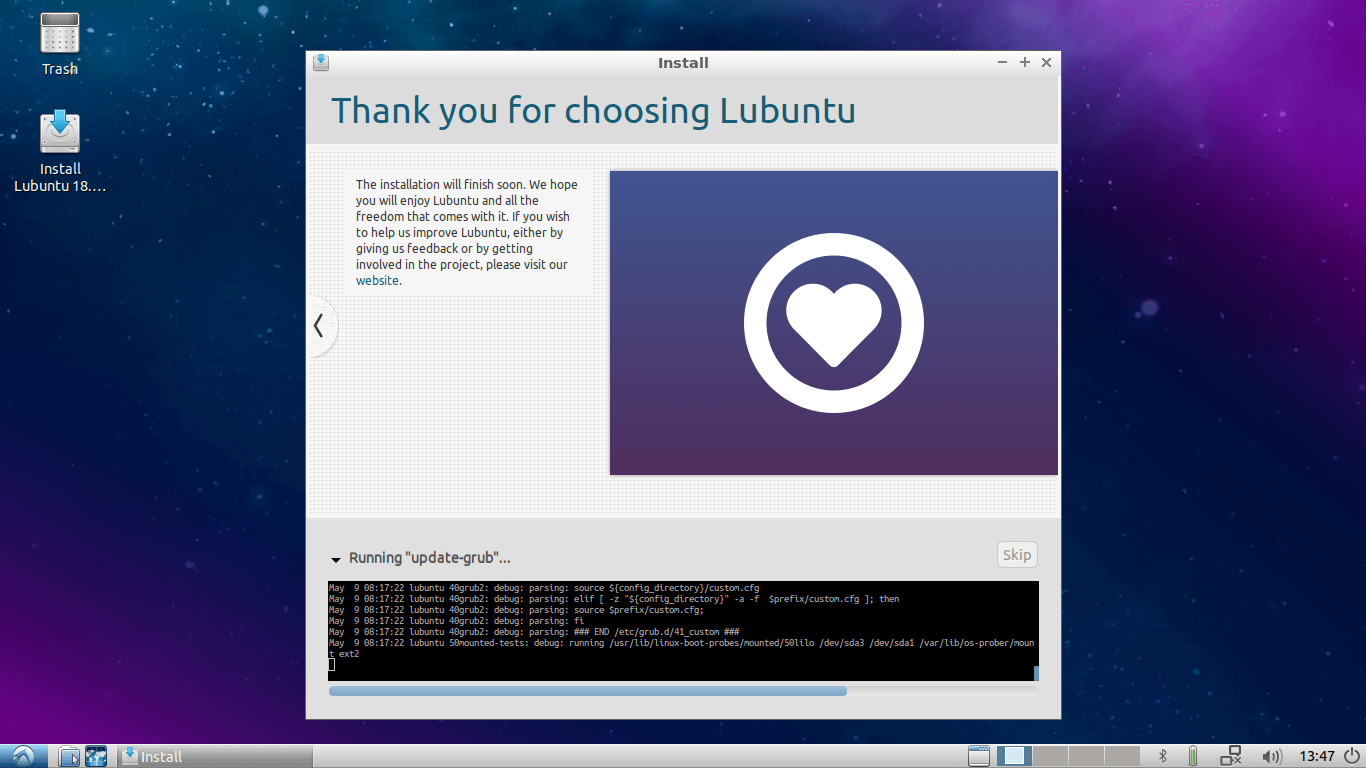
11. Let the installation finish.
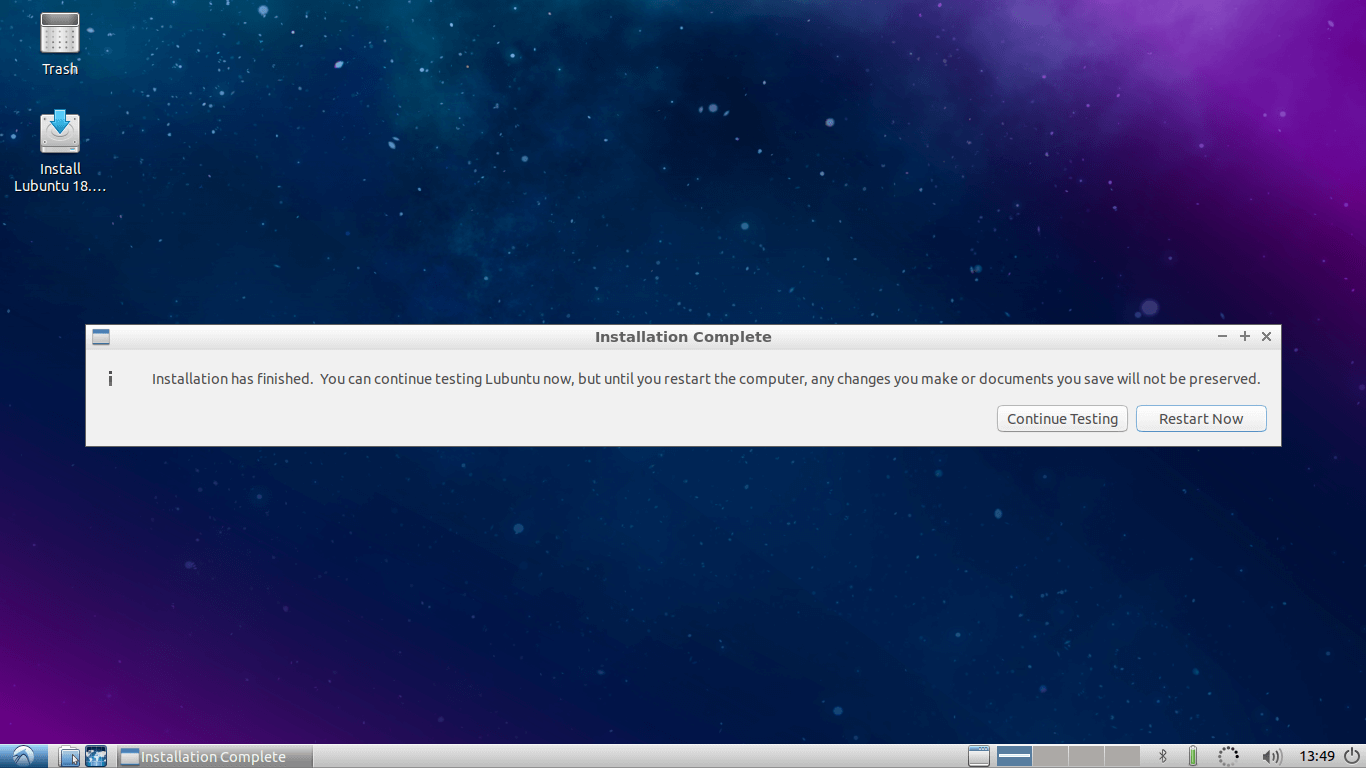
12. After completing installation hit restart and remove your installation media and press Enter.
13. Congratulations, you have successfully installed your own Linux OS on your pen drive to use it on any PC. Now you can connect a USB drive to any PC and start your system on that PC by simply selecting boot from USB option while booting.
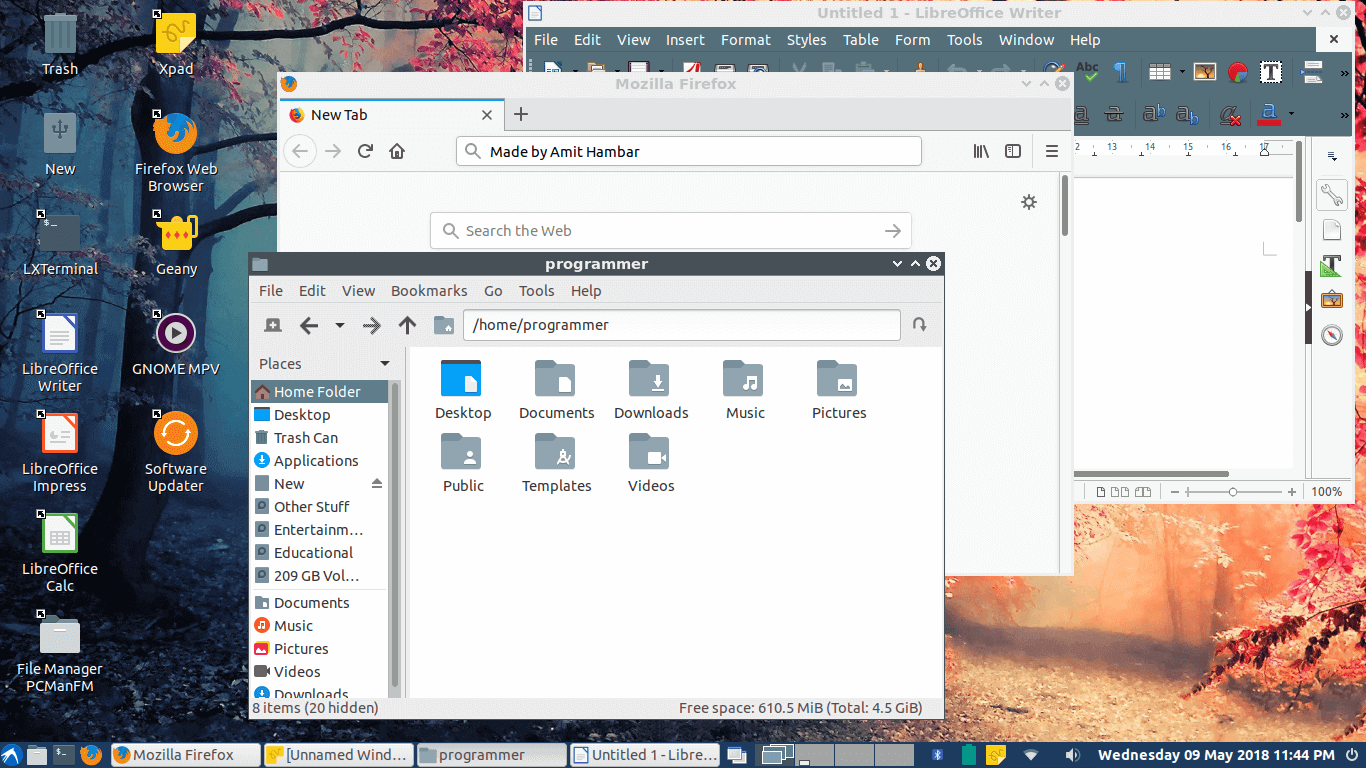
Step 4: Customize the Lubuntu System
Now it’s time for fun. Just boot your system on any PC and start customizing. You can install any software you want. You can change Themes, Icon themes, install docker.
You can add and store your online accounts on it. Install/modify/customize whatever you want. All the changes will be permanent. They will not change or reset after rebooting or booting on other PCs.
The following figure shows my customized Lubuntu 18.04.
The main advantage of this method is you can use your personal stuff, your online accounts securely on any PC. You can even do secure online transactions as well on any available PC.
I hope it will be helpful for you, if you have questions regarding this article, please feel free to ask in the comment section below.
Create a bootable USB stick on Ubuntu
Creating a bootable Ubuntu USB stick is very simple, especially from Ubuntu itself, and we’re going to cover the process in the next few steps.
Alternatively, we also have tutorials to help you create a bootable USB stick from both Microsoft Windows and Apple macOS.
2. Requirements
- A 4GB or larger USB stick/flash drive
- Ubuntu Desktop 14.04 or later installed
- An Ubuntu ISO file. See Get Ubuntu for download links
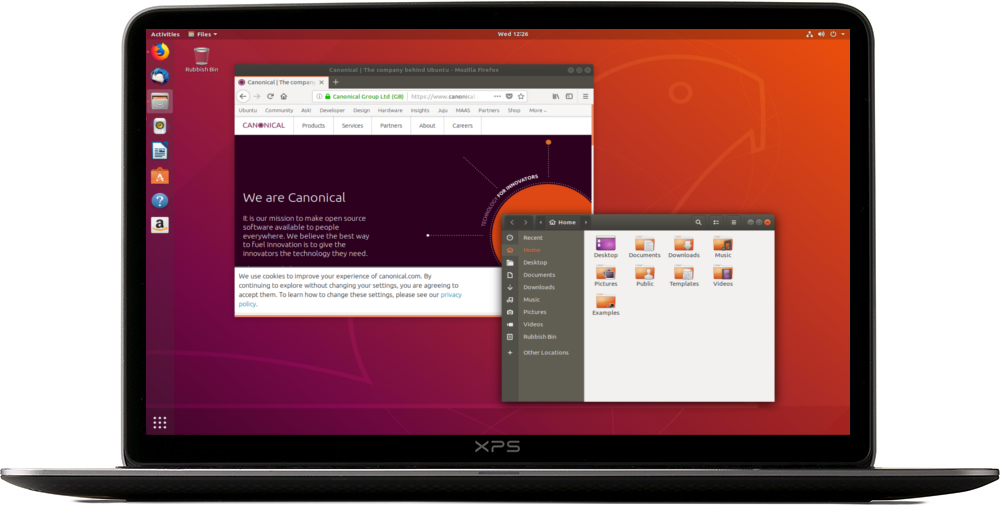
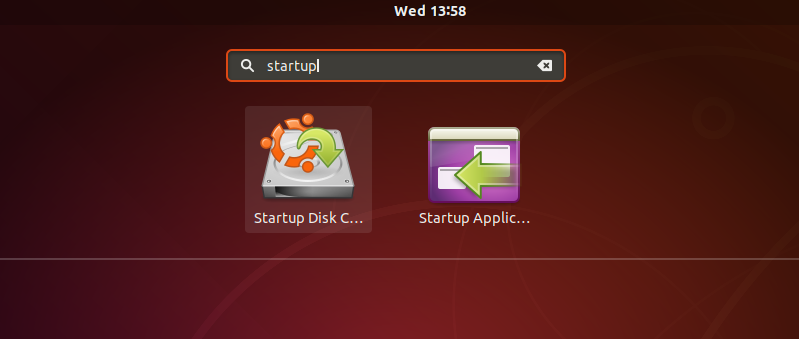
3. Launch Startup Disk Creator
We’re going to use an application called ‘Startup Disk Creator’ to write the ISO image to your USB stick. This is installed by default on Ubuntu, and can be launched as follows:
- Insert your USB stick (select ‘Do nothing’ if prompted by Ubuntu)
- On Ubuntu 18.04 and later, use the bottom left icon to open ‘Show Applications’
- In older versions of Ubuntu, use the top left icon to open the dash
- Use the search field to look for Startup Disk Creator
- Select Startup Disk Creator from the results to launch the application
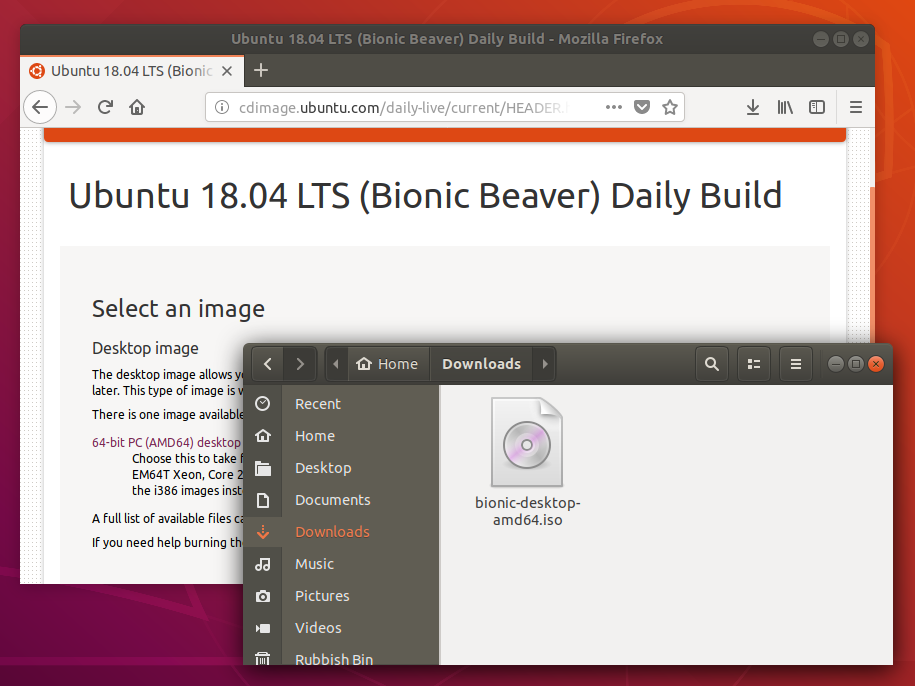
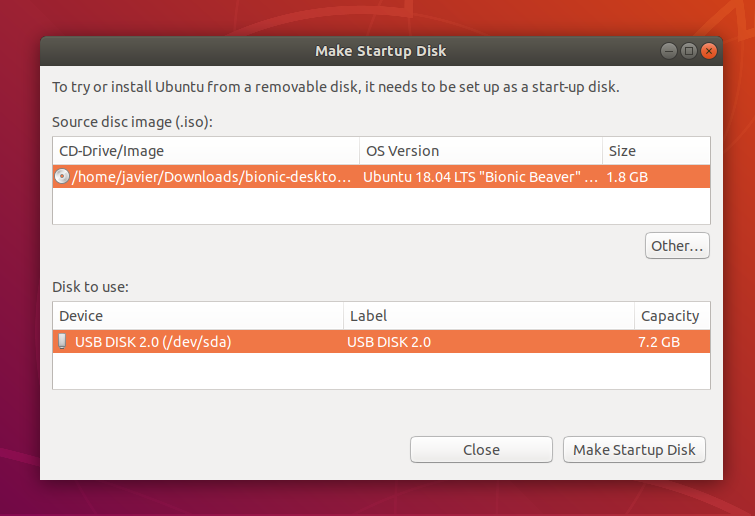
4. ISO and USB selection
When launched, Startup Disk Creator will look for the ISO files in your Downloads folder, as well as any attached USB storage it can write to.
It’s likely that both your Ubuntu ISO and the correct USB device will have been detected and set as ‘Source disc image’ and ‘Disk to use’ in the application window. If not, use the ‘Other’ button to locate your ISO file and select the exact USB device you want to use from the list of devices.
Click Make Startup Disk to start the process.
5. Confirm USB device
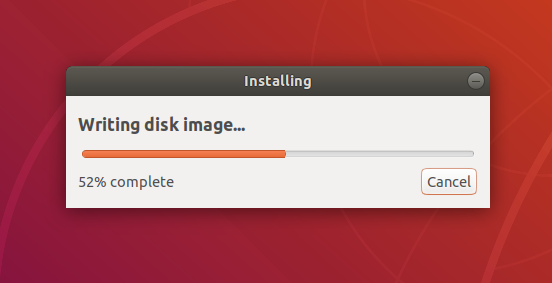
Before making any permanent changes, you will be asked to confirm the USB device you’ve chosen is correct. This is important because any data currently stored on this device will be destroyed.
After confirming, the write process will start and a progress bar appears.
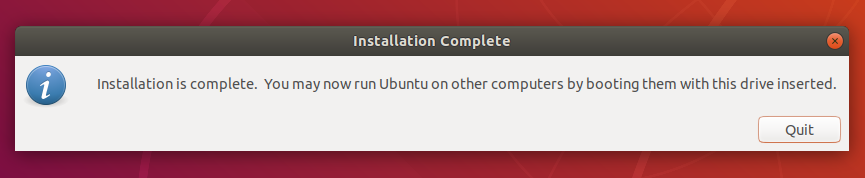
6. Installation complete
That’s it! You now have Ubuntu on a USB stick, bootable and ready to go.
If you want to install Ubuntu, take a look at our install Ubuntu desktop tutorial.
Finding help
If you get stuck, help is always at hand:
Create a bootable USB stick with Rufus on Windows
This tutorial will show you how to create a bootable USB stick on Microsoft Windows using Rufus.
For most users we recommend balenaEtcher instead of Rufus which is simpler to use and also available on MacOS and Ubuntu. Instructions are now included in the primary Install Ubuntu Desktop tutorial.
Creating a bootable Ubuntu USB stick from Microsoft Windows is very simple and we’re going to cover the process in the next few steps.
Alternatively, we also have tutorials to help you create a bootable USB stick from both Ubuntu and Apple macOS.

2. Requirements
- A 4GB or larger USB stick/flash drive
- Microsoft Windows XP or later
- Rufus, a free and open source USB stick writing tool
- An Ubuntu ISO file. See Get Ubuntu for download links

Take note of where your browser saves downloads: this is normally a directory called ‘Downloads’ on your Windows PC. Don’t download the ISO image directly to the USB stick! If using Windows XP or Vista, download version 2.18 of Rufus.
3. USB selection
Perform the following to configure your USB device in Rufus:
- Launch Rufus
- Insert your USB stick
- Rufus will update to set the device within the Device field
- If the Device selected is incorrect (perhaps you have multiple USB storage devices), select the correct one from the device field’s drop-down menu

You can avoid the hassle of selecting from a list of USB devices by ensuring no other devices are connected.
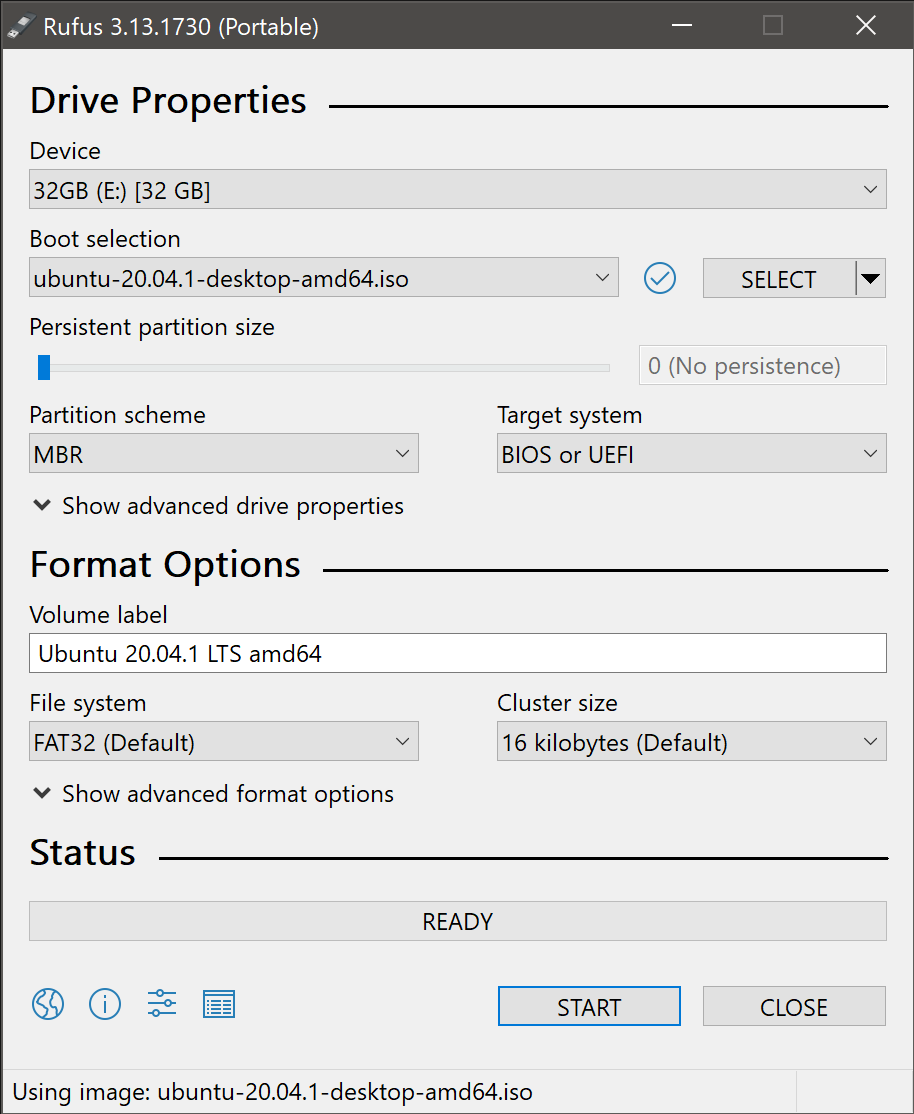
4. Select the Ubuntu ISO file
To select the Ubuntu ISO file you downloaded previously, click the SELECT to the right of “Boot selection”. If this is the only ISO file present in the Downloads folder you will only see one file listed.
Select the appropriate ISO file and click on Open.

5. Write the ISO
The Volume label will be updated to reflect the ISO selected.
Leave all other parameters with their default values and click START to initiate the write process.
6. Additional downloads
You may be alerted that Rufus requires additional files to complete writing the ISO. If this dialog box appears, select Yes to continue.

7. Write warnings
You will then be alerted that Rufus has detected that the Ubuntu ISO is an ISOHybrid image. This means the same image file can be used as the source for both a DVD and a USB stick without requiring conversion.
Keep Write in ISO Image mode selected and click on OK to continue.

Rufus will also warn you that all data on your selected USB device is about to be destroyed. This is a good moment to double check you’ve selected the correct device before clicking OK when you’re confident you have.
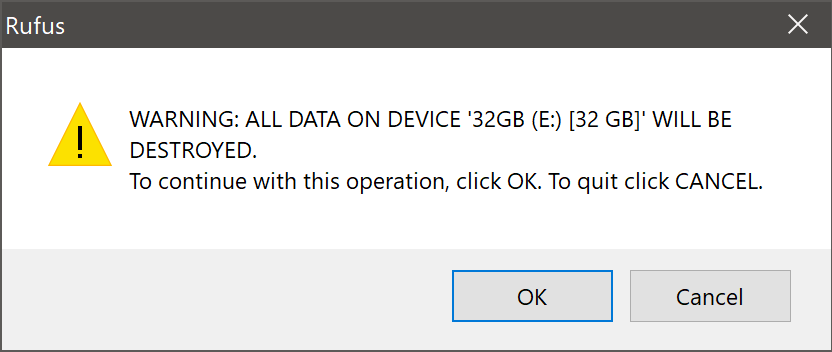
If your USB stick contains multiple partitions Rufus will warn you in a separate pane that these will also be destroyed.
8. Writing the ISO
The ISO will now be written to your USB stick, and the progress bar in Rufus will give you some indication of where you are in the process. With a reasonably modern machine, this should take around 10 minutes. Total elapsed time is shown in the lower right corner of the Rufus window.

9. Installation complete
When Rufus has finished writing the USB device, the Status bar will be filled green and the word READY will appear in the center. Select CLOSE to complete the write process.

Congratulations! You now have Ubuntu on a USB stick, bootable and ready to go.
To use it you need to insert the stick into your target PC or laptop and reboot the device. It should recognise the installation media automatically during startup but you may need to hold down a specific key (usually F12) to bring up the boot menu and choose to boot from USB.
For a full walkthrough of installing Ubuntu, take a look at our install Ubuntu desktop tutorial.
Finding help
If you get stuck, help is always at hand: